概述
数据卷 是一个可供一个或多个容器使用的特殊目录,它绕过 UFS,可以提供很多有用的特性:
数据卷可以在容器之间共享和重用- 对
数据卷的修改会立马生效 - 对
数据卷的更新,不会影响镜像 数据卷默认会一直存在,即使容器被删除
数据卷挂载的三种方式
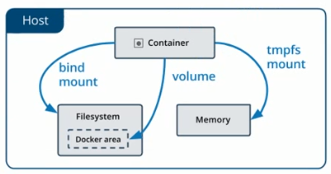
在Docker中,要想实现数据的持久化(所谓Docker的数据持久化即数据不随着Container的结束而结束),需要将数据从宿主机挂载到容器中。目前Docker提供了三种不同的方式将数据从宿主机挂载到容器中:
1、volumes
Docker管理宿主机文件系统的一部分,默认位于 /var/lib/docker/volumes 目录中;(最常用的方式)
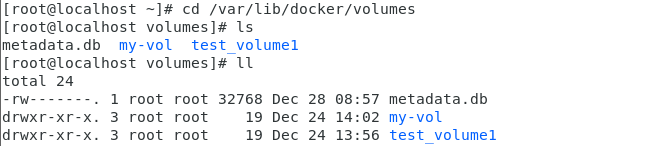
由上图可以知道,目前所有Container的数据都保存在了这个目录下边,由于没有在创建时指定卷,所以Docker帮我们默认创建许多匿名(就上面这一堆很长ID的名字)卷。
2、bind mounts
意为着可以存储在宿主机系统的任意位置;(比较常用的方式)
但是,bind mount在不同的宿主机系统时不可移植的,比如Windows和Linux的目录结构是不一样的,bind mount所指向的host目录也不能一样。这也是为什么bind mount不能出现在Dockerfile中的原因,因为这样Dockerfile就不可移植了。
3、tmpfs
挂载存储在宿主机系统的内存中,而不会写入宿主机的文件系统;(一般都不会用的方式)
三种方式的示意图如下所示:
创建数据卷
[root@localhost ~]# docker volume create test-volume1
test-volume1
[root@localhost ~]# docker volume create test-volume2
test-volume2
[root@localhost ~]# docker volume create test-volume3
test-volume3
查看所有的数据卷
[root@localhost ~]# docker volume ls
DRIVER              VOLUME NAME
local               test-volume1
local               test-volume2
local               test-volume3
查看指定数据卷详情信息
[root@localhost ~]# docker volume inspect test-volume1
[
    {
        "CreatedAt": "2020-12-24T10:34:20+08:00",
        "Driver": "local",
        "Labels": {},
        "Mountpoint": "/var/lib/docker/volumes/test-volume1/_data",
        "Name": "test-volume1",
        "Options": {},
        "Scope": "local"
    }
]
容器挂载数据卷
方式一:volumes
这里以nginx为例,创建一个数据卷test-nginx-vol,并且将数据卷挂载到 /usr/share/nginx/html (这个目录是yum安装nginx的默认网页目录)
[root@localhost volumes]# docker volume create test-nginx-vol
test-nginx-vol
[root@localhost volumes]# docker run -d -it --name=test-nginx -p 8800:80 -v test-nginx-vol:/usr/share/nginx/html nginx
5478064f3ab2cce8f8f858806d56b47ceeea44de549db9027ac8417c8a49d26f
如果没有通过-v指定,那么Docker会默认帮我们创建匿名数据卷进行映射和挂载。创建好容器之后,我们可以进入容器里面看看:
[root@localhost volumes]# docker exec -it test-nginx bash
root@5478064f3ab2:/# ls
bin  boot  dev	docker-entrypoint.d  docker-entrypoint.sh  etc	home  lib  lib64  media  mnt  opt  proc  root  run  sbin  srv  sys  tmp  usr  var
root@5478064f3ab2:/# cd  /usr/share/nginx/html
root@5478064f3ab2:/usr/share/nginx/html# ls
50x.html  index.html
进入宿主机创建的数据卷test-nginx-vol中,可以看看:
[root@localhost test-nginx-vol]# cd /var/lib/docker/volumes/test-nginx-vol/_data/
[root@localhost _data]# ls
50x.html  index.html
当stop并且remove当前nginx容器,会发现容器卷里面的文件还在,由此可见数据卷里边的东西是可以持久化的。
[root@localhost _data]# docker stop test-nginx
test-nginx
[root@localhost _data]# docker rm test-nginx
test-nginx
[root@localhost _data]# ls
50x.html  index.html
[root@localhost _data]# docker volume rm test-nginx-vol
test-nginx-vol
[root@localhost _data]# ls
[root@localhost _data]#
使用 --mount 或者-v标记来将 数据卷 挂载到容器里。
--mount和-v的区别:
- -v :如果宿主机上没有这个文件,也会自动创建
- --mount时:宿主机中没有这个文件会报错找不到这个文件,并创建失败
方式二:Bind Mounts
docker run -d -it --name=test-nginx -v /app/wwwroot:/usr/share/nginx/html nginx
指定了将宿主机上的 /app/wwwroot 目录(如果没有会自动创建)挂载到 /usr/share/nginx/html (这个目录是yum安装nginx的默认网页目录)。
这时我们再次进入容器内部看看:
[root@localhost _data]# docker run -d -it --name=test-nginx -v /app/wwwroot:/usr/share/nginx/html nginx
47a9ec3d0b3d16af216b443af26cde6d2c0e507104840aaf27a0e06545e37219
[root@localhost _data]# docker ps -a
CONTAINER ID        IMAGE               COMMAND                  CREATED             STATUS              PORTS               NAMES
47a9ec3d0b3d        nginx               "/docker-entrypoint.…"   6 seconds ago       Up 5 seconds        80/tcp              test-nginx
[root@localhost _data]# docker exec -it test-nginx bash
root@47a9ec3d0b3d:/# cd /usr/share/nginx/html
root@47a9ec3d0b3d:/usr/share/nginx/html# ls
root@47a9ec3d0b3d:/usr/share/nginx/html#
可以看到,与volumes不同,bind mounts的方式会隐藏掉被挂载目录里面的内容(如果非空的话),这里是/usr/share/nginx/html 目录下的内容被隐藏掉了,因此我们看不到。
但是,我们可以将宿主机上的文件随时挂载到容器中:
[root@localhost _data]# cd /app/wwwroot
[root@localhost wwwroot]# ls
[root@localhost wwwroot]# touch index.html
[root@localhost wwwroot]# ls
index.html
[root@localhost wwwroot]# docker exec -it test-nginx bash
root@47a9ec3d0b3d:/# cd /usr/share/nginx/html
root@47a9ec3d0b3d:/usr/share/nginx/html# ls
index.html
root@47a9ec3d0b3d:/usr/share/nginx/html#
查看容器挂载数据卷的具体信息
docker inspect test-nginx
数据卷 信息在 "Mounts" Key 下面
"Mounts": [
    {
        "Type": "volume",
        "Name": "test-nginx-vol",
        "Source": "/var/lib/docker/volumes/test-nginx-vol/_data",
        "Destination": "/usr/share/nginx/html",
        "Driver": "local",
        "Mode": "z",
        "RW": true,
        "Propagation": ""
    }
],
删除数据卷
[root@localhost ~]# docker volume rm test-volume3
test-volume3
[root@localhost ~]# docker volume ls
DRIVER              VOLUME NAME
local               test-volume1
local               test-volume2
数据卷 是被设计用来持久化数据的,它的生命周期独立于容器,Docker 不会在容器被删除后自动删除 数据卷,并且也不存在垃圾回收这样的机制来处理没有任何容器引用的 数据卷。如果需要在删除容器的同时移除数据卷。可以在删除容器的时候使用 docker rm -v 这个命令。
没有容器挂载的数据卷可能会占据很多空间,要清理请使用以下命令
[root@localhost ~]# docker volume prune
WARNING! This will remove all local volumes not used by at least one container.
Are you sure you want to continue? [y/N] y
Deleted Volumes:
test-volume1
test-volume2

Total reclaimed space: 0B
[root@localhost ~]# docker volume ls
DRIVER              VOLUME NAME