构建连接:NioSocketChannel 是什么时候激活的
Netty 系列目录(https://www.cnblogs.com/binarylei/p/10117436.html)
在上一节中,我们分析服务器的启动过程,接下来就是开门迎客。
1. 主线分析
1.1 主线
NioEventLoop 不断的轮询,接收 OP_ACCEPT 事件;ServerBootstrapAcceptor 接收到新的连接后初始化并注册到 childGroup 上。以上工作分别是在 boss thread 和 worker thread 两个线程上执行。
-
boss thread 线程
-
NioEventLoop 中的 selector 轮询创建连接事件(OP_ACCEPT):
-
创建 SocketChannel
-
初始化 SocketChannel 并从 worker group 中选择一个 NioEventLoop
-
-
worker thread 线程
- 将 SocketChannel 注册到选择的 NioEventLoop 的 selector
- 注册读事件(OP_READ)到 selector 上
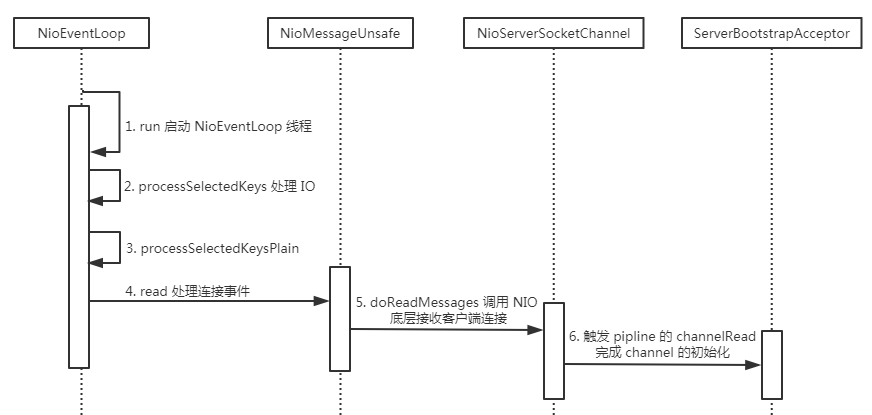
NioEventLoop#run
    -> processSelectedKeys
        -> AbstractNioMessageChannel.NioMessageUnsafe#read
            -> NioServerSocketChannel#doReadMessages
            -> pipeline#fireChannelRead
ServerBootstrapAcceptor#channelRead
    -> EventLoopGroup#register
1.2 知识点
(1)接受连接的本质
-
selector.select()/selectNow()/select(timeoutMillis) 发现OP_ACCEPT 事件,处理:
-
SocketChannel socketChannel = serverSocketChannel.accept()
-
selectionKey = javaChannel().register(eventLoop().unwrappedSelector(), 0, this);
-
selectionKey.interestOps(OP_READ);
(2)ServerBootstrapAcceptor
创建连接的初始化和注册是通过 pipeline.fireChannelRead 在 ServerBootstrapAcceptor 中完成的。
2. 源码分析
NioServerSocketChannel 注册到 eventLoop 后就会启动 NioEventLoop 线程,专门处理对应 channel 的网络 IO 事件。通过 OP_ACCEPT 事件接收客户端连接 NioSocketChannel,并进行初始化。
2.1 接收连接
(1)OP_ACCEPT 事件处理
processSelectedKey 负责处理 channel 的 OP_CONNECT、OP_WRITE、OP_READ、OP_ACCEPT 事件。这里我们只关注 OP_ACCEPT 事件是如何处理的。
// 分别处理 OP_CONNECT、OP_WRITE、OP_READ、OP_ACCEPT 事件
private void processSelectedKey(SelectionKey k, AbstractNioChannel ch) {
    // 省略...
    final AbstractNioChannel.NioUnsafe unsafe = ch.unsafe();
    int readyOps = k.readyOps();
    // OP_CONNECT
    if ((readyOps & SelectionKey.OP_CONNECT) != 0) {
        int ops = k.interestOps();
        ops &= ~SelectionKey.OP_CONNECT;
        k.interestOps(ops);
        unsafe.finishConnect();
    }

    // OP_WRITE
    if ((readyOps & SelectionKey.OP_WRITE) != 0) {
        ch.unsafe().forceFlush();
    }

    // OP_READ、OP_ACCEPT
    if ((readyOps & (SelectionKey.OP_READ | SelectionKey.OP_ACCEPT)) != 0 || readyOps == 0) {
        unsafe.read();
    }
}
说明: 可以看到 OP_READ 和 OP_ACCEPT 都是调用 unsafe.read() 处理的。不同的 Channel 对应不同的 unsafe,比如 NioServerSocketChannel 对应 NioMessageUnsafe,而 NioSocketChannel 对应 NioByteUnsafe。当然,Netty 比较巧妙的将 OP_READ 和 OP_ACCEPT 事件统一处理,这也会给我们读源码造成一些混乱。
(2)接收连接
下面,我们看一下 NioMessageUnsafe 是如何接收客户端连接的。猜也能猜到,肯定需要调用 serverSocketChannel.accept() 获取客户端连接。
// NioMessageUnsafe
private final List<Object> readBuf = new ArrayList<Object>();

@Override
public void read() {
    // 1. 接收客户端连接请求
    do {
        int localRead = doReadMessages(readBuf);
        if (localRead == 0) {
            break;
        }
        if (localRead < 0) {
            closed = true;
            break;
        }

        allocHandle.incMessagesRead(localRead);
    } while (allocHandle.continueReading());

    // 2. 接收客户端连接请求
    int size = readBuf.size();
    for (int i = 0; i < size; i ++) {
        pipeline.fireChannelRead(readBuf.get(i));
    }
    ...
}
说明: NioMessageUnsafe 的 read 方法完成了二件事:
- 通过 doReadMessages 接收客户端的 NioSocketChannel。当然这里的 doReadMessages 每次最多只能读一个 NioSocketChannel 对象。
- 触发 pipeline 的 fireChannelRead 事件完成 channel 的初始化工作 ,如有异常则触发 fireExceptionCaught。那肯定有一个 Handler 对应来处理这个 NioSocketChannel。
// NioServerSocketChannel:调用 NIO 底层接收客户连接
@Override
protected int doReadMessages(List<Object> buf) throws Exception {
    SocketChannel ch = SocketUtils.accept(javaChannel());
    if (ch != null) {
        buf.add(new NioSocketChannel(this, ch));
        return 1;
    }
    return 0;
}
说明: 真正接收客户端请求的操作则委托给了子类 NioServerSocketChannel#doReadMessages 方法完成。至此,NioServerSocketChannel 已经将请求的 NioSocketChannel 接收过来,但还未完成 channel 的初始化工作,如 handler 绑定,参数配置等。
3.2 初始化连接
上文提到 NioServerSocketChannel 在初始化的时候会绑定 ServerBootstrapAcceptor,这个 handler 完成了 channel 的初始化工作。NioServerSocketChannel 的 Pipeline 如下图:
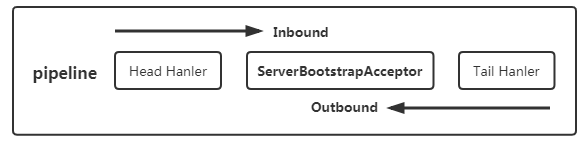
我们直接看一下 ServerBootstrapAcceptor#channelRead 方法。主要完成 NioSocketChannel 的 TCP 参数、附加属性、Handler 配置等,基本上和 NioServerSocketChannel 一模一样。
public void channelRead(ChannelHandlerContext ctx, Object msg) {
    final Channel child = (Channel) msg;

    // 1. NioSocketChannel 绑定 handler 和相关配置参数
    child.pipeline().addLast(childHandler);

    // 2. 配置 Socket 的 TCP 参数和附加属性
    setChannelOptions(child, childOptions, logger);
    for (Entry<AttributeKey<?>, Object> e: childAttrs) {
        child.attr((AttributeKey<Object>) e.getKey()).set(e.getValue());
    }

    // 3. NioSocketChannel 注册到 eventLoop 上
    try {
        childGroup.register(child).addListener(new ChannelFutureListener() {
            @Override
            public void operationComplete(ChannelFuture future) throws Exception {
                if (!future.isSuccess()) {
                    forceClose(child, future.cause());
                }
            }
        });
    } catch (Throwable t) {
        forceClose(child, t);
    }
}
说明: 其实这段代码和 NioServerSocketChannel 初始化的代码大同小异,唯一需要注意的是 NioSocketChannel 的注册逻辑稍有区别。
-
NioSocketChannel 注册的是 childGroup 线程。
-
NioSocketChannel 注册到 Selector 成功后,会触发 pipeline.fireChannelActive() 事件,调用其 beginRead 方法注册 OP_READ 事件。而 NioServerSocketChannel 需要 bind 成功才会注册 OP_ACCEPT 事件。
childGroup.register(child)注意:这里是 childGroup。Channel 是如何注册到 NioEventLoopGroup 是的详见:https://www.cnblogs.com/binarylei/p/10135712.html
每天用心记录一点点。内容也许不重要,但习惯很重要!