rsync语法:
Local: rsync [OPTION...] SRC... [DEST]            #<===本地传输数据

Access via remote shell:                          #<===借助通道传输数据,本地-远程主机;远程主机-本地
Pull: rsync [OPTION...] [USER@]HOST:SRC... [DEST] #<===从远程主机拉取数据到本地
Push: rsync [OPTION...] SRC... [USER@]HOST:DEST   #<===从本地推数据到远程主机

Access via rsync daemon:                          #<===通过守护进程(socket网络套接字)传输数据---重点
Pull: rsync [OPTION...] [USER@]HOST::SRC... [DEST]    #<===注意daemon模式下传输数据,使用的是自定义的模块的名称
Push: rsync [OPTION...] SRC... [USER@]HOST::DEST
本地传输模式和借助通道传输模式使用实例
[root@meinv01 ~]# rsync /etc/hosts /tmp/    #<==本地到本地
[root@meinv01 ~]# ls /tmp/
hosts
ssh-NFCFOdb882
[root@meinv01 ~]# rsync -avz /etc/hosts -e 'ssh -p 22' root@192.168.81.169:~   #<==借助ssh通道,拷贝本地文件到远程主机,如果是远程拉取数据到本地,调换一下位置即可
root@192.168.81.169's password:
sending incremental file list
sent 30 bytes  received 12 bytes  12.00 bytes/sec
total size is 158  speedup is 3.76
[root@meinv02 ~]# ll
total 44
-rw-------. 1 root root  1116 Aug  1 12:58 anaconda-ks.cfg
-rw-r--r--  1 root root   158 Aug  1 12:35 hosts
注意点:源路径如果是一个目录的话,带上尾随斜线和不带尾随斜线是不一样的,不带尾随斜线表示的是整个目录包括目录本身,带上尾随斜线表示的是目录中的文件,不包括目录本身
如:
[root@xuexi ~]# rsync -a /etc /tmp    #<==表示把etc这个目录及其目录下的文件和目录拷贝到tmp下
[root@xuexi ~]# rsync -a /etc/ /tmp   #<==只把etc下的文件及目录拷贝到tmp
rsync的常用参数说明:(-avzP相当于-vzrtopgDlP,脚本内用az即可)
-v      --verbose          输出传输时的进度信息
-z      --compress         传输时进行压缩传输以提高效率 --compress-level=NUM可按级别压缩
-a      --archive          归档模式,递归方式传输并保持所有文件属性,等价于--rtopgDl
-r      --recursive        对子目录以递归模式传输,小写r参数
-t      --times            保持文件时间信息
-o      --owner            保持文件属主信息
-p      --perms            保持文件权限信息
-g      --group            保持文件属组信息
-P      --progress         显示同步的过程及传输的进度等信息
-D      --devices          保持文件设备信息
-l      --links            保持软链接信息
-e      --rsh=command      指定使用的信道协议,指定替换的rsh的shell程序,如ssh
--exclude=pattern          指定排除不需要的传输的文件模式
--exclude-from=file        排除指定文件内容中的文件
--bwlimit=RATE             传输时进行限速(整数)
--delete                   同步参数(慎用
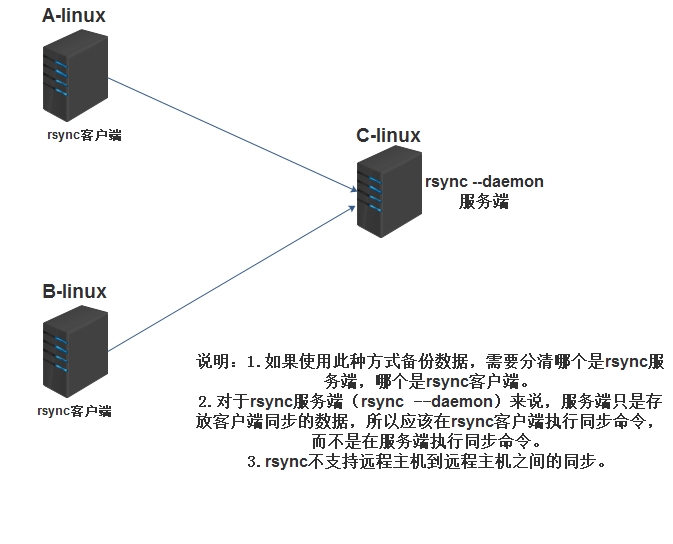
rsync通过守护进程socket传输数据图解:
rsync服务端配置:
[root@C-linux ~]# uname -r         #<==查看版本号
2.6.32-431.el6.x86_64
[root@C-linux ~]# cat /etc/redhat-release
CentOS release 6.5 (Final)
[root@C-linux ~]# /etc/init.d/iptables status    #<==停止防火墙
iptables: Firewall is not running.
[root@C-linux ~]# getenforce                    #<==关闭selinux
Disabled
[root@C-linux ~]# rpm -qa|grep rsync    #<==服务端和客户端和要保证rsync软件包已安装
rsync-3.0.6-9.el6_4.1.x86_64
[root@C-linux ~]# rsync --version        #<==查看rsync版本号
rsync version 3.0.6 protocol version 30
[root@C-linux ~]# rz -y
rz waiting to receive.
???a? zmodem ′???£ °′ Ctrl+C ???£
??′?? rsyncd.conf...
100% 562 bytes 562 bytes/s 00:00:01 0 ′?
?[root@C-linux ~]# ls
rsyncd.conf
[root@C-linux ~]# cp rsyncd.conf /etc/
[root@C-linux ~]# useradd -M -s /sbin/nologin rsync   #<==添加指定用户作为传输时使用的用户
[root@C-linux ~]# id rsync
uid=502(rsync) gid=502(rsync) 组=502(rsync)
[root@C-linux ~]# vi /etc/rsyncd.conf
[root@C-linux ~]# cat /etc/rsyncd.conf    #<==rsync服务端配置文件具体配置
#rsync_configuration
#port=873                          # 指定rsync端口。默认873(没有特殊需求,使用默认端口即可)
uid = rsync                        # rsync服务的运行用户,默认是nobody,文件传输成功后属主将是这个uid
gid = rsync                        # rsync服务的运行组,默认是nobody,文件传输成功后属组将是这个gid
use chroot = no                    # rsync daemon在传输前是否切换到指定的path目录下,并将其监禁在内
max connections = 200              # 指定最大连接数量,0表示没有限制
timeout = 300                      # 链接超时时间,确保rsync服务器不会永远等待一个崩溃的客户端,0表示永远等待
pid file = /var/run/rsyncd.pid     # 指定rsync daemon的pid文件
lock file = /var/run/rsync.lock    # 指定锁文件
log file = /var/log/rsyncd.log     # 指定rsync的日志文件存放,而不把日志发送给syslog

[data]                             # 模块ID ,传输数据时指定模块ID,就会将数据传输到模块指定对应的目录下
path = /data/                      # 指定该模块的路径,该参数必须指定。启动rsync服务前该目录必须存在。rsync请求访问模块本质就是访问该路径
ignore errors                      # 忽略某些IO错误信息
read only = false                  # 指定该模块是否可读写,即能否上传文件,false表示可读写,true表示可读不可写。所有模块默认不可上传
#write only = false                # 指定该模式是否支持下载,设置为true表示客户端不能下载。所有模块默认可下载
list = false                       # 客户端请求显示模块列表时,该模块是否显示出来,设置为false则该模块为隐藏模块。默认true
hosts allow = 10.0.0.0/24          # 指定允许连接到该模块的机器,多个ip用空格隔开或者设置区间
hosts deny = 0.0.0.0/32            # 指定不允许连接到该模块的机器
auth users = rsync_backup          # 指定连接到该模块的用户列表,只有列表里的用户才能连接到模块,用户名和对应密码保存在secrts file中,
                                   # 这里使用的不是系统用户,而是虚拟用户。不设置时,默认所有用户都能连接,但使用的是匿名连接
secrets file = /etc/rsync.password         # 保存auth users用户列表的用户名和密码,每行包含一个username:passwd。由于"strict modes",
                                           # 默认为true,所以此文件要求非rsync daemon用户不可读写。只有启用了auth users该选项才有效
#rsync_config_______________end

#[test]                     # 以下定义的是第二个模块(根据情况加载即可)
:wq                         #<==保存退出

[root@C-linux ~]# mkdir /data         #<==创建rsync模块所存放的目录
[root@C-linux ~]# chown -R rsync.rsync /data    #<==授权
[root@C-linux ~]# echo 'rsync_backup:123456' >/etc/rsync.password    #<==指定密码文件
[root@C-linux ~]# cat /etc/rsync.password
rsync_backup:123456
[root@C-linux ~]# chmod 600 /etc/rsync.password    #<==此文件权限需为600,否则出错
[root@C-linux ~]# ll /etc/rsync.password
-rw------- 1 root root 20 1月 31 13:16 /etc/rsync.password
[root@C-linux ~]# rsync --daemon                   #<==启动rsync服务
[root@C-linux ~]# netstat -lntup|grep rsync        #查看服务是否起来
[root@C-linux ~]# echo 'rsync --daemon' >>/etc/rc.local
以上是服务端(rsync --damon)的配置,下面
配置客户端
[root@A-linux ~]# /etc/init.d/iptables stop
[root@A-linux ~]# getenforce
Disabled
[root@A-linux ~]# rpm -qa|grep rsync
[root@A-linux ~]# echo '123456' >/etc/rsync.password
[root@A-linux ~]# cat /etc/rsync.password    #<===客户端密码文件只需要保留密码即可,无需将用户一起保留
123456
[root@A-linux ~]# chmod 600 /etc/rsync.password
[root@A-linux ~]# ll /etc/rsync.password
-rw------- 1 root root 7 1月  31 13:28 /etc/rsync.password
配置完成后,需要注意2个地方:
1. 数据的流向是从客户端到服务端,在客户端进行拉/推操作数据流向
2. 所有操作(备份)都是在客户端,服务端只是守护进程
3. 配置好rsync --daemon服务端后,在客户端推拉数据的时候,就不用借用通道了,直接是使用服务端侦听的端口传输数据
测试验证:
客户端推数据到服务端
[root@A-linux ~]# rsync -avz /tmp/ rsync_backup@10.0.0.4::data --password-file=/etc/rsync.password
sending incremental file list
./
hosts
.ICE-unix/
ssh-hBbdsD1500/
ssh-hBbdsD1500/agent.1500

sent 253 bytes received 41 bytes 588.00 bytes/sec
total size is 166 speedup is 0.56
服务端查看数据
[root@C-linux ~]# ll /data/
总用量 8
-rw-r--r-- 1 rsync rsync 166 1月 31 10:36 hosts
drwx------ 2 rsync rsync 4096 1月 31 13:27 ssh-hBbdsD1500
如果出现报错信息,查看日志排错即可! 更多rsync知识及原理深入了解,请查看好友博客