创建新的项目
1.在Eclipse IDE中创建一个新的项目并把填入必须的信息。 File->New->Android Project
2.创建新项目后的第一步是要在AndroidManifest.xml文件中添加必要的权限。
- 为了访问网络我们需要 INTERNET 权限
- 为了检查网络状态我们需要 ACCESS_NETWORK_STATE 权限
01 | <?xml version="1.0" encoding="utf-8"?> |
02 | <manifest xmlns:android="http://schemas.android.com/apk/res/android" |
03 | package="com.example.detectinternetconnection" |
04 | android:versionCode="1" |
05 | android:versionName="1.0" > |
06 | |
07 | <uses-sdk android:minSdkVersion="8" /> |
08 | |
09 | <application |
10 | android:icon="@drawable/ic_launcher" |
11 | android:label="@string/app_name" > |
12 | <activity |
13 | android:name=".AndroidDetectInternetConnectionActivity" |
14 | android:label="@string/app_name" > |
15 | <intent-filter> |
16 | <action android:name="android.intent.action.MAIN" /> |
17 | |
18 | <category android:name="android.intent.category.LAUNCHER" /> |
19 | </intent-filter> |
20 | </activity> |
21 | </application> |
22 | |
23 | <!-- Internet Permissions --> |
24 | <uses-permission android:name="android.permission.INTERNET" /> |
25 | |
26 | <!-- Network State Permissions --> |
27 | <uses-permission android:name="android.permission.ACCESS_NETWORK_STATE" /> |
28 | |
29 | </manifest> |
3.创建一个新的类,名为ConnectionDetector.java,并输入以下代码。
ConnectionDetector.java
01 | package com.example.detectinternetconnection; |
02 | |
03 | import android.content.Context; |
04 | import android.net.ConnectivityManager; |
05 | import android.net.NetworkInfo; |
06 | |
07 | public class ConnectionDetector { |
08 | |
09 | private Context _context; |
10 | |
11 | public ConnectionDetector(Context context){ |
12 | this._context = context; |
13 | } |
14 | |
15 | public boolean isConnectingToInternet(){ |
16 | ConnectivityManager connectivity = (ConnectivityManager) _context.getSystemService(Context.CONNECTIVITY_SERVICE); |
17 | if (connectivity != null) |
18 | { |
19 | NetworkInfo[] info = connectivity.getAllNetworkInfo(); |
20 | if (info != null) |
21 | for (int i = 0; i < info.length; i++) |
22 | if (info[i].getState() == NetworkInfo.State.CONNECTED) |
23 | { |
24 | return true; |
25 | } |
26 | |
27 | } |
28 | return false; |
29 | } |
30 | } |
4.当你需要在你的应用中检查网络状态时调用isConnectingToInternet()函数,它会返回true或false。
1 | ConnectionDetector cd = new ConnectionDetector(getApplicationContext()); |
2 | |
3 | Boolean isInternetPresent = cd.isConnectingToInternet(); // true or false |
5.在这个教程中为了测试我仅仅简单的放置了一个按钮。只要按下这个按钮就会弹出一个 alert dialog 显示网络连接状态。
6.打开 res/layout 目录下的 main.xml 并创建一个按钮。
main.xml
01 | <?xml version="1.0" encoding="utf-8"?> |
02 | <RelativeLayout xmlns:android="http://schemas.android.com/apk/res/android" |
03 | android:layout_width="fill_parent" |
04 | android:layout_height="fill_parent" |
05 | android:orientation="vertical" > |
06 | |
07 | <TextView |
08 | android:layout_width="fill_parent" |
09 | android:layout_height="wrap_content" |
10 | android:text="Detect Internet Status" /> |
11 | |
12 | <Button android:id="@+id/btn_check" |
13 | android:layout_height="wrap_content" |
14 | android:layout_width="wrap_content" |
15 | android:text="Check Internet Status" |
16 | android:layout_centerInParent="true"/> |
17 | |
18 | </RelativeLayout> |
7.最后打开你的 MainActivity 文件并粘贴下面的代码。在下面的代码中我用一个 alert dialog 来显示预期的状态信息。
01 | package com.example.detectinternetconnection; |
02 | |
03 | import android.app.Activity; |
04 | import android.app.AlertDialog; |
05 | import android.content.Context; |
06 | import android.content.DialogInterface; |
07 | import android.os.Bundle; |
08 | import android.view.View; |
09 | import android.widget.Button; |
10 | |
11 | public class AndroidDetectInternetConnectionActivity extends Activity { |
12 | |
13 | // flag for Internet connection status |
14 | Boolean isInternetPresent = false; |
15 | |
16 | // Connection detector class |
17 | ConnectionDetector cd; |
18 | |
19 | @Override |
20 | public void onCreate(Bundle savedInstanceState) { |
21 | super.onCreate(savedInstanceState); |
22 | setContentView(R.layout.main); |
23 | |
24 | Button btnStatus = (Button) findViewById(R.id.btn_check); |
25 | |
26 | // creating connection detector class instance |
27 | cd = new ConnectionDetector(getApplicationContext()); |
28 | |
29 | /** |
30 | * Check Internet status button click event |
31 | * */ |
32 | btnStatus.setOnClickListener(new View.OnClickListener() { |
33 | |
34 | @Override |
35 | public void onClick(View v) { |
36 | |
37 | // get Internet status |
38 | isInternetPresent = cd.isConnectingToInternet(); |
39 | |
40 | // check for Internet status |
41 | if (isInternetPresent) { |
42 | // Internet Connection is Present |
43 | // make HTTP requests |
44 | showAlertDialog(AndroidDetectInternetConnectionActivity.this, "Internet Connection", |
45 | "You have internet connection", true); |
46 | } else { |
47 | // Internet connection is not present |
48 | // Ask user to connect to Internet |
49 | showAlertDialog(AndroidDetectInternetConnectionActivity.this, "No Internet Connection", |
50 | "You don't have internet connection.", false); |
51 | } |
52 | } |
53 | |
54 | }); |
55 | |
56 | } |
57 | |
58 | /** |
59 | * Function to display simple Alert Dialog |
60 | * @param context - application context |
61 | * @param title - alert dialog title |
62 | * @param message - alert message |
63 | * @param status - success/failure (used to set icon) |
64 | * */ |
65 | public void showAlertDialog(Context context, String title, String message, Boolean status) { |
66 | AlertDialog alertDialog = new AlertDialog.Builder(context).create(); |
67 | |
68 | // Setting Dialog Title |
69 | alertDialog.setTitle(title); |
70 | |
71 | // Setting Dialog Message |
72 | alertDialog.setMessage(message); |
73 | |
74 | // Setting alert dialog icon |
75 | alertDialog.setIcon((status) ? R.drawable.success : R.drawable.fail); |
76 | |
77 | // Setting OK Button |
78 | alertDialog.setButton("OK", new DialogInterface.OnClickListener() { |
79 | public void onClick(DialogInterface dialog, int which) { |
80 | } |
81 | }); |
82 | |
83 | // Showing Alert Message |
84 | alertDialog.show(); |
85 | } |
86 | } |
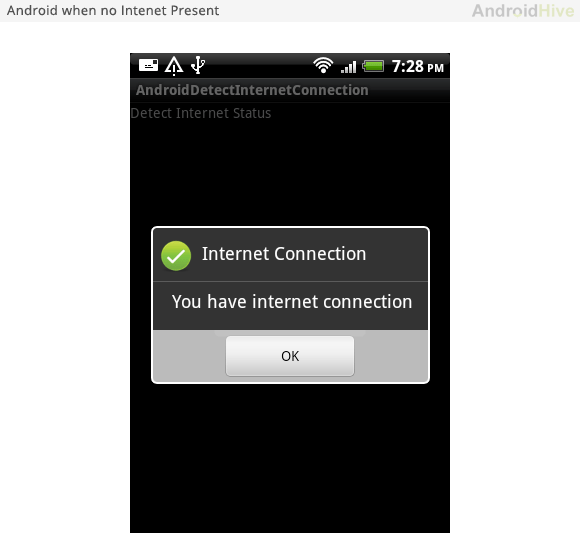
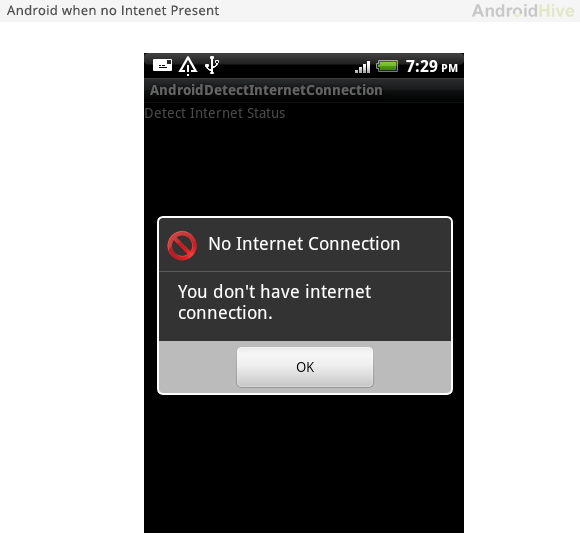
运行并测试下你的程序吧!你将会得到类似下面的结果。

