原文地址http://www.cnblogs.com/phinecos/archive/2007/11/20/965835.html
一、环境:
1.操作系统:windowsXp,windows2000+
2.java1.6,设置JAVA_HOME到环境变量
3.cygwin,当然这个不是必需的,只是nutch提供的脚本只能在shell环境下使用,所以使用cygwin来虚拟shell命令。
4.nutch版本:0.9
5.tomcat:6.0
二、nutch的安装和配置:
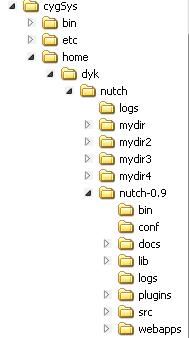
1,安装Cygwin1.5.5(我这里装到F:\cygSys),将nutch解压缩后放置到cygSys \home\用户名的一个目录下(我放在F:\cygSys\home\dyk\nutch下),如图:
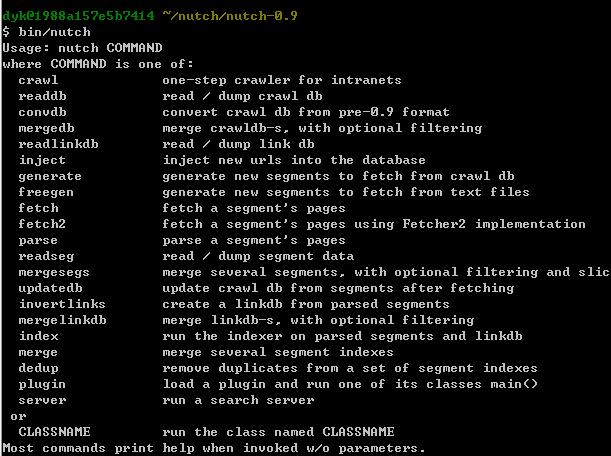
2,在Cygwin环境下进入nutch-0.9目录下,使用命令 bin/nutch进行测试,正常的情况下出现的结果是:
3,进行抓取网站的测试,以抓取http://www.163.com/为例
1) 新建一个文件myurl,在文件中输入http://www.163.com/保存,这个文件可以放在任何地方(我这个文件放在F:\cygSys\home\dyk\nutch\myurl),另外再建立一个爬虫日志目录logs(我放在F:\cygSys\home\dyk\nutch\logs)
2) 打开nutch-0.9\conf\nutch-site.xml文件,在<configuration></configuration>内插入以下内容:
<name>http.agent.name</name>
<value></value>
<description>HTTP 'User-Agent' request header. MUST NOT be empty -
please set this to a single word uniquely related to your organization.
NOTE: You should also check other related properties:
http.robots.agents
http.agent.description
http.agent.url
http.agent.email
http.agent.version
and set their values appropriately.
</description>
</property>
<property>
<name>http.agent.description</name>
<value></value>
<description>Further description of our bot- this text is used in
the User-Agent header. It appears in parenthesis after the agent name.
</description>
</property>
<property>
<name>http.agent.url</name>
<value></value>
<description>A URL to advertise in the User-Agent header. This will
appear in parenthesis after the agent name. Custom dictates that this
should be a URL of a page explaining the purpose and behavior of this
crawler.
</description>
</property>
<property>
<name>http.agent.email</name>
<value></value>
<description>An email address to advertise in the HTTP 'From' request
header and User-Agent header. A good practice is to mangle this
address (e.g. 'info at example dot com') to avoid spamming.
</description>
</property>
可以把<name>XXX</name>之间的内容替换为其他字符,当然就算是不替换也无所谓,这里的设置,是因为nutch遵守了robots协议,在获取response时,把自己的相关信息提交给被爬行的网站,以供识别。
3) 打开nutch-0.9\conf\crawl-urlfilter.txt文件,把MY.DOMAIN.NAME字符替换为myurl内的域名(比如我改成了“+^http://([a-z0-9]*\.)*163.com/”,其实更简单点,直接删除MY.DOMAIN.NAME这几个字就可以了,也就是说,只保存+^http://([a-z0-9]*\.)*这几个字就可以了,表示所有http的网站都同意爬行)。
<!--[endif]-->
4) 运行爬虫,在Cygwin输入以下命令:
这里dir表示存储的目录,-depth表示网址爬的深度,最后是指明日志文件
![]()
运行结束后,你可以打开日志文件查看爬虫运行的详细过程。
5,在tomcat上运行Nutch
把nutch-0.9.war拷贝到Tomcat\webapps\下面
在浏览器中输入http://localhost:8080/nutch-0.9/这步是为了使tomcat展开nutch-0.9.war,然后修改webapps/ nutch-0.9/WEB-INF/classes/nutch-site.xml文件如下:
<property>
<name>searcher.dir</name>
<value>F:\\cygSys\\home\\dyk\\nutch\\mydir4</value>
</property>
</configuration>
为了支持中文的搜索,修改Tomcat\conf\server.xml。找到对应的地方修改成
connectionTimeout="20000"
redirectPort="8443" URIEncoding="UTF-8" useBodyEncodingForURI="true"/>
在浏览器中输入http://localhost:8080/nutch-0.9,
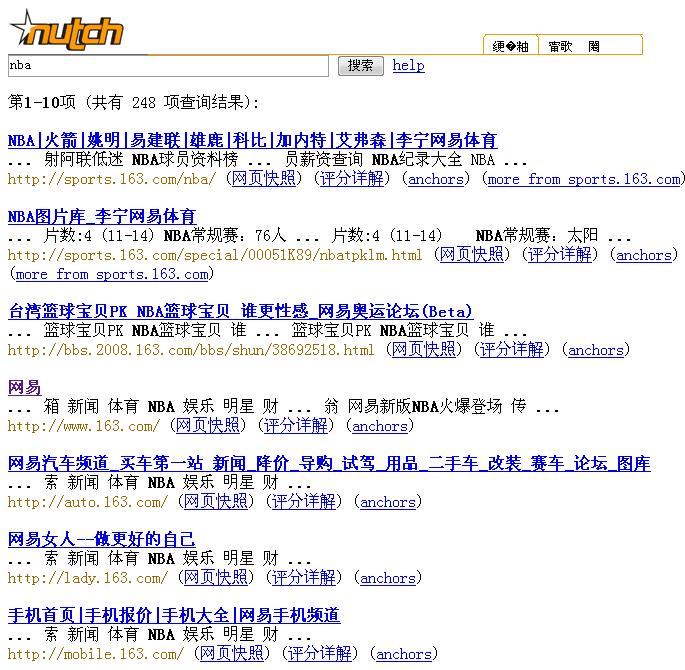
搜索“nba”,结果是