Logstash基本介绍和使用场景
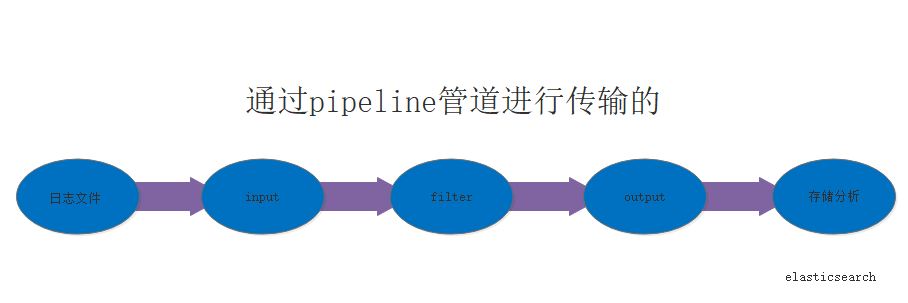
自我认为:logstash就是日志的采集收集,日志的搬运工,实时去采集日志。读取不同的数据源,并进行过滤,开发者自定义规范输出到目的地。日志的来源很多,如系统日志,应用日志等等(同类软件:filebeat)
官方文档:https://www.elastic.co/guide/en/logstash/current/index.htm
工作传输流程
在centos7上安装logstash
下载  logstash-6.2.4.tar.gz
wget https://artifacts.elastic.co/downloads/logstash/logstash-6.2.4.tar.gz

tar -xvf logstash-6.2.4.tar.gz
cd logstash-6.2.4/


修改配置文件:(基本配置)
    logstash.yml  修改 pipeline.workers,根据CPU核数增加1到2即可
    jvm.options      修改 xms和xmx为相同,一般是系统内存三份之二
input filter output数据流程测试
logstash配置文件vim logstash.conf
input {
  file {                                               # 从文件读取日志信息
     path => "/var/log/messages"         #文件所在的路径
     type => "system"                          #类型是system类型
    codec => "json"                         #日志格式时json格式时打开
     start_position => "beginning"         #从哪里开始读,beginning
      }
}

filter {
    mutate{                   #切割插件
      split => ["message","|"]          #通过|切割为message的数组
    }

}

output {
     elasticsearch {
     #stdout { codec => rubydebug }        #格式化控制台输出
        hosts => ["localhost:9200"]          #输出到es中
        index => "logstash-test-%{type}-%{host}"        #输出到哪个索引中去
    }
}
logstash 常用插件
案例1:
input{
        file{
                path => "/var/log/messages"   #路径可以通过数组传多个路径 ["path1","path2"]
                type => "system"
                start_position => "beginning"  #如果不加这个参数默认从文件的末尾去手机
        }
}
output{
        elasticsearch{
                hosts => ["192.168.1.127:9200"]  #地址是你es的地址
                index => "message-%{+YYYY.MM.dd}" #添加到es中的message+当前日期的索引中,如果没有这个索引就新建
        }
        stdout{ codec => rubydebug}
}

案例二   通过type不同将日志加入不同的索引中
input{
        file{
                path => "/var/log/messages"
                type => "system"                    #在此处设置类型
                start_position => "beginning"
        }
        file{
                path => "/temp/elasticsearch-6.2.4/logs/my-es.log"
                type => "elasticsearch"            #在此处设置类型
                start_position => "beginning"
        }
}
output{
        if [type] == "system" {                    #判断类型
                elasticsearch{
                        hosts => ["192.168.1.127:9200"]
                        index => "message-%{+YYYY.MM.dd}"
                }
        }

        if [type] == "elasticsearch" {            #判断类型
                elasticsearch{
                        hosts => ["192.168.1.127:9200"]
                        index => "elasticsearch-%{+YYYY.MM.dd}"
                }
        }
        stdout{ codec => rubydebug}
}

案例三

input{
        file{
                path => "/var/log/messages"
                type => "system"
                start_position => "beginning"
        }
        file{
                path => "/temp/elasticsearch-6.2.4/logs/my-es.log"
                type => "elasticsearch"
                start_position => "beginning"
                codec => multiline{                                 #设置日志的分割格式,不是按每一行进行分割   只是在碰到[进行分割为一个事件。
                        pattern => "^["
                        negate => true
                        what => "previous"
                }
        }
}
output{
        if [type] == "system" {
                elasticsearch{
                        hosts => ["192.168.1.127:9200"]
                        index => "message-%{+YYYY.MM.dd}"
                }
        }

        if [type] == "elasticsearch" {
                elasticsearch{
                        hosts => ["192.168.1.127:9200"]
                        index => "elasticsearch-%{+YYYY.MM.dd}"
                }
        }
        stdout{ codec => rubydebug}
}
针对nginx的访问日志收集
修改nginx的日志格式   根据实际情况vim /usr/local/nginx/conf/nginx.conf
http{
log_format  json '{"@timestamp":"$time_iso8601",'    #时间戳格式(否则logstash会一直有警告)
                     '"client":"$remote_addr",'
                     '"url":"$uri",'
                     '"status":"$status",'
                     '"domain":"$host",'
                     '"host":"$server_addr",'
                     '"size":"$body_bytes_sent",'
                     '"responsetime":"$request_time",'
                     '"referer":"$http_referer",'
                     '"ua":"$http_user_agent"'
                     '}';
server{
            access_log logs/access_json.log json;
        }
}

配置logstash
input{
        file{
                path => "/usr/local/nginx/logs/access_json.log"
                type => "nginx"
                start_position => "beginning"
                codec => json
        }
}
filter{
if [client] == "192.168.1.129"{ #碰到client为192.168.1.129的主机访问丢弃
drop{}
}
geoip { #基于访问ip确定地理位置需要下载配合数据库wget http://geolite.maxmind.com/download/geoip/database/GeoLite2-City.tar.gz
source => "client" #访问的IP地址
target => "geoip"
database => "/temp/logstash-6.2.4/GeoLite2-City_20180501/GeoLite2-City.mmdb" #解压后的mmdb文件位置
add_field => [ "[geoip][coordinates]", "%{[geoip][longitude]}" ]
add_field => [ "[geoip][coordinates]", "%{[geoip][latitude]}" ]
}
mutate {
convert => [ "[geoip][coordinates]", "float" ]
}
}
}
output{
        #stdout{}
        #stdout { codec => rubydebug }
        if [type] == "nginx"{
                elasticsearch{
                        hosts=>["192.168.1.127:9200"]
                        index => "iroad-nginx-access-%{+YYYY.MM.dd}"
                }
        }
}
syslog 和logstash对接
写logstash配置文件
input{
syslog{
type => "system-syslog"
host => "192.168.1.127"
port => "524"
}
}
output{
stdout{
codec => rubydebug
}
}
启动logstash
vim /etc/rsyslog.conf #修改配置文件使系统日志文件直接写到远程端口
将下图中的打开 填写你logstash中配好好的ip和端口
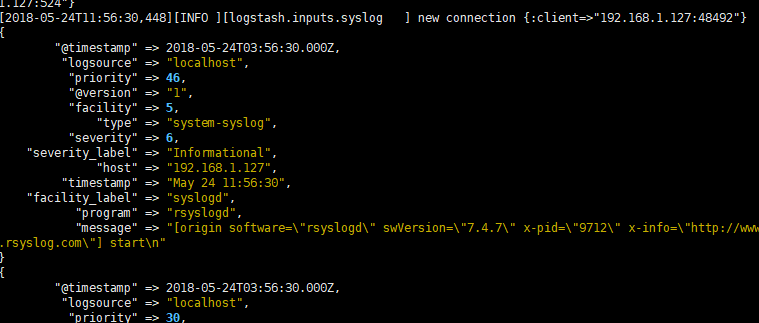
重新启动 systemctl restart rsyslog.service

重新启动rsyslog就会有数据显示在终端
input插件的tcp应用
input{
        tcp{
                host => "192.168.1.127"
                port => "5304"
}
output{
        stdout{
                codec => rubydebug
        }
}
filter插件的使用 mysql慢查询日志
input{
        file{
                path => "/temp/log/mysql-slow1.log"
                type => "mysql_slowlog"
                start_position => "beginning"
                codec => multiline {
                        pattern => "# User@Host"
                        negate => "true"
                        what => "previous"
                }
        }
}
filter{
        grok{
                match => {
                        "message" => "(?m)^# User@Host: %{USER:User}[[^]]+] @ (?:(?<clienthost>S*) )?[(?:%{IP:Client_IP})?]s.*# Query_time: %{NUMBER:Query_Time:float}s+Lock_time: %{NUMBER:Lock_Time:float}s+Rows_sent: %{NUMBER:Rows_Sent:int}s+Rows_examined: %{NUMBER:Rows_Examined:int}s*(?:use %{DATA:Database};s*)?SET timestamp=%{NUMBER:timestamp};s*(?<Query>(?<Action>w+)s+.*)
# Time:.*$"
                }
        }
        date {
                 match => [ "timestamp", "UNIX" ]
                 remove_field => [ "timestamp" ]
             }

}
output{
#       stdout{
#               codec => rubydebug
#       }
        elasticsearch {
                hosts => ["192.168.1.127:9200"]
                index => "mysql_slow-%{+YYYY.MM.dd}"
        }
}
tomcat和nginx小案例
input{
        file{
                path => "/usr/local/nginx/logs/access_json.log"
                type => "nginx"
                start_position => "beginning"
                codec => json
        }
        file{
                path => "/home/app/tomcat/apache-tomcat-8.5.8/logs/*.txt"
                type => "tomcat"
                start_position => "beginning"
                codec => json
        }

}
filter{
        if [client] == "192.168.1.129"{
                drop{}
        }
        if [url] =~ ".*/setBusinessGps.json HTTP/1.0" {
                drop{}
        }
        if [url] =~ ".* /iroad-service/.*.json HTTP/1.0$"{

                grok {
                        tag_on_failure => "通用"
                        }
        }
        if [url] =~ ".* /iroad-view/.* HTTP/1.0$"{

                grok {
                        tag_on_failure => "中山h5"
                        }
        }

        geoip {
                        source => "client"
                        target => "geoip"
                        database => "/temp/logstash-6.2.4/GeoLite2-City_20180501/GeoLite2-City.mmdb"
                        add_field => [ "[geoip][coordinates]", "%{[geoip][longitude]}" ]
                        add_field => [ "[geoip][coordinates]", "%{[geoip][latitude]}" ]
                }

                mutate {
                        convert => [ "[geoip][coordinates]", "float" ]
                }


}
output{
        #stdout{}
        #stdout { codec => rubydebug }
        if [type] == "nginx"{
                elasticsearch{
                        hosts=>["192.168.1.127:9200"]
                        manage_template => true
                        index => "logstash-iroad-nginx-access-new-%{+YYYY.MM.dd}"
                }
        }
        if [type] == "tomcat"{
                elasticsearch{
                        hosts=>["192.168.1.127:9200"]
                        manage_template => true
                        index => "logstash-iroad-tomcat-access-new-%{+YYYY.MM.dd}"
                }
        }
}
input和output与redis(list)消息队列实现解耦

输出到redis中
input{
        stdin{}
}
filter{

}
output{
        redis {
                host => "192.168.1.162"
                port => "7000"
                db => "6"
                data_type => "list"          #应用的是redis的list列表
                key => "demo"          #定义key
        }
}
从redis中输入
input{
        redis {
                host => "192.168.1.162"
                port => "7000"
                db => "6"
                data_type => "list"          #应用的是redis的list列表

                key => "demo"          #从key="demo"中取出
        }
}
filter{

}
output{
        elasticsearch {
                hosts => ["192.168.1.127:9200"]
                index => "redis-%{YYYY.MM.dd}"
        }
}
input插件:https://www.elastic.co/guide/en/logstash/current/input-plugins.html
filter插件:https://www.elastic.co/guide/en/logstash/current/filter-plugins.html
output插件:https://www.elastic.co/guide/en/logstash/current/output-plugins.html
目录文件说明:https://www.elastic.co/guide/en/logstash/6.2/dir-layout.html
配置详解:https://www.elastic.co/guide/en/logstash/6.2/logstash-settings-file.html