参考:《PyQt5:uic 官方教程》
工具 pyuic5 的使用
如果没有安装,则可以通过以下指令安装 pyuic5:
sudo apt-get install pyqt5-dev-tools
Usage: pyuic5 [options] <ui-file>
Options:
-p, --preview show a preview of the UI instead of generating code
-o FILE write generated code to FILE instead of stdout
-x, --execute generate extra code to test and display the class
-d, --debug show debug output
--from-imports generate imports relative to '.'
--resource-suffix=SUFFIX append SUFFIX to the basename of resource files [default: _rc]
动态载入UI文件及图元对象
import 模块
import PyQt5.uic
其内容如下:
- PACKAGE CONTENTS
- Compiler (package)
- Loader (package)
- driver
- exceptions
- icon_cache
- objcreator
- port_v3 (package)
- properties
- pyuic
- uiparser
- SUBMODULES
- compiler
- indenter
how to use it
常用方法包括:
compileUi(uifile, pyfile, execute=False, indent=4, from_imports=False, resource_suffix='_rc')
compileUiDir(dir, recurse=False, map=None, **compileUi_args)
loadUi(uifile, baseinstance=None, package='') -> widget
loadUiType(uifile, from_imports=False) -> (form class, base class)
注意后两个函数,功能强大——它们首先动态编译了ui文件并存储在内存;然后
- 对于loadUiType(),它导出一个tuple,装载着ui的图元类及其基类;
- 对于loadUi(),它导出一个ui图元类的实例对象。
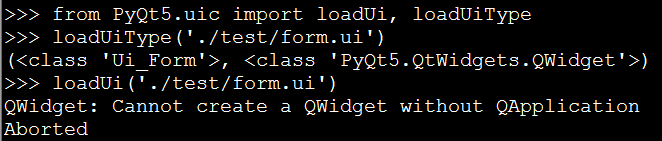
(请忽略崩溃的bug,它要求QApplication已经运行……)
在Qt5中应用MVC模式并调取 *.ui 文件(作为View)
使用uic动态载入 *.ui 的窗口对象
拓展:创建自定义Widget,并在UI Designer中载入新控件
模块化:页面嵌套的积木设计
复用性:使用容器窗口类封装自定义Widget
Qt5的容器窗口(Containers Widgets)

以上控件从上到下依次是:
- 组合框
- 滚动区
- 工具箱
- 切换卡
- 控件栈
- 框架
- 组件
- MDI窗口显示区
- 停靠窗口
- ActiveX...(呃,这个怎么表达)
这里仅对 QStackedWidget 加以说明:
The QStackedWidget class provides a stack of widgets where only one widget is visible at a time. QStackedWidget can be used to create a user interface similar to the one provided by QTabWidget. It is a convenience layout widget built on top of the QStackedLayout class.
Like QStackedLayout, QStackedWidget can be constructed and populated with a number of child widgets ("pages"):
QWidget *firstPageWidget = new QWidget;
QWidget *secondPageWidget = new QWidget;

QStackedWidget *stackedWidget = new QStackedWidget;
stackedWidget->addWidget(firstPageWidget);
stackedWidget->addWidget(secondPageWidget);

QVBoxLayout *layout = new QVBoxLayout;
layout->addWidget(stackedWidget);
setLayout(layout);

// 连接槽函数
connect(pageComboBox, SIGNAL(activated(int)),
        stackedWidget, SLOT(setCurrentIndex(int)));
When populating a stacked widget, the widgets are added to an internal list. The indexOf() function returns the index of a widget in that list. The widgets can either be added to the end of the list using the addWidget() function, or inserted at a given index using the insertWidget() function. The removeWidget() function removes a widget from the stacked widget. The number of widgets contained in the stacked widget can be obtained using the count() function.
The widget() function returns the widget at a given index position. The index of the widget that is shown on screen is given by currentIndex() and can be changed using setCurrentIndex(). In a similar manner, the currently shown widget can be retrieved using the currentWidget() function, and altered using the setCurrentWidget() function.
Whenever the current widget in the stacked widget changes or a widget is removed from the stacked widget, the currentChanged() and widgetRemoved() signals are emitted respectively.
示例
效果预览
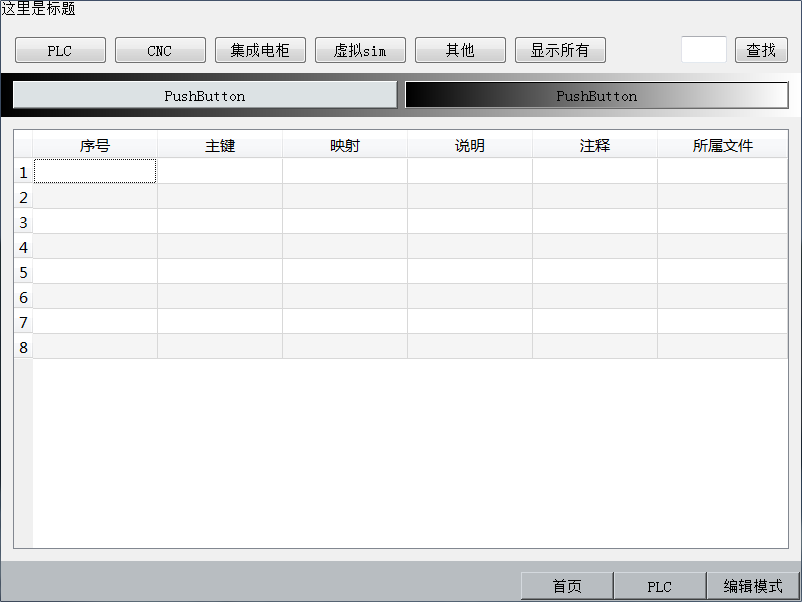
(读者们,忽略这个丑陋的界面吧,关注技术实现即可……)
Qt Designer 设计页面
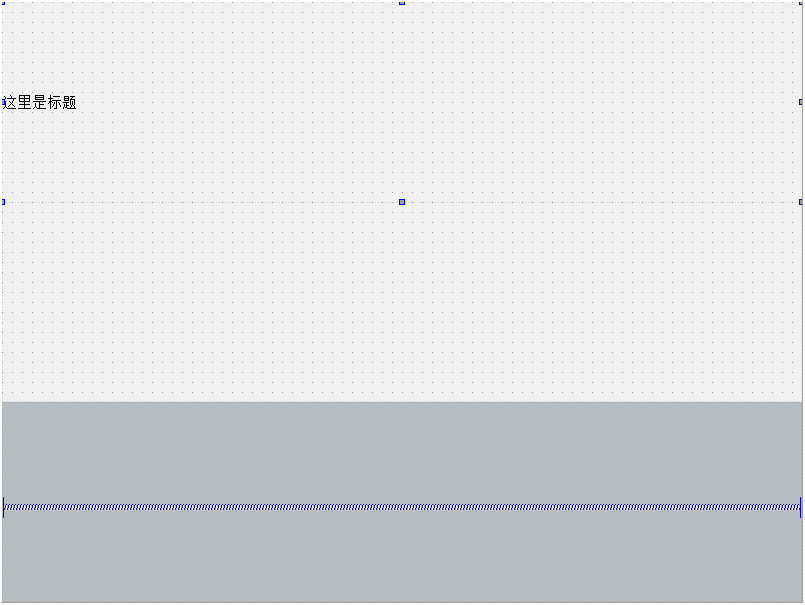
这是主窗口,就一个自上而下的三层结构……在这里这三个层次的比例如何失调都没关系——它会根据实际的填充而自动调整的。
需要注意的是:
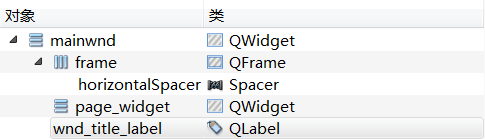
- 主显示区(中间部分)是通过QWidget代表的,它将在运行时被一个子页面的 “自定义组合控件” (管理对象)所替代。
- 下侧的frame是一个QFrame容器,我们将通过代码在运行时动态向这个容器里填充Button图元。

这就是Page页面,在View设计中,只管利用Designer工具把图形绘制的尽可能详尽(越接近需求越好,这样View的内容尽量多的通过Designer而不是代码实现。要知道,我们的目标是MVC,代码尽量少的参与View的设计与显示控制,除非显示样式与交互相关)。这里用到最多的操作是:
- 拖控件
- 添加布局
- 编辑样式表

测试页面布局(显示效果)
我们可以使用 pyuic5 预览设计效果,并调整页面尺寸来观察Layout的实际效果。
$ pyuic5.exe -p ui/editorpage.ui
组合控件(View + Controller)的接口设计
我们希望设计一个全新的组合控件,它包含了从ui文件继承来的页面图元,并增加了该控件的自定义动作(通过信号槽实现)。对于ui文件,我们需要将其载入接口类;对于信号槽,我们需要实现槽函数,并connnect到响应的signal上面:
from PyQt5.QtWidgets import QWidget, QFrame
from PyQt5.uic import loadUi

UI_Mapping = {}

class IVacWidget(QFrame):  # component of view and controller
    def __init__(self, parent=None):
        super().__init__(parent)
        self._load_ui_file(self)  # to use cls.__name__

    @classmethod
    def _load_ui_file(cls, parent):
        # print("-->>> {} ".format(cls.__name__))  # 验证:cls.__name__呈现多态(子类类名)
        try:
            loadUi(UI_Mapping[cls.__name__], parent)
        except KeyError:
            print(UI_Mapping)
            logging.error("Unable to find the Page[{}]".format(cls.__name__))


    def _active(self):
        """ 连接信号槽,激活widget模块的功能 """
        pass

    def _import(self):
        """ 载入数据 """
        pass
这里将 ui 文件的路径通过UI_Mapping映射确定,而该映射则在运行时读取配置文件载入数据。它的内容可以是这样的(json格式):
{
    "MainWndVac"        : "ui/mainwnd.ui",
    "BasePageVac"       : "ui/basepage.ui",
    "EditorPageVac"     : "ui/editorpage.ui"
}
那么解析它也很容易了:
# 以下内容用于动态改写 src.vacwx.UI_Mapping 值
import json
import src.vacwx

with open("uimap.json") as fp:
    src.vacwx.UI_Mapping = json.load(fp)
组合控件的实现(编写UI控制器)
如果我们仅仅需要把当前的页面载入我们的程序中, 那很简单:
from PyQt5.QtWidgets import QPushButton
from src.vacwx import IVacWidget

class BasePageVac(IVacWidget):
    def __init__(self, parent=None):
        super().__init__(parent)

    def _active(self):
        self.test_btn.pressed.connect(self.test_slot)

    def test_slot(self):
        # anything you want to do...
        pass


class EditorPageVac(IVacWidget):
    def __init__(self, parent=None):
        super().__init__(parent)
如上,Editor仅仅是显示了页面,于是就有了我们开头看到的那个丑陋的小页面。
当然,你也可以通过实现 _active() 和自定义槽函数,绑定标准控件的各种行为……
由于MainWnd需要依赖子页面的实现,我们将它作为独立文件设计,并添加页面下方的动态按钮,以及实现页面切换的效果:
import logging
from PyQt5.QtWidgets import QPushButton
from src.vacwx import IVacWidget, UI_Mapping
from wx.pagevac import *

logging.basicConfig(level=logging.INFO,  # filename="test.log",
                    format="[%(asctime)s] %(levelname)s --> %(message)s")
LOG = logging.getLogger(__file__)


class MainWndVac(IVacWidget):
    page_mapping = [
        {"首页": BasePageVac},
        {"PLC": BasePageVac},
        {"编辑模式": EditorPageVac},
    ]

    def __init__(self):
        super().__init__()

        self.create_pages()
        self._active()
        self.show()

    def create_pages(self):
        self.page_list = []
        self.page_btn_list = []
        for dict_page in self.page_mapping:
            page_name = list(dict_page)[0]
            page_class = dict_page[page_name]

            page = page_class()
            # LOG.info("(1) page_id->{}".format(id(page)))  # check Page ID first.

            page_btn = QPushButton(page_name)
            # page_btn.clicked.connect(lambda: self.switch_page(page))  # ?? while the index++, the connect-map is changed.
            # self.page_btn_list[index].clicked.connect(lambda: self.switch_page(self.page_list[index]))  # failed again...
            self.page_btn_layout.addWidget(page_btn)

            self.page_list.append(page)
            self.page_btn_list.append(page_btn)

        # 初始化首页
        self.switch_page(self.page_list[0])
        # for page in self.page_list:  # check Page ID second.
        #     LOG.info("(2) page_id->{}".format(id(page)))

    def switch_page(self, switch_to: IVacWidget):
        """ switch_to is an IVacWidget """
        # LOG.info("VacMainCtrller::switch_page({}) is called...Page[{}] is activated.".format(switch_to, id(switch_to)))
        for page in self.page_list:
            if not page.isHidden():
                if page != switch_to:
                    self.page_layout.removeWidget(page)
                    page.hide()
                else:  return
        self.page_layout.addWidget(switch_to)
        switch_to.show()

    def _active(self):
        self.page_btn_list[0].clicked.connect(lambda: self.switch_page(self.page_list[0]))
        self.page_btn_list[1].clicked.connect(lambda: self.switch_page(self.page_list[1]))
        self.page_btn_list[2].clicked.connect(lambda: self.switch_page(self.page_list[2]))
最后是整个程序的入口:
if __name__ == '__main__':
    try:
        app = QApplication(sys.argv)
        mainwin = MainWndVac()
        sys.exit(app.exec_())
    except Exception as e:
        LOG.error(e)
        traceback.print_exc()
        sys.exit(-1)
OK,至此功能完成。
总结
这个过程并不复杂,封装也很简单,只是如果实现容器对 ui 的载入等操作有着 pyuic 自定义的组合逻辑。既然趟了路,就把经验罗列出来,其他人也可以省下点时间。
另外,这个模式的应用场景和价值却很大——
- 首先,查询GUI的API是一件繁琐的事情,而Qt Designer已经把这个工作做到了“尽可能完善”;
- 其次,当你设计一个组合控件,其中不再涉及View对象(这里只适用于静态图元对象)的创建、管理时,你的代码将更具条理——都是在处理控制过程;
- 对于动态图元的创建,也适用于上一条:它也属于控制过程的一部分——你总得根据环境的特殊性或变化触发动态对象的创建事件;
- 最后,你完全解耦了Data与View层——这二者的耦合是造成代码混乱的直接原因。
本篇博文的内容还没有经过足够的验证,欢迎大家指正。我也将持续更新这个流程,以待完善。