我们现在还需要为管理员提供一个途径,使他能方便的管理网站的商品目录,这也是所有网站都需要的功能,常用到了几乎所有开发人员都要开发这种功能的地步,为了简化这种重复开发、又没有技术含量的工作,VS的设计和开发者们也试图通过MVC框架来自动生成这些功能,帮助开发人员,这也是我们开发这个管理后台的主要目的---学习如何通过MVC生成一个具有CRUD功能的管理模块。
创建CRUD Controller
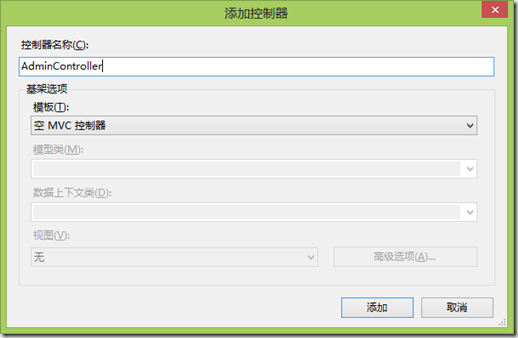
我们将会创建一个新的controller去处理administration功能.右击SportsStore.WebUI工程的Controllers文件夹并选择添加Controller. 命名为AdminController,并确保模板下拉框中选择的是Empty MVC Controller:
修改代码如下:
using SportsStore.Domain.Abstract;
using System;
using System.Collections.Generic;
using System.Linq;
using System.Web;
using System.Web.Mvc;
namespace SportsStore.WebUI.Controllers
{
    public class AdminController : Controller
    {
        private IProductsRepository repository;
        public AdminController(IProductsRepository repo)
        {
            repository = repo;
        }
        public ViewResult Index()
        {
            return View(repository.Products);
        }
    }
}
我们所关心的是Index方法能否正确返回Product对象,所以,我们不能偷懒,还是创建一个mock repository 的实现,通过action 方法返回数据,做一个比较。现在我们就添加一个新的单元测试类,命名为AdminTests.cs:
using Microsoft.VisualStudio.TestTools.UnitTesting;
using Moq;
using SportsStore.Domain.Abstract;
using SportsStore.Domain.Entities;
using SportsStore.WebUI.Controllers;
using System;
using System.Collections.Generic;
using System.Linq;
using System.Web.Mvc;

namespace SportsStore.UnitTests
{
    [TestClass]
    public class AdminTests
    {
        [TestMethod]
        public void Index_Contains_All_Products()
        {
            // Arrange - create the mock repository
            Mock<IProductsRepository> mock = new Mock<IProductsRepository>();
            mock.Setup(m => m.Products).Returns(new Product[] {
                                new Product {ProductID = 1, Name = "P1"},
                                new Product {ProductID = 2, Name = "P2"},
                                new Product {ProductID = 3, Name = "P3"},
                                }.AsQueryable());

            // Arrange - create a controller
            AdminController target = new AdminController(mock.Object);
            // Action
            Product[] result = ((IEnumerable<Product>)target.Index().
            ViewData.Model).ToArray();
            // Assert
            Assert.AreEqual(result.Length, 3);
            Assert.AreEqual("P1", result[0].Name);
            Assert.AreEqual("P2", result[1].Name);
            Assert.AreEqual("P3", result[2].Name);
        }
    }
}
创建一个新的Layout
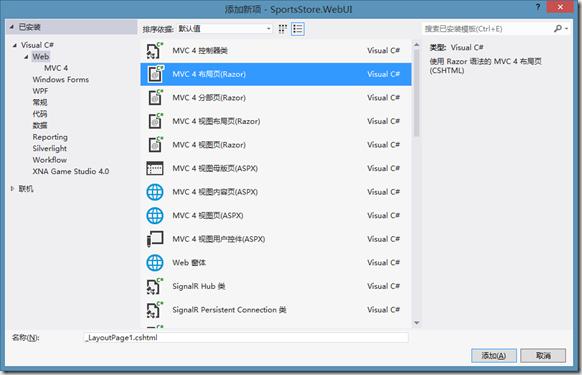
右击SportsStore.WebUI工程的Views/Shared并选择添加新建项. 选择MVC 4 布局页模板并设置名字为_AdminLayout.cshtml:
我们这个命名使用了一个下划线开头,这是因为微软还有另外一种技术,叫做WebMatrix,这种技术也使用Razor语法,它通过带下划线的命名来保持一个页面被驻留在浏览器中,在MVC4中不存在这种需求,当把一个启动layout命名为带下划线的这种命名规则,却一直被保存着,在任何地方都适用。
<!DOCTYPE html>
<html>
<head>
    <meta name="viewport" content="width=device-width" />
    <link href="~/Content/Admin.css" rel="stylesheet" type="text/css" />
    <title></title>
</head>
<body>
<div>
    @RenderBody()
</div>
</body>
</html>
我们还用为这个View添加一个Admin.css样式单,右击Content文件夹,添加一个样式单:
BODY, TD { font-family: Segoe UI, Verdana }
H1 { padding: .5em; padding-top: 0; font-weight: bold;
font-size: 1.5em; border-bottom: 2px solid gray; }
DIV#content { padding: .9em; }
TABLE.Grid TD, TABLE.Grid TH { border-bottom: 1px dotted gray; text-align:left; }
TABLE.Grid { border-collapse: collapse; width:100%; }
TABLE.Grid TH.NumericCol, Table.Grid TD.NumericCol {
text-align: right; padding-right: 1em; }
FORM {margin-bottom: 0px; }
DIV.Message { background: gray; color:White; padding: .2em; margin-top:.25em; }
.field-validation-error { color: red; display: block; }
.field-validation-valid { display: none; }
.input-validation-error { border: 1px solid red; background-color: #ffeeee; }
.validation-summary-errors { font-weight: bold; color: red; }
.validation-summary-valid { display: none; }
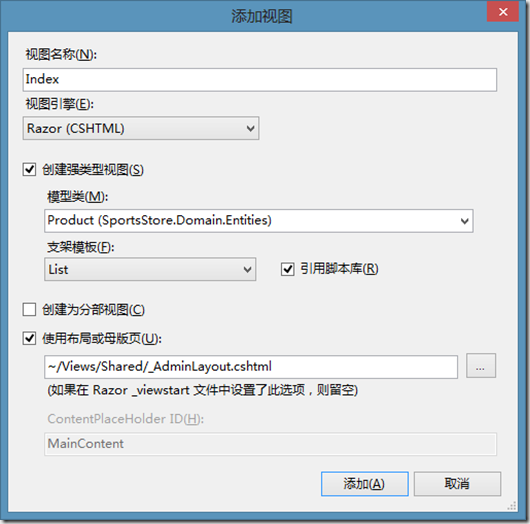
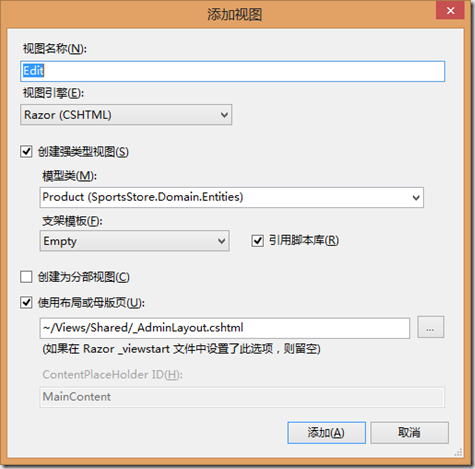
我们已经完成了这个layout,现在要为这个Admin控制器添加一个Index视图了:
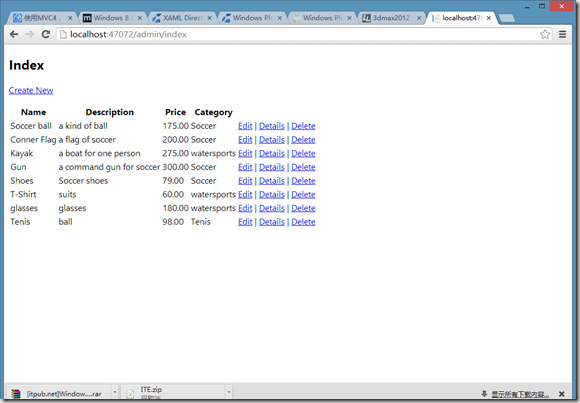
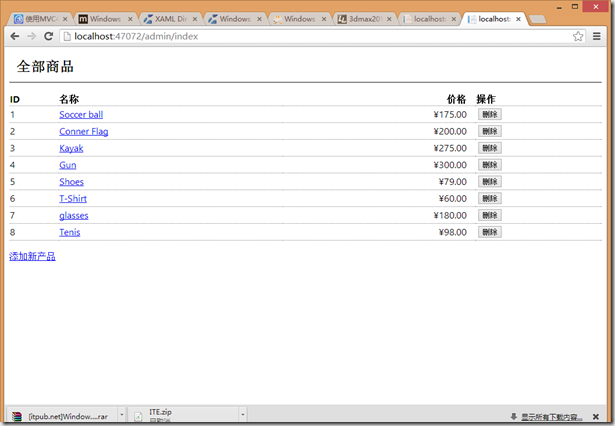
这里一定要仔细看清楚上面的图片哦!我们选择了List scaffold(支架模板),这很重要.点击添加按钮,生成了一个带有代码的新视图,仔细看看这些代码,你可以将它汉化一下,为了不引起大家误解,我不去汉化它,就让它保持原样吧!在地址栏中输入/Admin/index,你会看到下图:
现在,你该明白scaffold为我们做了什么了吧!好了,现在你已经看到了效果了,让我们再去修善一下Index.cshtml文件吧!
@model IEnumerable<SportsStore.Domain.Entities.Product>
@{
    ViewBag.Title = "Admin: 全部商品";
    Layout = "~/Views/Shared/_AdminLayout.cshtml";
}
<h1>全部商品</h1>
<table class="Grid">
<tr>
<th>ID</th>
<th>名称</th>
<th class="NumericCol">价格</th>
<th>操作</th>
</tr>
@foreach (var item in Model) {
<tr>
    <td>@item.ProductID</td>
    <td>@Html.ActionLink(item.Name, "Edit", new { item.ProductID })</td>
    <td class="NumericCol">@item.Price.ToString("c")</td>
<td>
    @using (Html.BeginForm("Delete", "Admin")) {
        @Html.Hidden("ProductID", item.ProductID)
        <input type="submit" value="删除"/>
    }
</td>
</tr>
}
</table>
<p>@Html.ActionLink("添加新产品", "Create")</p>
编辑Products
要做这项工作很简单,和我们之前的操作非常相似,我们要做的无非是两件事:
1.显示一个允许管理员修改价格和属性的页面。
2.添加一个Action方法,当数据被提交后,这个方法能处理修改后的数据。
现在,我们就去为AdminController添加一个Edit方法,记住,你要添加下面的代码到你的AdminController类:
using SportsStore.Domain.Entities;
         public ViewResult Edit(int productId)
        {
            Product product = repository.Products
            .FirstOrDefault(p => p.ProductID == productId);
            return View(product);
        }
添加测试方法到你的AdminTest类中:
        [TestMethod]
        public void Can_Edit_Product() {
            // Arrange - create the mock repository
            Mock<IProductsRepository> mock = new Mock<IProductsRepository>();
            mock.Setup(m => m.Products).Returns(new Product[] {
                    new Product {ProductID = 1, Name = "P1"},
                    new Product {ProductID = 2, Name = "P2"},
                    new Product {ProductID = 3, Name = "P3"},
                    }.AsQueryable());
            // Arrange - create the controller
            AdminController target = new AdminController(mock.Object);
            // Act
            Product p1 = target.Edit(1).ViewData.Model as Product;
            Product p2 = target.Edit(2).ViewData.Model as Product;
            Product p3 = target.Edit(3).ViewData.Model as Product;
            // Assert
            Assert.AreEqual(1, p1.ProductID);
            Assert.AreEqual(2, p2.ProductID);
            Assert.AreEqual(3, p3.ProductID);
         }

        [TestMethod]
        public void Cannot_Edit_Nonexistent_Product()
        {
            // Arrange - create the mock repository
            Mock<IProductsRepository> mock = new Mock<IProductsRepository>();
            mock.Setup(m => m.Products).Returns(new Product[] {
                        new Product {ProductID = 1, Name = "P1"},
                        new Product {ProductID = 2, Name = "P2"},
                        new Product {ProductID = 3, Name = "P3"},
                        }.AsQueryable());
            // Arrange - create the controller
            AdminController target = new AdminController(mock.Object);
            // Act
            Product result = (Product)target.Edit(4).ViewData.Model;
            // Assert
            Assert.IsNull(result);
        }
创建Edit视图
修改代码如下:
@model SportsStore.Domain.Entities.Product
@{
    ViewBag.Title = "Admin: 编辑" + @Model.Name;
    Layout = "~/Views/Shared/_AdminLayout.cshtml";
    }

    <h1>Edit @Model.Name</h1>

@using (Html.BeginForm()) {
    @Html.EditorForModel()
    <input type="submit" value="保存" />
    @Html.ActionLink("取消并返回", "Index")
}
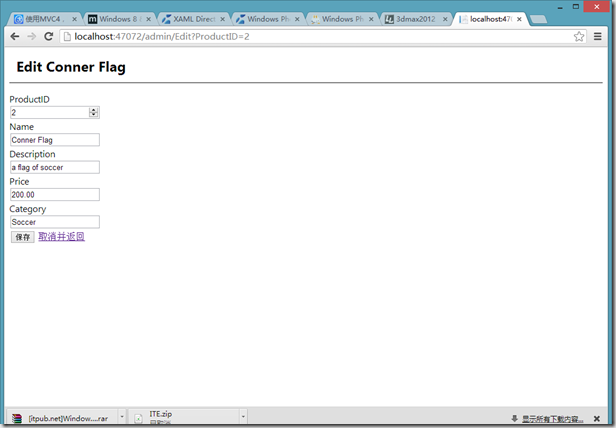
现在,你点击一下商品名称,我们能看到下图的结果:
Wow,MVC真是太方便了,但是,我仔细看看才发现,我们的ProductID居然能够编辑,这个是一个严重的Bug,我绝不允许它的存在,但是,这是什么原因导致的呢?仔细分析一下,原来我们的View中使用了
EditorForModel 方法, 这个方法的确非常的方便,但我们却没有得到一个非常理想的结果,我们不希望管理员能够看到或编辑产品编号,而且这个产品简介的字段也太短了,参阅MVC指导手册后,我才发现,我们需要使用模块数据元的特性去影响 Html.EditorForModel方法,不管怎么说,去试试看吧!打开SportsStore.Domain工程Entities文件夹中的Product类,添加两个新的引用:
using System.ComponentModel.DataAnnotations;
using System.Web.Mvc;
修改后的代码如下:
using System;
using System.Collections.Generic;
using System.Linq;
using System.Text;
using System.Threading.Tasks;
using System.ComponentModel.DataAnnotations;
using System.Web.Mvc;

namespace SportsStore.Domain.Entities
{
    public class Product
    {
        [HiddenInput(DisplayValue = false)]
        public int ProductID { get; set; }
        public string Name { get; set; }

        [DataType(DataType.MultilineText)]
        public string Description { get; set; }
        public decimal Price { get; set; }
        public string Category { get; set; }
    }
}
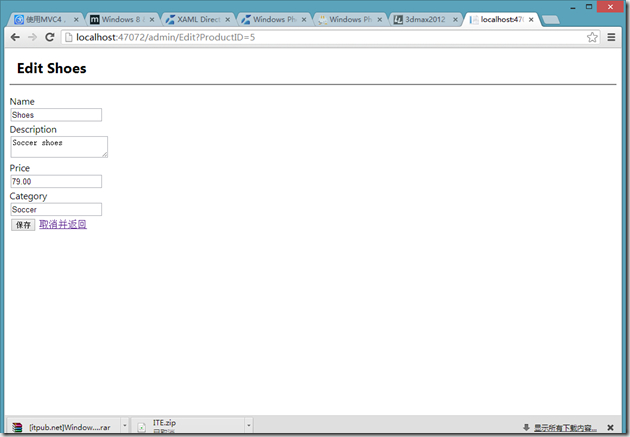
好,再运行一下!
哈哈,这才是我们想要的结果!
更新Product Repository
现在,我们需要一个新的功能,使我们能够保存产品的更新。首先,我们要在IProductRepository接口中添加一个新的方法:
using System;
using System.Collections.Generic;
using System.Linq;
using System.Text;
using System.Threading.Tasks;
using SportsStore.Domain.Entities;

namespace SportsStore.Domain.Abstract
{

    public interface IProductsRepository
    {
        IQueryable<Product> Products { get; }

        void SaveProduct(Product product);
    }
}
现在我们要把这个方法的实现添加的我们的EF实现类中,你还记得它放在哪吗?去找找吧!
using SportsStore.Domain.Abstract;
using SportsStore.Domain.Entities;
using System.Linq;
namespace SportsStore.Domain.Concrete
{
    public class EFProductRepository : IProductsRepository
    {
        private EFDbContext context = new EFDbContext();
        public IQueryable<Product> Products
        {
            get { return context.Products; }
        }

       public void SaveProduct(Product product)
        {
            if (product.ProductID == 0)
            {
                context.Products.Add(product);
            }
            else
            {
                Product dbEntry = context.Products.Find(product.ProductID);
                if (dbEntry != null)
                {
                    dbEntry.Name = product.Name;
                    dbEntry.Description = product.Description;
                    dbEntry.Price = product.Price;
                    dbEntry.Category = product.Category;
                }
            }
            context.SaveChanges();
        }
    }
}
当管理员点击保存按钮时,会产生一个Edit的Post请求,我们需要重载一个Edit方法,去处理这个请求,在你的AdminController中添加如下方法:
        [HttpPost]
        public ActionResult Edit(Product product)
        {
            if (ModelState.IsValid)
            {
                repository.SaveProduct(product);
                TempData["message"] = string.Format("{0} has been saved", product.Name);
                return RedirectToAction("Index");
            }
            else
            {
                // there is something wrong with the data values
                return View(product);
            }
        }
添加如下测试方法到AdminTest类:
[TestMethod]
        public void Can_Save_Valid_Changes() {
            // Arrange - create mock repository
            Mock<IProductsRepository> mock = new Mock<IProductsRepository>();
            // Arrange - create the controller
            AdminController target = new AdminController(mock.Object);
            // Arrange - create a product
            Product product = new Product {Name = "Test"};
            // Act - try to save the product
            ActionResult result = target.Edit(product);
            // Assert - check that the repository was called
            mock.Verify(m => m.SaveProduct(product));
            // Assert - check the method result type
            Assert.IsNotInstanceOfType(result, typeof(ViewResult));
        }

        [TestMethod]
        public void Cannot_Save_Invalid_Changes() {
            // Arrange - create mock repository
            Mock<IProductsRepository> mock = new Mock<IProductsRepository>();
            // Arrange - create the controller
            AdminController target = new AdminController(mock.Object);
            // Arrange - create a product
            Product product = new Product { Name = "Test" };
            // Arrange - add an error to the model state
            target.ModelState.AddModelError("error", "error");
            // Act - try to save the product
            ActionResult result = target.Edit(product);
            // Assert - check that the repository was not called
            mock.Verify(m => m.SaveProduct(It.IsAny<Product>()), Times.Never());
            // Assert - check the method result type
            Assert.IsInstanceOfType(result, typeof(ViewResult));
        }
显示确认信息
现在我们要在_AdminLayout.cshtml文件中添加一条标签,我们使用TempData模板处理一个消息,这样,我们就能够在任何使用了这个模板的页面处理消息,而不用到处去写Razor:
<!DOCTYPE html>
<html>
<head>
    <meta name="viewport" content="width=device-width" />
    <link href="~/Content/Admin.css" rel="stylesheet" type="text/css" />
    <title></title>
</head>
<body>
<div>
    @if (TempData["message"] != null) {
    <div class="Message">@TempData["message"]</div>
    }
    @RenderBody()
</div>
</body>
</html>
今天的内容实在是不少,暂时先写到这里吧,活不是一天干完的,我相信,你花一天时间画的画,你用一年的时间都卖不出去,而你花一年的时间画的画,你却能在一天之内卖出去!明天我们继续为我们的管理后台添加数据验证的功能和删除的功能,这些虽然没有太高的技术含量,但却是我们经常需要用到的东西,在本系列教程的最后部分,我们将进入到本教程最精彩的部分---网站安全。我将详尽的讲解如何使用MVC授权和过滤等MVC的重量级技术,请继续关注我们的项目,关注我的续篇!
