Redis是一款开源的、高性能的键-值存储(key-value store)。它常被称作是一款数据结构服务器(data structure server)。
Redis的键值可以包括字符串(strings)类型,同时它还包括哈希(hashes)、列表(lists)、集合(sets)和 有序集合(sorted sets)等数据类型。 对于这些数据类型,你可以执行原子操作。例如:对字符串进行附加操作(append);递增哈希中的值;向列表中增加元素;计算集合的交集、并集与差集等。
为了获得优异的性能,Redis采用了内存中(in-memory)数据集(dataset)的方式。同时,Redis支持数据的持久化,你可以每隔一段时间将数据集转存到磁盘上(snapshot),或者在日志尾部追加每一条操作命令(append only file,aof)。
Redis同样支持主从复制(master-slave replication),并且具有非常快速的非阻塞首次同步( non-blocking first synchronization)、网络断开自动重连等功能。同时Redis还具有其它一些特性,其中包括简单的事物支持、发布订阅 ( pub/sub)、管道(pipeline)和虚拟内存(vm)等 。
Redis具有丰富的客户端,支持现阶段流行的大多数编程语言.
Redis 这里只介绍Linux安装:
一.redis安装
1、首先上官网下载Redis 压缩包,地址:http://redis.io/download 下载稳定版
2、通过远程管理工具,将压缩包拷贝到Linux服务器中,执行解压操作
这里介绍一下由于是本地通过xshell连接的是阿里云服务器,现在介绍如何通过xshell
把文件从本地或者(windows)系统上传到linux系统。
首先 执行下面命令:
yum install lrzsz 安装完毕就可用:
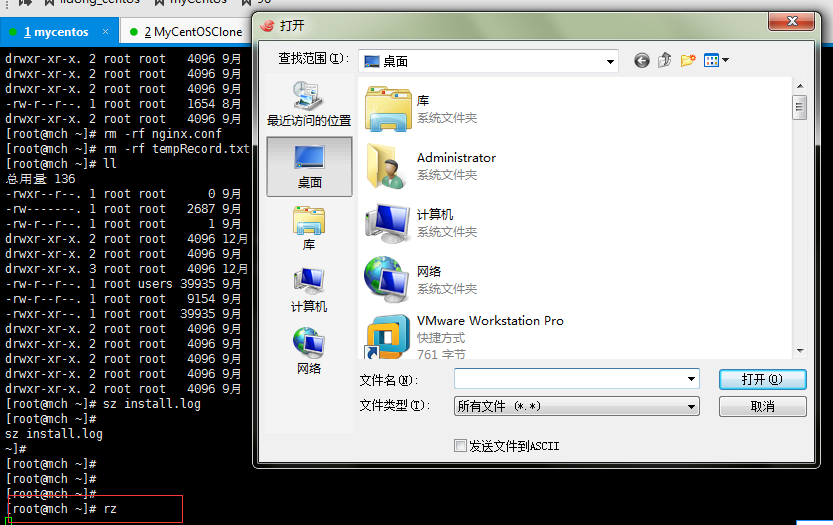
运行命令rz,即是接收文件(上传到Linux上),xshell就会弹出文件选择对话框,选好文件之后关闭对话框,文件就会上传到linux里的当前目录。也可以直接把要上传的文件拖到xshell上完成上传.如下图:

下面进行Linux安装:
第一步:
解压上传的redis压缩包。执行如下命令:
tar -zxvf redis-压缩包
到达压缩包所在的目录:
cd redis安装包(解压后的包)
第二步:
执行(一定要在redis安装包所在目录) make 命令进行基本的编译
编译完成之后,可以看到解压文件中会有对应的src、conf等文件夹
第三步:
编译成功后,进入src文件夹,执行make install进行redis安装
当然也可以指定具体的安装路径进行安装。
执行如下命令:
make install (PREFIX=/usr/local/redis )指定安装路径.
第四步:
cd usr/local/redis/bin 路径下
执行ll命令 看到响应的可执行的命令:
redis-benchmark
redis-check-aof
redis-check-rdb
redis-cli
redis-sentinel-> redis-server
redis-server
于此同时将cp redis.conf /usr/local/redis 将配置文件redis.conf 安装到redis下:
第五步:
前端启动redis服务
./redis-server 执行该命令启动 ,不能进行后台交互,编辑redis.conf 文件,
将daemonize no 改成daemonize yes ,启用守护进程。
编辑之后 执行如下命令:
./bin/redis-cli ./redis.conf
用 ps -ef|grep redis 查看redis进程。
关闭redis执行如下命令。
./bin/redis-cli shutdown
执行客户端命令:
./bin/redis-cli
进入 127.0.0.1:6379> (这可以进行redis操作了)
ctrl+c退出命令。
本地用java连接服务器。
commons-pool2-2.3.jar
jedis-2.8.0.jar 下载如下架包.
public class JedisDemo {
@Test
public void test() {
//1.设置IP地址和端口
Jedis jedis=new Jedis("132.24.280.226", 6379);
//2.存值
jedis.set("name", "caixiang");
//3.取值
String name=jedis.get("name");
System.out.println("name:"+name);
//释放资源
jedis.close();
}
}
我是连接阿里云上的redis数据库,这时出现 connect timeout的错误。
有的说关闭防火墙,或则暴露redis 服务端口默认6379.
vim /etc/sysconfig/iptables
增加规则
-A INPUT -m state --state NEW -m tcp -p tcp --dport 6379 -j ACCEPT
保存退出后
systemctl restart iptables.service #重启防火墙使配置生效.这是 针对centos7以下的版本。
----centos 7 没有 itables防火墙
systemctl stop firewalld 停止firewalld防火墙
systemctl disable firewalld 禁用防火墙
centos 7 防火墙的设置博客:
https://www.cnblogs.com/moxiaoan/p/5683743.html。
但是我关闭防火墙或者暴露了6379端口,依然没有。
------最后通过如下方式我顺利连接上了,我们一步一步到来:
我本地是连接阿里云服务器上redis端口,首先开放阿里云上6379端口,不然会出现 connect timeout
开房端口之后还是会被拒绝 connect refused 因为redis.conf 默认配置 bind 127.0.0.1 只能在本地连接。重启服务 ./bin/redis-server .redis-conf
重新连接之后,会出现以下错误:
:DENIED Redis is running
in protected mode because protected mode is enabled, no bind address was specified,
no authentication password is requested to clients.当然提示你
Alternatively you can just disable the protected mode by editing the Redis configuration file, a
nd setting the protected mode option to 'no', and then restarting the server. 3)
If you started the server manually just for testing, restart it with the '--protected-mode no' option. 4
) Setup a bind address or an authentication password. NOTE: You only need to do one of the above things in order for the server to start accepting connections from the outside.
翻译一下就是提示你关闭保护模式 protected mode option to 'no', 重启服务:and then restarting the server
2、修改redis服务器的参数配置
修改redis的守护进程为no ,不启用
127.0.0.1:6379> config set daemonize "no"
修改redis的保护模式为no,不启用
127.0.0.1:6379> config set protected-mode "no"
OK
通过命令将服务的保护模式改为protected-node 'no'
ok
但是我的服务器连接依然报错。
另外一种方式是加上安全认证,即redis默认是没有密码的可以直接登录,这里加上密码,配置见下图 vim redis.conf 设置了密码:requirepass "11111"
重新启动服务就连接上了。
Jedis jedis=new Jedis("223.74.180.226", 6379);
jedis.auth("11111"); 连接的时候加上这句话 就OK了