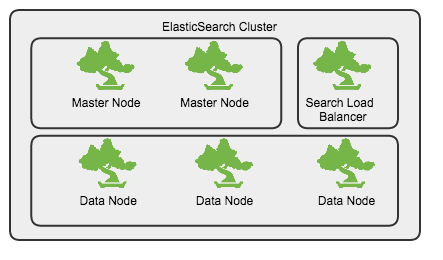
集群规划
- 独立的master节点,不存储数据, 数量不少于2
- 数据节点(Data Node)
- 查询节点(Query Node),起到负载均衡的作用
Linux系统参数配置
文件句柄
Linux中,每个进程默认打开的最大文件句柄数是1000,对于服务器进程来说,显然太小,通过修改/etc/security/limits.conf来增大打开最大句柄数
* - nofile 65535虚拟内存设置
max_map_count定义了进程能拥有的最多内存区域
sysctl -w vm.max_map_count=262144修改/etc/elasticsearch/elasticsearch.yml
bootstrap.mlockall: true修改/etc/security/limits.conf, 在limits.conf中添加如下内容
* soft memlock unlimited
* hard memlock unlimited
memlock 最大锁定内存地址空间, 要使limits.conf文件配置生效,必须要确保pam_limits.so文件被加入到启动文件中。
确保/etc/pam.d/login文件中有如下内容
session required /lib/security/pam_limits.so验证是否生效
curl localhost:9200/_nodes/stats/process?pretty磁盘缓存相关参数
vm.dirty_background_ratio 这个参数指定了当文件系统缓存脏页数量达到系统内存百分之多少时(如5%)就会触发pdflush/flush/kdmflush等后台回写进程运行,将一定缓存的脏页异步地刷入外存;
vm.dirty_ratio
-
该参数则指定了当文件系统缓存脏页数量达到系统内存百分之多少时(如10%),系统不得不开始处理缓存脏页(因为此时脏页数量已经比较多,为了避免数据丢失需要将一定脏页刷入外存);在此过程中很多应用进程可能会因为系统转而处理文件IO而阻塞。
-
把该参数适当调小,原理通(1)类似。如果cached的脏数据所占比例(这里是占MemTotal的比例)超过这个设置,系统会停止所有的应用层的IO写操作,等待刷完数据后恢复IO。所以万一触发了系统的这个操作,对于用户来说影响非常大的。
sysctl -w vm.dirty_ratio=10
sysctl -w vm.dirty_background_ratio=5
swap调优
swap空间是一块磁盘空间,操作系统使用这块空间保存从内存中换出的操作系统不常用page数据,这样可以分配出更多的内存做page cache。这样通常会提升系统的吞吐量和IO性能,但同样会产生很多问题。页面频繁换入换出会产生IO读写、操作系统中断,这些都很影响系统的性能。这个值越大操作系统就会更加积极的使用swap空间。
调节swappniess方法如下
sudo sh -c 'echo "0">/proc/sys/vm/swappiness'io sched
如果集群中使用的是SSD磁盘,那么可以将默认的io sched由cfq设置为noop
sudo sh -c 'echo "noop">/sys/block/sda/queue/scheduler'JVM参数设置
在/etc/sysconfig/elasticsearch中设置最大堆内存,该值不应超过32G
ES_HEAP_SIZE=32g
ES_JAVA_OPTS="-Xms32g"
MAX_LOCKED_MEMORY=unlimited
MAX_OPEN_FILES=65535
indice参数调优
以创建demo_logs模板为例,说明可以调优的参数及其数值设定原因。
PUT _template/demo_logs
{
      "order": 6,
      "template": "demo-*",
      "settings": {
         "index.merge.policy.segments_per_tier": "25",
         "index.mapping._source.compress": "true",
         "index.mapping._all.enabled": "false",
         "index.warmer.enabled": "false",
         "index.merge.policy.min_merge_size": "10mb",
         "index.refresh_interval": "60s",
         "index.number_of_shards": "7",
         "index.translog.durability": "async",
         "index.store.type": "mmapfs",
         "index.merge.policy.floor_segment": "100mb",
         "index.merge.scheduler.max_thread_count": "1",
         "index.translog.translog.flush_threshold_size": "1g",
         "index.merge.policy.merge_factor": "15",
         "index.translog.translog.flush_threshold_period": "100m",
         "index.translog.sync_interval": "5s",
         "index.number_of_replicas": "1",
         "index.indices.store.throttle.max_bytes_per_sec": "50mb",
         "index.routing.allocation.total_shards_per_node": "2",
         "index.translog.flush_threshold_ops": "1000000"
      },
      "mappings": {
         "_default_": {
            "dynamic_templates": [               {                  "string_template": {                     "mapping": {                        "index": "not_analyzed",                        "ignore_above": "10915",                        "type": "string"                     },                     "match_mapping_type": "string"                  }               },               {                  "level_fields": {                     "mapping": {                        "index": "no",                        "type": "string"                     },                     "match": "Level*Exception*"                  }               }            ]
         }
        }
      "aliases": {}
   }
replica数目
为了让创建的es index在每台datanode上均匀分布,同一个datanode上同一个index的shard数目不应超过3个。
计算公式: (number_of_shard * (1+number_of_replicas)) < 3*number_of_datanodes
每台机器上分配的shard数目
"index.routing.allocation.total_shards_per_node": "2",refresh时间间隔
默认的刷新时间间隔是1s,对于写入量很大的场景,这样的配置会导致写入吞吐量很低,适当提高刷新间隔,可以提升写入量,代价就是让新写入的数据在60s之后可以被搜索,新数据可见的及时性有所下降。
"index.refresh_interval": "60s"translog
降低数据flush到磁盘的频率。如果对数据丢失有一定的容忍,可以打开async模式。
"index.translog.flush_threshold_ops": "1000000",
"index.translog.durability": "async",
merge相关参数
"index.merge.policy.floor_segment": "100mb",
"index.merge.scheduler.max_thread_count": "1",
"index.merge.policy.min_merge_size": "10mb"
mapping设置
对于不参与搜索的字段(fields), 将其index方法设置为no, 如果对分词没有需求,对参与搜索的字段,其index方法设置为not_analyzed
多使用dynamic_template
集群参数调优
{
   "persistent": {
      "cluster": {
         "routing": {
            "allocation": {
               "enable": "new_primaries",
               "cluster_concurrent_rebalance": "8",
               "allow_rebalance": "indices_primaries_active",
               "node_concurrent_recoveries": "8"
            }
         }
      },
      "indices": {
         "breaker": {
            "fielddata": {
               "limit": "30%"
            },
            "request": {
               "limit": "30%"
            }
         },
         "recovery": {
            "concurrent_streams": "10",
            "max_bytes_per_sec": "200mb"
         }
      }
   },
   "transient": {
      "indices": {
         "store": {
            "throttle": {
               "type": "merge",
               "max_bytes_per_sec": "50mb"
            }
         },
         "recovery": {
            "concurrent_streams": "8"
         }
      },
      "threadpool": {
         "bulk": {
            "type": "fixed"
            "queue_size": "1000",
            "size": "30"
         },
         "index": {
            "type": "fixed",
            "queue_size": "1200",
            "size": "30"
         }
      },
      "cluster": {
         "routing": {
            "allocation": {
               "enable": "all",
               "cluster_concurrent_rebalance": "8",
               "node_concurrent_recoveries": "15"
            }
         }
      }
   }
}避免shard的频繁rebalance,将allocation的类型设置为new_primaries, 将默认并行rebalance由2设置为更大的一些的值
避免每次更新mapping, 针对2.x以下的版本
"indices.cluster.send_refresh_mapping": false调整threadpool, size不要超过core数目,否则线程之间的context switching会消耗掉大量的cpu时间,导致load过高。 如果没有把握,那就不要去调整。
定期清理cache
为避免fields data占用大量的jvm内存,可以通过定期清理的方式来释放缓存的数据。释放的内容包括field data, filter cache, query cache
curl -XPOST "localhost:9200/_cache/clear"ES平衡分片
 "cluster.routing.allocation.balance.shard":"0.45f",//定义分配在该节点的分片数的因子 阈值=因子*(当前节点的分片数-集群的总分片数/节点数,即每个节点的平均分片数)

 "cluster.routing.allocation.balance.index":"0.55f",//定义分配在该节点某个索引的分片数的因子,阈值=因子*(保存当前节点的某个索引的分片数-索引的总分片数/节点数,即每个节点某个索引的平均分片数)

"cluster.routing.allocation.balance.threshold":"1.0f",//超出这个阈值就会重新分配分片

"cluster.routing.allocation.total_shards_per_node":-1,//单个节点的最大分片数

//Disk-based Shard Allocation
"cluster.routing.allocation.disk.threshold_enabled":true,//是否开启基于硬盘的分发策略
"cluster.routing.allocation.disk.watermark.low":"85%",//不会分配分片到硬盘使用率高于这个值的节点
"cluster.routing.allocation.disk.watermark.high":"90%",//如果硬盘使用率高于这个值,则会重新分片该节点的分片到别的节点
"cluster.info.update.interval":"30s",//当前硬盘使用率的查询频率
"cluster.routing.allocation.disk.include_relocations":true,//计算硬盘使用率时,是否加上正在重新分配给其他节点的分片的大小
归并线程配置
segment 归并的过程,需要先读取 segment,归并计算,再写一遍 segment,最后还要保证刷到磁盘。可以说,这是一个非常消耗磁盘 IO 和 CPU 的任务。所以,ES 提供了对归并线程的限速机制,确保这个任务不会过分影响到其他任务。
在 5.0 之前,归并线程的限速配置 indices.store.throttle.max_bytes_per_sec 是 20MB。对于写入量较大,磁盘转速较高,甚至使用 SSD 盘的服务器来说,这个限速是明显过低的。对于 Elastic Stack 应用,社区广泛的建议是可以适当调大到 100MB或者更高。
# curl -XPUT http://127.0.0.1:9200/_cluster/settings -d'
{
    "persistent" : {
        "indices.store.throttle.max_bytes_per_sec" : "100mb"
    }
}'
5.0 开始,ES 对此作了大幅度改进,使用了 Lucene 的 CMS(ConcurrentMergeScheduler) 的 auto throttle 机制,正常情况下已经不再需要手动配置 indices.store.throttle.max_bytes_per_sec 了。官方文档中都已经删除了相关介绍,不过从源码中还是可以看到,这个值目前的默认设置是 10240 MB。
归并线程的数目,ES 也是有所控制的。默认数目的计算公式是: Math.min(3, Runtime.getRuntime().availableProcessors() / 2)。即服务器 CPU 核数的一半大于 3 时,启动 3 个归并线程;否则启动跟 CPU 核数的一半相等的线程数。相信一般做 Elastic Stack 的服务器 CPU 合数都会在 6 个以上。所以一般来说就是 3 个归并线程。如果你确定自己磁盘性能跟不上,可以降低index.merge.scheduler.max_thread_count 配置,免得 IO 情况更加恶化。
归并策略
归并线程是按照一定的运行策略来挑选 segment 进行归并的。主要有以下几条:
- index.merge.policy.floor_segment 默认 2MB,小于这个大小的 segment,优先被归并。
- index.merge.policy.max_merge_at_once 默认一次最多归并 10 个 segment
- index.merge.policy.max_merge_at_once_explicit 默认 forcemerge 时一次最多归并 30 个 segment。
- index.merge.policy.max_merged_segment 默认 5 GB,大于这个大小的 segment,不用参与归并。forcemerge 除外。
根据这段策略,其实我们也可以从另一个角度考虑如何减少 segment 归并的消耗以及提高响应的办法:加大 flush 间隔,尽量让每次新生成的 segment 本身大小就比较大。
forcemerge 接口
既然默认的最大 segment 大小是 5GB。那么一个比较庞大的数据索引,就必然会有为数不少的 segment 永远存在,这对文件句柄,内存等资源都是极大的浪费。但是由于归并任务太消耗资源,所以一般不太选择加大 index.merge.policy.max_merged_segment 配置,而是在负载较低的时间段,通过 forcemerge 接口,强制归并 segment。
# curl -XPOST http://127.0.0.1:9200/logstash-2015-06.10/_forcemerge?max_num_segments=1
由于 forcemerge 线程对资源的消耗比普通的归并线程大得多,所以,绝对不建议对还在写入数据的热索引执行这个操作。这个问题对于 Elastic Stack 来说非常好办,一般索引都是按天分割的。更合适的任务定义方式
其它
- marvel: 安装marvel插件,多观察系统资源占用情况,包括内存,cpu
- 日志: 对es的运行日志要经常查看,检查index配置是否合理,以及入库数据是否存在异常
调优之后的运行效果
写入量稳定在30K/s
【重新分配分片】
Elasticsearch通过reroute api重新分配分片
elasticsearch可以通过reroute api来手动进行索引分片的分配。
不过要想完全手动,必须先把cluster.routing.allocation.disable_allocation参数设置为true,禁止es进行自动索引分片分配,否则你从一节点把分片移到另外一个节点,那么另外一个节点的一个分片又会移到那个节点。数据量很少的时候,可能影响不大,但是如果数据量很大,这个参数必须要设置,因为如果不设置,即便你不手动迁移分片,在我们重启机群的时候,也会产生分片的迁移,导致大量资源被占用,重启变慢.
一共有三种操作,分别为:移动(move),取消(cancel)和分配(allocate)。下面分别介绍这三种情况:
移动(move)
把分片从一节点移动到另一个节点。可以指定索引名和分片号。
取消(cancel)
取消分配一个分片。可以指定索引名和分片号。node参数可以指定在那个节点取消正在分配的分片。allow_primary参数支持取消分配主分片。
分配(allocate)
分配一个未分配的分片到指定节点。可以指定索引名和分片号。node参数指定分配到那个节点。allow_primary参数可以强制分配主分片,不过这样可能导致数据丢失。我一般用来清空某个未分配分片的数据的时候才设置这个参数
集群索引中可能由多个分片构成,并且每个分片可以拥有多个副本,将一个单独的索引分为多个分片,可以处理不能在单一服务器上运行的
大型索引.
由于每个分片有多个副本,通过副本分配到多个服务器,可以提高查询的负载能力.
为了进行分片和副本操作,需要确定将这些分片和副本放到集群节点的哪个位置,需要确定把每个分片和副本分配到哪台服务器/节点上.
1.索引创建&指定节点参数:
$curl -XPOST 'http://localhost:9200/filebeate-ali-hk-fd-tss1'
$curl -XPUT 'http://localhost:9200/filebeat-ali-hk-fd-tss1/_settings' -d '{
"index.routing.allocation.include.zone":"ali-hk-ops-elk1"
}'
将索引指定存放在elk1的节点上
$curl -XPUT 'http://localhost:9200/filebeat-ali-hk-fd-tss1/settings' -d '{
"index.routing.allocation.include._ip":"ip_addr1,ip_addr2"
}'
根据ip地址指定索引的分配节点
2.排除索引分配的节点:
$curl -XPOST 'http://localhost:9200/filebeat-ali-hk-fd-tss2'
$curl -XPUT 'http://localhost:9200/filebeat-ali-hk-fd-tss2/_setting' -d '{
"index.routing.allocation.exclude.zone":"ali-hk-ops-elk2"
}'
$curl -XPUT 'http://localhost:9200/filebeat-ali-hk-fd-tss2/_setting' -d '{
"index.routing.allocation.exclude._ip":"ip_addr1,ip_addr2"
}'
根据ip地址排除索引分配的节点
3.每个节点上分片和副本数量的控制:
对一个索引指定每个节点上的最大分片数量:
$curl -XPUT 'http://localhost:9200/filebeat-ali-hk-fd-tss1/_settings' -d '{
"index.routing.allocation.total_shards_per_node":1
}'
如果配置不当,导致主分片无法分配的话,集群就会处于red状态.
4.手动移动分片和副本:
移动分片:
$curl -XPOST 'http://localhost:9200/_cluster/reroute' -d '{
"commands":[{
"move":{
"index":"filebeat-ali-hk-fd-tss1",
"shard":1,
"from_node":"ali-hk-ops-elk1",
"to_node":"ali-hk-ops-elk2"
}
}]
}'
取消分片:
$curl -XPOST 'http://localhost:9200/_cluster/reroute' -d '{
"commands":[{
"cancel":{
"index":"filebeat-ali-hk-fd-tss1",
"shard":1,
"node":"ali-hk-ops-elk1"
}
}]
}'
分配分片(用来分配未分配状态的分片,会导致数据丢失):
$curl -XPOST 'http://localhost:9200/_cluster/reroute' -d '{
"commands":[{
"allocate":{
"index":"filebeat-ali-hk-fd-tss1",
"shard":1,
"node":"ali-hk-ops-elk1",
allow_primary" : true (允许该分片做主分片)
}
}]
}'
将某个未分配的索引手动分配到某个节点上.
$curl -XPOST 'http://localhost:9200/_cluster/reroute' -d '{
"commands":[
{
"move":{
"index":"filebeat-ali-hk-fd-tss1",
"shard":1,
"from_node":"ali-hk-ops-elk1",
"to_node":"ali-hk-ops-elk2"
}
},
{
"cancel":{
"index":"filebeat-ali-hk-fd-tss1",
"shard":1,
"node":"ali-hk-ops-elk1"
}
},
{
"allocate":{
"index":"filebeat-ali-hk-fd-tss1",
"shard":1,
"node":"ali-hk-ops-elk1"
}
}]
}'
5.关于unassigned shards的问题解决:
1)出现大量的unassigned shards
2)集群的状态为:red
集群状态:red-->存在不可用的主分片
A:fix unassigned shards:
查看所有分片的状态:
$curl -XGET 'http://localhost:9200/_cat/shards'
查询所有unassigned的分片:
$curl -XGET 'http://localhost:9200/_cat/shards' | grep UNASSIGNED
B:查询得到master节点的唯一标识:
$curl -XGET 'http://localhost:9200/_nodes/process?pretty=true'
C:执行route对unassigned的索引进行手动分片:
for index in $(curl -XGET 'http://localhost:9200/_cat/shards' | grep UNASSIGNED |awk '{print 1}'|sort |uniq):do for shards in1}'|sort |uniq):do for shards in(curl -XGET 'http://localhost:9200/_cat/shards' | grep UNASSIGNED | grep index | awk '{printindex | awk '{print2}'|sort|uniq):do
curl XPOST 'http://localhost:9200/_cluster/reroute'-d '{
"commands":[
{
"allocate":{
"index":index,"shards":index,"shards":shards,
"node":"ali-k-ops-elk1",
"allow_primary":"true"
}
}
]
}'
=============================================================
集群升级操作
#1、 关闭自动分片
PUT _cluster/settings
{
"persistent": {
"cluster": {
"routing": {
"rebalance": {
"enable": "none"
},
"allocation": {
"enable": "none"
}
}
}
}
}
#2、 备份老配置cp elasticsearch.yml elasticsearch.yml_20181017 然后在每个节点增加如下配置到elasticsearch.yml,去除历史相同配置
#3、 更新后的节点依次重启操作:确保前一个节点启动正常,并且状态正常后再重启下一个节点
通过es_head插件关闭索引,停止ES集群
# 重启整个集群:顺序是先启master组(所有的master重启完成后要停止集群的shard自动均衡),再启hot组节点,最后启stale组节点
relo、init、unassign这3项都变成0
#4、 集群正常后,开启自动分片
PUT _cluster/settings
{
"persistent": {
"cluster": {
"routing": {
"rebalance": {
"enable": "all"
},
"allocation": {
"enable": "all"
}
}
}
}
}
# memory_lock
bootstrap.memory_lock: true
# cache
indices.cache.cleanup_interval: 5m
indices.memory.index_buffer_size: 20%
indices.queries.cache.count: 100000
indices.queries.cache.size: 10%
indices.requests.cache.size: 10%
indices.requests.cache.expire: 5m
indices.store.throttle.type: none
# search
search.highlight.term_vector_multi_value: false
# thread_pool
thread_pool.bulk.size: 20
thread_pool.search.size: 25
thread_pool.bulk.queue_size: 1024
thread_pool.force_merge.size: 4
# fielddata
indices.fielddata.cache.size: 40%
磁盘性能测试:
1、先熟悉两个特殊的设备:
(1)/dev/null:回收站、无底洞。
(2)/dev/zero:产生字符。
2、测试磁盘写能力
time dd if=/dev/zero of=/cy/testw.dbf bs=4k count=10000
real 0m36.669s
写速度为:4*10000/1024/36.669=M/s。
rm -f /cy/testw.dbf
3、测试磁盘读能力
time dd if=/dev/sdb of=/dev/null bs=4k
4、测试同时读写能力
time dd if=/dev/sdb of=/cy/testrw.dbf bs=4k
rm -f /cy/testrw.dbf
系统参数调优:
sysctl -w vm.dirty_ratio=20
sysctl -w vm.dirty_background_ratio=10