一 安装
1.windows:
1.先安装wheel 让pip支持本地安装 .whl 文件
2. https://www.lfd.uci.edu/~gohlke/pythonlibs/#twisted 选择符合电脑上已安装python版本的电脑字长一致的twisted版本下载 命令 pip install Twisted-18.9.0-cp36-cp36m-win_amd64.whl
3.pip3 install pywin32 scrapy需要借助操作系统的部分功能,pywin32来沟通
4.pip3 install scrapy 安装好在windows中的依赖模块后,再安装
2.Linux:
pip3 install scrapy
二 基本使用


1. 创建project
	scrapy startproject 项目名称

	项目名称
	   项目名称/
			- spiders				# 爬虫文件
				- chouti.py
				- cnblgos.py
				....
			- items.py 				# 持久化
			- pipelines				# 持久化
			- middlewares.py		# 中间件
			- settings.py 			# 配置文件(爬虫)
	   scrapy.cfg					# 配置文件(部署)

2. 创建爬虫
	cd 项目名称

	scrapy genspider chouti chouti.com
	scrapy genspider cnblgos cnblgos.com

3. 启动爬虫
	scrapy crawl chouti
	scrapy crawl chouti --nolog  # 不打印日志
1 import sys,os,io
2 sys.stdout=io.TextIOWrapper(sys.stdout.buffer,encoding='gb18030')
三 scrapy的爬虫流程图
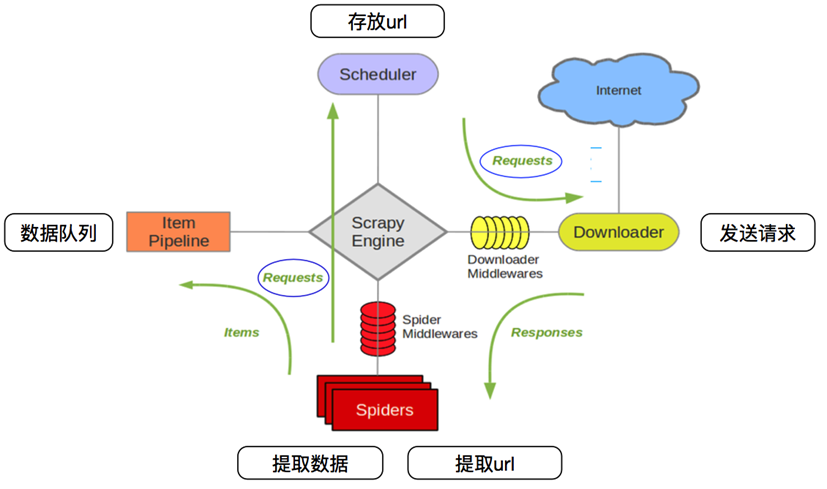
1 - 创建项目 scrapy startproject 项目名
2 - 创建爬虫 scrapy genspider spider_name allow_domain
3 - 完善爬虫
4   - start_url,response --> parse
5   - 数据yield 通过传递给管道
6   - 能够yield 的数据类型,dict,request,Item,None
7 - 管道
8   - 开启管道
9     - 开启管道,键:位置,值:距离引擎的远近,越小越近
 1 class ChoutiSpider(scrapy.Spider):
 2     name = 'chouti'
 3     allowed_domains = ['chouti.com']
 4     start_urls = ['http://chouti.com/']
 5
 6     def parse(self, response):
 7         # print(response,type(response)) # 对象
 8         # print(response.text)
 9         """
10         from bs4 import BeautifulSoup
11         soup = BeautifulSoup(response.text,'html.parser')
12         content_list = soup.find('div',attrs={'id':'content-list'})
13         """
14         # 去子孙中找div并且id=content-list
15         f = open('news.log', mode='a+')
16         item_list = response.xpath('//div[@id="content-list"]/div[@class="item"]')
17         for item in item_list:
18             text = item.xpath('.//a/text()').extract_first()
19             href = item.xpath('.//a/@href').extract_first()
20             print(href,text.strip())
21             f.write(href+'
')
22         f.close()
23
24         page_list = response.xpath('//div[@id="dig_lcpage"]//a/@href').extract()
25         for page in page_list:
26             from scrapy.http import Request
27             page = "https://dig.chouti.com" + page
28             # 如果下一页的解析步骤一样则可以重用,也可以再定义一个parse,通过meta参数值传递到下一个parse方法中
29             yield Request(url=page,callback=self.parse) # https://dig.chouti.com/all/hot/recent/2
四 scrapy使用详情
items,pipelines,meta参数的使用案例
 1 import scrapy
 2 from yangguang.items import YangguangItem
 3
 4 class YgSpider(scrapy.Spider):
 5     name = 'yg'
 6     allowed_domains = ['sun07691.com']
 7     # start_urls可以不满足allowed_domains
 8     start_urls = ['http://wz.sun0769.com/index.php/question/questionType?type=4&page=0']
 9
10     def parse(self, response):
11         #分组
12         tr_list = response.xpath("//div[@class='greyframe']/table[2]/tr/td/table/tr")
13         for tr in tr_list:
14             item = YangguangItem()
15             item["title"] = tr.xpath("./td[2]/a[@class='news14']/@title").extract_first()
16             item["href"] = tr.xpath("./td[2]/a[@class='news14']/@href").extract_first()
17             item["publish_date"]=tr.xpath("./td[last()]/text()").extract_first()
18
19             yield  scrapy.Request(
20                 item["href"],
21                 callback=self.parse_detail,
22                 meta = {"item":item}
23             )
24         #翻页
25         next_url = response.xpath("//a[text()='>']/@href").extract_first()
26         if next_url is not None:
27             yield scrapy.Request(
28                 next_url,
29                 callback=self.parse
30             )
31
32     def parse_detail(self,response): #处理详情页
33         item = response.meta["item"]
34         item["content"] = response.xpath("//div[@class='c1 text14_2']//text()").extract()
35         item["content_img"] = response.xpath("//div[@class='c1 text14_2']//img/@src").extract()
36         item["content_img"] = ["http://wz.sun0769.com"+i for i in item["content_img"]]
37         yield item
1 import scrapy
2
3 class YangguangItem(scrapy.Item):
4     # define the fields for your item here like:
5     title = scrapy.Field()
6     href = scrapy.Field()
7     publish_date = scrapy.Field()
8     content_img = scrapy.Field()
9     content = scrapy.Field()
 1 BOT_NAME = 'yangguang'
 2
 3 SPIDER_MODULES = ['yangguang.spiders']
 4 NEWSPIDER_MODULE = 'yangguang.spiders'
 5
 6 MONGO_HOST = "localhost"
 7
 8 USER_AGENT = 'Mozilla/5.0 (Macintosh; Intel Mac OS X 10_13_2) AppleWebKit/537.36 (KHTML, like Gecko) Chrome/63.0.3239.132 Safari/537.36'
 9
10 ROBOTSTXT_OBEY = False
11
12 ITEM_PIPELINES = {
13    'yangguang.pipelines.YangguangPipeline': 300,
14 }
 1 import re
 2 from pymongo import MongoClient
 3
 4 class YangguangPipeline(object):
 5     def open_spider(self,spider): # This method is called when the spider is opened. 只会执行一次,适合做数据库连接
 6         # spider.hello = "world"  # 可以在parse方法中  print(self.hello,"*"*100)
 7         client = MongoClient()
 8         self.collection = client["test"]["test"]
 9
10     def process_item(self, item, spider):
11         spider.settings.get("MONGO_HOST")
12         item["content"] = self.process_content(item["content"])
13         print(item)  # item是Scr1Item的对象,继承scrapy.Item,继承DictItem
14
15         self.collection.insert(dict(item)) # insert参数需要为原生的dict类型
16         return item
17
18     def process_content(self,content):
19         content = [re.sub(r"xa0|s","",i) for i in content]
20         content = [i for i in content if len(i)>0] #去除列表中的空字符串
21         return content
Scrapy深入之认识程序的debug信息

scrapy深入之scrapy shell
Scrapy shell是一个交互终端,我们可以在未启动spider的情况下尝试及调试代码,也可以用来测试XPath表达式
1 命令行:scrapy shell http://www.itcast.cn/channel/teacher.shtml
2
3 常用对象:
4 response.url:当前响应的url地址
5 response.request.url:当前响应对应的请求的url地址
6 response.headers:响应头
7 response.body:响应体,也就是html代码,默认是byte类型
8 response.requests.headers:当前响应的请求头
参考: