用我现在最常使用的php框架fastadmin举例子,当然thinkphp或者原生php也是同样的原理,大家理解思路就好了、
环境:fastadmin,summernote编辑器
【summernote的居中功能在段落里,且不会吃掉section标签,加上导入word功能之后,简直完美~】
按照国际惯例先放效果图
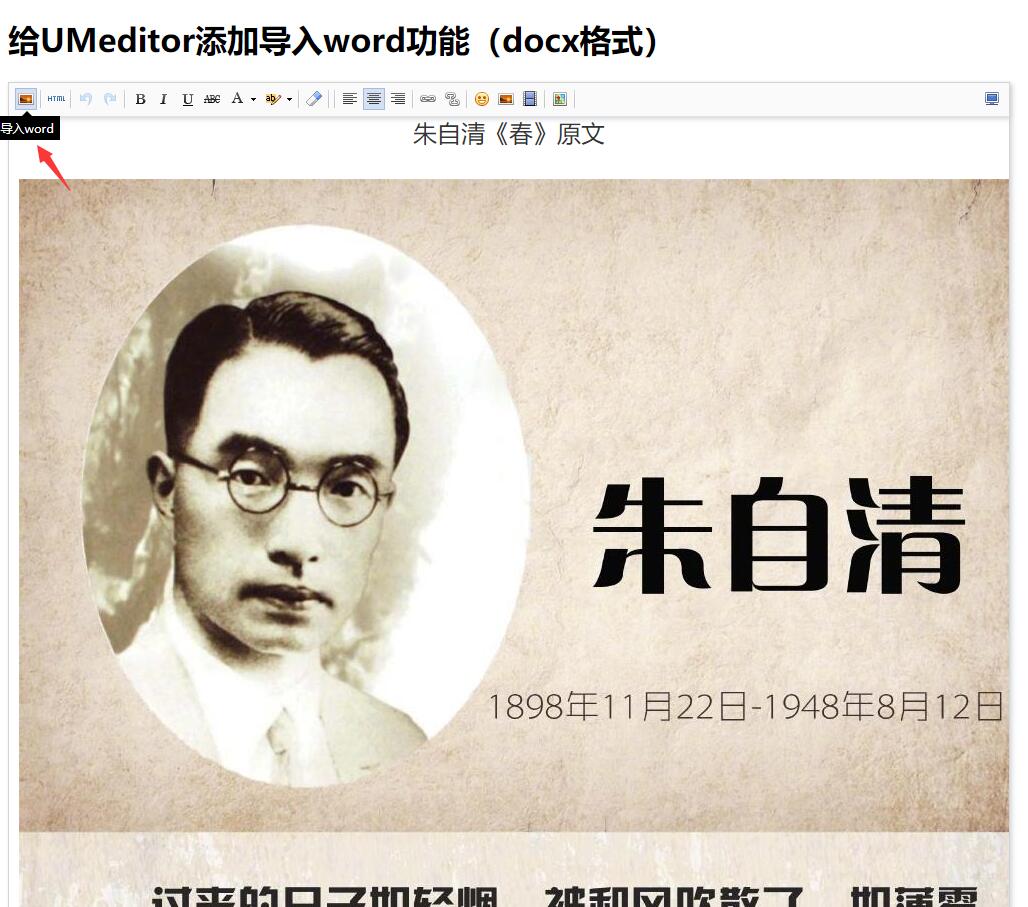
github上的demo里我还没有换图标,不过fastadmin里的是换了的,效果如下:
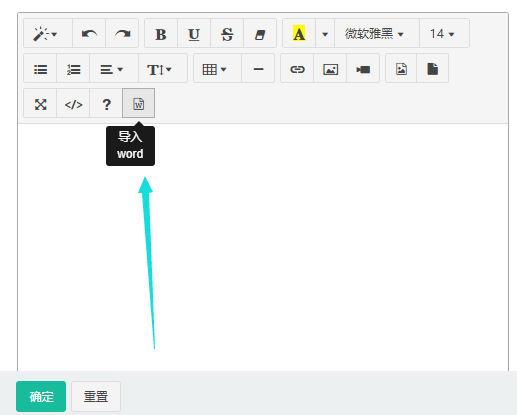
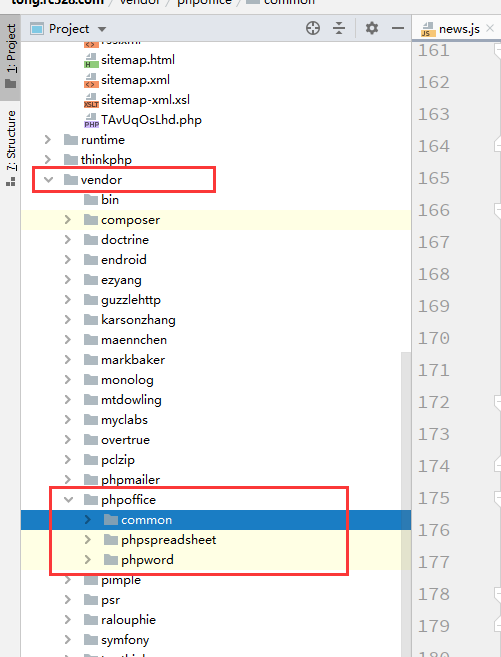
1、thinkphp使用composer安装phpword插件(这个插件能够把word转为html)
composer require phpoffice/phpword
安装完成之后的文件在vender目录下
2、打开require统一管理后台插件的js

引入我们需要的ajaxfileupload.js插件(这个插件允许文件通过ajax上传到服务器,而不是form表单)
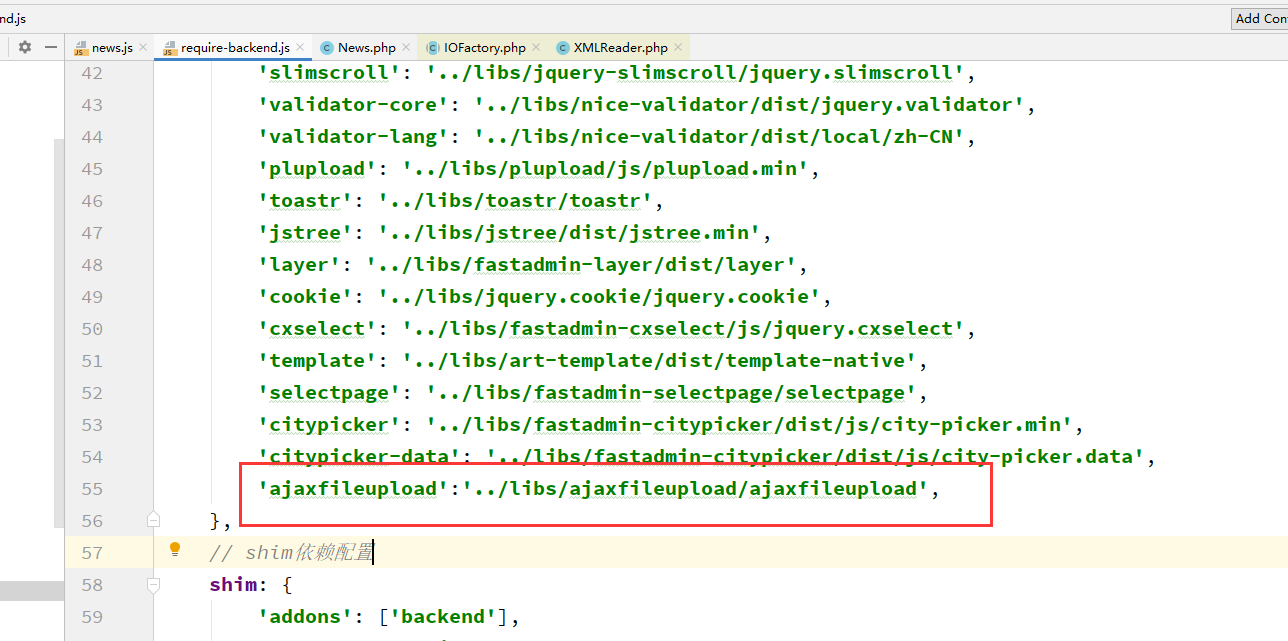
'ajaxfileupload':'../libs/ajaxfileupload/ajaxfileupload',
3、以新增新闻的编辑器为例,打开

在开头载入需要的组件
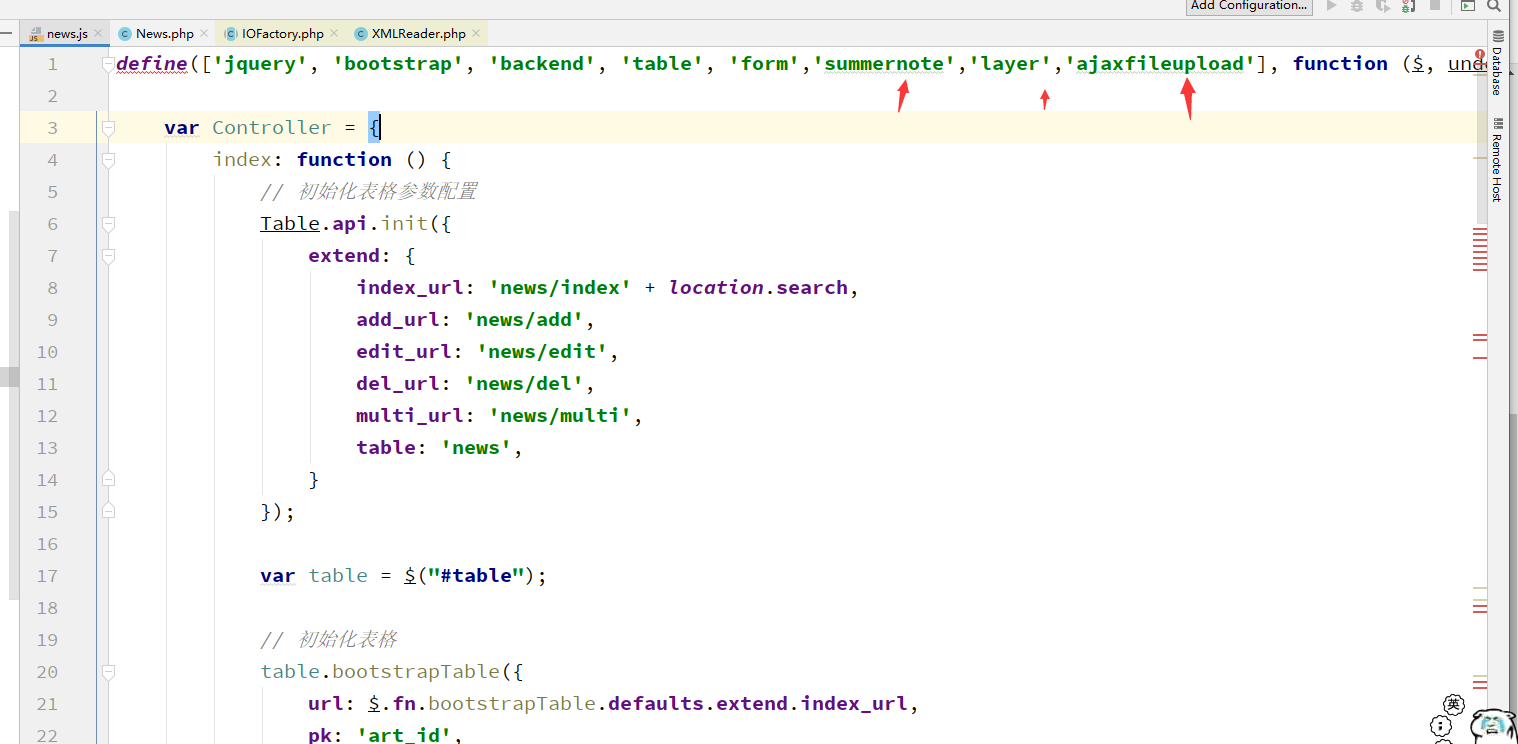
define(['jquery', 'bootstrap', 'backend', 'table', 'form','summernote','layer','ajaxfileupload'], function ($, undefined, Backend, Table, Form,summernote,layer,ajaxfileupload) {
然后修改add方法
add: function () {
    Controller.api.bindevent();


    var imageButton = function (context) {
        var ui = $.summernote.ui;
        var button = ui.button({
            contents: '<i class="fa fa-file-image-o"/>',
            tooltip: __('Choose'),
            click: function () {
                parent.Fast.api.open("general/attachmentlect?element_id=&multiple=true&mimetype=image/*", __('Choose'), {
                    callback: function (data) {
                        var urlArr = data.url.split(/\,/);
                        $.each(urlArr, function () {
                            var url = Fast.api.cdnurl(this);
                            context.invoke('editor.insertImage', url);
                        });
                    }
                });
                return false;
            }
        });
        return button.render();
    };
    var attachmentButton = function (context) {
        var ui = $.summernote.ui;
        var button = ui.button({
            contents: '<i class="fa fa-file"/>',
            tooltip: __('Choose'),
            click: function () {
                parent.Fast.api.open("general/attachmentlect?element_id=&multiple=true&mimetype=*", __('Choose'), {
                    callback: function (data) {
                        var urlArr = data.url.split(/\,/);
                        $.each(urlArr, function () {
                            var url = Fast.api.cdnurl(this);
                            var node = $("<a href='" + url + "'>" + url + "</a>");
                            context.invoke('insertNode', node[0]);
                        });
                    }
                });
                return false;
            }
        });
        return button.render();
    };

    // 新增编辑器导入word功能
    var wordBtn = function (context) {
        var ui = $.summernote.ui;
        var button = ui.button({
            contents: '<i class="fa fa-file-word-o"/>',
            tooltip: '导入word',
            click: function () {
                // 点击之后的操作
                layer.open({
                    type: 1,
                    skin: 'layui-layer-rim', //加上边框
                    area: ['420px', '160px'], //宽高
                    content: '<input type="file" id="file" name="file" title="上传word" value="" ><br/><input type="button" value="上传" id="submit" />'
                });
            }
        });
        return button.render();   // return button as jquery object
    };
    $(".summernote,.editor", $('form')).summernote({
        height: 250,
        lang: 'zh-CN',
        fontNames: [
            'Arial', 'Arial Black', 'Serif', 'Sans', 'Courier',
            'Courier New', 'Comic Sans MS', 'Helvetica', 'Impact', 'Lucida Grande',
            "Open Sans", "Hiragino Sans GB", "Microsoft YaHei",
            '微软雅黑', '宋体', '黑体', '仿宋', '楷体', '幼圆',
        ],
        fontNamesIgnoreCheck: [
            "Open Sans", "Microsoft YaHei",
            '微软雅黑', '宋体', '黑体', '仿宋', '楷体', '幼圆'
        ],
        toolbar: [
            ['style', ['style', 'undo', 'redo']],
            ['font', ['bold', 'underline', 'strikethrough', 'clear']],
            ['fontname', ['color', 'fontname', 'fontsize']],
            ['para', ['ul', 'ol', 'paragraph', 'height']],
            ['table', ['table', 'hr']],
            ['insert', ['link', 'picture', 'video']],
            ['select', ['image', 'attachment']],
            ['view', ['fullscreen', 'codeview', 'help','word']],
        ],
        buttons: {
            image: imageButton,
            attachment: attachmentButton,
            word:wordBtn
        },
        dialogsInBody: true,
        followingToolbar: false,
        callbacks: {
            onChange: function (contents) {
                $(this).val(contents);
                $(this).trigger('change');
            },
            onInit: function () {
            },
            onImageUpload: function (files) {
                var that = this;
                //依次上传图片
                for (var i = 0; i < files.length; i++) {
                    Upload.api.send(files[i], function (data) {
                        var url = Fast.api.cdnurl(data.url);
                        $(that).summernote("insertImage", url, 'filename');
                    });
                }
            }
        }
    });


    // 点击上传按钮,发送ajax,上传word文档,并获取到返回的html地址
    // 动态生成的元素需要使用在document上加点击事件
    $(document).on('click','#submit',function(){
        var path = $('#file').val();
        if ($.trim(path) == "") {
            alert("请选择要上传的文件");
            return;
        }


        $.ajaxFileUpload({
            url: 'form',  //这里是服务器处理的代码
            type: 'post',
            secureuri: false, //一般设置为false
            fileElementId: 'file', // 上传文件的id、name属性名
            dataType: 'json', //返回值类型,一般设置为json、application/json
            success: function (data, status) {
                console.log('success')
            },
            error:function(data, status, e){
                console.log('error')
                var responseText = data.responseText;
                // console.log(responseText);
                // 把html赋值给富文本,,并关闭layui
                $('.layui-layer-close').click();
                $(".summernote,.editor", $('form')).summernote('code',responseText);
            }
        });
    });
},
4、修改控制器

use PhpOfficePhpWordPhpWord;

...

public function form(){

    // 接收表单上传的文件,并存储到服务器中
    $file = $_FILES['file']['tmp_name'];//上传的文件
    move_uploaded_file($file,"/words/res.docx");


    // 使用phpword将word转为html
    $phpWord = IOFactory::load('/words/res.docx');
    $xmlWriter = IOFactory::createWriter($phpWord, "HTML");
    $resPath = '/words/res.html';
    $xmlWriter->save($resPath);


    $html = file_get_contents($resPath);
    return $html;
}
5、记得public目录下创建一个words文件夹,用来存储word和html文件
----------------------------------------------------------------------------------------
实践过程中发现base64格式的代码太长、太占空间,于是决定将base64格式的图片转为普通格式的图片,存入服务器
1、修改phpofficephpwordsrcPhpWordElementImage.php
在这个类文件的最后新增一个方法,用于将base64格式的图片转为普通格式图片存入服务器
public function base64_image_content($base64_image_content,$path){
        //匹配出图片的格式
        if (preg_match('/^(data:s*image/(w+);base64,)/', $base64_image_content, $result)){
            $type = $result[2];
            $new_file = $path."/".date('Ymd',time())."/";
            if(!file_exists($new_file)){
                //检查是否有该文件夹,如果没有就创建,并给予最高权限
                mkdir($new_file, 0700);
            }
            $new_file = $new_file.time().rand(100000000000, 900000000000).".{$type}"; // 如果同时上传多张图片,则时间戳相同会存在覆盖,因为加上随机上确保图片名称不重复
       if (file_put_contents($new_file, base64_decode(str_replace($result[1], '', $base64_image_content)))){
                return '/'.$new_file;
            }else{
                return false;
            }
        }else{
            return false;
        }
    }
2、提前创建好存放图片的文件夹
D:/phpstudy_pro/WWW/word/public/word_images
3、修改phpofficephpwordsrcPhpWordWriterHTMLElementImage.php
原先是将图片以base64格式返回的,改为html里访问服务器图片的格式并返回
public function write()
    {
        if (!$this->element instanceof ImageElement) {
            return '';
        }
        $content = '';
        $imageData = $this->element->getImageStringData(true);
        if ($imageData !== null) {
            $styleWriter = new ImageStyleWriter($this->element->getStyle());
            $style = $styleWriter->write();
            $imageData = 'data:' . $this->element->getImageType() . ';base64,' . $imageData;


            // 1、获取到项目根目录
            // ---- D:/phpstudy_pro/WWW/word/vendor/phpoffice/phpword/src/PhpWord/Writer/HTML/Element/
            $path = str_replace('\','/',realpath(dirname(__FILE__).'/'))."/";
            // --- D:/phpstudy_pro/WWW/word
            $path = explode('/vendor/phpoffice/phpword/src/PhpWord/Writer/HTML/Element/',$path)[0];


            // 2、调用在类中新增的方法,将图片存入 D:/phpstudy_pro/WWW/word/public/word_images
            $imageData = $this->element->base64_image_content($imageData, $path.'/public/word_images');


            // 3、替换为html里要显示的格式,替换时根据项目的默认路径灵活修改
            $imgPath = str_replace($path."/","",$imageData); // 原生php版本
            // $imgPath = str_replace($path."/public/","",$imageData); // thinkphp版本
            $content .= $this->writeOpening();


            // 4、返回
            $content .= "<img border="0" style="{$style}" src="{$imgPath}"/>";
            $content .= $this->writeClosing();

        }
        return $content;
    }
4、原生php的demo(框架的demo实在太大了,就不放出来了,大家同理自己改写下就好)
下载项目部署到服务器上,访问form.html即可查看效果~