这里使用elasticsearch做全文检索,不是ELK日志采集。
elasticsearch作为全文检索,必须服务端和客服端的版本一致,所以在安装elasticsearch时,要注意版本问题。
前言
- 这里我的系统是阿里云的 CentOS 7.2 64位,2核8G
- $开始的命令表示你要输入的命令
一、JAVA环境配置
ElasticSearch是基于lucence开发的,也就是运行需要java支持。所以要先安装JAVA环境。 由于ElasticSearch 5.x 依赖于JDK 1.8的,所以现在我们下载JDK 1.8或者更高版本。以下命令将会下载最新的jdk
$ yum install java
安装完毕后测试
$ java -version
二、Elasticsearch引擎安装
1、创建帐号和分配权限
官方文档上说Elasticsearch不适合在root管理员帐号下运行,所以要先建立一个账号专门运行Elasticsearch.
创建es组和账户,创建组命令groupadd 用户组,创建用户useradd -g 用户组 用户名
$ groupadd es
$ useradd -g es es
设置密码
$ passwd es

FX_zscs_0303
按照提示输入密码和确认密码就成功创建elsearch账户了。
2、修改系统参数
使用命令vim /etc/security/limits.conf在最后添加数据如下:(soft nproc和hard nproc也可以设置成65536)
root soft nofile 65535
root hard nofile 65535

#es
es soft nofile 65536
es hard nofile 65536

* soft nofile 65535
* hard nofile 65535
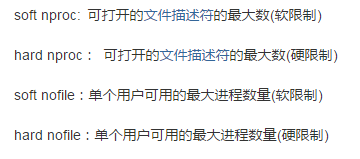
使用命令vim /etc/sysctl.conf在最后添加一行数据如下:vm.max_map_count=262144
修改完后,执行如下命令
sysctl -p
3、创建elasticsearch工作目录
$ cd /data/
$ mkdir elasticsearch
4、下载elasticsearch
打开官网 https://www.elastic.co/cn/downloads
选择下载elasticsearch,根据需要选择对应的安装包,这里选择5.5.3版本,下载完后得到 elasticsearch-5.5.3.tar.gz
5、安装
将下载好的elasticsearch-5.5.3.tar.gz上传到/data/elasticsearch目录下
解压elasticsearch-5.5.3.tar.gz 到当前目录
$ tar -zxvf elasticsearch-5.5.3.tar.gz -C /data/elasticsearch
查看
$ ls
elasticsearch-5.5.3  elasticsearch-5.5.3.tar.gz
删除压缩文件,使用命令
$ rm -f elasticsearch-5.5.3.tar.gz
授权/data/elasticsearch文件给es用户,命令说明chown [选项]... [所有者][:[组]] 文件...
chown -R es:es /data/elasticsearch
6、配置
进入/data/elasticsearch/elasticsearch-5.5.3目录,使用命令
cd /data/elasticsearch/elasticsearch-5.5.3
目录结构
├── elasticsearch-5.5.3
│   ├── bin
│   │   ├── elasticsearch
│   │   ├── elasticsearch.bat
│   │   ├── elasticsearch.in.bat
│   │   ├── elasticsearch.in.sh
│   │   ├── elasticsearch-keystore
│   │   ├── elasticsearch-keystore.bat
│   │   ├── elasticsearch-plugin
│   │   ├── elasticsearch-plugin.bat
│   │   ├── elasticsearch-service.bat
│   │   ├── elasticsearch-service-mgr.exe
│   │   ├── elasticsearch-service-x64.exe
│   │   ├── elasticsearch-service-x86.exe
│   │   ├── elasticsearch-systemd-pre-exec
│   │   ├── elasticsearch-translog
│   │   └── elasticsearch-translog.bat
│   ├── config
│   │   ├── elasticsearch.yml
│   │   ├── jvm.options
│   │   └── log4j2.properties
│   ├── lib
│   ├── LICENSE.txt
│   ├── modules
│   ├── NOTICE.txt
│   ├── plugins
│   └── README.textile
进入其中的config目录(使用命令cd config),编辑elasticsearch.yml文件
cd ./config
vim elasticsearch.yml
添加配置,注意,配置文件“:”后要有空格
#这是集群名字,我们 起名为 elasticsearch
#es启动后会将具有相同集群名字的节点放到一个集群下。
cluster.name:  es-zscs

#节点名字。
node.name: "es-node1"

# 数据存储位置(单个目录设置)
path.data: /data/elasticsearch/elasticsearch-5.5.3/data

# 日志文件的路径
path.logs: /data/elasticsearch/elasticsearch-5.5.3/logs


#设置绑定的ip地址,可以是ipv4或ipv6的,默认为0.0.0.0
#network.bind_host: 192.168.250.104

#设置其它节点和该节点交互的ip地址,如果不设置它会自动设置,值必须是个真实的ip地址
#network.publish_host: 192.168.250.104

#同时设置bind_host和publish_host上面两个参数。
#network.host: 192.168.250.104


# 设置节点间交互的tcp端口,默认是9300
transport.tcp.port: 9300

# 设置是否压缩tcp传输时的数据,默认为false,不压缩
transport.tcp.compress: true

# 设置对外服务的http端口,默认为9200
http.port: 9200

# 使用http协议对外提供服务,默认为true,开启
#http.enabled: false

#discovery.zen.ping.unicast.hosts:["节点1的 ip","节点2 的ip","节点3的ip"]
#这是一个集群中的主节点的初始列表,当节点(主节点或者数据节点)启动时使用这个列表进行探测
#discovery.zen.ping.unicast.hosts: ["192.168.137.100",  "192.168.137.101","192.168.137.100:9301"]

#指定集群中的节点中有几个有master资格的节点。
#对于大集群可以写(2-4)。
discovery.zen.minimum_master_nodes: 1
配置说明
| 属性名 | 值 | 作用 |
|---|---|---|
| cluster.name | elk | 设置当前节点所属的集群的名称,为elasticsearch提供发现节点的作用 |
| node.name | elk-es-01 | 设置当前节点的名称 |
| path.data | /data/elk/elasticsearch/data | 设置当前节点的数据目录 |
| npath.logs | /data/elk/elasticsearch/logs | 设置当前节点的日志文件 |
| network.host | 0.0.0.0 | 设置允许访问的服务器ip,0.0.0.0代表所有的服务器 |
| http.port | 9200 | 对外提供的服务端口 |
| discovery.zen.ping.unicast.hosts | IP列表 | 用来发现新增的集群节点 |
7、引擎启动
切换到es用户
su es
启动elasticsearch,(-d表示为后台启动)
/data/elasticsearch/elasticsearch-5.5.3/bin/elasticsearch -d
查看elasticsearch进程情况
$ ps -ef |grep elasticsearch
root     30076 25943  0 20:28 pts/0    00:00:00 grep --color=auto elasticsearch
或者使用
$ /data/elasticsearch/elasticsearch-5.5.3/bin/elasticsearch
打印结果,出现[es-node1] started表示启动成功
[2017-09-27T09:39:11,080][INFO ][o.e.n.Node               ] [es-node1] initializing ...
[2017-09-27T09:39:11,172][INFO ][o.e.e.NodeEnvironment    ] [es-node1] using [1] data paths, mounts [[/data (/dev/vdb1)]], net usable_space [90.2gb], net total_space [98.3gb], spins? [possibly], types [ext3]
[2017-09-27T09:39:11,173][INFO ][o.e.e.NodeEnvironment    ] [es-node1] heap size [1.9gb], compressed ordinary object pointers [true]
[2017-09-27T09:39:11,174][INFO ][o.e.n.Node               ] [es-node1] node name [es-node1], node ID [u5y2ra-qQL-q3IpdvfT4wA]
[2017-09-27T09:39:11,174][INFO ][o.e.n.Node               ] [es-node1] version[5.5.3], pid[9830], build[9305a5e/2017-09-07T15:56:59.599Z], OS[Linux/3.10.0-514.6.2.el7.x86_64/amd64], JVM[Oracle Corporation/Java HotSpot(TM) 64-Bit Server VM/1.8.0_112/25.112-b15]
[2017-09-27T09:39:11,174][INFO ][o.e.n.Node               ] [es-node1] JVM arguments [-Xms2g, -Xmx2g, -XX:+UseConcMarkSweepGC, -XX:CMSInitiatingOccupancyFraction=75, -XX:+UseCMSInitiatingOccupancyOnly, -XX:+AlwaysPreTouch, -Xss1m, -Djava.awt.headless=true, -Dfile.encoding=UTF-8, -Djna.nosys=true, -Djdk.io.permissionsUseCanonicalPath=true, -Dio.netty.noUnsafe=true, -Dio.netty.noKeySetOptimization=true, -Dio.netty.recycler.maxCapacityPerThread=0, -Dlog4j.shutdownHookEnabled=false, -Dlog4j2.disable.jmx=true, -Dlog4j.skipJansi=true, -XX:+HeapDumpOnOutOfMemoryError, -Des.path.home=/data/elasticsearch/elasticsearch-5.5.3]
[2017-09-27T09:39:12,109][INFO ][o.e.p.PluginsService     ] [es-node1] loaded module [aggs-matrix-stats]
[2017-09-27T09:39:12,109][INFO ][o.e.p.PluginsService     ] [es-node1] loaded module [ingest-common]
[2017-09-27T09:39:12,109][INFO ][o.e.p.PluginsService     ] [es-node1] loaded module [lang-expression]
[2017-09-27T09:39:12,109][INFO ][o.e.p.PluginsService     ] [es-node1] loaded module [lang-groovy]
[2017-09-27T09:39:12,109][INFO ][o.e.p.PluginsService     ] [es-node1] loaded module [lang-mustache]
[2017-09-27T09:39:12,109][INFO ][o.e.p.PluginsService     ] [es-node1] loaded module [lang-painless]
[2017-09-27T09:39:12,109][INFO ][o.e.p.PluginsService     ] [es-node1] loaded module [parent-join]
[2017-09-27T09:39:12,109][INFO ][o.e.p.PluginsService     ] [es-node1] loaded module [percolator]
[2017-09-27T09:39:12,109][INFO ][o.e.p.PluginsService     ] [es-node1] loaded module [reindex]
[2017-09-27T09:39:12,110][INFO ][o.e.p.PluginsService     ] [es-node1] loaded module [transport-netty3]
[2017-09-27T09:39:12,110][INFO ][o.e.p.PluginsService     ] [es-node1] loaded module [transport-netty4]
[2017-09-27T09:39:12,110][INFO ][o.e.p.PluginsService     ] [es-node1] loaded plugin [analysis-ik]
[2017-09-27T09:39:13,899][INFO ][o.e.d.DiscoveryModule    ] [es-node1] using discovery type [zen]
[2017-09-27T09:39:14,389][INFO ][o.e.n.Node               ] [es-node1] initialized
[2017-09-27T09:39:14,389][INFO ][o.e.n.Node               ] [es-node1] starting ...
[2017-09-27T09:39:14,520][INFO ][o.e.t.TransportService   ] [es-node1] publish_address {127.0.0.1:9300}, bound_addresses {127.0.0.1:9300}
[2017-09-27T09:39:17,579][INFO ][o.e.c.s.ClusterService   ] [es-node1] new_master {es-node1}{u5y2ra-qQL-q3IpdvfT4wA}{PALJMXYuQmeQ2ZDaGzAhfw}{127.0.0.1}{127.0.0.1:9300}, reason: zen-disco-elected-as-master ([0] nodes joined)
[2017-09-27T09:39:17,605][INFO ][o.e.h.n.Netty4HttpServerTransport] [es-node1] publish_address {127.0.0.1:9200}, bound_addresses {127.0.0.1:9200}
[2017-09-27T09:39:17,605][INFO ][o.e.n.Node               ] [es-node1] started
[2017-09-27T09:39:17,614][INFO ][o.e.g.GatewayService     ] [es-node1] recovered [0] indices into cluster_state
测试服务是否启动,如果启动成功则有如下提示
curl http://localhost:9200/?pretty
打出如下,说明没问题
{
  "name" : "es-node1",
  "cluster_name" : "es-zscs",
  "cluster_uuid" : "DaViHV9TRaKL-AVobcjfAw",
  "version" : {
    "number" : "5.5.3",
    "build_hash" : "9305a5e",
    "build_date" : "2017-09-07T15:56:59.599Z",
    "build_snapshot" : false,
    "lucene_version" : "6.6.0"
  },
  "tagline" : "You Know, for Search"
}
8、错误问题
ERROR: [2] bootstrap checks failed
[1]: max file descriptors [65535] for elasticsearch process is too low, increase to at least [65536]
[2]: max virtual memory areas vm.max_map_count [65530] is too low, increase to at least [262144]
解决办法
以管理员的账号登录linux,修改系统参数
使用命令vim /etc/security/limits.conf在最后添加数据如下:(soft nproc和hard nproc也可以设置成65536)
root soft nofile 65535
root hard nofile 65535

#es
es soft nofile 65536
es hard nofile 65536

* soft nofile 65535
* hard nofile 65535
使用命令vim /etc/sysctl.conf在最后添加一行数据如下:vm.max_map_count=262144
修改完后,执行如下命令
sysctl -p
参考
http://blog.csdn.net/u012371450/article/details/51776505
三、Elasticsearch中安装中文分词器(IK+pinyin)
在安装分词器的时候要注意版本问题,分词器的版本要和elasticsearch版本一致
1、安装IK
IK,elasticsearch-analysis-ik提供了两种方式,ik_smart就是最少切分,ik_max_word则为细粒度的切分(可能是双向,没看过源码)
1.1 下载地址
ik分词器下载地址
https://github.com/medcl/elasticsearch-analysis-ik
也可以下载对应的releases版本进行安装
https://github.com/medcl/elasticsearch-analysis-ik/releases
1.2获取ik分词器插件包
ik分词器插件可以直接下载对应版本的源码进行maven打包,也可以直接下载打包好的文件进行安装,下面介绍两种方式
1.2.1 maven打包安装
下载对应版本的ik源码,这里下载elasticsearch-analysis-ik-5.5.3.zip,下载地址https://github.com/medcl/elasticsearch-analysis-ik/releases
如果没有对应的版本,只需要修改pom.xml就可以了
<properties>
        <!-- 这里的版本号,修改成你对应的版本就行了。
        不过最好不要跨度太大,相近的版本可能没有问题,但是跨度太大的版本,这样做就不保证好使了-->
        <elasticsearch.version>5.5.3</elasticsearch.version>
        <maven.compiler.target>1.7</maven.compiler.target>
        <elasticsearch.assembly.descriptor>${project.basedir}/src/main/assemblies/plugin.xml</elasticsearch.assembly.descriptor>
        <elasticsearch.plugin.name>analysis-ik</elasticsearch.plugin.name>
        <elasticsearch.plugin.classname>org.elasticsearch.plugin.analysis.ik.AnalysisIkPlugin</elasticsearch.plugin.classname>
        <elasticsearch.plugin.jvm>true</elasticsearch.plugin.jvm>
        <tests.rest.load_packaged>false</tests.rest.load_packaged>
        <skip.unit.tests>true</skip.unit.tests>
        <gpg.keyname>4E899B30</gpg.keyname>
        <gpg.useagent>true</gpg.useagent>
    </properties>
下载后,执行mvn package,进行打包
├─config
├─src
└─target
    ├─archive-tmp
    ├─classes
    ├─generated-sources
    ├─maven-archiver
    ├─maven-status
    ├─releases
    │  └─elasticsearch-analysis-ik-5.5.3.zip
    └─surefire
编译完成后,可以在target/releases目录下找到对应的zip包。
解压elasticsearch-analysis-ik-5.5.3.zip包,复制到/data/elasticsearch/elasticsearch-5.5.3/plugins/analysis-ik下即可
1.2.2 直接下载ik分词器插件包
下载地址https://github.com/medcl/elasticsearch-analysis-ik/releases
解压elasticsearch-analysis-ik-5.5.3.zip包,复制到/data/elasticsearch/elasticsearch-5.5.3/plugins/analysis-ik下即可
1.3 安装ik分词器插件
将下载好的elasticsearch-analysis-ik-5.5.3.zip上传到/data/elasticsearch目录下
解压到/data/elasticsearch/elasticsearch-5.5.3/plugins/analysis-ik
unzip -d ./ik ./elasticsearch-analysis-ik-5.5.3.zip
mv ./ik/elasticsearch/ /data/elasticsearch/elasticsearch-5.5.3/plugins/analysis-ik
rm -rf ik
这样ik分词器就安装好了,重启elasticsearch就可以使用分词器了
1.4 测试
ik 带有两个分词器
- ik_max_word :会将文本做最细粒度的拆分;尽可能多的拆分出词语
- ik_smart:会做最粗粒度的拆分;已被分出的词语将不会再次被其它词语占有
4.1测试ik_max_word分词器
这里使用curl进行测试
curl -XGET 'http://localhost:9200/_analyze?pretty&analyzer=ik_max_word' -d '联想是全球最大的笔记本厂商'
返回结果
{
  "tokens" : [
    {
      "token" : "联想",
      "start_offset" : 0,
      "end_offset" : 2,
      "type" : "CN_WORD",
      "position" : 0
    },
    {
      "token" : "是",
      "start_offset" : 2,
      "end_offset" : 3,
      "type" : "CN_CHAR",
      "position" : 1
    },
    {
      "token" : "全球",
      "start_offset" : 3,
      "end_offset" : 5,
      "type" : "CN_WORD",
      "position" : 2
    },
    {
      "token" : "最大",
      "start_offset" : 5,
      "end_offset" : 7,
      "type" : "CN_WORD",
      "position" : 3
    },
    {
      "token" : "的",
      "start_offset" : 7,
      "end_offset" : 8,
      "type" : "CN_CHAR",
      "position" : 4
    },
    {
      "token" : "笔记本",
      "start_offset" : 8,
      "end_offset" : 11,
      "type" : "CN_WORD",
      "position" : 5
    },
    {
      "token" : "笔记",
      "start_offset" : 8,
      "end_offset" : 10,
      "type" : "CN_WORD",
      "position" : 6
    },
    {
      "token" : "本厂",
      "start_offset" : 10,
      "end_offset" : 12,
      "type" : "CN_WORD",
      "position" : 7
    },
    {
      "token" : "厂商",
      "start_offset" : 11,
      "end_offset" : 13,
      "type" : "CN_WORD",
      "position" : 8
    }
  ]
}
1.4.2 测试ik_smart分词器
这里使用curl进行测试
curl -XGET 'http://localhost:9200/_analyze?pretty&analyzer=ik_smart' -d '联想是全球最大的笔记本厂商'
返回结果
{
  "tokens" : [
    {
      "token" : "联想",
      "start_offset" : 0,
      "end_offset" : 2,
      "type" : "CN_WORD",
      "position" : 0
    },
    {
      "token" : "是",
      "start_offset" : 2,
      "end_offset" : 3,
      "type" : "CN_CHAR",
      "position" : 1
    },
    {
      "token" : "全球",
      "start_offset" : 3,
      "end_offset" : 5,
      "type" : "CN_WORD",
      "position" : 2
    },
    {
      "token" : "最大",
      "start_offset" : 5,
      "end_offset" : 7,
      "type" : "CN_WORD",
      "position" : 3
    },
    {
      "token" : "的",
      "start_offset" : 7,
      "end_offset" : 8,
      "type" : "CN_CHAR",
      "position" : 4
    },
    {
      "token" : "笔记本",
      "start_offset" : 8,
      "end_offset" : 11,
      "type" : "CN_WORD",
      "position" : 5
    },
    {
      "token" : "厂商",
      "start_offset" : 11,
      "end_offset" : 13,
      "type" : "CN_WORD",
      "position" : 6
    }
  ]
}
参考文档:
http://blog.csdn.net/jam00/article/details/52983056
http://www.cnblogs.com/xing901022/p/5910139.html
1.5 热词更新配置
网络词语日新月异,如何让新出的网络热词(或特定的词语)实时的更新到我们的搜索当中呢 先用 ik 测试一下
curl -XGET 'http://localhost:9200/_analyze?pretty&analyzer=ik_max_word' -d '成龙原名陈港生'
返回结果
{
  "tokens" : [
    {
      "token" : "成龙",
      "start_offset" : 0,
      "end_offset" : 2,
      "type" : "CN_WORD",
      "position" : 0
    },
    {
      "token" : "原名",
      "start_offset" : 2,
      "end_offset" : 4,
      "type" : "CN_WORD",
      "position" : 1
    },
    {
      "token" : "陈",
      "start_offset" : 4,
      "end_offset" : 5,
      "type" : "CN_CHAR",
      "position" : 2
    },
    {
      "token" : "港",
      "start_offset" : 5,
      "end_offset" : 6,
      "type" : "CN_CHAR",
      "position" : 3
    },
    {
      "token" : "生",
      "start_offset" : 6,
      "end_offset" : 7,
      "type" : "CN_CHAR",
      "position" : 4
    }
  ]
}
ik 的主词典中没有”陈港生” 这个词,所以被拆分了。
现在我们来配置一下,修改 IK 的配置文件 :ES 目录/plugins/ik/config/ik/IKAnalyzer.cfg.xml
修改如下:
<?xml version="1.0" encoding="UTF-8"?>
<!DOCTYPE properties SYSTEM "http://java.sun.com/dtd/properties.dtd">
<properties>
    <comment>IK Analyzer 扩展配置</comment>
    <!--用户可以在这里配置自己的扩展字典 -->
    <entry key="ext_dict">custom/mydict.dic;custom/single_word_low_freq.dic</entry>
     <!--用户可以在这里配置自己的扩展停止词字典-->
    <entry key="ext_stopwords">custom/ext_stopword.dic</entry>
    <!--用户可以在这里配置远程扩展字典 -->
    <entry key="remote_ext_dict">http://192.168.1.136/hotWords.php</entry>
    <!--用户可以在这里配置远程扩展停止词字典-->
    <!-- <entry key="remote_ext_stopwords">words_location</entry> -->
</properties>
这里我是用的是远程扩展字典,因为可以使用其他程序调用更新,且不用重启ES,很方便;当然使用自定义的 mydict.dic 字典也是很方便的,一行一个词,自己加就可以了。
既然是远程词典,那么就要是一个可访问的链接,可以是一个页面,也可以是一个txt的文档,但要保证输出的内容是 utf-8 的格式。
hotWords.php 的内容
$s = <<<'EOF'
陈港生
元楼
蓝瘦
EOF;
header('Last-Modified: '.gmdate('D, d M Y H:i:s', time()).' GMT', true, 200);
header('ETag: "5816f349-19"');
echo $s;
ik 接收两个返回的头部属性 Last-Modified 和 ETag,只要其中一个有变化,就会触发更新,ik 会每分钟获取一次,
重启 Elasticsearch ,查看启动记录,看到了三个词已被加载进来
[2016-10-31 15:08:57,749][INFO ][ik-analyzer              ] 陈港生
[2016-10-31 15:08:57,749][INFO ][ik-analyzer              ] 元楼
[2016-10-31 15:08:57,749][INFO ][ik-analyzer              ] 蓝瘦
现在我们来测试一下,再次执行上面的请求,返回
...
  }, {
    "token" : "陈港生",
    "start_offset" : 5,
    "end_offset" : 8,
    "type" : "CN_WORD",
    "position" : 2
  }, {
...
可以看到 ik 分词器已经匹配到了 “陈港生” 这个词
参考文档:
http://blog.csdn.net/jam00/article/details/52983056
2、pinyin 分词器
2.1 安装pinyin分词器
pinyin分词器可以让用户输入拼音,就能查找到相关的关键词。比如在某个商城搜索中,输入 yonghui,就能匹配到永辉。这样的体验还是非常好的。
pinyin分词器的安装与IK是一样的。 下载地址:
https://github.com/medcl/elasticsearch-analysis-pinyin
对应的releases版本
https://github.com/medcl/elasticsearch-analysis-pinyin/releases
安装方式和ik分词器一样,这里就不介绍了。
安装路径是/data/elasticsearch/elasticsearch-5.5.3/plugins/analysis-pinyin
重启elasticsearch生效
2.2 测试
测试地址
curl -XGET 'http://localhost:9200/_analyze?pretty&analyzer=pinyin' -d '刘德华'
返回结果
{
  "tokens" : [
    {
      "token" : "liu",
      "start_offset" : 0,
      "end_offset" : 1,
      "type" : "word",
      "position" : 0
    },
    {
      "token" : "ldh",
      "start_offset" : 0,
      "end_offset" : 3,
      "type" : "word",
      "position" : 0
    },
    {
      "token" : "de",
      "start_offset" : 1,
      "end_offset" : 2,
      "type" : "word",
      "position" : 1
    },
    {
      "token" : "hua",
      "start_offset" : 2,
      "end_offset" : 3,
      "type" : "word",
      "position" : 2
    }
  ]
}
3、其它分词器
参考文档:
http://www.54tianzhisheng.cn/2017/09/07/Elasticsearch-analyzers/
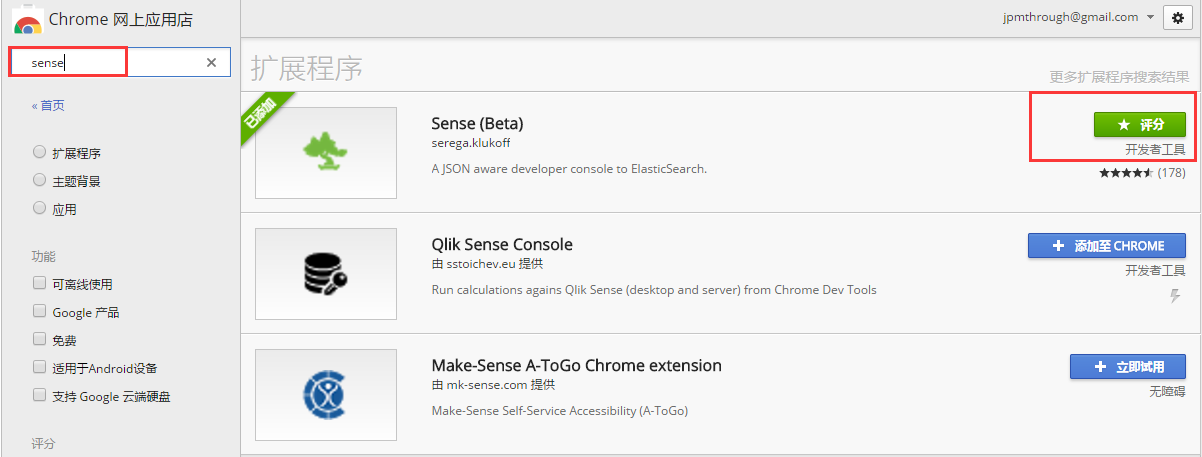
四、工具安装
1、Sense安装使用
对于不熟悉Linux的人来讲,使用curl是个硬伤,所以 Chrome有个插件Sense可以帮我们很方便的操作Elasticsearch。国内需要FQ
先来测试下分词