在Java中,关于锁我想大家都很熟悉。在并发编程中,我们通过锁,来避免由于竞争而造成的数据不一致问题。通常,我们以synchronized 、Lock来使用它。
但是Java中的锁,只能保证在同一个JVM进程内中执行。如果在分布式集群环境下呢?
一、分布式锁
分布式锁,是一种思想,它的实现方式有很多。比如,我们将沙滩当做分布式锁的组件,那么它看起来应该是这样的:
加锁:在沙滩上踩一脚,留下自己的脚印,就对应了加锁操作。其他进程或者线程,看到沙滩上已经有脚印,证明锁已被别人持有,则等待。
解锁:把脚印从沙滩上抹去,就是解锁的过程。
锁超时:为了避免死锁,我们可以设置一阵风,在单位时间后刮起,将脚印自动抹去。
分布式锁的实现有很多,比如基于数据库、memcached、Redis、系统文件、zookeeper等。它们的核心的理念跟上面的过程大致相同。
二、redis
我们先来看如何通过单节点Redis实现一个简单的分布式锁。
1、加锁
加锁实际上就是在redis中,给Key键设置一个值,为避免死锁,并给定一个过期时间。
SET lock_key random_value NX PX 5000
值得注意的是:
random_value 是客户端生成的唯一的字符串。
NX 代表只在键不存在时,才对键进行设置操作。
PX 5000 设置键的过期时间为5000毫秒。
这样,如果上面的命令执行成功,则证明客户端获取到了锁。
2.解锁
解锁的过程就是将Key键删除。但也不能乱删,不能说客户端1的请求将客户端2的锁给删除掉。这时候random_value的作用就体现出来。
为了保证解锁操作的原子性,我们用LUA脚本完成这一操作。先判断当前锁的字符串是否与传入的值相等,是的话就删除Key,解锁成功。
if redis.call('get',KEYS[1]) == ARGV[1] then
   return redis.call('del',KEYS[1])
else
   return 0
end
3、实现
首先,我们在pom文件中,引入Jedis。在这里,笔者用的是最新版本,注意由于版本的不同,API可能有所差异。<dependency>
<groupId>redis.clients</groupId>
<artifactId>jedis</artifactId>
<version>3.0.1</version>
</dependency>
加锁的过程很简单,就是通过SET指令来设置值,成功则返回;否则就循环等待,在timeout时间内仍未获取到锁,则获取失败。
@Service
public class RedisLock {

    Logger logger = LoggerFactory.getLogger(this.getClass());

    private String lock_key = "redis_lock"; //锁键

    protected long internalLockLeaseTime = 30000;//锁过期时间

    private long timeout = 999999; //获取锁的超时时间


    //SET命令的参数
    SetParams params = SetParams.setParams().nx().px(internalLockLeaseTime);

    @Autowired
    JedisPool jedisPool;


    /**
     * 加锁
     * @param id
     * @return
     */
    public boolean lock(String id){
        Jedis jedis = jedisPool.getResource();
        Long start = System.currentTimeMillis();
        try{
            for(;;){
                //SET命令返回OK ,则证明获取锁成功
                String lock = jedis.set(lock_key, id, params);
                if("OK".equals(lock)){
                    return true;
                }
                //否则循环等待,在timeout时间内仍未获取到锁,则获取失败
                long l = System.currentTimeMillis() - start;
                if (l>=timeout) {
                    return false;
                }
                try {
                    Thread.sleep(100);
                } catch (InterruptedException e) {
                    e.printStackTrace();
                }
            }
        }finally {
            jedis.close();
        }
    }
}
解锁我们通过jedis.eval来执行一段LUA就可以。将锁的Key键和生成的字符串当做参数传进来。
 /**
     * 解锁
     * @param id
     * @return
     */
    public boolean unlock(String id){
        Jedis jedis = jedisPool.getResource();
        String script =
                "if redis.call('get',KEYS[1]) == ARGV[1] then" +
                        "   return redis.call('del',KEYS[1]) " +
                        "else" +
                        "   return 0 " +
                        "end";
        try {
            Object result = jedis.eval(script, Collections.singletonList(lock_key),
                                    Collections.singletonList(id));
            if("1".equals(result.toString())){
                return true;
            }
            return false;
        }finally {
            jedis.close();
        }
    }
最后,我们可以在多线程环境下测试一下。我们开启1000个线程,对count进行累加。调用的时候,关键是唯一字符串的生成。这里,笔者使用的是Snowflake算法。
@Controller
public class IndexController {

    @Autowired
    RedisLock redisLock;

    int count = 0;

    @RequestMapping("/index")
    @ResponseBody
    public String index() throws InterruptedException {

        int clientcount =1000;
        CountDownLatch countDownLatch = new CountDownLatch(clientcount);

        ExecutorService executorService = Executors.newFixedThreadPool(clientcount);
        long start = System.currentTimeMillis();
        for (int i = 0;i<clientcount;i++){
            executorService.execute(() -> {

                //通过Snowflake算法获取唯一的ID字符串
                String id = IdUtil.getId();
                try {
                    redisLock.lock(id);
                    count++;
                }finally {
                    redisLock.unlock(id);
                }
                countDownLatch.countDown();
            });
        }
        countDownLatch.await();
        long end = System.currentTimeMillis();
        logger.info("执行线程数:{},总耗时:{},count数为:{}",clientcount,end-start,count);
        return "Hello";
    }
}
至此,单节点Redis的分布式锁的实现就已经完成了。比较简单,但是问题也比较大,最重要的一点是,锁不具有可重入性。
三、redisson
1、可重入锁
上面我们自己实现的Redis分布式锁,其实不具有可重入性。那么下面我们先来看看Redisson中如何调用可重入锁。
在这里,笔者使用的是它的最新版本,3.10.1。
<dependency>
    <groupId>org.redisson</groupId>
    <artifactId>redisson</artifactId>
    <version>3.10.1</version>
</dependency>
首先,通过配置获取RedissonClient客户端的实例,然后getLock获取锁的实例,进行操作即可。
public static void main(String[] args) {

    Config config = new Config();
    config.useSingleServer().setAddress("redis://127.0.0.1:6379");
    config.useSingleServer().setPassword("redis1234");

    final RedissonClient client = Redisson.create(config);
    RLock lock = client.getLock("lock1");

    try{
        lock.lock();
    }finally{
        lock.unlock();
    }
}
2、获取锁实例
我们先来看RLock lock = client.getLock("lock1"); 这句代码就是为了获取锁的实例,然后我们可以看到它返回的是一个RedissonLock对象。
public RLock getLock(String name) {
    return new RedissonLock(connectionManager.getCommandExecutor(), name);
}
在RedissonLock构造方法中,主要初始化一些属性。
public RedissonLock(CommandAsyncExecutor commandExecutor, String name) {
    super(commandExecutor, name);
    //命令执行器
    this.commandExecutor = commandExecutor;
    //UUID字符串
    this.id = commandExecutor.getConnectionManager().getId();
    //内部锁过期时间
    this.internalLockLeaseTime = commandExecutor.
                getConnectionManager().getCfg().getLockWatchdogTimeout();
    this.entryName = id + ":" + name;
}
3、加锁
当我们调用lock方法,定位到lockInterruptibly。在这里,完成了加锁的逻辑。
public void lockInterruptibly(long leaseTime, TimeUnit unit) throws InterruptedException {

    //当前线程ID
    long threadId = Thread.currentThread().getId();
    //尝试获取锁
    Long ttl = tryAcquire(leaseTime, unit, threadId);
    // 如果ttl为空,则证明获取锁成功
    if (ttl == null) {
        return;
    }
    //如果获取锁失败,则订阅到对应这个锁的channel
    RFuture<RedissonLockEntry> future = subscribe(threadId);
    commandExecutor.syncSubscription(future);

    try {
        while (true) {
            //再次尝试获取锁
            ttl = tryAcquire(leaseTime, unit, threadId);
            //ttl为空,说明成功获取锁,返回
            if (ttl == null) {
                break;
            }
            //ttl大于0 则等待ttl时间后继续尝试获取
            if (ttl >= 0) {
                getEntry(threadId).getLatch().tryAcquire(ttl, TimeUnit.MILLISECONDS);
            } else {
                getEntry(threadId).getLatch().acquire();
            }
        }
    } finally {
        //取消对channel的订阅
        unsubscribe(future, threadId);
    }
    //get(lockAsync(leaseTime, unit));
}
tryAcquire来获取锁,如果返回值ttl为空,则证明加锁成功,返回;如果不为空,则证明加锁失败。这时候,它会订阅这个锁的Channel,等待锁释放的消息,然后重新尝试获取锁。流程如下:
获取锁
获取锁的过程是怎样的呢?接下来就要看tryAcquire方法。在这里,它有两种处理方式,一种是带有过期时间的锁,一种是不带过期时间的锁。private <T> RFuture<Long> tryAcquireAsync(long leaseTime, TimeUnit unit, final long threadId) { //如果带有过期时间,则按照普通方式获取锁 if (leaseTime != -1) { return tryLockInnerAsync(leaseTime, unit, threadId, RedisCommands.EVAL_LONG); } //先按照30秒的过期时间来执行获取锁的方法 RFuture<Long> ttlRemainingFuture = tryLockInnerAsync( commandExecutor.getConnectionManager().getCfg().getLockWatchdogTimeout(), TimeUnit.MILLISECONDS, threadId, RedisCommands.EVAL_LONG); //如果还持有这个锁,则开启定时任务不断刷新该锁的过期时间 ttlRemainingFuture.addListener(new FutureListener<Long>() { @Override public void operationComplete(Future<Long> future) throws Exception { if (!future.isSuccess()) { return; } Long ttlRemaining = future.getNow(); // lock acquired if (ttlRemaining == null) { scheduleExpirationRenewal(threadId); } } }); return ttlRemainingFuture; }
接着往下看,tryLockInnerAsync方法是真正执行获取锁的逻辑,它是一段LUA脚本代码。在这里,它使用的是hash数据结构。
<T> RFuture<T> tryLockInnerAsync(long leaseTime, TimeUnit unit,
                            long threadId, RedisStrictCommand<T> command) {

        //过期时间
        internalLockLeaseTime = unit.toMillis(leaseTime);

        return commandExecutor.evalWriteAsync(getName(), LongCodec.INSTANCE, command,
                  //如果锁不存在,则通过hset设置它的值,并设置过期时间
                  "if (redis.call('exists', KEYS[1]) == 0) then " +
                      "redis.call('hset', KEYS[1], ARGV[2], 1); " +
                      "redis.call('pexpire', KEYS[1], ARGV[1]); " +
                      "return nil; " +
                  "end; " +
                  //如果锁已存在,并且锁的是当前线程,则通过hincrby给数值递增1
                  "if (redis.call('hexists', KEYS[1], ARGV[2]) == 1) then " +
                      "redis.call('hincrby', KEYS[1], ARGV[2], 1); " +
                      "redis.call('pexpire', KEYS[1], ARGV[1]); " +
                      "return nil; " +
                  "end; " +
                  //如果锁已存在,但并非本线程,则返回过期时间ttl
                  "return redis.call('pttl', KEYS[1]);",
        Collections.<Object>singletonList(getName()),
                internalLockLeaseTime, getLockName(threadId));
    }
这段LUA代码看起来并不复杂,有三个判断:
1. 通过exists判断,如果锁不存在,则设置值和过期时间,加锁成功。
2. 通过hexists判断,如果锁已存在,并且锁的是当前线程,则证明是重入锁,加锁成功。
3. 如果锁已存在,但锁的不是当前线程,则证明有其他线程持有锁。返回当前锁的过期时间,加锁失败。

加锁成功后,在redis的内存数据中,就有一条hash结构的数据。Key为锁的名称;field为随机字符串+线程ID;值为1。如果同一线程多次调用lock方法,值递增1。
127.0.0.1:6379> hgetall lock1
1) "b5ae0be4-5623-45a5-8faa-ab7eb167ce87:1"
2) "1"
4、解锁
我们通过调用unlock方法来解锁。
public RFuture<Void> unlockAsync(final long threadId) {
    final RPromise<Void> result = new RedissonPromise<Void>();

    //解锁方法
    RFuture<Boolean> future = unlockInnerAsync(threadId);

    future.addListener(new FutureListener<Boolean>() {
        @Override
        public void operationComplete(Future<Boolean> future) throws Exception {
            if (!future.isSuccess()) {
                cancelExpirationRenewal(threadId);
                result.tryFailure(future.cause());
                return;
            }
            //获取返回值
            Boolean opStatus = future.getNow();
            //如果返回空,则证明解锁的线程和当前锁不是同一个线程,抛出异常
            if (opStatus == null) {
                IllegalMonitorStateException cause =
                    new IllegalMonitorStateException("
                        attempt to unlock lock, not locked by current thread by node id: "
                        + id + " thread-id: " + threadId);
                result.tryFailure(cause);
                return;
            }
            //解锁成功,取消刷新过期时间的那个定时任务
            if (opStatus) {
                cancelExpirationRenewal(null);
            }
            result.trySuccess(null);
        }
    });

    return result;
}
然后我们再看unlockInnerAsync方法。这里也是一段LUA脚本代码。
protected RFuture<Boolean> unlockInnerAsync(long threadId) {
    return commandExecutor.evalWriteAsync(getName(), LongCodec.INSTANCE, EVAL,

            //如果锁已经不存在, 发布锁释放的消息
            "if (redis.call('exists', KEYS[1]) == 0) then " +
                "redis.call('publish', KEYS[2], ARGV[1]); " +
                "return 1; " +
            "end;" +
            //如果释放锁的线程和已存在锁的线程不是同一个线程,返回null
            "if (redis.call('hexists', KEYS[1], ARGV[3]) == 0) then " +
                "return nil;" +
            "end; " +
            //通过hincrby递减1的方式,释放一次锁
            //若剩余次数大于0 ,则刷新过期时间
            "local counter = redis.call('hincrby', KEYS[1], ARGV[3], -1); " +
            "if (counter > 0) then " +
                "redis.call('pexpire', KEYS[1], ARGV[2]); " +
                "return 0; " +
            //否则证明锁已经释放,删除key并发布锁释放的消息
            "else " +
                "redis.call('del', KEYS[1]); " +
                "redis.call('publish', KEYS[2], ARGV[1]); " +
                "return 1; "+
            "end; " +
            "return nil;",
    Arrays.<Object>asList(getName(), getChannelName()),
        LockPubSub.unlockMessage, internalLockLeaseTime, getLockName(threadId));

}
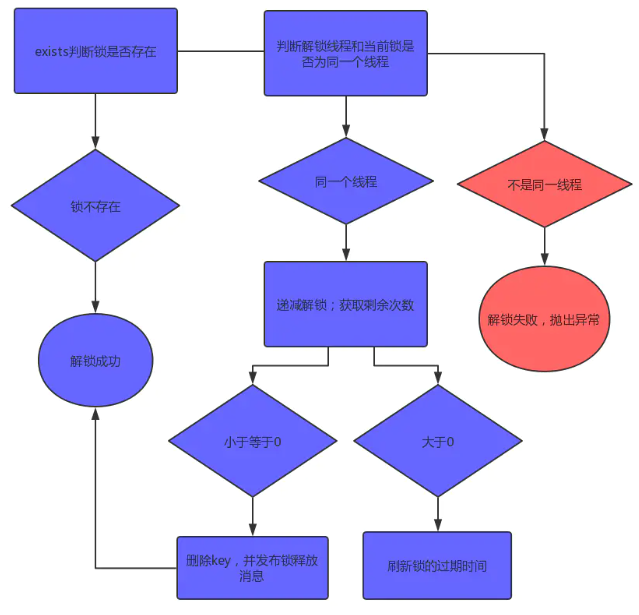
如上代码,就是释放锁的逻辑。同样的,它也是有三个判断:
1. 如果锁已经不存在,通过publish发布锁释放的消息,解锁成功。
2. 如果解锁的线程和当前锁的线程不是同一个,解锁失败,抛出异常。
3. 通过hincrby递减1,先释放一次锁。若剩余次数还大于0,则证明当前锁是重入锁,刷新过期时间;若剩余次数小于0,删除key并发布锁释放的消息,解锁成功。