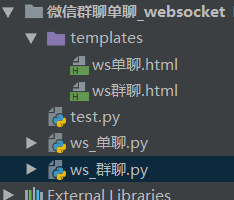
环境需求:flask,websocket第三方包
目录结构

web中实现群聊
ws_群聊.py文件

# 实现一个websocket 先下载包  gevent-websocket

from flask import Flask, request, render_template
from geventwebsocket.handler import WebSocketHandler
from geventwebsocket.websocket import WebSocket  # 语法提示作用
from gevent.pywsgi import WSGIServer
import json

app = Flask(__name__)

user_socket_dict = {}  # 定义一字典   user_id:链接


@app.route('/ws/<user>')
def ws(user):
    # print(request.environ)
    user_socket = request.environ.get("wsgi.websocket")  # type:WebSocket
    if user_socket:  # 当用户连接时候
        user_socket_dict[user] = user_socket  # 添加到用户列表
    print(len(user_socket_dict), user_socket_dict)
    while 1:
        msg = user_socket.receive()  # 接受消息
        print(msg)  # 页面传过来的数据   b"{from_user:jinwangba ,to_user:yinwangba,msg:"doushidawangba"}"
        msg_dict = json.loads(msg)
        to_user_socket = user_socket_dict.get(msg_dict.get("to_user"))
        to_user_socket.send(json.dumps(
            {"from_user": user,
             "to_user": msg_dict.get("to_user"),
             "msg": msg_dict.get("msg"
                                 )}))


@app.route('/')
def index():
    return render_template("ws单聊.html")


if __name__ == '__main__':
    print('服务已启动')
    # app.run("0.0.0.0", 5000, debug=True)
    http_serv = WSGIServer(("0.0.0.0", 8080), app, handler_class=WebSocketHandler)
    http_serv.serve_forever()  # 永久启动
前端html页面

<!DOCTYPE html>
<html lang="zh-CN">
<head>
    <meta http-equiv="content-type" content="text/html; charset=UTF-8">

    <meta http-equiv="X-UA-Compatible" content="IE=edge">
    <title>标题</title>
</head>
<body>
<p>发送内容 <input type="text" id="msg">
    <button onclick="send_msg()">发送消息</button>
</p>
<div id="msg_list"  style=" 500px;">

</div>

</body>
<script type="application/javascript">
    var ws = new WebSocket("ws://192.168.98.1:8080/ws");  //创建ws连接
    ws.onopen = function () {
        // ws.send("hello")   // 连接成功后发送 hello 消息
        alert("欢迎登陆群聊室")
    };
    ws.onmessage = function (ws_status) {
        console.log(ws_status.data);
        var ptag = document.createElement("p");  //创建p标签
        ptag.innerText = ws_status.data;    // 内容是其他用户发送过来的消息
        document.getElementById("msg_list").appendChild(ptag)   // 在div中添加p标签
    };

    function send_msg() {
        var msg = document.getElementById("msg").value;
        var ptag = document.createElement("p");  // 创建p标签
        ptag.style.cssText = "text-align: right;";   //位置在右边
        ptag.innerText = msg;   //内容是自己发送的消息
        document.getElementById('msg_list').appendChild(ptag);   //添加自己内容的p标签
        ws.send(msg)  //获取发送消息空内容发送此消息
    }
</script>
</html>
web中实现单聊
ws_单聊.py文件

# 实现一个websocket 先下载包  gevent-websocket

from flask import Flask, request, render_template
from geventwebsocket.handler import WebSocketHandler
from geventwebsocket.websocket import WebSocket  # 语法提示作用
from gevent.pywsgi import WSGIServer
import json

app = Flask(__name__)

user_socket_dict = {}  # 定义一字典   user_id:链接


@app.route('/ws/<user>')
def ws(user):
    # print(request.environ)
    user_socket = request.environ.get("wsgi.websocket")  # type:WebSocket
    if user_socket:  # 当用户连接时候
        user_socket_dict[user] = user_socket  # 添加到用户列表
    print(len(user_socket_dict), user_socket_dict)
    while 1:
        msg = user_socket.receive()  # 接受消息
        print(msg)  # 页面传过来的数据   b"{from_user:jinwangba ,to_user:yinwangba,msg:"doushidawangba"}"
        msg_dict = json.loads(msg)
        to_user_socket = user_socket_dict.get(msg_dict.get("to_user"))
        to_user_socket.send(json.dumps(
            {"from_user": user,
             "to_user": msg_dict.get("to_user"),
             "msg": msg_dict.get("msg"
                                 )}))


@app.route('/')
def index():
    return render_template("ws单聊.html")


if __name__ == '__main__':
    print('服务已启动')
    # app.run("0.0.0.0", 5000, debug=True)
    http_serv = WSGIServer(("0.0.0.0", 8080), app, handler_class=WebSocketHandler)
    http_serv.serve_forever()  # 永久启动
前端html页面

<!DOCTYPE html>
<html lang="zh-CN">
<head>
    <meta http-equiv="content-type" content="text/html; charset=UTF-8">

    <meta http-equiv="X-UA-Compatible" content="IE=edge">
    <title>标题</title>
</head>
<body>
<p>发送内容 <input type="text" id="msg">
    <button onclick="send_msg()">发送消息</button>
</p>
<div id="msg_list"  style=" 500px;">

</div>

</body>
<script type="application/javascript">
    var ws = new WebSocket("ws://192.168.98.1:8080/ws");  //创建ws连接
    ws.onopen = function () {
        // ws.send("hello")   // 连接成功后发送 hello 消息
        alert("欢迎登陆群聊室")
    };
    ws.onmessage = function (ws_status) {
        console.log(ws_status.data);
        var ptag = document.createElement("p");  //创建p标签
        ptag.innerText = ws_status.data;    // 内容是其他用户发送过来的消息
        document.getElementById("msg_list").appendChild(ptag)   // 在div中添加p标签
    };

    function send_msg() {
        var msg = document.getElementById("msg").value;
        var ptag = document.createElement("p");  // 创建p标签
        ptag.style.cssText = "text-align: right;";   //位置在右边
        ptag.innerText = msg;   //内容是自己发送的消息
        document.getElementById('msg_list').appendChild(ptag);   //添加自己内容的p标签
        ws.send(msg)  //获取发送消息空内容发送此消息
    }
</script>
</html>
注 : ws服务连接要根据自己ip实现
还可以了看看原理和基于Tornado实现的方法
