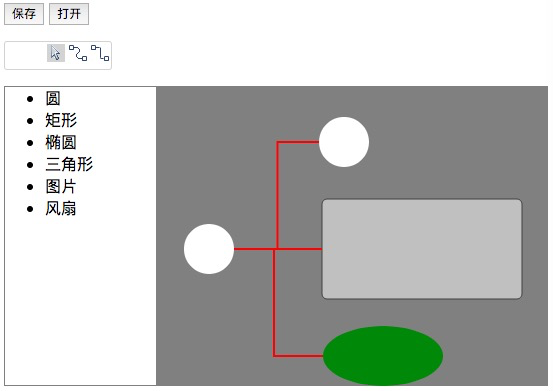
前面章节已讲到如何在两个组件间通过曲线(贝塞尔曲线)进行连接,一般在实际应用中,贝塞尔曲线在数据流图、思维导图中应用比较多,许多如组织架构图等通过折线连接,本文在之前的基础上如何快速实现两个组件间的折线连接:

之前示例是用checkbox来指示是否画线状态,现在增加了一种线条所以需要修改一下用三种状态来识别是选择/曲线/折线之一,index.html中代码片断如下:
<ul class="lineTypeUL"><li class="arrowli active"></li><li class="lineCurve"></li><li class="linePoly"></li></ul>
//样式定义如下:
    <style>
        .lineTypeUL{
            display:inline-block;
            text-align:center;
            border:1px solid lightgray;
            border-radius: 3px;
        }
        .lineTypeUL li{
            display:inline-block;
            background-image: url("icons.png");
            18px;
            height:18px;
            margin:2px;
        }
        .lineTypeUL li:hover{
            background-color:lightgray;
        }
        .lineTypeUL .active{
            background-color:lightgray;
        }
        .arrowli{
            background-position:0 0px;
        }
        .lineCurve{
            background-position: -18px 0px;
        }
        .linePoly{
            background-position:-36px 0px;
        }
    </style>
//事件代码:
        $(".lineTypeUL li").each(
            function(){
                $(this).on("click", function () {
                    $(".lineTypeUL li").removeClass("active");
                    view.setLineStatus(this.className);
                    $(this).addClass("active");
                })
            }
        )
对于前端开发来说必须掌握的一个技能就是spirit图标,一个网站用到的图标通过合并在一个文件中,能够减少网站资源请求的次数(虽然是异步并行请求),提高效率,注意background的用法。
在visualDesigner.js中,增加一个PolyLine类,同BezierLine的写法:
function PolyLine() {
        this.properties={};
        this.properties.typeName = "折线";
        this.properties.strokeWidth = 2;
        this.properties.strokeColor = 'red';
    }
    PolyLine.prototype = $.extend({}, Component.prototype);
    PolyLine.prototype = $.extend(PolyLine.prototype, {
        render: function (options) {

            this.properties=$.extend(this.properties,options)
            this.properties.x = Math.min(this.properties.sxy.x, this.properties.txy.x);
            this.properties.y = Math.min(this.properties.sxy.y, this.properties.txy.y);
            this.properties.width = Math.abs(this.properties.txy.x - this.properties.sxy.x);
            this.properties.height = Math.abs(this.properties.txy.y - this.properties.sxy.y);

            this.group=new paper.Group();
            this.properties.x=Math.min(this.properties.sxy.x,this.properties.txy.x);
            this.properties.y=Math.min(this.properties.sxy.y,this.properties.txy.y);
            this.properties.width = Math.abs(this.properties.txy.x - this.properties.sxy.x);
            this.properties.height = Math.abs(this.properties.txy.y - this.properties.sxy.y);

            if (this.properties.targetType=="left" || this.properties.targetType=="right")
            {
                if (this.properties.mxy1==undefined && this.properties.mxy2==undefined){
                    this.properties.mxy1=[this.properties.sxy.x+(this.properties.txy.x-this.properties.sxy.x)/2,this.properties.sxy.y];
                    this.properties.mxy2=[this.properties.sxy.x+(this.properties.txy.x-this.properties.sxy.x)/2,this.properties.txy.y];
                }
                else
                {
                    this.properties.mxy1[1]=this.properties.sxy.y;
                    this.properties.mxy2[1]=this.properties.txy.y;
                }
            }
            else
            {
                if (this.properties.mxy1==undefined && this.properties.mxy2==undefined){
                    this.properties.mxy1=[this.properties.sxy.x,(this.properties.txy.y-this.properties.sxy.y)/2+this.properties.sxy.y];
                    this.properties.mxy2=[this.properties.txy.x,(this.properties.txy.y-this.properties.sxy.y)/2+this.properties.sxy.y];
                }
                else
                {
                    this.properties.mxy1[0]=this.properties.sxy.x;
                    this.properties.mxy2[0]=this.properties.txy.x;
                }
            }

            this.group=new paper.Group();
            var me = this;
            var drag = false;
            var line = new paper.Path();
            line.strokeWidth = 2;

            line.strokeColor = this.properties.strokeColor;
            line.add(this.properties.sxy);
            line.add(this.properties.mxy1);
            line.add(this.properties.mxy2);
            line.add(this.properties.txy);
            //BezierArrow(line,targetType,this.properties.txy.x, this.properties.txy.y);
            this.group.addChild(line);

            //this.group.translate(this.properties.x, this.properties.y);
            return this;
        }
    });
同时修改createLine方法
    VisualDesigner.prototype.createLine= function (typeName, options) {
        if (!options.id)
            options.id = this.createId(); //为元素增加id属性
        var element = null;
        switch (typeName) {
            case "曲线":
                element = new BezierLine().init().render(options);
                break;
            case "折线":
                element=new PolyLine().init().render(options);
                break;
        }
        this.lines[element.properties.id] = element;
        element.designer = this;

    }
增加一创建线条的分支,当然还需要修改当前画线类型和画线结束的代码
    VisualDesigner.prototype.setLineStatus = function (status) {
        if (status=="arrowli")
            this.lining = false;
            else
            {
                this.lining=true;
                if (status=="lineCurve")
                    this.lineType="曲线";
                else if (status="linePoly")
                    this.lineType="折线";
            }
    }
。。。。
        dragEnd:function(co,pos)
        {
            var xy = co.node.getConnectorCenterByPos(pos); //获取当前鼠标位置处连接点的中央坐标
            if (this.line !== null  ) {
                if (this.start.node.properties.id!=co.node.properties.id){
                    this.designer.createLine(this.designer.lineType,{sourceType:this.start.node.getConnectorDirection(this.startPos),targetType:co.node.getConnectorDirection(pos),source:this.start.node.properties.id,target:co.node.properties.id,sxy:this.startPos,txy:xy});
                }
                this.line.remove();

            }
            this.start=null; //清除画线状态,等待重新画线
            this.startPos=null;

        },
至此就大功告成了,得益于之前我们以OOP的思路构建的框架,在扩展新的组件或连线时,代码变得如些精简。
同学们快动手试试增加更多的连线方式吧。
源代码:sample.1.8.rar
(本文为原创,在引用代码和文字时请注明出处)