DockerCompose安装与快速体验
1 简介
以前:dockerfile build run
缺点:手动操作单个容器、处理依赖关系
现在:Docker Compose
定义运行多个容器
1.1 官方介绍
Compose is a tool for defining and running multi-container Docker applications. With Compose, you use a YAML file to configure your application’s services. Then, with a single command, you create and start all the services from your configuration. To learn more about all the features of Compose, see the list of features.
定义、运行多个容器
YAML配置文件
single command?
Compose works in all environments: production, staging, development, testing, as well as CI workflows. You can learn more about each case in Common Use Cases.
Using Compose is basically a three-step process:
- Define your app’s environment with a
Dockerfileso it can be reproduced anywhere.- 保证我们的项目在任何地方都可以运行
- Define the services that make up your app in
docker-compose.ymlso they can be run together in an isolated environment.- service是什么?
- docker-compose.yml 怎么写?
- Run
docker-compose upand Compose starts and runs your entire app.
1.2 总结
作用:批量容器编排
Compose 是Dcoker官方的开源项目,需要安装
Dockerfile 让程序在任何地方运行,如web服务、redis、MySQL、Nginx...多个容器
docker-compose.yml样例:
version: "3.9"  # optional since v1.27.0
services:
  web:
    build: .
    ports:
      - "5000:5000"
    volumes:
      - .:/code
      - logvolume01:/var/log
    links:
      - redis
  redis:
    image: redis
volumes:
  logvolume01: {}
1.3 重要概念
- 服务services:容器、应用(Web、redis、MySQL...)
- 项目project:一组关联的容器
2 安装
On Linux, you can download the Docker Compose binary from the Compose repository release page on GitHub. Follow the instructions from the link, which involve running the curl command in your terminal to download the binaries. These step-by-step instructions are also included below.
For
alpine, the following dependency packages are needed:py-pip,python-dev,libffi-dev,openssl-dev,gcc,libc-dev, andmake.
-
Run this command to download the current stable release of Docker Compose:
curl -L https://get.daocloud.io/docker/compose/releases/download/1.25.5/docker-compose-`uname -s`-`uname -m` > /usr/local/bin/docker-composeTo install a different version of Compose, substitute
1.28.2with the version of Compose you want to use.If you have problems installing with
curl, see Alternative Install Options tab above. -
Apply executable permissions to the binary:
sudo chmod +x /usr/local/bin/docker-compose
Note: If the command
docker-composefails after installation, check your path. You can also create a symbolic link to/usr/binor any other directory in your path.
For example:
sudo ln -s /usr/local/bin/docker-compose /usr/bin/docker-compose
-
Optionally, install command completion for the
bashandzshshell. -
Test the installation.
$ docker-compose --version
docker-compose version 1.28.2, build 1110ad01
3 体验
使用Docker Compose 部署一个Python计数器应用,使用了redis
3.1 Setup
-
Create a directory for the project:
$ mkdir composetest $ cd composetest -
Create a file called
app.pyin your project directory and paste this in:import time import redis from flask import Flask app = Flask(__name__) cache = redis.Redis(host='redis', port=6379) def get_hit_count(): retries = 5 while True: try: return cache.incr('hits') except redis.exceptions.ConnectionError as exc: if retries == 0: raise exc retries -= 1 time.sleep(0.5) @app.route('/') def hello(): count = get_hit_count() return 'Hello World! I have been seen {} times. '.format(count) -
Create another file called
requirements.txtin your project directory and paste this in:flask redis
这时候文件夹应该是这样的:

3.2 Create a Dockerfile
n your project directory, create a file named Dockerfile and paste the following:
FROM python:3.7-alpine
WORKDIR /code
ENV FLASK_APP=app.py
ENV FLASK_RUN_HOST=0.0.0.0
RUN apk add --no-cache gcc musl-dev linux-headers
COPY requirements.txt requirements.txt
RUN pip install -r requirements.txt
EXPOSE 5000
COPY . .
CMD ["flask", "run"]
This tells Docker to:
- 使用 Python 3.7 镜像来构建镜像.
- 工作目录在
/code. - 使用
flask命令设置环境变量 - 安装gcc和其他依赖
- 拷贝
requirements.txt并安装Python依赖 - 暴露5000端口
- 拷贝当前文件夹
.到镜像中工作目录中的.文件夹 - 运行
flask run.
3.3 Define services in a Compose file
Create a file called docker-compose.yml in your project directory and paste the following:
version: "3"
services:
  web:
    build: .
    ports:
      - "5000:5000"
  redis:
    image: "redis:alpine"
This Compose file defines two services: web and redis.
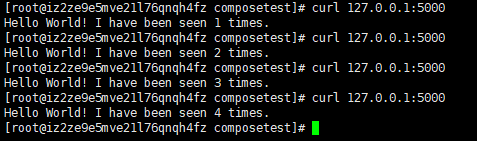
3.4 Build and run your app with Compose
docker-compose up
[root@iz2ze9e5mve21l76qnqh4fz composetest]# docker-compose up -d
Building web
Step 1/10 : FROM python:3.7-alpine
 ---> 72e4ef8abf8e
Step 2/10 : WORKDIR /code
 ---> f4d13e766f2e
Removing intermediate container b1df4b5efba7
Step 3/10 : ENV FLASK_APP app.py
 ---> Running in f42192ec6377
 ---> 6d252c7ff68e
Removing intermediate container f42192ec6377
Step 4/10 : ENV FLASK_RUN_HOST 0.0.0.0
 ---> Running in fc821a3dcd5d
 ---> 362d54e6f6d8
Removing intermediate container fc821a3dcd5d
Step 5/10 : RUN apk add --no-cache gcc musl-dev linux-headers
 ---> Running in ebfdf85f9f31

fetch http://dl-cdn.alpinelinux.org/alpine/v3.12/main/x86_64/APKINDEX.tar.gz
fetch http://dl-cdn.alpinelinux.org/alpine/v3.12/community/x86_64/APKINDEX.tar.gz
(1/13) Installing libgcc (9.3.0-r2)
(2/13) Installing libstdc++ (9.3.0-r2)
(3/13) Installing binutils (2.34-r1)
(4/13) Installing gmp (6.2.0-r0)
(5/13) Installing isl (0.18-r0)
(6/13) Installing libgomp (9.3.0-r2)
(7/13) Installing libatomic (9.3.0-r2)
(8/13) Installing libgphobos (9.3.0-r2)
(9/13) Installing mpfr4 (4.0.2-r4)
(10/13) Installing mpc1 (1.1.0-r1)
(11/13) Installing gcc (9.3.0-r2)
(12/13) Installing linux-headers (5.4.5-r1)
(13/13) Installing musl-dev (1.1.24-r10)
Executing busybox-1.31.1-r19.trigger
OK: 153 MiB in 48 packages
 ---> 7ef4d92e09e8
Removing intermediate container ebfdf85f9f31
Step 6/10 : COPY requirements.txt requirements.txt
 ---> 93e6fdf775d7
Removing intermediate container 053014e3340f
Step 7/10 : RUN pip3 install -r requirements.txt
 ---> Running in a655bbe54a56

Collecting flask
  Downloading Flask-1.1.2-py2.py3-none-any.whl (94 kB)
Collecting click>=5.1
  Downloading click-7.1.2-py2.py3-none-any.whl (82 kB)
Collecting itsdangerous>=0.24
  Downloading itsdangerous-1.1.0-py2.py3-none-any.whl (16 kB)
Collecting Jinja2>=2.10.1
  Downloading Jinja2-2.11.2-py2.py3-none-any.whl (125 kB)
Collecting MarkupSafe>=0.23
  Downloading MarkupSafe-1.1.1.tar.gz (19 kB)
Collecting Werkzeug>=0.15
  Downloading Werkzeug-1.0.1-py2.py3-none-any.whl (298 kB)
Collecting redis
  Downloading redis-3.5.3-py2.py3-none-any.whl (72 kB)
Building wheels for collected packages: MarkupSafe
  Building wheel for MarkupSafe (setup.py): started
  Building wheel for MarkupSafe (setup.py): finished with status 'done'
  Created wheel for MarkupSafe: filename=MarkupSafe-1.1.1-cp37-cp37m-linux_x86_64.whl size=16911 sha256=58fb0e468fef4edace73d03591c6b5163e41c8de79fb6ebcc02f717296586727
  Stored in directory: /root/.cache/pip/wheels/b9/d9/ae/63bf9056b0a22b13ade9f6b9e08187c1bb71c47ef21a8c9924
Successfully built MarkupSafe
Installing collected packages: MarkupSafe, Werkzeug, Jinja2, itsdangerous, click, redis, flask
Successfully installed Jinja2-2.11.2 MarkupSafe-1.1.1 Werkzeug-1.0.1 click-7.1.2 flask-1.1.2 itsdangerous-1.1.0 redis-3.5.3
WARNING: You are using pip version 20.3.3; however, version 21.0 is available.
You should consider upgrading via the '/usr/local/bin/python -m pip install --upgrade pip' command.
 ---> a93b42cb4f43
Removing intermediate container a655bbe54a56
Step 8/10 : EXPOSE 5000
 ---> Running in aa4af48fbbf6
 ---> d3532243dcc8
Removing intermediate container aa4af48fbbf6
Step 9/10 : COPY . .
 ---> c1babb743bb9
Removing intermediate container de275c1712ea
Step 10/10 : CMD flask run
 ---> Running in dee778cc314d
 ---> 8bae89d7c7c9
Removing intermediate container dee778cc314d
Successfully built 8bae89d7c7c9
WARNING: Image for service web was built because it did not already exist. To rebuild this image you must use `docker-compose build` or `docker-compose up --build`.
Creating composetest_web_1   ... done
Creating composetest_redis_1 ... done
-
创建网络
-
compose帮我们维护了一个网络,同一个项目下的服务都在同一个网络中,即可以通过hostname进行访问,比如mysql:3306

-
可以使用
docker network inspect xxxx查看详情
-
-
执行 docker-compose.yml -
启动服务
- 默认的服务名:文件名_服务名_num,其中num是副本的数量
3.5 Result