http://robots.thoughtbot.com/designing-for-ios-graphics-performance 【原文】
In the previous article, we explored different techniques to customize the look and feel of UIButton, assigning to each a difficulty level based on the complexity of the Objective-C code involved in the implementation. What I intentionally left out mentioning however, is that some of these methods come with non-trivial performance ramifications that should be taken into consideration when choosing one over another.
Behind The Scenes
In order to understand how performance is affected, we need to have a closer look at the technology stack behind graphics in iOS. This block diagram represents the different frameworks and libraries and how they relate to each other:
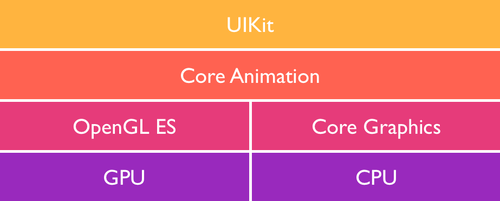
In the topmost layer, there is UIKit—a high-level Objective-C framework that manages the graphical user interface in iOS. It is made up of a collection of classes, each corresponding to a specific UI control such as UIButton and UILabel. UIKit itself is built on top of Core Animation, a framework introduced in OS X Leopard and ported to iOS to power the smooth transitions that it later became known for.
Deeper in the stack we have OpenGL ES, an open-standard library for rendering 2D and 3D computer graphics on mobile devices. It is widely used for game graphics and powers both Core Animation and UIKit. The last piece in the software stack is Core Graphics—historically referred to as Quartz—which is a CPU-based drawing engine that made its debut on OS X. These two low-level frameworks are both written in the C programming language.
The bottom row in the diagram represents the hardware stack, composed of the the graphics card (GPU) and the main processor (CPU).
We talk about hardware acceleration when the GPU is used for compositing and rendering graphics, such as the case for OpenGL and the Core Animation/UIKit implementations built on top of it. Until recently, hardware acceleration was a major advantage that iOS held over Android; most animations in the latter felt noticeably choppier as a result of its reliance on the CPU for drawing.
Offscreen drawing on the other hand refers to the process of generating bitmap graphics in the background using the CPU before handing them off to the GPU for onscreen rendering. In iOS, offscreen drawing occurs automatically in any of the following cases:
- Core Graphics (any class prefixed with CG*)
- The
drawRect()method, even with an empty implementation. - CALayers with a
shouldRasterizeproperty set to YES. - CALayers using masks (
setMasksToBounds) and dynamic shadows (setShadow*). - Any text displayed on screen, including Core Text.
- Group opacity (
UIViewGroupOpacity).
As a general rule, offscreen drawing affects performance when animation is involved. You can inspect which parts of the UI are being drawn offscreen using Instruments with an iOS device:
- Plug in your development-ready iOS device using USB
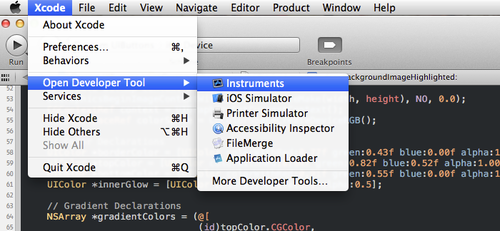
- Open Instruments using the Developer Applications menu in Xcode.
- Select the iOS > Graphics > Core Animation template

- Bring up the detail pane using the middle toggle icon
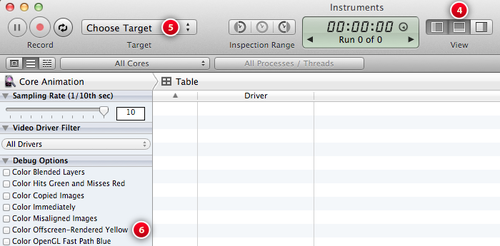
- Select your device as a target
- Check the “Color Offscreen-Rendered Yellow” debug option
- On your device, anything drawn offscreen will be overlaid with a yellow tint
Update: You can also inspect offscreen rendering by checking the Debug > Color Offscreen-Rendered option in the iOS Simulator. Unless you are doing performance tests—which was the case here—using the simulator is the easiest and most straightforward way to inspect offscreen rendering.
The Case of UIButton
Let’s now have a look at the performance footprint of each of the previously introduced approaches.
Using Pre-rendered Assets
Customizing our button with a UIImage background relies entirely on the GPU
for rendering the image assets saved on disk. The resizable background image
variant is considered the least resource-hungry approach since it results in
smaller app bundles and takes advantage of hardware acceleration when
stretching or tiling pixels.
Using CALayers
The CALayer-based method we implemented requires offscreen-drawing passes as it uses masking to render rounded corners. We also had to explicitly disable the animation that comes turned on by default when using Core Animation. Bottom line, unless you need animated transitions, this technique is not adequate for custom drawing.
Using drawRect
The drawRect method relies on Core Graphics to do the custom drawing, but its
main drawback lies in the way it handles touch events: each time the button is
pressed, setNeedsDisplay forces it to redraw; not only once, but twice for
every single tap. This is not a good use of CPU and memory, especially if there
are multiple instances of our UIButton in the interface.
A Hybrid Approach
So, does this mean that using pre-rendered assets is the only viable solution? The short answer is no. If you still need the flexibility of drawing with code, there are techniques to optimize your code and reduce its performance footprint. One way is to generate a stretchable bitmap image and reuse it across all instances.
We’ll start by creating a new subclass of UIButton following the same steps
detailed in the previous tutorial, then we’ll define our class-level static
variables:
// In CBHybrid.m
#import "CBHybrid.h"

@implementation CBHybrid

// Resizable background image for normal state
static UIImage *gBackgroundImage;

// Resizable background image for highlighted state
static UIImage *gBackgroundImageHighlighted;

// Background image border radius and height
static int borderRadius = 5;
static int height = 37;
Next we will move our drawing code from drawRect in CBBezier to a new
helper method, with a couple of changes: we will generate a resizable image
instead of a full-sized one, then we will save the output to a static variable
for later reuse:
- (UIImage *)drawBackgroundImageHighlighted:(BOOL)highlighted {
    // Drawing code goes here
}
First, we need to get the width of our resizable image. For optimal performance, we want a 1pt stretchable area in the vertical center of the image.
float width = 1 + (borderRadius * 2);
The height matters less in this case, as long as the button is tall enough for the gradient to be visible. The value of 37pt was picked to match the height of the other buttons.
Moving on, we need a bitmap context to draw into, so let’s create one:
UIGraphicsBeginImageContextWithOptions(CGSizeMake(width, height), NO, 0.0);
CGContextRef context = UIGraphicsGetCurrentContext();
CGColorSpaceRef colorSpace = CGColorSpaceCreateDeviceRGB();
Setting the second boolean argument to NO will ensure that our image context
is not opaque. The last argument is for the scale factor (screen density). When
set to 0.0 it defaults the scale factor of the device.
The next block will be exactly like our previous Core Graphics implementation
in CBBezier, save for updated values and the use of the highlighted
argument instead of the default self.highlighted property:
// Gradient Declarations
// NSArray *gradientColors = ...

// Draw rounded rectangle bezier path
UIBezierPath *roundedRectanglePath = [UIBezierPath bezierPathWithRoundedRect: CGRectMake(0, 0, width, height) cornerRadius: borderRadius];

// Use the bezier as a clipping path
[roundedRectanglePath addClip];

// Use one of the two gradients depending on the state of the button
CGGradientRef background = highlighted? highlightedGradient : gradient;

// Draw gradient within the path
CGContextDrawLinearGradient(context, background, CGPointMake(140, 0), CGPointMake(140, height-1), 0);

// Draw border
// [borderColor setStroke...

// Draw Inner Glow
// UIBezierPath *innerGlowRect...
The only step we will need to add compared to CBBezier is a method that saves
the output in a UIImage and a call to UIGraphicsEndImageContext to clean up
after us.
UIImage* backgroundImage = UIGraphicsGetImageFromCurrentImageContext();

// Cleanup
UIGraphicsEndImageContext();
Now that we have a method to generate our background images, we will have to
implement a common initializer method that will instantiate these images and
set them up as the background for our CBHybrid instance.
- (void)setupBackgrounds {

    // Generate background images if necessary
    if (!gBackgroundImage && !gBackgroundImageHighlighted) {
        gBackgroundImage = [[self drawBackgroundImageHighlighted:NO] resizableImageWithCapInsets:UIEdgeInsetsMake(borderRadius, borderRadius, borderRadius, borderRadius) resizingMode:UIImageResizingModeStretch];
        gBackgroundImageHighlighted = [[self drawBackgroundImageHighlighted:YES] resizableImageWithCapInsets:UIEdgeInsetsMake(borderRadius, borderRadius, borderRadius, borderRadius) resizingMode:UIImageResizingModeStretch];
    }

    // Set background for the button instance
    [self setBackgroundImage:gBackgroundImage forState:UIControlStateNormal];
    [self setBackgroundImage:gBackgroundImageHighlighted forState:UIControlStateHighlighted];
}
We’ll proceed by setting the button type to custom and implementing
initWithCoder (or initWithFrame if the button instance is created in code):
+ (CBHybrid *)buttonWithType:(UIButtonType)type
{
    return [super buttonWithType:UIButtonTypeCustom];
}

- (id)initWithCoder:(NSCoder *)aDecoder {
    self = [super initWithCoder:aDecoder];
    if (self) {
        [self setupBackgrounds];
    }

    return self;
}
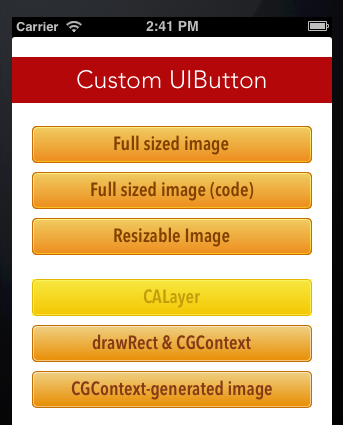
To make sure that the new subclass is working properly, duplicate one of the
buttons in Interface Builder and change its class to CBHybrid. Change the
button content to CGContext-generated image then build and run.
The full subclass code can be found here.
Closing Words
When all is said and done, pre-rendered assets would still perform better than any code-based solution. Then again, there is much to gain in terms of flexibility and efficiency once Core Graphicsis tamed—that and a hybrid approach like the one we just covered would not affect performance to any noticeable degree on today’s hardware.
Update: Andy Matuschak, a member of the UIKit team, was kind enough to provide more clarifications about offscreen rendering as well as some good insights about cache-purging in the comments section.