前言:
前一篇文章《.NET Core 微服务—API网关(Ocelot) 教程 [二]》已经让Ocelot和目录api(Api.Catalog)、订单api(Api.Ordering)通过网关方式运行起来了。但在日常开发中Api并不是所有人都能访问的,是添加了认证、授权的。那么本篇文章就将继续介绍Ocelot如何和 IdentityServer4 认证服务如何配合使用的。
创建认证服务(Api.IdentityServer)
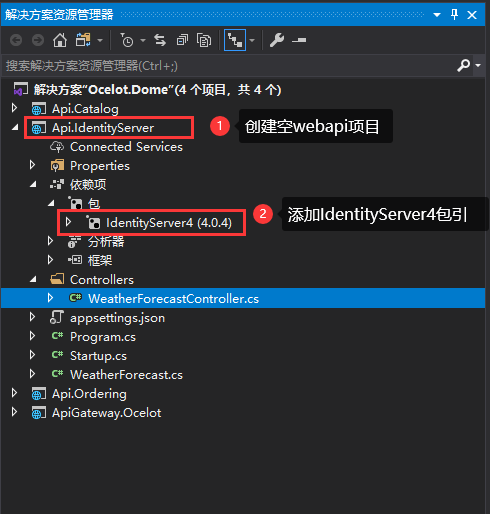
1、创建一个空的WebApi项目-Api.IdentityServer,并添加IdentityServer4项目引用:如下图:
Install-Package IdentityServer4

2、要启用IdentityServer服务,不仅要把 IdentityServer 注册到容器中, 还需要配置一下内容:
- Authorization Server 保护了哪些 API (资源);
-
哪些客户端 Client(应用) 可以使用这个 Authorization Server;
-
指定可以使用 Authorization Server 授权的 Users(用户)
a) 创建文件 InMemoryConfig.cs,用于设置以上相关内容:

 1 using IdentityServer4;
 2 using IdentityServer4.Models;
 3 using IdentityServer4.Test;
 4 using System;
 5 using System.Collections.Generic;
 6 using System.Linq;
 7 using System.Threading.Tasks;
 8
 9 namespace Api.IdentityServer
10 {
11     public class InMemoryConfig
12     {
13         public static IEnumerable<IdentityResource> GetIdentityResourceResources()
14         {
15             return new List<IdentityResource>
16             {
17                 //必须要添加,否则报无效的scope错误
18                 new IdentityResources.OpenId(),
19             };
20         }
21
22         /// <summary>
23         /// api资源列表
24         /// </summary>
25         /// <returns></returns>
26         public static IEnumerable<ApiResource> GetApiResources()
27         {
28             //可访问的API资源(资源名,资源描述)
29             return new List<ApiResource>
30             {
31                 new ApiResource("Api.Catalog", "Api.Catalog"),
32                 new ApiResource("Api.Ordering", "Api.Ordering")
33             };
34         }
35
36         /// <summary>
37         /// 客户端列表
38         /// </summary>
39         /// <returns></returns>
40         public static IEnumerable<Client> GetClients()
41         {
42             return new List<Client>
43             {
44                 new Client
45                 {
46                     ClientId = "client_Catalog", //访问客户端Id,必须唯一
47                     //使用客户端授权模式,客户端只需要clientid和secrets就可以访问对应的api资源。
48                     AllowedGrantTypes = GrantTypes.ClientCredentials,
49                     ClientSecrets =
50                     {
51                         new Secret("secret".Sha256())
52                     },
53                     AllowedScopes = { "Api.Catalog", IdentityServerConstants.StandardScopes.OpenId,IdentityServerConstants.StandardScopes.Profile }
54                 },
55                 new  Client
56                 {
57                     ClientId = "client_Ordering",
58                     ClientSecrets = new [] { new Secret("secret".Sha256()) },
59                     //这里使用的是通过用户名密码和ClientCredentials来换取token的方式. ClientCredentials允许Client只使用ClientSecrets来获取token. 这比较适合那种没有用户参与的api动作
60                     AllowedGrantTypes = GrantTypes.ResourceOwnerPasswordAndClientCredentials,
61                     AllowedScopes = { "Api.Ordering", IdentityServerConstants.StandardScopes.OpenId,IdentityServerConstants.StandardScopes.Profile }
62                 }
63             };
64         }
65
66         /// <summary>
67         /// 指定可以使用 Authorization Server 授权的 Users(用户)
68         /// </summary>
69         /// <returns></returns>
70         public static IEnumerable<TestUser> Users()
71         {
72             return new[]
73             {
74                     new TestUser
75                     {
76                         SubjectId = "1",
77                         Username = "cba",
78                         Password = "abc"
79                     }
80             };
81         }
82     }
83 }
GetApiResources:这里指定了name和display name, 以后api使用authorization server的时候, 这个name一定要一致
GetClients: 认证客户端列表
Users: 这里的内存用户的类型是TestUser, 只适合学习和测试使用, 实际生产环境中还是需要使用数据库来存储用户信息的, 例如接下来会使用asp.net core identity. TestUser的SubjectId是唯一标识.
b) 在Startup.cs中启用IdentityServer服务

 1 using System;
 2 using System.Collections.Generic;
 3 using System.Linq;
 4 using System.Threading.Tasks;
 5 using Microsoft.AspNetCore.Builder;
 6 using Microsoft.AspNetCore.Hosting;
 7 using Microsoft.AspNetCore.Mvc;
 8 using Microsoft.Extensions.Configuration;
 9 using Microsoft.Extensions.DependencyInjection;
10 using Microsoft.Extensions.Hosting;
11 using Microsoft.Extensions.Logging;
12
13 namespace Api.IdentityServer
14 {
15     public class Startup
16     {
17         public Startup(IConfiguration configuration)
18         {
19             Configuration = configuration;
20         }
21
22         public IConfiguration Configuration { get; }
23
24         // This method gets called by the runtime. Use this method to add services to the container.
25         public void ConfigureServices(IServiceCollection services)
26         {
27             services.AddControllers();
28
29             services.AddIdentityServer()
30                 .AddDeveloperSigningCredential()
31 .AddInMemoryApiResources(InMemoryConfig.GetApiResources())
32                 .AddInMemoryClients(InMemoryConfig.GetClients())
33                 .AddTestUsers(InMemoryConfig.Users().ToList());
34
35             services.AddAuthentication();//配置认证服务
36         }
37
38         // This method gets called by the runtime. Use this method to configure the HTTP request pipeline.
39         public void Configure(IApplicationBuilder app, IWebHostEnvironment env)
40         {
41             if (env.IsDevelopment())
42             {
43                 app.UseDeveloperExceptionPage();
44             }
45             app.UseStaticFiles();
46             app.UseRouting();
47
48             app.UseIdentityServer();
49
50             app.UseAuthentication();
51             app.UseAuthorization();
52
53             app.UseEndpoints(endpoints =>
54             {
55                 endpoints.MapControllers();
56             });
57         }
58     }
59 }
为ocelot项目集成IdentityServer
1、添加IdentityServer4.AccessTokenValidation的包,也可以通过程序包管理控制台执行以下命令
Install-Package IdentityServer4.AccessTokenValidation
添加包引用后,在Startup中的 ConfigureServices 中分别注册两个认证方案 Configure 中配置IdentityServer服务。
        public void ConfigureServices(IServiceCollection services)
        {

            services.AddAuthentication()
              .AddJwtBearer("Api.Catalog", i =>
              {
                  i.Audience = "Api.Catalog";
                  i.Authority = "http://localhost:5332";
                  i.RequireHttpsMetadata = false;
              }).AddJwtBearer("Api.Ordering", y =>
              {
                  y.Audience = "Api.Ordering";
                  y.Authority = "http://localhost:5331";
                  y.RequireHttpsMetadata = false;
              });

            services.AddOcelot();//注入Ocelot服务

            services.AddControllers();
        }
2、修改ocelot配置文件,在Routes中添加授权信息
调整ApiGateway.Ocelot项目中ocelot.json配置文件如下:
{
  "GlobalConfiguration": {

  },
  "Routes": [
    {
      "DownstreamPathTemplate": "/api/{controller}/{action}",
      "DownstreamScheme": "http",
      "DownstreamHostAndPorts": [
        {
          "Host": "localhost",
          "Port": 5331
        }
      ],
      "UpstreamPathTemplate": "/Catalog/{controller}/{action}",
      "UpstreamHttpMethod": [ "Get", "Post" ],
      "LoadBalancerOptions": {
        "Type": "RoundRobin"
      },
      //授权信息
      "AuthenticationOptions": {
        "AuthenticationProviderKey": "Api.Catalog",
        "AllowedScopes": []
      }
    },
    {
      "DownstreamPathTemplate": "/api/{controller}/{action}",
      "DownstreamScheme": "http",
      "DownstreamHostAndPorts": [
        {
          "Host": "localhost",
          "Port": 5332
        }
      ],
      "UpstreamPathTemplate": "/Ordering/{controller}/{action}",
      "UpstreamHttpMethod": [ "Get", "Post" ],
      "LoadBalancerOptions": {
        "Type": "RoundRobin"
      },
      //授权信息
      "AuthenticationOptions": {
        "AuthenticationProviderKey": "Api.Ordering",
        "AllowedScopes": []
      }
    }
  ]
}
Ocelot会去检查Routes是否配置了AuthenticationOptions节点。如果有会根据配置的认证方案进行身份认证。如果没有则不进行身份认证。
AuthenticationProviderKey 是刚才注册的认证方案。
AllowedScopes 是 AllowedScopes中配置的授权访问范围。
验证效果
1、根据网关设置访问:目录api:http://localhost:5330/Ordering/Values/1
如图:

2、先获取Token后再访问该接口:

根据获取Token在http://localhost:5330/Ordering/Values/1 请求时,添加认证头信息,即可请求成功

回顾总结
1、在IdentityServer注册相关资源服务和客户端信息。
2、Ocelot通过注册认证方案,在配置文件中指定路由的认证方案
3、该认证是在Ocelot网关层对相关资源进行认证,并非资源服务认证
4、认证调用失败时,尝试把IdentityServer包版本降低尝试
源码:https://github.com/cwsheng/ocelot.Demo.git
