ClassPathXmlApplicationContext的注册方式
源码分析基于Spring4.3
从ClassPathXmlApplicationContext入口,最终都会调用到
/*
	 * 使用给定父级创建新的ClassPathXmlApplicationContext,从给定的XML文件加载定义信息。
	 * 加载所有的bean 定义信息并且创建所有的单例
	 * 或者,在进一步配置上下文之后手动调用刷新。
*/
public ClassPathXmlApplicationContext(String[] configLocations, boolean refresh, ApplicationContext parent)
  throws BeansException {

  super(parent);
  setConfigLocations(configLocations);
  if (refresh) {
    refresh();
  }
}
上述注释的解释如是说:在容器的启动过程中,初始化过程中所有的bean都是单例存在的
自动刷新ApplicationContext context = new ClassPathXmlApplicationContext("xxx.xml");就等同于
手动刷新ApplicationContext context = new ClassPathXmlApplicationContext(); context.register("xxx.xml"); context.refresh();
上述一共有三条链路,下面来一一分析
加载父子容器
- 首先是加载并初始化父容器的方法
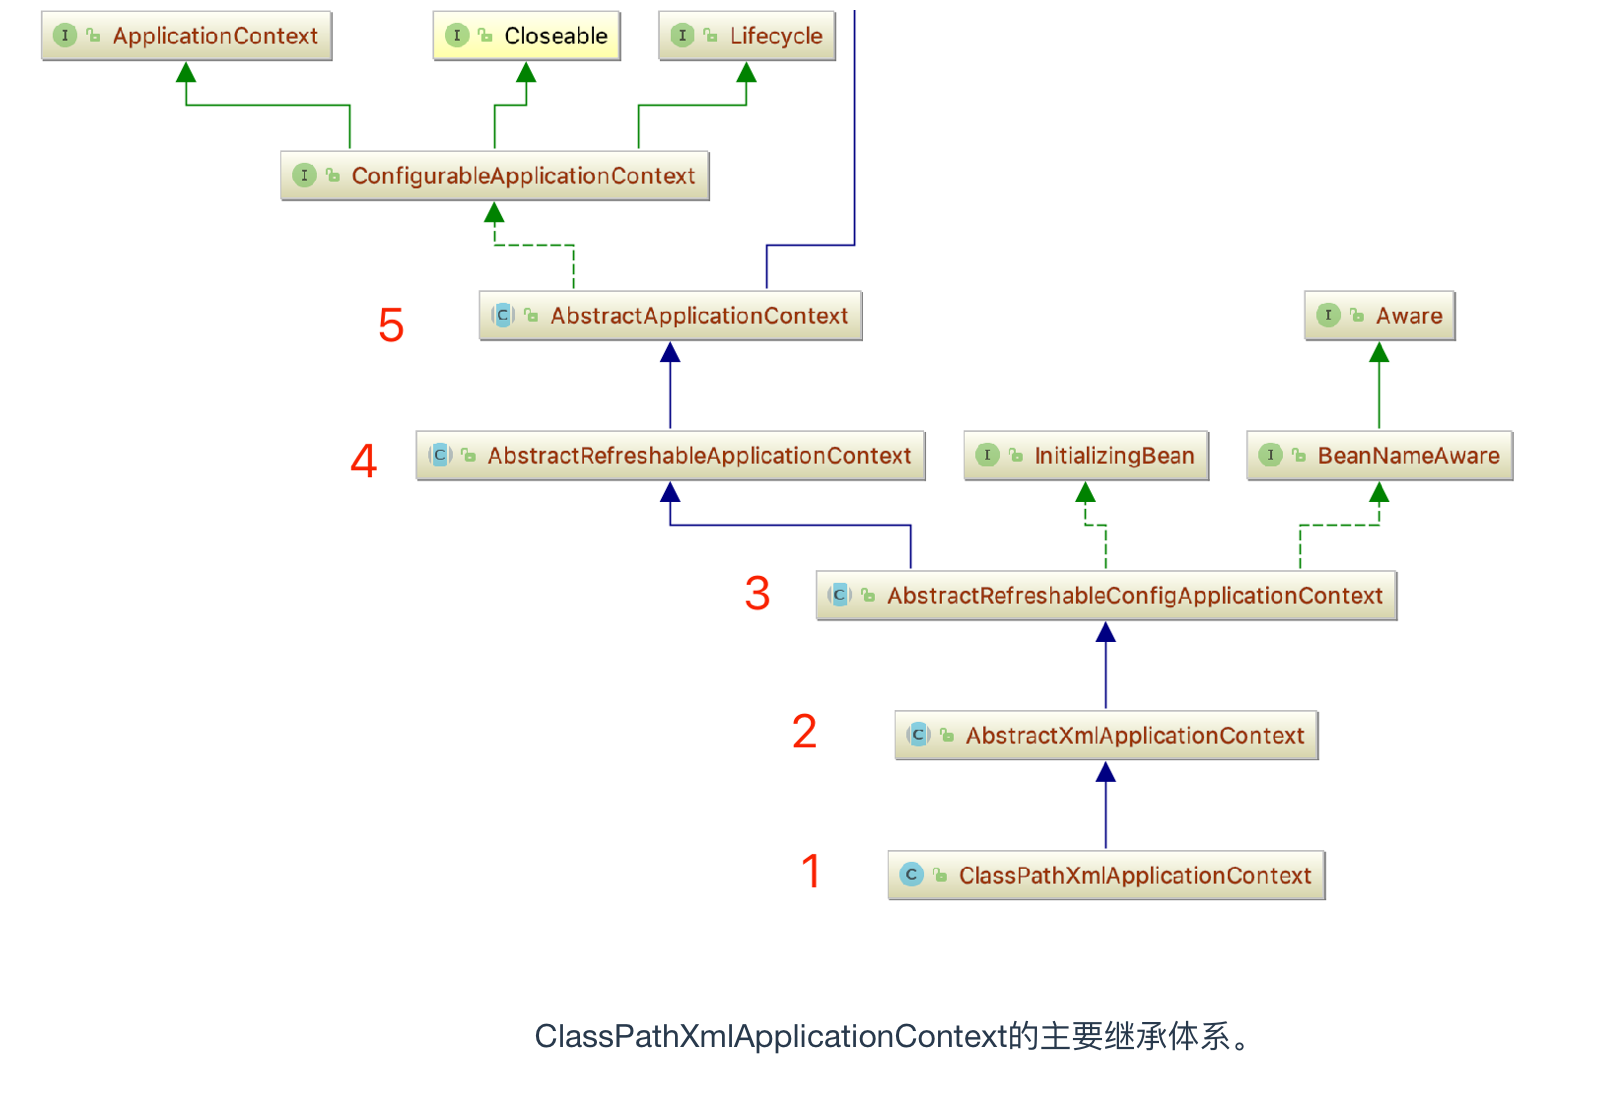
- 第一个出场的是
ClassPathXmlApplicationContext,它是一个独立的应用程序上下文,从类路径获取上下文定义文件,能够将普通路径解析为包含包路径的类路径资源名称。它可以支持Ant-Style(路径匹配原则),它是一站式应用程序的上下文,考虑使用GenericApplicationContext类结合XmlBeanDefinitionReader来设置更灵活的上下文配置。
Ant-Style 路径匹配原则,例如 "mypackages/application-context.xml" 可以用"mypackages/*-context.xml" 来替换。
⚠️注意: 如果有多个上下文配置,那么之后的bean定义将覆盖之前加载的文件。这可以用来通过额外的XML文件故意覆盖某些bean定义
-
随后不紧不慢走过来的不是一个完整的somebody,
AbstractXmlApplicationContext, 它是为了方便ApplicationContext的实现而出现的(抽象类一个很重要的思想就是适配)。AbstractXmlApplicationContext 的最主要作用就是通过创建一个XML阅读器解析ClassPathXmlApplicationContext 注册的配置文件。它有两个最主要的方法 loadBeanDefinitions(DefaultListableBeanFactory beanFactory) 和 loadBeanDefinitions(XmlBeanDefinitionReader reader) -
下一个缓缓出场的是
AbstractRefreshableConfigApplicationContext,它就像是中间人的角色,并不作多少工作,很像古代丞相的奏折要呈递给皇上,它的作用就相当于是拿奏折的角色。它用作XML应用程序上下文实现的基类,例如ClassPathXmlApplicationContext、FileSystemXmlApplicationContext和XmlWebApplicationContext -
当老板的一般都比较听小秘的,那么
AbstractRefreshableApplicationContext就扮演了小秘的角色,它是ApplicationContext的基类,支持多次调用refresh()方法,每次都会创建一个新的内部bean factory实例。继承 AbstractRefreshableApplicationContext 需要唯一实现的方法就是loadBeanDefinitions,在每一次调用刷新方法的时候。一个具体的实现是加载bean定义信息的DefaultListableBeanFactory。 -
但是只有小秘给老板递交请辞不行,中间还要有技术leader 来纵览大局,向上与老板探讨公司发展计划,在下领导新人做项目打硬仗(这种男人真的很有魅力哈哈哈),但是技术leader也不能干完所有的工作,他还需要交给手下的程序员去帮他完成具体的工作,程序员接到一项工作,看看有没有可复用的项目和开源类库,发现有可用的,直接把"引用"链接过去就可以了。这就是容器的初始化工作,但是这一步的流程还没有结束,你还得时刻记住你是给boss干活的。
public AbstractApplicationContext(@Nullable ApplicationContext parent) {
  // 交给其他程序员去完成的工作
  this();
  // 明确自己的老板是谁
  setParent(parent);
}

public AbstractApplicationContext() {
  this.resourcePatternResolver = getResourcePatternResolver();
}

// 返回 ResourcePatternResolver 去解析资源实例中的匹配模式,默认的是 PathMatchingResourcePatternResolver 支持 Ant-Style 模式。
protected ResourcePatternResolver getResourcePatternResolver() {
  return new PathMatchingResourcePatternResolver(this);
}

// 此时的resourceLoader 就是ClassPathXmlApplicationContext 对象。
public PathMatchingResourcePatternResolver(ResourceLoader resourceLoader) {
  Assert.notNull(resourceLoader, "ResourceLoader must not be null");
  this.resourceLoader = resourceLoader;
}
你需要一些程序员帮你做具体的编码工作,也需要明确你是公司的员工,需要听从老板的,所以你需要明确老板是谁
@Override
public void setParent(@Nullable ApplicationContext parent) {
  this.parent = parent;
  if (parent != null) {
    Environment parentEnvironment = parent.getEnvironment();
    if (parentEnvironment instanceof ConfigurableEnvironment) {
      getEnvironment().merge((ConfigurableEnvironment) parentEnvironment);
    }
  }
}
但是这个时候老板出差了,不在了(因为传过来的parent 是 null),所以你需要自己做一些decision。至此,第一条线路就分析完成了。
配置路径解析
- 第二条线路,
ApplicationContext中的 setConfigLocations(configLocations)
// 参数传过来的是可变参数,可变参数是一个数组,也就是说,你可以传递多个配置文件,用","分隔起来。
public void setConfigLocations(@Nullable String... locations) {
  if (locations != null) {
    Assert.noNullElements(locations, "Config locations must not be null");
    // configlocations 是一个可为空的String数组,可以为null,为null可以进行手动注册。
    this.configLocations = new String[locations.length];
    // 解析数组中的每一个配置文件的路径。
    for (int i = 0; i < locations.length; i++) {
      this.configLocations[i] = resolvePath(locations[i]).trim();
    }
  }
  // 默认是直接创建了一个 ClassPathXmlApplicationContext 的无参数的构造函数,采用手动注册的方式。
  else {
    this.configLocations = null;
  }
}
关键点:路径解析方法 : AbstractRefreshableConfigApplicationContext 中的 resolvePath(locations[i]).trim(); 来看看是如何进行路径解析的
// 解析给定的路径,必要时用相应的环境属性值替换占位符。应用于路径配置。
protected String resolvePath(String path) {
  return getEnvironment().resolveRequiredPlaceholders(path);
}
涉及两个方法,AbstractRefreshableConfigApplicationContext 中的getEnvironment() 和 validateRequiredProperties(),先来看第一个
-
getEnvironment()
// 以配置的形式返回此应用程序上下文的Environment,来进一步自定义 // 如果没有指定,则通过初始化默认的环境。 @Override public ConfigurableEnvironment getEnvironment() { if (this.environment == null) { // 使用默认的环境配置 this.environment = createEnvironment(); } return this.environment; }-
下面来看一下createEnvironment()如何初始化默认的环境:
// 创建并返回一个 StandardEnvironment,子类重写这个方法为了提供
// 一个自定义的 ConfigurableEnvironment 实现。
protected ConfigurableEnvironment createEnvironment() {
		// StandardEnvironment 继承AbstractEnvironment,而AbstractEnvironment
		// 实现了ConfigurableEnvironment
		return new StandardEnvironment();
	}
其实很简单,也只是new 了一个StandardEnvironment() 的构造器而已。StandardEnvironment是什么?非web应用程序的Environment 的标准实现。他实现了AbstractEnvironment 抽象类,下面是具体的继承树:
-
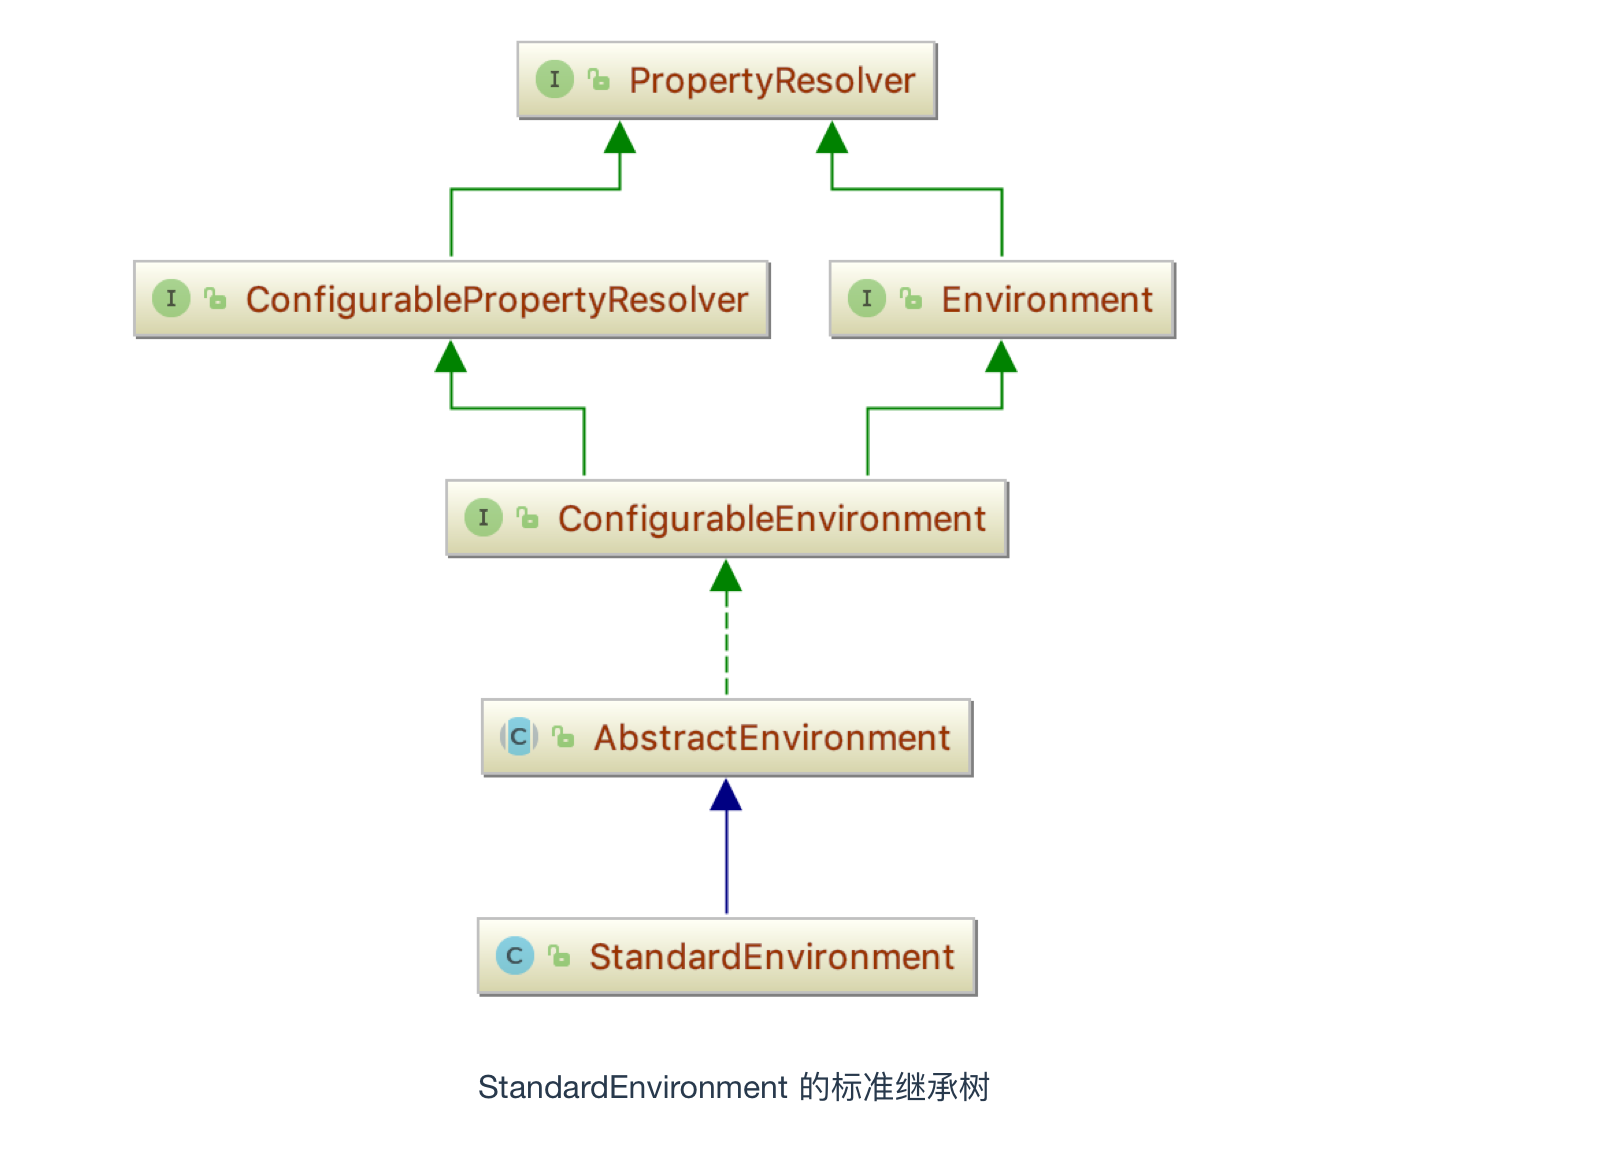
StandardEnvironment是AbstractEnvironment的具体实现,而AbstractEnvironment又是继承了ConfigurableEnvironment接口,提供了某些方法的具体实现,ConnfigurableEnvironment 继承了Environment,而Environment 和 ConfigurablePropertyResolver 同时继承了PropertyResolver
下面来看一下StandardEnvironment() 的源码:

public class StandardEnvironment extends AbstractEnvironment {

  // 系统属性资源名称
	public static final String SYSTEM_ENVIRONMENT_PROPERTY_SOURCE_NAME = "systemEnvironment";

  // JVM系统属性资源名:
	public static final String SYSTEM_PROPERTIES_PROPERTY_SOURCE_NAME = "systemProperties";

  //为标准的Java 环境 自定义合适的属性文件
	@Override
	protected void customizePropertySources(MutablePropertySources propertySources) {
		propertySources.addLast(new MapPropertySource(SYSTEM_PROPERTIES_PROPERTY_SOURCE_NAME, getSystemProperties()));
		propertySources.addLast(new SystemEnvironmentPropertySource(SYSTEM_ENVIRONMENT_PROPERTY_SOURCE_NAME, getSystemEnvironment()));
	}

}


现在读者就会产生疑问,不是说new出来一个标准的StandardEnvironment 实现吗,但是StandardEnvironment并没有默认的构造方法啊?这是什么回事呢?

其实StandardEnvironment 的构造方法是 AbstractEnvironment:

public AbstractEnvironment() {
  // 实现自定义属性资源的方法,也就是StandardEnvironment中customizePropertySources()
  customizePropertySources(this.propertySources);
  if (logger.isDebugEnabled()) {
    logger.debug("Initialized " + getClass().getSimpleName() + " with PropertySources " + this.propertySources);
  }
}


上述的`customizePropertySources` 由`StandardEnvironment` 来实现,具体如下

@Override
protected void customizePropertySources(MutablePropertySources propertySources) {
  propertySources.addLast(new MapPropertySource(SYSTEM_PROPERTIES_PROPERTY_SOURCE_NAME, getSystemProperties()));
  propertySources.addLast(new SystemEnvironmentPropertySource(SYSTEM_ENVIRONMENT_PROPERTY_SOURCE_NAME, getSystemEnvironment()));
}


由于容器在刚起步的时候 propertySources 是null,所以添加完系统环境(systemEnvironment)和系统属性(systemProperties) 之后,会变成下图所示
-
-

如何获取系统属性和如何获取系统环境没有往下跟,有兴趣的读者可以继续沿用。
大致截一个图,里面大概的属性是这样
systemProperties
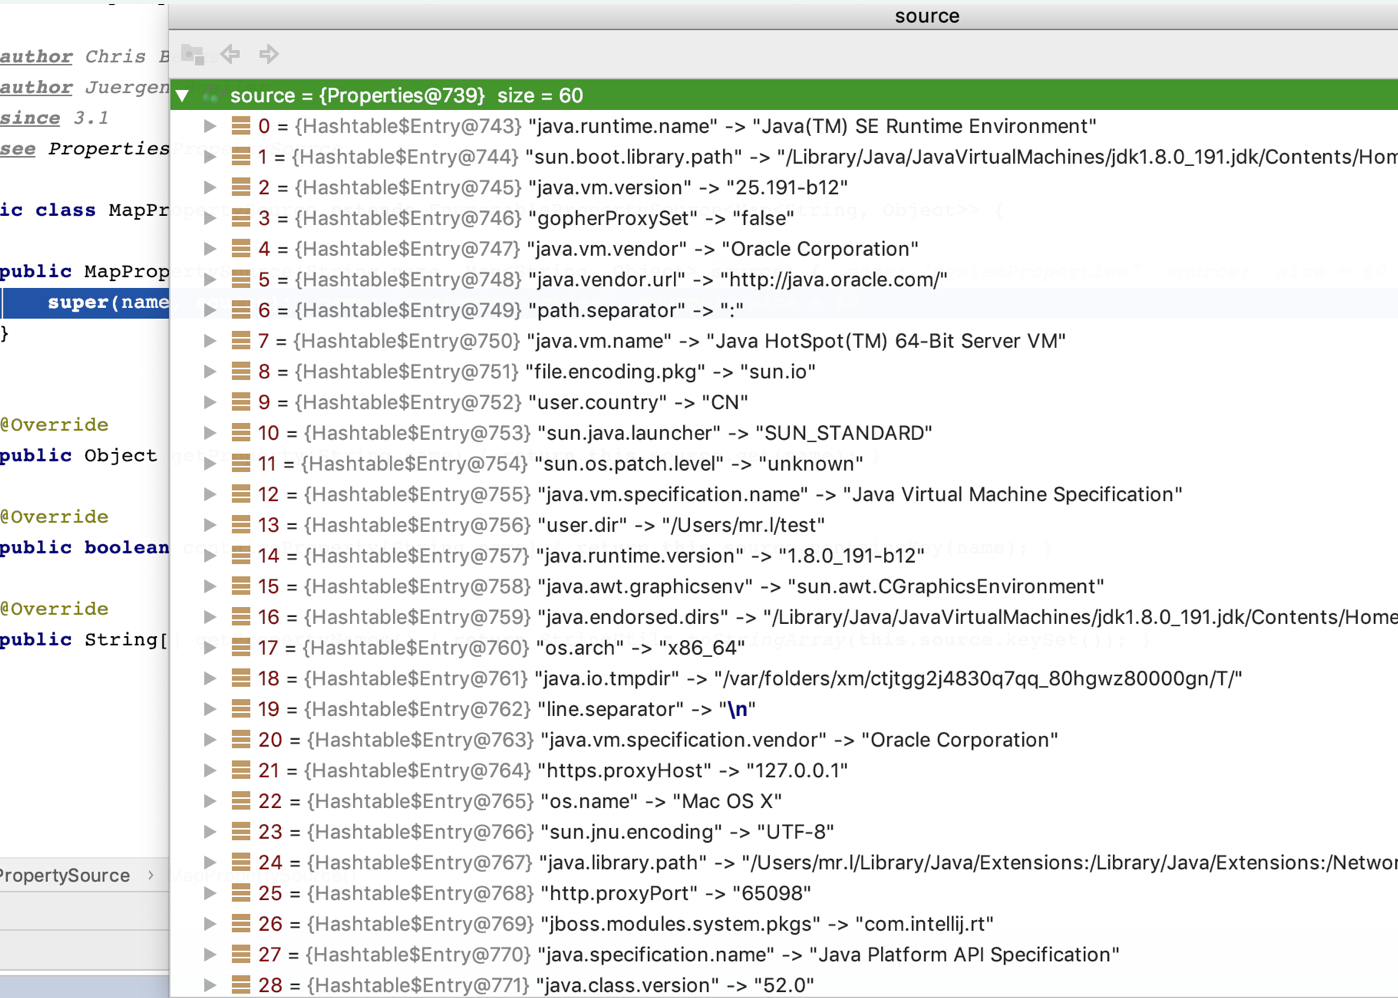
systemEnvironment

-
-
另外一个是 resolveRequiredPlaceholders,它是由
PropertyResolver超顶级接口定义的方法
// 在给定的text 参数中解析${} 占位符,将其替换为getProperty 解析的相应属性值。
// 没有默认值的无法解析的占位符将导致抛出IllegalArgumentException。
String resolveRequiredPlaceholders(String text) throws IllegalArgumentException;
-
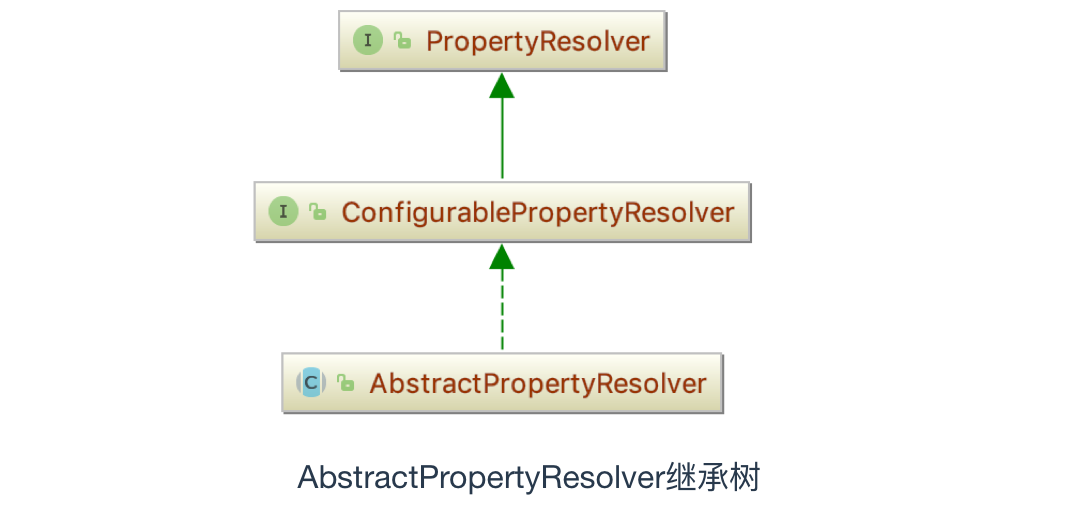
- 由
AbstractPropertyResolver子类来实现,且看AbstractPropertyResolver的继承树
-
具体实现的方法如下:
// 传递进来的文本就是解析过的 配置文件 SimpleName
@Override
public String resolveRequiredPlaceholders(String text) throws IllegalArgumentException {
  if (this.strictHelper == null) {
    this.strictHelper = createPlaceholderHelper(false);
  }
  return doResolvePlaceholders(text, this.strictHelper);
}

// 调用createPlaceholderHelper
private PropertyPlaceholderHelper createPlaceholderHelper(boolean ignoreUnresolvablePlaceholders) {
		return new PropertyPlaceholderHelper(this.placeholderPrefix, this.placeholderSuffix,
				this.valueSeparator, ignoreUnresolvablePlaceholders);
}

----------------------------PropertyPlaceholderHelper-------------------------------

  // PropertyPlaceholderHelper加载的时候会把下面的特殊字符放进去
  static {
		wellKnownSimplePrefixes.put("}", "{");
		wellKnownSimplePrefixes.put("]", "[");
		wellKnownSimplePrefixes.put(")", "(");
	}

/*
	创建一个新的 PropertyPlaceholderHelper 使用提供的前缀 和 后缀
	 * 参数解释:placeholderPrefix 占位符开头的前缀
	 *         placeholderSuffix 占位符结尾的后缀
	 *		   valueSeparator 占位符变量和关联的默认值 之间的分隔符
	 *		   ignoreUnresolvablePlaceholders 指示是否应忽略不可解析的占位符。
*/

public PropertyPlaceholderHelper(String placeholderPrefix, String placeholderSuffix,
                                 @Nullable String valueSeparator, boolean ignoreUnresolvablePlaceholders) {

  Assert.notNull(placeholderPrefix, "'placeholderPrefix' must not be null");
  Assert.notNull(placeholderSuffix, "'placeholderSuffix' must not be null");
  this.placeholderPrefix = placeholderPrefix;
  this.placeholderSuffix = placeholderSuffix;
  String simplePrefixForSuffix = wellKnownSimplePrefixes.get(this.placeholderSuffix);
  if (simplePrefixForSuffix != null && this.placeholderPrefix.endsWith(simplePrefixForSuffix)) {
    this.simplePrefix = simplePrefixForSuffix;
  }
  else {
    this.simplePrefix = this.placeholderPrefix;
  }
  this.valueSeparator = valueSeparator;
  this.ignoreUnresolvablePlaceholders = ignoreUnresolvablePlaceholders;
}
解析完成占位符之后,需要做真正的解析,调用
AbstractPropertyResolver中的doResolvePlaceholders 方法。private String doResolvePlaceholders(String text, PropertyPlaceholderHelper helper) { return helper.replacePlaceholders(text, new PropertyPlaceholderHelper.PlaceholderResolver() { @Override public String resolvePlaceholder(String placeholderName) { return getPropertyAsRawString(placeholderName); } }); }PlaceholderResolver是 PropertyPlaceholderHelper类的内部类,这是一种匿名内部类的写法,它真正调用的就是PropertyPlaceholderHelper中的 replacePlaceholders 方法,具体如下:// 将格式为 ${name} 的占位符替换为从提供 PlaceholderResolver 返回的值。 public String replacePlaceholders(String value, PlaceholderResolver placeholderResolver) { Assert.notNull(value, "'value' must not be null"); return parseStringValue(value, placeholderResolver, new HashSet<String>()); } protected String parseStringValue( String value, PlaceholderResolver placeholderResolver, Set<String> visitedPlaceholders) { StringBuilder result = new StringBuilder(value); int startIndex = value.indexOf(this.placeholderPrefix); // 判断指定的占位符有无 ${ 存在,没有的话直接返回 while (startIndex != -1) { int endIndex = findPlaceholderEndIndex(result, startIndex); if (endIndex != -1) { String placeholder = result.substring(startIndex + this.placeholderPrefix.length(), endIndex); String originalPlaceholder = placeholder; if (!visitedPlaceholders.add(originalPlaceholder)) { throw new IllegalArgumentException( "Circular placeholder reference '" + originalPlaceholder + "' in property definitions"); } // Recursive invocation, parsing placeholders contained in the placeholder key. placeholder = parseStringValue(placeholder, placeholderResolver, visitedPlaceholders); // Now obtain the value for the fully resolved key... String propVal = placeholderResolver.resolvePlaceholder(placeholder); if (propVal == null && this.valueSeparator != null) { int separatorIndex = placeholder.indexOf(this.valueSeparator); if (separatorIndex != -1) { String actualPlaceholder = placeholder.substring(0, separatorIndex); String defaultValue = placeholder.substring(separatorIndex + this.valueSeparator.length()); propVal = placeholderResolver.resolvePlaceholder(actualPlaceholder); if (propVal == null) { propVal = defaultValue; } } } if (propVal != null) { // Recursive invocation, parsing placeholders contained in the // previously resolved placeholder value. propVal = parseStringValue(propVal, placeholderResolver, visitedPlaceholders); result.replace(startIndex, endIndex + this.placeholderSuffix.length(), propVal); if (logger.isTraceEnabled()) { logger.trace("Resolved placeholder '" + placeholder + "'"); } startIndex = result.indexOf(this.placeholderPrefix, startIndex + propVal.length()); } else if (this.ignoreUnresolvablePlaceholders) { // Proceed with unprocessed value. startIndex = result.indexOf(this.placeholderPrefix, endIndex + this.placeholderSuffix.length()); } else { throw new IllegalArgumentException("Could not resolve placeholder '" + placeholder + "'" + " in value "" + value + """); } visitedPlaceholders.remove(originalPlaceholder); } else { startIndex = -1; } } return result.toString(); }直白一点,上述过程就是用来判断有没有 ${ 这个占位符,如果有的话就进入下面的判断逻辑,把${}
中的值替换为 PlaceholderResolver 返回的值,如果没有的话,就直接返回。
- 由
容器刷新
在经过上述的准备工作完成后,接下来就是整个IOC,DI和AOP的核心步骤了,也是Spring框架的灵魂。由于源码太多,设计范围太广,本篇只分析刷新预处理应该做的事:我们都知道,无论你加载的是哪一种上下文环境,最终都会调用 AbstractApplicationContext 的refresh()方法,此方法是一切加载、解析、注册、销毁的核心方法,采用了工厂的设计思想。
// 完成IoC容器的创建及初始化工作
	@Override
	public void refresh() throws BeansException, IllegalStateException {
		synchronized (this.startupShutdownMonitor) {

      // 1: 刷新前的准备工作。
			prepareRefresh();

			// 告诉子类刷新内部bean 工厂。
      //  2:创建IoC容器(DefaultListableBeanFactory),加载解析XML文件(最终存储到Document对象中)
      // 读取Document对象,并完成BeanDefinition的加载和注册工作
			ConfigurableListableBeanFactory beanFactory = obtainFreshBeanFactory();

      //  3: 对IoC容器进行一些预处理(设置一些公共属性)
			prepareBeanFactory(beanFactory);

			try {

				// 	4:  允许在上下文子类中对bean工厂进行后处理。
								postProcessBeanFactory(beanFactory);

				//  5: 调用BeanFactoryPostProcessor后置处理器对BeanDefinition处理
                invokeBeanFactoryPostProcessors(beanFactory);

				//  6: 注册BeanPostProcessor后置处理器
                registerBeanPostProcessors(beanFactory);

				//  7: 初始化一些消息源(比如处理国际化的i18n等消息源)
                initMessageSource();

				//  8: 初始化应用事件多播器
                initApplicationEventMulticaster();

				//  9: 初始化一些特殊的bean
                onRefresh();

				//  10: 注册一些监听器
                registerListeners();

				//  11: 实例化剩余的单例bean(非懒加载方式)
        //      注意事项:Bean的IoC、DI和AOP都是发生在此步骤
                finishBeanFactoryInitialization(beanFactory);

				//  12: 完成刷新时,需要发布对应的事件
                finishRefresh();
			}

			catch (BeansException ex) {
				if (logger.isWarnEnabled()) {
					logger.warn("Exception encountered during context initialization - " +
							"cancelling refresh attempt: " + ex);
				}

				// 销毁已经创建的单例避免占用资源
				destroyBeans();

				// 重置'active' 标签。
				cancelRefresh(ex);

				// 传播异常给调用者
				throw ex;
			}

			finally {

				// 重置Spring核心中的常见内省缓存,因为我们可能不再需要单例bean的元数据了...
				resetCommonCaches();
			}
		}
	}
刷新容器之刷新预处理
此步骤的主要作用在于:准备刷新的上下文,设置启动的时间和active的标志作为扮演属性资源初始化的角色。
protected void prepareRefresh() {
		this.startupDate = System.currentTimeMillis();
		this.closed.set(false);
		this.active.set(true);

		if (logger.isInfoEnabled()) {
			logger.info("Refreshing " + this);
		}

		// 初始化environment 上下文中的占位符属性资源
		initPropertySources();
		// 验证标记为必需的所有属性是否可解析
		getEnvironment().validateRequiredProperties();

		// 允许收集早期的ApplicationEvents
		this.earlyApplicationEvents = new LinkedHashSet<>();
	}
这里面有两处代码需要说明:initPropertySources这个方法是需要子类进行实现的,默认是不会做任何事情的;getEnvironment() 这个方法由于上述的源码分析过程中,已经默认创建了 createEnvironment,所以这段代码是直接返回的
@Override
public ConfigurableEnvironment getEnvironment() {
  if (this.environment == null) {
    this.environment = createEnvironment();
  }
  return this.environment;
}
下面只剩下了validateRequiredProperties()的分析,不着急,看源码不能着急,要怀着这个世界很美好的心情去看。
首先在 ConfigurablePropertyResolver 接口中定义了 validateRequiredProperties 方法
// 验证每一个被setRequiredProperties 设置的属性存在并且解析非空值,会抛出
// MissingRequiredPropertiesException 异常如果任何一个需要的属性没有被解析。
void validateRequiredProperties() throws MissingRequiredPropertiesException;
在抽象子类AbstractPropertyResolver 中被重写
@Override
public void validateRequiredProperties() {
  // 属性找不到抛出异常的对象
  MissingRequiredPropertiesException ex = new MissingRequiredPropertiesException();
  for (String key : this.requiredProperties) {
    if (this.getProperty(key) == null) {
      ex.addMissingRequiredProperty(key);
    }
  }
  if (!ex.getMissingRequiredProperties().isEmpty()) {
    throw ex;
  }
}
因为在我们的源码分析中,没有看到任何操作是在对 requiredProperties 进行添加操作,也就是如下:
@Override
public void setRequiredProperties(String... requiredProperties) {
  if (requiredProperties != null) {
    for (String key : requiredProperties) {
      this.requiredProperties.add(key);
    }
  }
}
所以,此时的 requiredProperties 这个set集合是null, 也就不存在没有解析的元素了。
本篇到此就结束了,下一篇文章会进行源码分析的下一个步骤: 创建IOC容器以及Bean的解析。