挑战任务回顾教育系统APP(二)以及教育系统APP(三)
检验登录和注册模块。请修改MainActivity和LoginActivity,欢迎界面调转入主界面后,自动跳转入登录界面,登录成功后,返回主界面,在主界面的Hello World位置显示:用户名 “登录成功”。
解决方法
解决任务看看一下AndroidManifest.xml
<?xml version="1.0" encoding="utf-8"?>
<manifest xmlns:android="http://schemas.android.com/apk/res/android"
    package="cn.edu.gdmec.android.boxuegu">

    <!--原为android:theme="@style/AppTheme"-->
    <!--去除ActionBar标题栏-->
    <!--添加应用图标,app_icon-->
    <application
        android:allowBackup="true"
        android:icon="@drawable/app_icon"
        android:label="@string/app_name"
        android:roundIcon="@mipmap/ic_launcher_round"
        android:supportsRtl="true"
        android:theme="@style/Theme.AppCompat.NoActionBar">
        <activity android:name=".activity.SplashActivity">
            <intent-filter>
                <action android:name="android.intent.action.MAIN" />
                <category android:name="android.intent.category.LAUNCHER" />
            </intent-filter>
        </activity>
        <!--添加实现类-->
        <activity android:name=".activity.MainActivity"></activity>
        <activity android:name=".activity.LoginActivity"></activity>
        <activity android:name=".activity.RegisterActivity"></activity>
    </application>
</manifest>
然后在MainActivity中编写代码,activity_main.xml添加一下显示,把helloWord改为显示账号:
<?xml version="1.0" encoding="utf-8"?>
<!--任务:检验登录和注册模块-->
<!--在主界面的Hello World位置显示:用户名 “登录成功”-->
<LinearLayout xmlns:android="http://schemas.android.com/apk/res/android"
    android:layout_width="match_parent"
    android:layout_height="match_parent"
    android:orientation="vertical"
    android:gravity="center">

    <TextView
        android:id="@ id/et_user_name"
        android:layout_width="wrap_content"
        android:layout_height="wrap_content"
        android:text="hello"
        android:layout_gravity="center"/>

</LinearLayout>
package cn.edu.gdmec.android.boxuegu.activity;
import android.content.Intent;
import android.support.v7.app.AppCompatActivity;
import android.os.Bundle;
import android.widget.TextView;
import android.widget.Toast;
import cn.edu.gdmec.android.boxuegu.R;
/*任务在主界面的Hello World位置显示:用户名 “登录成功”*/
public class MainActivity extends AppCompatActivity {
private TextView et_user_name;
@Override
protected void onCreate(Bundle savedInstanceState) {
super.onCreate(savedInstanceState);
setContentView(R.layout.activity_main);
et_user_name = findViewById(R.id.et_user_name);
Intent intent=new Intent(MainActivity.this,LoginActivity.class);
startActivityForResult(intent,1);
}
@Override
protected void onActivityResult(int requestCode, int resultCode, Intent data) {
super.onActivityResult(requestCode, resultCode, data);
if (data!=null){
String userName = data.getStringExtra("userName");
//if (!TextUtils.isEmpty(userName)){
Toast.makeText(MainActivity.this,"登陆成功:" userName, Toast.LENGTH_SHORT).show();
et_user_name.setText(userName);
//}
}
}
}最后在LoginActivity下:
data.putExtra("userName",userName);教育系统APP(三) 主界面学习目标:掌握注册和登录模块的开发,能够实现模块切换功能。
主页面,挑战任务
学习目标主界面有三个模块,分别为课程模块、习题模块、用户模块。用户点击底部导航栏可以实现三个模块的跳转。主界面用于做三个模块的切换。使用Fragment做为三个模块界面的载体。
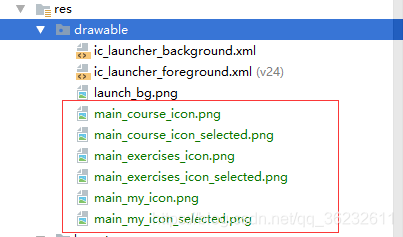
任务实施放置图片资源本次实验要用到的图片资源有6个,分别为mainexercisesicon.png、maincourseicon.png、mainmyicon.pngmainexercisesicon_selected.png、maincourseicon_selected.png、mainmyicon_selected.png把要用到的图片资源放进drawrable文件夹中。

activity_main布局MainActivity页面主要包括两个区域:放Fragment的main_body底部导航栏mainbottombaractivity_main.xml的完整代码
<?xml version="1.0" encoding="utf-8"?>
<RelativeLayout
    xmlns:android="http://schemas.android.com/apk/res/android"
    android:layout_width="match_parent"
    android:layout_height="wrap_content"
    android:orientation="vertical">
    <LinearLayout
        android:orientation="vertical"
        android:background="@android:color/white"
        android:layout_width="match_parent"
        android:layout_height="match_parent">
        <!--标题栏-->
        <include layout="@layout/main_title_bar"/>
        <!--放置Fragment的main_body-->
        <RelativeLayout
            android:id="@ id/main_body"
            android:background="@android:color/white"
            android:layout_width="match_parent"
            android:layout_height="match_parent">
        </RelativeLayout>
    </LinearLayout>

    <LinearLayout
        android:id="@ id/main_bottom_bar"
        android:layout_alignParentBottom="true"
        android:background="#F2F2F2"
        android:orientation="horizontal"
        android:layout_width="match_parent"
        android:layout_height="55dp">
        <RelativeLayout
            android:layout_weight="1"
            android:id="@ id/bottom_bar_course_btn"
            android:layout_width="0dp"
            android:layout_height="match_parent">
            <TextView
                android:id="@ id/bottom_bar_text_course"
                android:layout_width="match_parent"
                android:layout_height="wrap_content"
                android:layout_alignParentBottom="true"
                android:layout_centerHorizontal="true"
                android:layout_marginBottom="3dp"
                android:gravity="center"
                android:singleLine="true"
                android:text="课 程"
                android:textColor="#666666"
                android:textSize="14sp"/>
            <ImageView
                android:layout_width="27dp"
                android:layout_height="27dp"
                android:layout_above="@ id/bottom_bar_text_course"
                android:layout_alignParentTop="true"
                android:layout_centerHorizontal="true"
                android:layout_marginTop="3dp"
                android:id="@ id/bottom_bar_image_course"
                android:src="@drawable/main_course_icon"/>
        </RelativeLayout>
        <RelativeLayout
            android:id="@ id/bottom_bar_exercises_btn"
            android:layout_weight="1"
            android:layout_width="0dp"
            android:layout_height="match_parent">
            <TextView
                android:id="@ id/bottom_bar_text_exercises"
                android:layout_width="match_parent"
                android:layout_height="wrap_content"
                android:layout_alignParentBottom="true"
                android:layout_centerHorizontal="true"
                android:layout_marginBottom="3dp"
                android:gravity="center"
                android:singleLine="true"
                android:text="习 题"
                android:textColor="#666666"
                android:textSize="14sp"/>
            <ImageView
                android:layout_width="27dp"
                android:layout_height="27dp"
                android:layout_above="@ id/bottom_bar_text_exercises"
                android:layout_alignParentTop="true"
                android:layout_centerHorizontal="true"
                android:layout_marginTop="3dp"
                android:id="@ id/bottom_bar_image_exercises"
                android:src="@drawable/main_exercises_icon"/>
        </RelativeLayout>
        <RelativeLayout
            android:layout_weight="1"
            android:id="@ id/bottom_bar_myinfo_btn"
            android:layout_width="0dp"
            android:layout_height="match_parent">
            <TextView
                android:id="@ id/bottom_bar_text_myinfo"
                android:layout_width="match_parent"
                android:layout_height="wrap_content"
                android:layout_alignParentBottom="true"
                android:layout_centerHorizontal="true"
                android:layout_marginBottom="3dp"
                android:gravity="center"
                android:singleLine="true"
                android:text="我"
                android:textColor="#666666"
                android:textSize="14sp"/>
            <ImageView
                android:layout_width="27dp"
                android:layout_height="27dp"
                android:layout_above="@ id/bottom_bar_text_myinfo"
                android:layout_alignParentTop="true"
                android:layout_centerHorizontal="true"
                android:layout_marginTop="3dp"
                android:id="@ id/bottom_bar_image_myinfo"
                android:src="@drawable/main_my_icon"/>
        </RelativeLayout>
    </LinearLayout>
</RelativeLayout>
实例化控件点一下MainActivity
public class MainActivity extends AppCompatActivity {
    private RelativeLayout main_body;
    private TextView bottom_bar_text_course;
    private ImageView bottom_bar_image_course;
    private RelativeLayout bottom_bar_course_btn;
    private TextView bottom_bar_text_exercises;
    private ImageView bottom_bar_image_exercises;
    private RelativeLayout bottom_bar_exercises_btn;
    private TextView bottom_bar_text_myinfo;
    private ImageView bottom_bar_image_myinfo;
    private RelativeLayout bottom_bar_myinfo_btn;
    private LinearLayout main_bottom_bar;

    @Override
    protected void onCreate(Bundle savedInstanceState) {
        super.onCreate(savedInstanceState);
        setContentView(R.layout.activity_main);
        initView();
        setRequestedOrientation(ActivityInfo.SCREEN_ORIENTATION_PORTRAIT);
    }


    private void initView() {
        main_body = findViewById(R.id.main_body);
        bottom_bar_text_course = findViewById(R.id.bottom_bar_text_course);
        bottom_bar_image_course = findViewById(R.id.bottom_bar_image_course);
        bottom_bar_course_btn = findViewById(R.id.bottom_bar_course_btn);
        bottom_bar_text_exercises = findViewById(R.id.bottom_bar_text_exercises);
        bottom_bar_image_exercises = findViewById(R.id.bottom_bar_image_exercises);
        bottom_bar_exercises_btn = findViewById(R.id.bottom_bar_exercises_btn);
        bottom_bar_text_myinfo = findViewById(R.id.bottom_bar_text_myinfo);
        bottom_bar_image_myinfo = findViewById(R.id.bottom_bar_image_myinfo);
        bottom_bar_myinfo_btn = findViewById(R.id.bottom_bar_myinfo_btn);
        main_bottom_bar = findViewById(R.id.main_bottom_bar);
    }

}
控件实例化的部分就完成啦。
底部导航栏状态的切换方法底部导航栏在点击切换时,会有变色的效果。

给MainActivity加一个setSelectStatus()方法。
    private void setSelectStatus(int index) {
        switch (index){
            case 0:
                bottom_bar_image_course.setImageResource(R.drawable.main_course_icon_selected);
                bottom_bar_text_course.setTextColor(Color.parseColor("#0097F7"));
                bottom_bar_text_exercises.setTextColor(Color.parseColor("#666666"));
                bottom_bar_text_myinfo.setTextColor(Color.parseColor("#666666"));
                bottom_bar_image_exercises.setImageResource(R.drawable.main_exercises_icon);
                bottom_bar_image_myinfo.setImageResource(R.drawable.main_my_icon);
                break;
            case 1:
                bottom_bar_image_exercises.setImageResource(R.drawable.main_exercises_icon_selected);
                bottom_bar_text_exercises.setTextColor(Color.parseColor("#0097F7"));
                bottom_bar_text_course.setTextColor(Color.parseColor("#666666"));
                bottom_bar_text_myinfo.setTextColor(Color.parseColor("#666666"));
                bottom_bar_image_course.setImageResource(R.drawable.main_course_icon);
                bottom_bar_image_myinfo.setImageResource(R.drawable.main_my_icon);
                break;
            case 2:
                bottom_bar_image_myinfo.setImageResource(R.drawable.main_my_icon_selected);
                bottom_bar_text_myinfo.setTextColor(Color.parseColor("#0097F7"));
                bottom_bar_text_course.setTextColor(Color.parseColor("#666666"));
                bottom_bar_text_exercises.setTextColor(Color.parseColor("#666666"));
                bottom_bar_image_exercises.setImageResource(R.drawable.main_exercises_icon);
                bottom_bar_image_course.setImageResource(R.drawable.main_course_icon);
                break;
        }
    }
在setSelectStatus()方法里用参数index来判断当前选的按钮。
底部导航栏的响应导航栏颜色切换效果的方法写好了,接下来是点击响应的方法。先给MainActivity加上View.OnClickListener接口
public class MainActivity extends AppCompatActivity implements View.OnClickListener{Alt 回车生成onClick() 方法在生成的onClick()方法中加上导航栏区域的响应。
    @Override
    public void onClick(View v) {
        switch (v.getId()){
            case R.id.bottom_bar_course_btn:
                setSelectStatus(0);
                break;
            case R.id.bottom_bar_exercises_btn:
                setSelectStatus(1);
                break;
            case R.id.bottom_bar_myinfo_btn:
                setSelectStatus(2);
                break;
        }
    }
别忘了给三个RelativeLayout控件加上监听器,我的习惯是在initView()方法里加。
        bottom_bar_course_btn.setOnClickListener(this);
        bottom_bar_exercises_btn.setOnClickListener(this);
        bottom_bar_myinfo_btn.setOnClickListener(this);
至此,底部导航栏的代码就完成了。
    private void initView() {
        main_body = findViewById(R.id.main_body);
        bottom_bar_text_course = findViewById(R.id.bottom_bar_text_course);
        bottom_bar_image_course = findViewById(R.id.bottom_bar_image_course);
        bottom_bar_course_btn = findViewById(R.id.bottom_bar_course_btn);
        bottom_bar_text_exercises = findViewById(R.id.bottom_bar_text_exercises);
        bottom_bar_image_exercises = findViewById(R.id.bottom_bar_image_exercises);
        bottom_bar_exercises_btn = findViewById(R.id.bottom_bar_exercises_btn);
        bottom_bar_text_myinfo = findViewById(R.id.bottom_bar_text_myinfo);
        bottom_bar_image_myinfo = findViewById(R.id.bottom_bar_image_myinfo);
        bottom_bar_myinfo_btn = findViewById(R.id.bottom_bar_myinfo_btn);
        main_bottom_bar = findViewById(R.id.main_bottom_bar);

        bottom_bar_course_btn.setOnClickListener(this);
        bottom_bar_exercises_btn.setOnClickListener(this);
        bottom_bar_myinfo_btn.setOnClickListener(this);
    }
三个fragment的创建我们还是用Fragment的方法来做三个模块的界面吧。首先新建3个布局文件。fragment_course.xmlfragment_exercises.xmlfragment_myinfo.xml布局文件的内容都相似,一个大大的TextView,里面写着Fragment_1/2/3。记得改背景颜色和字体颜色。
fragment_course.xml
<?xml version="1.0" encoding="utf-8"?>
<LinearLayout
    xmlns:android="http://schemas.android.com/apk/res/android"
    android:layout_width="match_parent"
    android:layout_height="match_parent"
    android:background="@android:color/white">
    <TextView
        android:layout_width="wrap_content"
        android:layout_height="wrap_content"
        android:text="Fragment_1"
        android:textColor="@android:color/black"
        android:textSize="50sp"/>
</LinearLayout>
fragment_exercises.xml
<?xml version="1.0" encoding="utf-8"?>
<LinearLayout
xmlns:android="http://schemas.android.com/apk/res/android"
android:layout_width="match_parent"
android:layout_height="match_parent"
android:background="@android:color/white">
<TextView
android:layout_width="wrap_content"
android:layout_height="wrap_content"
android:text="Fragment_2"
android:textColor="@android:color/black"
android:textSize="50sp"/>
</LinearLayout>fragment_myinfo.xml
<?xml version="1.0" encoding="utf-8"?>
<LinearLayout
    xmlns:android="http://schemas.android.com/apk/res/android"
    android:layout_width="match_parent"
    android:layout_height="match_parent"
    android:background="@android:color/white">
    <TextView
        android:layout_width="wrap_content"
        android:layout_height="wrap_content"
        android:text="Fragment_3"
        android:textColor="@android:color/black"
        android:textSize="50sp"/>
</LinearLayout>
建一个Fragment包,把三个Fragment放进去CourseFragment.java
package cn.edu.gdmec.android.boxuegu.fragment;

import android.os.Bundle;
import android.support.v4.app.Fragment;
import android.view.LayoutInflater;
import android.view.View;
import android.view.ViewGroup;

import cn.edu.gdmec.android.boxuegu.R;

public class CourseFragment extends Fragment {


    @Override
    public View onCreateView(LayoutInflater inflater, ViewGroup container,
                             Bundle savedInstanceState) {
        return inflater.inflate(R.layout.fragment_course, null);
    }

    @Override
    public void onViewCreated(View view, Bundle savedInstanceState) {
        super.onViewCreated(view, savedInstanceState);

    }
}
ExercisesFragment.java
package cn.edu.gdmec.android.boxuegu.fragment;

import android.os.Bundle;
import android.support.v4.app.Fragment;
import android.view.LayoutInflater;
import android.view.View;
import android.view.ViewGroup;

import cn.edu.gdmec.android.boxuegu.R;

public class ExercisesFragment extends Fragment {

    @Override
    public View onCreateView(LayoutInflater inflater, ViewGroup container,
                             Bundle savedInstanceState) {
        return inflater.inflate(R.layout.fragment_exercises, null);
    }

    @Override
    public void onViewCreated(View view, Bundle savedInstanceState) {
        super.onViewCreated(view, savedInstanceState);

    }

}
MyinfoFragment.java
package cn.edu.gdmec.android.boxuegu.fragment;

import android.os.Bundle;
import android.support.v4.app.Fragment;
import android.view.LayoutInflater;
import android.view.View;
import android.view.ViewGroup;

import cn.edu.gdmec.android.boxuegu.R;

public class MyinfoFragment extends Fragment {

    @Override
    public View onCreateView(LayoutInflater inflater, ViewGroup container,
                             Bundle savedInstanceState) {
        return inflater.inflate(R.layout.fragment_myinfo, null);
    }

    @Override
    public void onViewCreated(View view, Bundle savedInstanceState) {
        super.onViewCreated(view, savedInstanceState);

    }

}
三个fragment的显示和切换Fragment用的是android.support.v4.app.Fragment接下来我们在MainActivity里把AppCompatActivity改为FragmentActivity。
public class MainActivity extends FragmentActivity implements View.OnClickListener{把Fragment加到Activity里的代码如下
FragmentManager manager = getSupportFragmentManager();
FragmentTransaction transaction = manager.beginTransaction();
transaction.add(R.id.main_body,new CourseFragment()).commit();
我们写一个setMain()方法,用于打开初始页面
    private void setMain() {
        this.getSupportFragmentManager().beginTransaction().add(R.id.main_body,new CourseFragment()).commit();
        setSelectStatus(0);
    }
这里面用的是连写,跟上面Fragment加到Activity的代码是一样效果的,这个看个人习惯。
在onCreate()方法里调用
    @Override
    protected void onCreate(Bundle savedInstanceState) {
        super.onCreate(savedInstanceState);
        setContentView(R.layout.activity_main);
        initView();
        setRequestedOrientation(ActivityInfo.SCREEN_ORIENTATION_PORTRAIT);
        setMain();
    }
点击底部导航栏时,要切换响应的fragment,我们在onClick()方法里加上Fragment切换的方法。
    @Override
    public void onClick(View v) {
        switch (v.getId()){
            case R.id.bottom_bar_course_btn:
                getSupportFragmentManager().beginTransaction().add(R.id.main_body,new CourseFragment()).commit();
                setSelectStatus(0);
                break;
            case R.id.bottom_bar_exercises_btn:
                getSupportFragmentManager().beginTransaction().add(R.id.main_body,new ExercisesFragment()).commit();
                setSelectStatus(1);
                break;
            case R.id.bottom_bar_myinfo_btn:
                getSupportFragmentManager().beginTransaction().add(R.id.main_body,new MyinfoFragment()).commit();
                setSelectStatus(2);
                break;
        }
    }
完整的MainActivity.java
package cn.edu.gdmec.android.boxuegu.activity;

import android.content.pm.ActivityInfo;
import android.graphics.Color;
import android.os.Bundle;
import android.support.v4.app.FragmentActivity;
import android.view.View;
import android.widget.ImageView;
import android.widget.LinearLayout;
import android.widget.RelativeLayout;
import android.widget.TextView;

import cn.edu.gdmec.android.boxuegu.R;
import cn.edu.gdmec.android.boxuegu.fragment.CourseFragment;
import cn.edu.gdmec.android.boxuegu.fragment.ExercisesFragment;
import cn.edu.gdmec.android.boxuegu.fragment.MyinfoFragment;

/*任务在主界面的Hello World位置显示:用户名 “登录成功”*/
public class MainActivity extends FragmentActivity implements View.OnClickListener{
    private RelativeLayout main_body;
    private TextView bottom_bar_text_course;
    private ImageView bottom_bar_image_course;
    private RelativeLayout bottom_bar_course_btn;
    private TextView bottom_bar_text_exercises;
    private ImageView bottom_bar_image_exercises;
    private RelativeLayout bottom_bar_exercises_btn;
    private TextView bottom_bar_text_myinfo;
    private ImageView bottom_bar_image_myinfo;
    private RelativeLayout bottom_bar_myinfo_btn;
    private LinearLayout main_bottom_bar;

    @Override
    protected void onCreate(Bundle savedInstanceState) {
        super.onCreate(savedInstanceState);
        setContentView(R.layout.activity_main);
        initView();
        setRequestedOrientation(ActivityInfo.SCREEN_ORIENTATION_PORTRAIT);
        //把Fragment加到Activity里的代码如下
       /* FragmentManager manager = getSupportFragmentManager();
        FragmentTransaction transaction = manager.beginTransaction();
        transaction.add(R.id.main_body,new CourseFragment()).commit();*/
       setMain();
    }

    private void setMain() {
        this.getSupportFragmentManager().beginTransaction().add(R.id.main_body,new MyinfoFragment()).commit();
        setSelectStatus(2);
    }

    private void setSelectStatus(int index) {
        switch (index){
            case 0:
                bottom_bar_image_course.setImageResource(R.drawable.main_course_icon_selected);
                bottom_bar_text_course.setTextColor(Color.parseColor("#0097F7"));
                bottom_bar_text_exercises.setTextColor(Color.parseColor("#666666"));
                bottom_bar_text_myinfo.setTextColor(Color.parseColor("#666666"));
                bottom_bar_image_exercises.setImageResource(R.drawable.main_exercises_icon);
                bottom_bar_image_myinfo.setImageResource(R.drawable.main_my_icon);
                break;
            case 1:
                bottom_bar_image_exercises.setImageResource(R.drawable.main_exercises_icon_selected);
                bottom_bar_text_exercises.setTextColor(Color.parseColor("#0097F7"));
                bottom_bar_text_course.setTextColor(Color.parseColor("#666666"));
                bottom_bar_text_myinfo.setTextColor(Color.parseColor("#666666"));
                bottom_bar_image_course.setImageResource(R.drawable.main_course_icon);
                bottom_bar_image_myinfo.setImageResource(R.drawable.main_my_icon);
                break;
            case 2:
                bottom_bar_image_myinfo.setImageResource(R.drawable.main_my_icon_selected);
                bottom_bar_text_myinfo.setTextColor(Color.parseColor("#0097F7"));
                bottom_bar_text_course.setTextColor(Color.parseColor("#666666"));
                bottom_bar_text_exercises.setTextColor(Color.parseColor("#666666"));
                bottom_bar_image_exercises.setImageResource(R.drawable.main_exercises_icon);
                bottom_bar_image_course.setImageResource(R.drawable.main_course_icon);
                break;
        }
    }
    private void initView() {
        main_body = findViewById(R.id.main_body);
        bottom_bar_text_course = findViewById(R.id.bottom_bar_text_course);
        bottom_bar_image_course = findViewById(R.id.bottom_bar_image_course);
        bottom_bar_course_btn = findViewById(R.id.bottom_bar_course_btn);
        bottom_bar_text_exercises = findViewById(R.id.bottom_bar_text_exercises);
        bottom_bar_image_exercises = findViewById(R.id.bottom_bar_image_exercises);
        bottom_bar_exercises_btn = findViewById(R.id.bottom_bar_exercises_btn);
        bottom_bar_text_myinfo = findViewById(R.id.bottom_bar_text_myinfo);
        bottom_bar_image_myinfo = findViewById(R.id.bottom_bar_image_myinfo);
        bottom_bar_myinfo_btn = findViewById(R.id.bottom_bar_myinfo_btn);
        main_bottom_bar = findViewById(R.id.main_bottom_bar);

        bottom_bar_course_btn.setOnClickListener(this);
        bottom_bar_exercises_btn.setOnClickListener(this);
        bottom_bar_myinfo_btn.setOnClickListener(this);
    }

    @Override
    public void onClick(View v) {
        switch (v.getId()){
            case R.id.bottom_bar_course_btn:
                getSupportFragmentManager().beginTransaction().add(R.id.main_body,new CourseFragment()).commit();
                setSelectStatus(0);
                break;
            case R.id.bottom_bar_exercises_btn:
                getSupportFragmentManager().beginTransaction().add(R.id.main_body,new ExercisesFragment()).commit();
                setSelectStatus(1);
                break;
            case R.id.bottom_bar_myinfo_btn:
                getSupportFragmentManager().beginTransaction().add(R.id.main_body,new MyinfoFragment()).commit();
                setSelectStatus(2);
                break;
        }
    }
}
好了,完成,这里没有新添加的activity的类。接下来进行挑战任务!
挑战任务初次打开页面都是Fragment1,请修改相关代码,让初始打开的页面为Fragment3,别忘了底部导航栏也要变颜色哦
总结这是走好Android的三步!
❤️ 不要忘记留下你学习的脚印 [点赞 收藏 评论]
作者Info:
【作者】:Jeskson
【原创公众号】:达达前端小酒馆。
【福利】:公众号回复 “资料” 送自学资料大礼包(进群分享,想要啥就说哈,看我有没有)!
【转载说明】:转载请说明出处,谢谢合作!~
大前端开发,定位前端开发技术栈博客,PHP后台知识点,web全栈技术领域,数据结构与算法、网络原理等通俗易懂的呈现给小伙伴。谢谢支持,承蒙厚爱!!!
若本号内容有做得不到位的地方(比如:涉及版权或其他问题),请及时联系我们进行整改即可,会在第一时间进行处理。
请点赞!因为你们的赞同/鼓励是我写作的最大动力!
欢迎关注达达的CSDN!
这是一个有质量,有态度的博客