XMemcached Introduction
XMemcached is a new java memcached client. Maybe you don't know "memcached" so far, you can check Here. It is a free & open source, high-performance, distributed memory object caching system, generic in nature, but intended for use in speeding up dynamic web applications by alleviating database load. And many users use it as memory database too. Memcached talk with client with self define protocol, XMemcached is a java client for it.
There are two java clients before: the official client base on traditional blocked IO, maintained by Greg Whalin, the Spymemcached based on java NIO, maintained by Dustin Sallings. And there are some improved version base on them too. So, what's advantage of XMemcached, why we need a new java client for Memcached?
XMemcached Features
High performance
XMemcached is a client which base on java NIO too, Java NIO is efficient (special under high concurrent), and use less resource than traditional blocked IO. The traditional blocked IO need create some connections to build a connection pool for improve efficiency. But NIO only need one connection (sure, NIO also support pool management), reduce the cost for thread creation and switch, it is more obvious under hight concurrent. So the performance of XMemcached and Spymemcached are very excellent, and in some point, XMemcached is more excellent than Spymemcached, you can check Java Memcached Clients Benchmark for details.
Binary and Text protocol
XMemcached support all protocols of memcached, also included Binary protocol from Memcached 1.4.0.
Client distribution
Memcached supports distribution by client, and XMemcached implements it, and supply implement of consistent hash algorithm.
Weighted server
XMemcached can adjust weight of node for balance the load of memcached server, the weight is more high, the memcached server will store more data, and receive more load.
Dynamically add/remove server
XMemcached can dynamically add/remove server, by JMX or programming, it is easy to extend server or replace server.
JMX Monitor/Control
You can monitor or control XMemcached client by JMX, you can set some parameters, view the STAT. data, add or remove server etc.
Integration with Spring and Hibernate-memcached
Just like many projects, XMemcached also support integration with Spring framework. Hibernate-memcached is a open source project, it can use memcached as secondary cache of hibernate, the default is Spymemcached, you can use XMemcached too.
NIO Connection Pool
As mentioned before, Java NIO will use one connection for one memcached server at most time, but XMemcached can also support connection pool. You can create a few connections to build a connection pool to one memcached server, it can improve the performance under high concurrent environment, and it is transparent to user. You must assure the data's independence or synchronization of data, there is no synchronization between connections to a server, you must make sure the data are all independent, or you can use CAS for atomic operation.
Expendable
XMemcached is implemented under java NIO frameworkyanf4j, with clear architecture. (yanf4j is combined into XMemcached after XMemcached 1.2.5). You can find the classes UML diagram of XMemcached here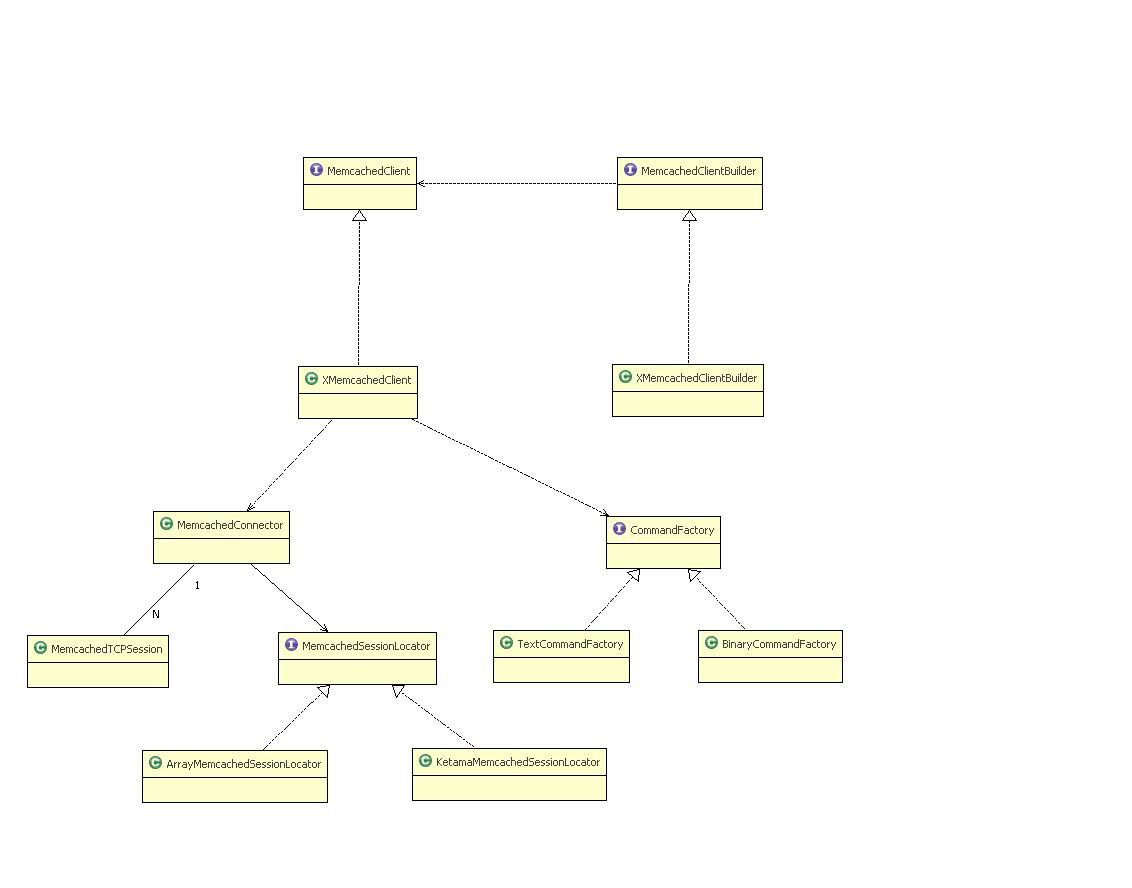 .
.
User Guide
We will show you some examples from simple to complex, then you can learn XMemcached easily.
Dependence
XMemcached depend onslf4j
You must download dependence or download whole XMemcached package with dependence before test following code.
If you use maven
If you build your project with maven, you can only add dependency to use XMemcached (only for 1.2.5+)
 <dependency>
       <groupId>com.googlecode.xmemcached</groupId>
       <artifactId>xmemcached</artifactId>
       <version>${version}</version>
  </dependency>
Simple Example
As the general user, you need to add/get data from memcached at most time. If we have a memcached server, the IP address or host name is "host", the service port is 11211, you can check this simple example:
    MemcachedClientBuilder builder =newXMemcachedClientBuilder(
                                        AddrUtil.getAddresses("localhost:11211"));
    MemcachedClient memcachedClient = builder.build();
    try{
                memcachedClient.set("hello",0,"Hello,xmemcached");
                String value = memcachedClient.get("hello");
                System.out.println("hello="+ value);
                memcachedClient.delete("hello");
                value = memcachedClient.get("hello");
                System.out.println("hello="+ value);
    }catch(MemcachedException e){
                System.err.println("MemcachedClient operation fail");
                e.printStackTrace();
    }catch(TimeoutException e){
                System.err.println("MemcachedClient operation timeout");
                e.printStackTrace();
    }catch(InterruptedException e){
                // ignore
    }
    try{
              //close memcached client
                memcachedClient.shutdown();
    }catch(IOException e){
                System.err.println("Shutdown MemcachedClient fail");
                e.printStackTrace();
    }
Note: For save time, please import packages by yourself or by IDE.
Since XMemcachedClient has many options to create, there is a XMemcachedClientBuilder class to help build MemcachedClient. The MemcachedClient is a main interface, you can find almost methods in this class. XMemcachedClient is a implement of MemcachedClient.
When you use XMemcachedClientBuilder, the parameter of memcached server list should be a string which just like "host1:port1 host2:port2 …" , the AddrUtil.getAddresses will get IP addresses list after parse it.
You can use "set" to store data, it has 3 parameters, the first is key name, the second is expire time (second), after the expire time, you can't find the key in memcached server. The third parameter is the data for store, it can be any java serialized object.
You can use "get" with a key name for retrieve data. If you will remove stored data, you can use "delete" with a key.
Since XMemcached is based on NIO, so the process of communication is asynchronous, When the client send a request to memcached server, you can't know how long you will receive the response, client can only wait, so there is a concept of timeout. After send a request, the client will regard it is failed after some time if no response. The default timeout value is 5 second(since 1.3.8,before is 1 second). The above example use default timeout time for all calls. If you need different timeout, you can use like this:
value=client.get(“hello”,3000);
It will timeout after 3 seconds, you will get a TimeoutException if no response in 3 second, you need handle the exception by your code. And you need handle InterruptException too, because the method use CountDownLatch.await(timeout) internally. And if MemcachedException occurred, it means some exceptions in XMemcached internal, just like encode/decode exception, or network failed.
touch and getAndTouch
Memcached 1.4 supports touch protocol to update cache item's expire time using key without value. Xmemcached 1.3.6 supports binary touch and getAndTouch commands,and xmemcached 1.3.8 supports text touch command:
   client.touch(key,new_expire_time);
   value=client.getAndTouch(key,new_expire_time);  //only valid when using binary protocol.
Client distribution
The distribution of Memcached is implement by client side, Client will get a memcached server by hash of key, then store the value to the server.
XMemcached support client distribution strategy, the default strategy is Standard Hash: "hash(key) mod server_count", you need do nothing if use default strategy.
XMemcached also support Consistent Hash, it need set by method:
        MemcachedClientBuilder builder =newXMemcachedClientBuilder(AddrUtil
                                .getAddresses(properties.getProperty("test.memcached.servers"))
        builder.setSessionLocator(newKetamaMemcachedSessionLocator());
        MemcachedClient client=builder.build();
You can check "Integration with Spring Framework" for configuration.
XMemcached supply another hash algorithm -- Election Hash, you can use it in some case, just like:
  MemcachedClientBuilder builder =newXMemcachedClientBuilder(
                                        AddrUtil.getAddresses("server1:11211 server2:11211 server3:11211"));
  builder.setSessionLocator(newElectionMemcachedSessionLocator());
  MemcachedClient mc = builder.build();
CAS Operation
Memcached implement atomic update by CAS protocol, actually it is compare and set, the theory like Optimistic locking, it will bring a cas value when request to store a data, memcached will check the cas value with current cas value, it will overwrite old data if the value is same, otherwise it failed. It is very useful in concurrent environment. XMemcached support CAS protocol, whatever text protocol or binary protocol. CAS protocol has two steps: get CAS value and try update, so a typical use case should like:
  GetsResponse<Integer> result = client.gets("a");
  long cas = result.getCas();
  //try update value of "a" to 2
  if(!client.cas("a",0,2, cas)){
        System.err.println("cas error");
   }
First you can get a GetsResponse by "gets" method, this object include the stored data and cas value, then try to update the value by "cas" method, it will print "cas error" if failed. Obvious, it is a little complicated. If you will try many atomic update you need a loop, so XMemcached supply a CASOperation interface to implement it, it allows you try N times to atomic update the data of the key, you don't need get cas value by call "gets" again, just like this:
 client.cas("a",0,newCASOperation<Integer>(){
                        publicint getMaxTries(){
                                return1;
                        }

                        publicInteger getNewValue(long currentCAS,Integer currentValue){
                                        return2;
                        }
        });
CASOperation interface only has two method, one method "getMaxTries" is used to set max try times, it is 1 time by default, if bigger than "Max Tries", it will throw a TimeoutException, if you will try more times, just set a big value; another method is "getNewValue", the returned value will be stored if not failed, the parameters of this method are get from last GetsResponse result by call "gets".
More Examples
Here is more example, show how to call methods of MemcachedClient:
  MemcachedClientBuilder builder =newXMemcachedClientBuilder(
                                        AddrUtil.getAddresses(“localhost:12000”));
  MemcachedClient client = builder.build();
                        client.flushAll();
  if(!client.set("hello",0,"world")){
                System.err.println("set error");
  }
  if(!client.add("hello",0,"dennis")){
                System.err.println("Add error,key is existed");
  }
  if(!client.replace("hello",0,"dennis")){
                System.err.println("replace error");
  }
  client.append("hello"," good");
  client.prepend("hello","hello ");
  String name = client.get("hello",newStringTranscoder());
  System.out.println(name);
  client.deleteWithNoReply(“hello”);
First it store a "world" value by "hello" key, and call "add" and "replace", since the key exists, so "add" will failed, at same situation, "replace" will be ok, the value is updated to "dennis" from "world". Then we call append and prepend, append a " good" for the value, and insert "hello " before the value, then we can get the last value is "hello dennis good". And we call "deleteWithNoReply" to remove the data, this method will remove data and memcached will return nothing, so this method don't need wait the response, it is very good for batch operation. You will find xxxWithNoReply version for set/add/replace, please check API document for details.
Iterate all keys
Memcached is not supply a method to iterate all keys, but you can iterate all key by "stats items" and "stats cachedump" protocol, but is low performance, it is not recommended. XMemcached only support iterate in text protocol now.
If you want iterate all keys, you need retrieve a KeyIterator:
MemcachedClient client=...
KeyIterator it=client.getKeyIterator(AddrUtil.getOneAddress("localhost:11211"));
while(it.hasNext())
{
   String key=it.next();
}
Incr/Decr
The following code show you how to use incr/decr, these two operations are like AtomicInteger class in java, for increase and decrease atomically:
 assert(1==this.memcachedClient.incr("a",5,1));
 assert(6==this.memcachedClient.incr("a",5));
 assert(10==this.memcachedClient.incr("a",4));
 assert(9==this.memcachedClient.decr("a",1));
 assert(7==this.memcachedClient.deccr("a",2));
"incr" and "decr" both have method with 3 parameters, the first is the key name, the second is step, the third is default value if key is not exist. and them have method with 2 parameters too, the third parameter is removed, it will use "0" as default value.
XMemcached also supply a Counter class, it packing the incr/decr method, you can use it just like AtomicInteger:
  Counter counter=client.getCounter("counter",0);
  counter.incrementAndGet();
  counter.decrementAndGet();
  counter.addAndGet(-10);
The second parameter is for initial value for counter.
Namespace APIs
Since 1.4.2, xmemcached supports namespace pattern in memcached,you can put a group of items into a namespace in memcached,and invalidate a group of cache item at one time,for example:
String ns ="namespace";
this.memcachedClient.withNamespace(ns,
                                newMemcachedClientCallable<Void>(){

                                        publicVoid call(MemcachedClient client)
                                                        throwsMemcachedException,InterruptedException,
                                                        TimeoutException{
                                                //a,b,c is under namespace
                                                client.set("a",1);
                                                client.set("b",1);
                                                client.set("c",1);
                                                returnnull;
                                        }
                                });
//get the value of a in namespace
Integer aValue =this.memcachedClient.withNamespace(ns,
                                newMemcachedClientCallable<Integer>(){

                                        publicInteger call(MemcachedClient client)
                                                        throwsMemcachedException,InterruptedException,
                                                        TimeoutException{
                                                  return client.get("a");
                                        }
                                });

//invalidate namespace
this.memcachedClient.invalidateNamespace(ns);
STAT. Information
Memcached supply protocol for view stat. information.
Map<InetSocketAddress,Map<String,String>> result=client.getStats();
getStats method will return a map, it stored all stat. data of all active memcached servers, you can stat special data, e.g. "items":
Map<InetSocketAddress,Map<String,String>> result=client.getStatsByItem("items");
You only need set the parameter value by the name (items, sizes, slabs).
SASL authentication
Memcached 1.4.3 start to support client SASL authentication, after enable SASL in server side, client need authentication with server, otherwise will be denied. XMemcached support this feature since 1.2.5. Assume memcached server enable the SASL authentication, use "cacheuser" as user name, use "123456" as password, you need access Memcached like this:
        MemcachedClientBuilder builder =newXMemcachedClientBuilder(
                                        AddrUtil.getAddresses("localhost:11211"));
        builder.addAuthInfo(AddrUtil.getOneAddress("localhost:11211"),AuthInfo
                                        .typical("cacheuser","123456"));
        // Must use binary protocol
        builder.setCommandFactory(newBinaryCommandFactory());
        MemcachedClient client=builder.build();
Note: SASL authentication only support binary protocol.
If you will use Spring configuration, please check "Integration with Spring Framework" chapter.
Advance Topic
Integration with Spring Framework
You can use XMemcachedClientFactoryBean class, it can work with Spring, just like:
<beanname="memcachedClient"
                class="net.rubyeye.xmemcached.utils.XMemcachedClientFactoryBean"destroy-method="shutdown">
                <propertyname="servers">
                        <value>host1:port1 host2:port2</value>
                </property>
   </bean>
Then you can use the bean when you need it.
The following is more configuration in Spring Configuration File, include protocol, consistent hash, weighted server, connection pool, even included SASL authentication (Since XMemcached 1.2.5).
<beanname="server1"class="java.net.InetSocketAddress">
                <constructor-arg>
                        <value>host1</value>
                </constructor-arg>
                <constructor-arg>
                        <value>port1</value>
                </constructor-arg>
</bean>

<beanname="memcachedClient"
                class="net.rubyeye.xmemcached.utils.XMemcachedClientFactoryBean"destroy-method="shutdown">
                <propertyname="servers">
                        <value>host1:port1 host2:port2 host3:port3</value>
                </property>
                <!-- server's weights -->
                <propertyname="weights">
                        <list>
                                <value>1</value>
                                <value>2</value>
                                <value>3</value>
                        </list>
                </property>

                <!-- AuthInfo map,only valid on 1.2.5 or later version -->
                <propertyname="authInfoMap">
                        <map>
                                <entrykey-ref="server1">
                                        <beanclass="net.rubyeye.xmemcached.auth.AuthInfo"
                                                factory-method="typical">
                                                <constructor-argindex="0">
                                                        <value>cacheuser</value>
                                                </constructor-arg>
                                                <constructor-argindex="1">
                                                        <value>123456</value>
                                                </constructor-arg>
                                        </bean>
                                </entry>
                        </map>
                </property>
                <!-- NIO connection pool size -->
                <propertyname="connectionPoolSize"value="2"></property>
                 <!-- Use binary protocol, default is TextCommandFactory -->
                <propertyname="commandFactory">
                   <beanclass="net.rubyeye.xmemcached.command.BinaryCommandFactory"></bean>
                </property>
                <!-- Distributed strategy -->
                <propertyname="sessionLocator">
                        <beanclass="net.rubyeye.xmemcached.impl.KetamaMemcachedSessionLocator"></bean>
                </property>
                <!-- Serializing transcoder -->
                <propertyname="transcoder">
                        <beanclass="net.rubyeye.xmemcached.transcoders.SerializingTranscoder"/>
                </property>
                 <!-- ByteBuffer allocator -->
                <propertyname="bufferAllocator">
                        <beanclass="net.rubyeye.xmemcached.buffer.SimpleBufferAllocator"></bean>
                </property>
        </bean>
Parameters List:
| Property Name | Value |
| servers | Memcached Server List: host1:port1 host2:port2 |
| weights | Weight of servers, more high weight, more connections |
| authInfoMap | authentication information, only avaiable for XMemcached 1.2.5+ |
| connectionPoolSize | NIO connection pool size, default 1 |
| commandFactory | protocol factory, net.rubyeye.xmemcached.command.BinaryCommandFactory,TextCommandFactory (default),KestrelCommandFactory |
| sessionLocator | distributed strategy,consitent hash: net.rubyeye.xmemcached.impl.KetamaMemcachedSessionLocator or ArraySessionLocator(default) |
| transcoder | serlize transcoder, use net.rubyeye.xmemcached.transcoders.SerializingTranscoder by default, more details please checkjavadoc |
| bufferAllocator | IoBuffer allocator, use net.rubyeye.xmemcached.buffer.SimpleBufferAllocator by default,also support CachedBufferAllocator(not recommended now) |
Spring 3.0 and Builder Configuration
Spring 3.0 use a different way to find "destroy" method, so if you just use above configuration, you will got a exception when start, the message will this: "Couldn't find a destroy method named 'shutdown' on bean", then XMemcached can't work in such situation, and Spring IOC container can't start too. Any solution? sure, you can create MemcachedClient by factory method in XmemcachedClientBuilder, here is a example:
   <beanname="memcachedClientBuilder"class="net.rubyeye.xmemcached.XMemcachedClientBuilder">
                <!-- XMemcachedClientBuilder have two arguments.First is server list,and second is weights array. -->
                <constructor-arg>
                        <list>
                                <beanclass="java.net.InetSocketAddress">
                                        <constructor-arg>
                                                <value>localhost</value>
                                        </constructor-arg>
                                        <constructor-arg>
                                                <value>12000</value>
                                        </constructor-arg>
                                </bean>
                                <beanclass="java.net.InetSocketAddress">
                                        <constructor-arg>
                                                <value>localhost</value>
                                        </constructor-arg>
                                        <constructor-arg>
                                                <value>12001</value>
                                        </constructor-arg>
                                </bean>
                        </list>
                </constructor-arg>
                <constructor-arg>
                        <list>
                                <value>1</value>
                                <value>2</value>
                        </list>
                </constructor-arg>
                <propertyname="authInfoMap">
                        <map>
                                <entrykey-ref="server1">
                                        <beanclass="net.rubyeye.xmemcached.auth.AuthInfo"
                                                factory-method="typical">
                                                <constructor-argindex="0">
                                                        <value>cacheuser</value>
                                                </constructor-arg>
                                                <constructor-argindex="1">
                                                        <value>123456</value>
                                                </constructor-arg>
                                        </bean>
                                </entry>
                        </map>
                </property>
                <propertyname="connectionPoolSize"value="2"></property>
                <propertyname="commandFactory">
                        <beanclass="net.rubyeye.xmemcached.command.TextCommandFactory"></bean>
                </property>
                <propertyname="sessionLocator">
                        <beanclass="net.rubyeye.xmemcached.impl.KetamaMemcachedSessionLocator"></bean>
                </property>
                <propertyname="transcoder">
                        <beanclass="net.rubyeye.xmemcached.transcoders.SerializingTranscoder"/>
                </property>
        </bean>
        <!-- Use factory bean to build memcached client -->
        <beanname="memcachedClient3"factory-bean="memcachedClientBuilder"
                factory-method="build"destroy-method="shutdown"/>
Weighted Server
If you use spring, please check above chapter. If you will set it by programming, here it is:
 MemcachedClientBuilder builder =new
XMemcachedClientBuilder(AddrUtil.getAddresses("localhost:12000 localhost:12001"),newint[]{1,3});
   MemcachedClient memcachedClient=builder.build();
It passes into an int array, the value is for the weight of server, so you can see the weight is 1 for "localhost:12000" server, and the weight is 3 for "localhost:12001" server. And you should know the weight of XMemcached is implement by connection counte, you will find 3 connections if the weight is 3, MemcachedSessionLocator will find them in connection session list.
You can update the weight for one server, use setServerWeight:
 publicinterfaceXMemcachedClientMBean{
             ....
         /**
         * Set a memcached server's weight
         *
         * @param server
         * @param weight
         */
        publicvoid setServerWeight(String server,int weight);
   }
Use binary protocol
If you use spring, please check "Integration with Spring Framework" chapter.
Memcached support binary protocol from version 1.4, XMemcached support binary protocol from version 1.2. It is simple to enable this feature, just set CommandFactory:
MemcachedClientBuilder builder =new    XMemcachedClientBuilder(AddrUtil.getAddresses("localhost:12000 localhost:12001"),newint[]{1,3});
   builder.setCommandFactory(newBinaryCommandFactory());//use binary protocol
   MemcachedClient memcachedClient=builder.build();
The default protocol use TextCommandFactory for Text Protocol.
JMX Support
You can monitor XMemcached by JMX, you need add some options when you start jvm:
java -Dxmemcached.jmx.enable=true
XMemcached exposes service by RMI:
service:jmx:rmi:///jndi/rmi://[host]:7077/xmemcachedServer
And you can check these MBean by jconsole.
It includes following MBeans:
| MBean | Description |
| net.rubyeye.xmemcached.monitor.StatisticsHandlerMBean | for Stat. Information of Client |
| net.rubyeye.xmemcached.impl.OptimizerMBean | for adjust performance option |
| net.rubyeye.xmemcached.XMemcachedClientMBean | dynamically add/remove server, list avaiable servers |
More JMX Options:
| Option | Description |
| -Dxmemcached.rmi.port | RMI port |
| -Dxmemcached.rmi.name | RMI service name |
Dynamically add/remove server
You can use JMX to do it, or by programming:
    MemcachedClient client=newXMemcachedClient(AddrUtil.getAddresses("server1:11211 server2:11211"));
   //Add two new memcached nodes
   client.addServer("server3:11211 server4:11211");
   //Remove memcached servers
   client.removeServer("server1:11211 server2:11211");
NIO Connection Pool
XMemcached is base on java NIO, it has one connection to one Memcached server by default, it is very excellent in most projects. But in some typical high-concurrent enviornment, it will has bottleneck too. So Xmemcached support NIO connection pool, it can create multiple connections to one Memcached server. But you should know, they are not synchronized, so you must make sure the synchronzation of data update. You can enable connection pool with following code:
  MemcachedClientBuilder builder =new    XMemcachedClientBuilder(AddrUtil.getAddresses("localhost:12000"));

  builder.setConnectionPoolSize(5);
If you use spring, please check "Integration with Spring Framework" chapter.
Talk with Kestrel
Kestrel is a open source project by twitter by scala language, it is a simple and high-performance MQ. It support Memcached text protocol, but not full compatibled, e.g. it can't support flag, so many client can't work since they use flag for serlization. XMemcached support a KestrelCommandFactory to support Kestrel. With KestrelCommandFactory you can:
- close get with multiple keys, because Kestrel doesn't support bulk get.
- support Blocking Fetch and Reliable Fetch of Kestrel.
- support store any java serializable type.
Use KestrelCommandFactory like this:
 MemcachedClientBuilder builder =newXMemcachedClientBuilder(AddrUtil.getAddresses("localhost:12000 localhost:12001"),newint[]{1,3});
   builder.setCommandFactory(newKestrelCommandFactory());
   MemcachedClient memcachedClient=builder.build();
You should note, since Kestrel doesn't support flag, so XMemcached append 4 bytes as flag before stored data, if all your application use XMemcached, it is fine, but if you will use other client, maybe it will not work again, so you can turn of this feature by:
client.setPrimitiveAsString(true);
After set it to true, all the primitive type will be stored as string, but you can' store serializable type now.
Talk with tokyotyrant
You can talk with TokyoTyrant by TokyoTyrantTranscoder, but TokyoTyrant doesn't support flag/exptime in memcached text protocol, so TokyoTyrantTranscoder append 4 bytes before value as flag, if all your application use XMemcached, it is fine, but if you will use other client, maybe it will not compatibled, just like talk with Kestrel.
 MemcachedClientBuilder builder =new    XMemcachedClientBuilder(AddrUtil.getAddresses("localhost:12000 localhost:12001"),newint[]{1,3});
   builder.setTranscoder(newTokyoTyrantTranscoder());
   MemcachedClient memcachedClient=builder.build();
Integration with Hibernate-memcached
Like use spymemcahed, you can check wiki of hibernate-memcached, if use XMemcached, first you need set memcacheClientFactory to XmemcachedClientFactory.
| Property | Value |
| hibernate.memcached.memcacheClientFactory | net.rubyeye.xmemcached.utils.hibernate.XmemcachedClientFactory |
And please note other properties, they have many difference:
| Property | Value |
| hibernate.memcached.servers | localhost:11211 localhost:11212 |
| ibernate.memcached.cacheTimeSeconds | 300 |
| hibernate.memcached.keyStrategy | HashCodeKeyStrategy |
| hibernate.memcached.readBufferSize | DEFAULT_SESSION_READ_BUFF_SIZE |
| hibernate.memcached.operationTimeout | DEFAULT_OP_TIMEOUT |
| hibernate.memcached.hashAlgorithm | NATIVE_HASH,KETAMA_HASH etc. |
| hibernate.memcached.commandFactory | TextCommandFactory , BinaryCommandFactory |
| hiberante.memcached.sessionLocator | ArrayMemcachedSessionLocator,KetamaMemcachedSessionLocator |
Compression、sanitizeKeys and misc.
Data compression
Memcached is inefficient when you store large data, XMemcached will help you compress large data, and auto uncompress and deserilize data when you retrieve the data, the Threshold is 16K by default, you can set the threshold by setCompressionThreshold in Transcoder interface, you can set it to 1K:
memcachedClient.getTranscoder()).setCompressionThreshold(1024);
This method is introduced since version 1.2.1, you can do it by this before version 1.2.1:
((SerializingTranscoder)memcachedClient.getTranscoder()).setCompressionThreshold(1024);
packZeros
There is a special process when XMemcached serialize number type, There prefix zeors will be removed, the data will more smaller. For example the number "3" will be serialized into "0x0003", it will convert into "0x3" after process. And it will append zeros when deserialization by the number type automaticlly. The feature is turned on by default, you can turn it off for compatibility.
memcachedClient.getTranscoder()).setPackZeros(false);
sanitizeKeys
There is a "sanitizeKeys" option in offical client, when you use URL as the key, MemcachedClient will encode the URL before store. It is off by default, you can enable it by:
memcachedClient.setSanitizeKeys(true);
This feature is introducted since version 1.2.1.
https://code.google.com/p/xmemcached/wiki/User_Guide#Changes_History