Last updated and checked to work with version 3.0.0 of the tools
This tutorial will take you through the process of using the "Eclipse Integration Gradle" tooling to import a Gradle multi-project into STS and execute some Gradle tasks on the imported project(s).
For installation instructions please see the reamde.md file in the github project.
We will use spring-security as a running example throughout this tutorial. If you want to follow along, the first step is to checkout the source code from git:
git clone git://github.com/SpringSource/spring-security.git
This will create the "spring-security" folder directly below whatever directory you typed the command in.
Importing Existing Gradle Projects
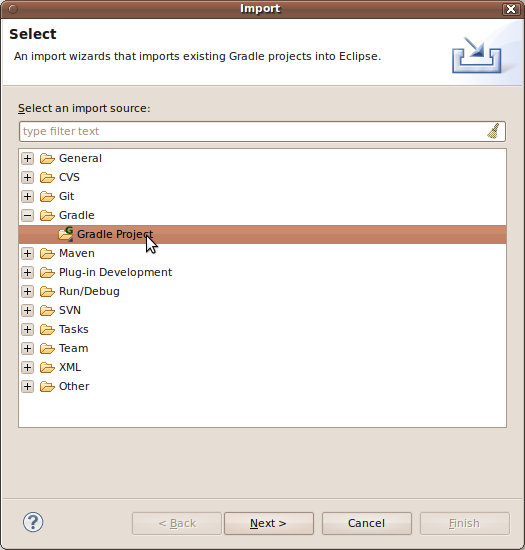
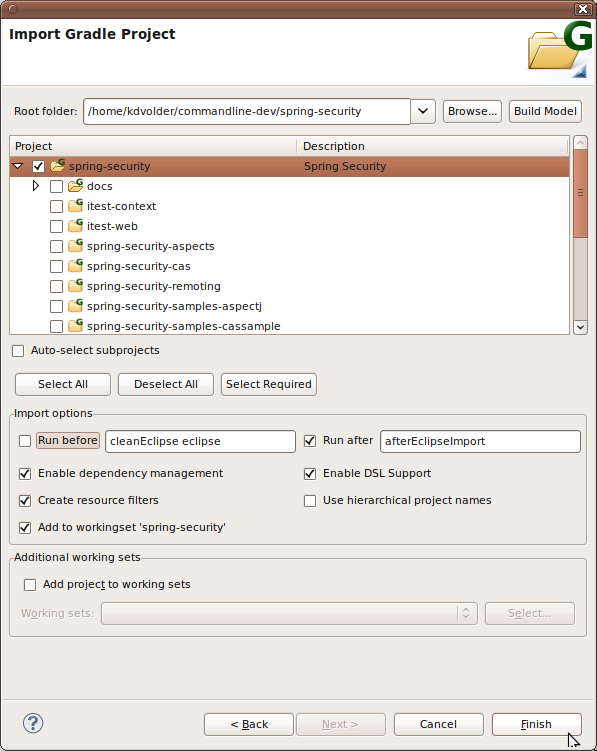
Now that we have the source code checked out we can use the Gradle Import Wizard to import a subset of the spring-security projects into an Eclipse workspace. The wizard is accessible via the File >> Import menu.
The first thing you have to do in the wizard is point it to the root folder of your Gradle project. Click the "Browse" button and find the folder, or simply enter the path to your project folder if you remember it.
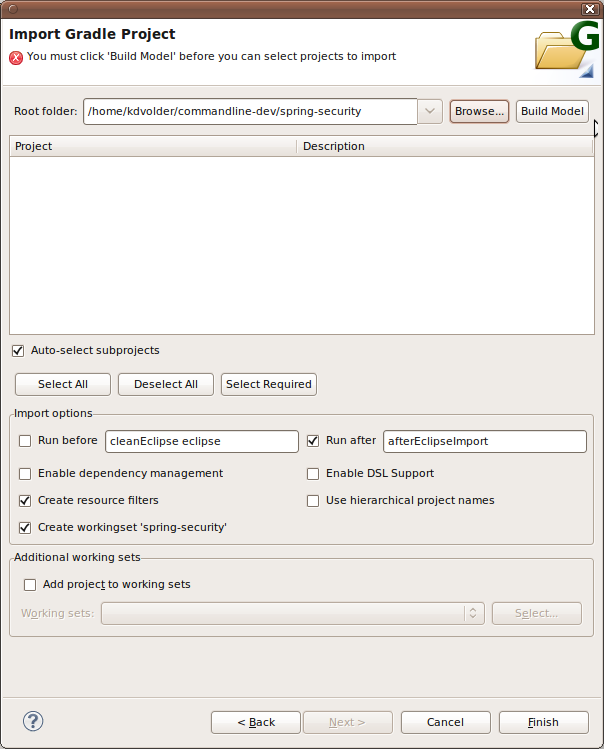
A typical Gradle project may consist of a hierarchy of (sub)projects. Before you can select which (sub)projects you are interested in you must request the Gradle API to construct a Gradle project/sub-project structure model. Click the "Build Model" button to do this.
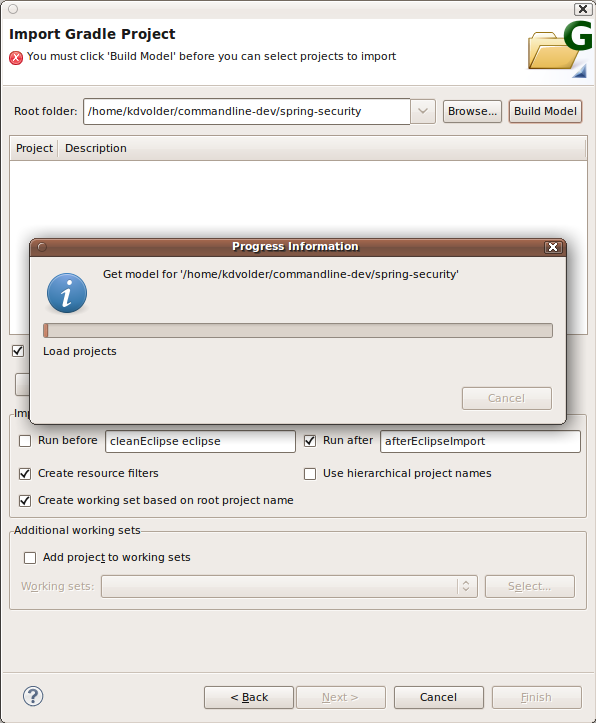
Building the model may take some time, so be patient! How much time depends on the complexity of your project and how many of the build script's dependencies can already be found in the gradle cache. For spring-security, an initial "Build Model" with a completely cleared .gradle cache may take a few minutes to complete.
Once the model has been constructed, you can select projects import. By clicking the "Select All" Button you can easily import all projects. However, let's assume we are only interested in the "spring-security-samples-jaas" project.
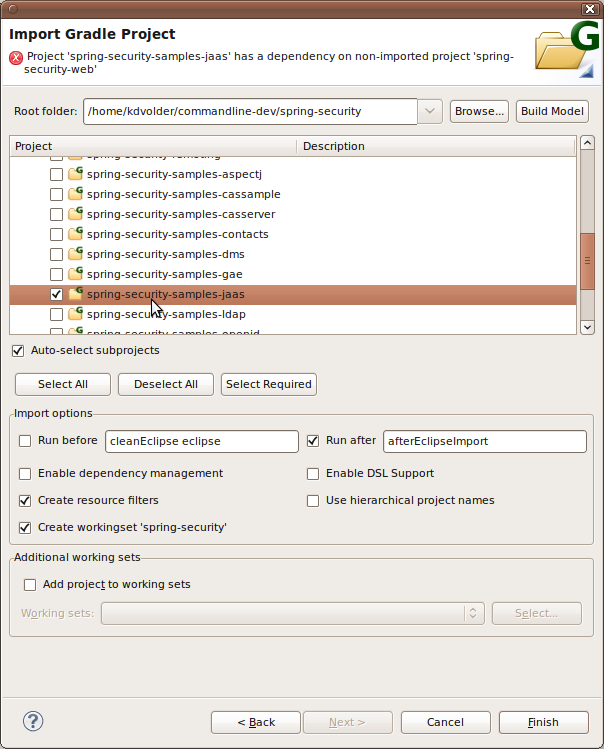
If a project is selected and that project has an inter-project dependency on another project, then this other project must also be imported. Otherwise, the imported project would have problems with its classpath (missing dependencies). The import wizard uses the project dependency information provided by the Gradle tooling API to check whether you have properly selected all required projects. In the screenshot above, a missing dependency on "spring-security-web" is detected and reported.
To fix it, select the missing project (but another missing dependency will be reported) or simply click the "Select required" button to automatically select all required projects based on your current selection.
You may or may not want to import the root project (usually it contains the main build script). If you click the root project, you will notice that it automatically selects/deselects all the subprojects below it. If you just want to select the root project alone, you can uncheck the"Auto-select subprojects" option.
We will not import the root project now. We can always import more projects later. It is beneficial to only import the projects you require because it means means speedier builds and less clutter in your workspace.
Import options
Besides selecting which projects to import, the wizard also provides some additional options.
Run before / after
These options allow the execution of specific gradle tasks to aid in the initialization of imported projects. When enabled, the wizard will execute the given tasks on each imported project that defines the task(s).
Default values are automatically set to support two common use cases.
Use case 1: execute cleanEclipse eclipse before importing
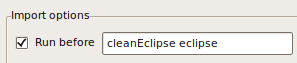
Although our tooling, in principle, should fully configure your project from information provided by the Gradle Tooling API, in practice the Gradle Tooling API is till to limited to make this possible for all types of projects. At this time, unless your project is a 'pure Java' project it can't be correctly and fully configured without relying on these tasks to bridge the gap.
For spring-security, some projects require AspectJ and/or WTP/Web support. This functionality is not yet covered by the tooling API so we need to run the eclipse tasks before importing.
Note that unless a project overrides the defaults, the 'run before' option will be turned on automatically. There should be no harm from having it enabled, except that it will take noticably longer to peform the import operation.
Use case 2: execute afterEclipseImport task
This task is intended as an open-ended hook. The hook is provided so that a build-script author can define this task to make any kind of customization they might want.
This option is enabled by default, however, unless an imported project actually defines the task it has no effect.
Note that 'afterEclipseImport' is not a built-in Gradle task, Therefore most typical projects do not define this task. However, spring-security does so it is important to have this option enabled here.
We recommend you always leave this option on by default. If the task is indeed defined, it is probably the project developer's intention that it be executed on import. Conversely, if it is not defined the Wizard will be able to detect this and act accordingly.
Enable Dependency Management
Enabling this option means that STS will configure your project's dependencies based on information it obtains from calling the Gradle Tooling API. The center piece of this mechanism is a 'Gradle Dependencies' classpath entry. The contents of this entry will be computed dynamically by calling on the Gradle Tooling API. This option is recommended for projects that are fully supported by the tooling API. At present this means 'pure' Java projects, or in Eclipse terms: projects that only require the Java nature.
The advantage of using this option is that your project's .classpath file will be free of user-specific references to files in the local Gralde cache. Thus, if dependency management is enabled, checking in files like .classpath into source control is reasonable.
Therefore, enabling dependency management is the default. Unfortunately, due to the limited nature of the current Gradle Tooling API, this option may not work well for many projects. If so, you may consider disabling the option and relying directly on your build script and the Gradle eclipse plugin's 'cleanEclipse' and 'eclipse' tasks to configure your projects on import instead.
Since 2.9.0, STS explicitly attempts to provide good support for projects that want to rely mostly on the generated metadata rather than the Tooling API. If dependency management is disabled then STS will not add the 'Gradle Dependencies' entry, nor will it configure source folders or dependencies between projects. Instead, you should select some tasks (typically 'cleanEclipse eclipse' to execute before import instead.
When dependency management is disabled, of course most of the menu commands related to dependency management will then also become disabled. However the Refresh All will still be enabled. It provides an alternate implementation which uses information captured and stored in .settings/gradle during import. Invoking Refresh All will essentially re-import your project inplace. That is, the same before/after tasks will be re-executed, and the same set of selected customizations are re-applied to your project. Assuming that 'cleanEclipse eclipse' is amongst the selected before tasks, the effect of this is that all of your project's Eclipse configuration data will be refreshed.
Important: If dependency managment is disabled, your generated .classpath file is not suitable to share with other users via a source code repository. This is because it will typically contain absolute paths pointing to files in the your local Gradle cache. The same may also be true for other generated Eclipse/STS metadata files. Therefore, you should devise a process where each developer generates their own .classpath and other Eclipse/STS metadata files.
An exception to this rule is the file at${rootproject}/.settings/gradle/org.springsource.ide.eclipse.gradle.core.import.prefs. This file contains the most important configuration options for the import Wizard. If your project requires some specific non-default options, then sharing this file can help take the guess work out of the import process for your potential contributors.
Enable DSL Support
This option will enable DSL support in the Groovy Editor. What this means is that, if you have Groovy Eclipse installed, you will get a modicum of Gradle awareness while editing .gradlefiles. I.e. simple code assist and JavaDoc style hover's for some elements in your build script will be provided.
Selecting this option will enable DSL support for all the imported projects at once. If you only want to enable it for selected projects. Then you should disable the option in the wizard and enable it for individual projects afterwards via "Gradle >> Enable DSL" menu.
Create resource filters
Enabling this option will add resource filters to the imported projects to "hide" nested projects from the parent project.
This deserves some further explanation. Eclipse (and therefore STS) essentially does not support project hierarchies. Only a "flat" project structure is supported in Eclipse and projects can not contain other projects.
To overcome this limitation, a Gradle project hierarchy is flattened into a list of Eclipse projects. The projects will be imported as "linked projects" so that nesting structure is still maintained in the file system structure of the imported projects. However, if you import both a parent and (some of) its children in this way, it will appear as if the resources (files and folders) in the children are present multiple times in the workspace: once in the child itself and also once inside a nested folder of the parent project that contains the child. Although Eclipse supports this kind of setup, and it is possible to work with workspaces that show the same underlying file aliassed in multiple locations in the Eclipse workspace, it can be confusing.
For example if you pressed "CTRL-SHIFT-R" to "open resource" and searched for one of these aliassed resources, you would see that resource appear multiple times. To avoid this, keep the "create resource filters" enabled. This will configure the parent project in such a way that the children's project's resources are treated as "invisible/non-existent" in the parent.
Use hierarchical project names
This option selects between two different project naming schemes.
Names of the imported Eclipse projects can be chosen freely by the user. Since the projects are represented as links to the actual file system location, the names of the projects don't affect the underlying project structure. Of course, choosing sensible names will help in remembering what each Eclipse project represents in terms of the Gradle project hierarchy!
The wizard will give a name to each imported project based on one of two naming schemes.
- default: use the name of a project exactly as it is returned by the Gradle Tooling API.
- hierarchical: the name of each project consists of the name of each ancestor in the path leading to the project and the project itself, separated by dots. For example the "spring-security-web" project would get Eclipse name "spring-ecurity.spring-security-test" in the hierarchical naming scheme.
WARNING: It is not safe to use this option, or otherwise rename projects in the workspace if you are relying on the 'eclipse' gradle task to help configure your projects. The reason for this is that Gradle has no way of knowing that projects in the workspace are using non-default names. This may cause any references to the renamed project(s) in Gradle-generated metadata to break.
Create working set 'spring-security'
This creates a working set based on the root project's name and adds all imported projects to this workingset. If the working set already exists this option will say "add" instead of "create". In that case projects will just be added to this existing working set.
Additional working sets
This provides a similar UI to the standard Eclipse import wizard for adding projects to working sets. It allows you to add the imported projects to an arbitrary number of working sets. You can use this instead of (or in conjunction with) the previous option. The previous option is more convenient and quick (in terms of numbers of clicks and keystrokes required) but if you need more control over the working sets and/or their names, this UI is provided as a more general fall-back option.
Performing the Import
For this tutorial we leave everything at the default settings.
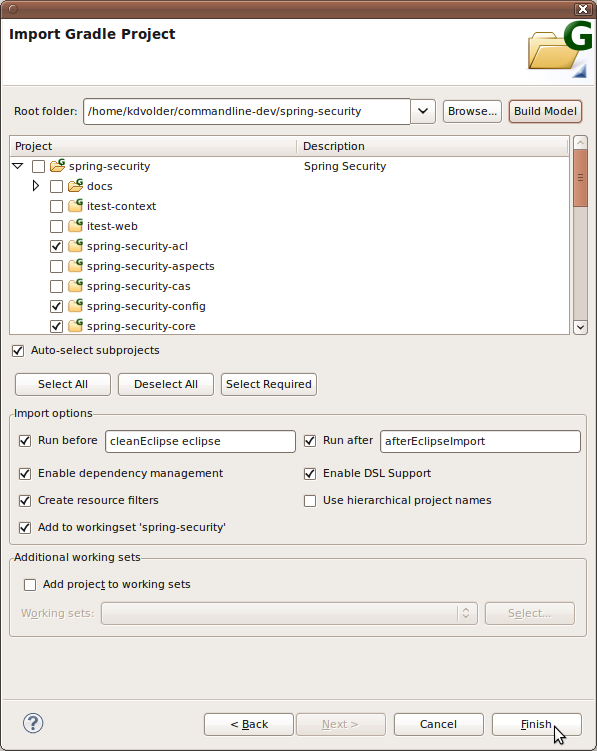
Once you click finish, the selected projects will be imported into the Eclipse workspace.
Imported Project Auto-configuration
Depending on selected option. The import wizard will automatically configured projects as follows.
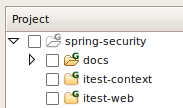
In all cases:
- A Gradle Nature is added to each project (shown in the UI as a bold, green "G" overlayed in the bottom right corner of the project icon).
If dependency management is enabled
- A Gradle Dependencies class path entry is added to dynamically compute the project's binary "jar" dependencies.
- The project's source folders are configured
- Dependencies between projects are configured as Eclipse project dependencies
If dependency management is disabled then these configurations will not be automatically applied. Instead, it is assumed that you have defined and selected appropriate run before/after gradle tasks to achieve a similar effect.
If DSL support is enabled, the following additions will be made to your project's configuration:
- Groovy Nature
- Gradle DSLD classpath entry
- Groovy Libraries classpath entry
Note that this turns your project into a Groovy project. Because of limitations in both AJDT and Greclipse, DSLD support can not be enabled for AspectJ projects. If you attempt to do so, a warning will be logged in the Eclipse Error Log. DSL support will not be added to any affected projects. However, the import should still proceed and no other ill effects should ensue.
The sceenshot below shows the workspace right after the import finished:
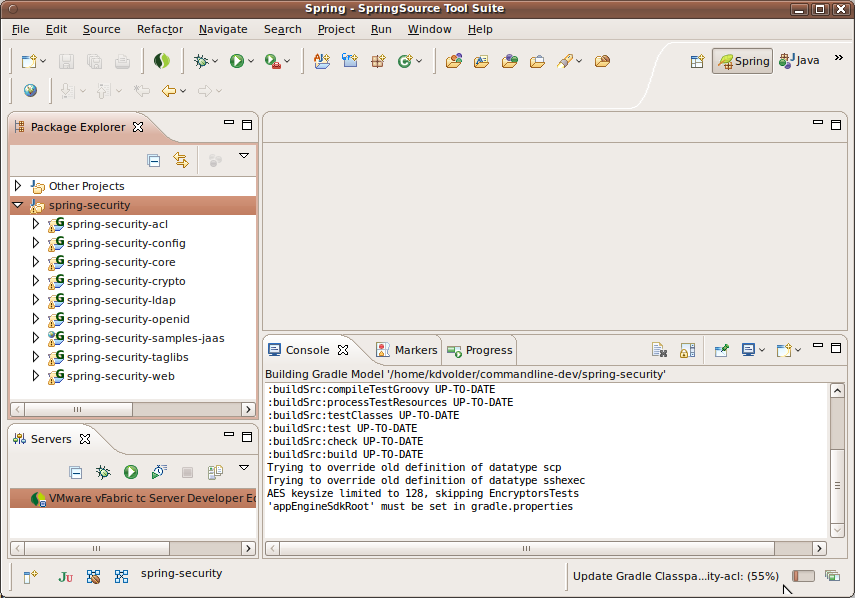
A few things worth mentioning:
- You may notice a background job (bottom right of the workspace window) called "Update Gradle Classpath Container". This job is updating the "Gradle Dependencies" classpath entry. The job may take a long time to complete, especially right after the first import, because it is downloading all the dependencies into the Gradle cache folder.
- The current implementation of the Gradle tooling API does not provide good progress information (yet), so if you examine the Job queue more closely, you may notice that sometimes it appears as if the job's progress bar is stuck. Be patient, it may take several minutes but the job should eventually complete. Subsequent updates should be much faster since the dependencies are already downloaded.
- Eclipse, by default, does not show working sets in the package explorer. If you want to use workingsets to organize projects in your workspace, you can enable this from the package explorer's configuration menu (under the little triangle in the top-left corner of the package explorer view, change "toplevel elements" from "projects" into "workingsets").
- The ...-samples-jaas project has retained its WTP-related configuration infos, as can be seen from its icon. You can also test this out by deploying it to the server. (Menu: Run As >> Run On Server).
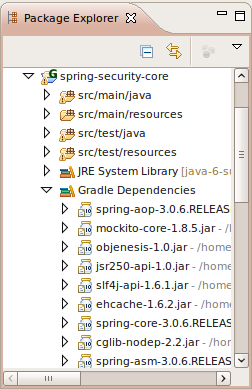
The screenshot below shows the package explorer view, with "workingsets as toplevel elements" enabled, after the classpath container update has completed. You can see the downloaded .jar entries in the classpath container (under "Gradle Dependencies").
Refreshing Project Configuration Data
Presently, there is no mechanism to automatically refresh the Gradle project model. As a result, a project's configuration will become outdated. To force various aspects of the project configuration to be recomputed you can invoke the commands in the Gradle context menuaccessed by right clicking on the Gradle project.

The Gradle context menu provides the following commands:
-
Disable(or enable) dependency management:
Remove/add the "Gradle Dependencies" class path container from/to the project. Removing the container means that you intend to take personal responsibility for managing the project's dependencies or that you want to run Gradle tasks such as "cleanEclipse" and "eclipse" to Refresh Dependencies.-
Refresh Dependencies: For each of the selected projects (one or more Gradle projects can be selected, but all selected projects must have dependency management enabled.
- Invalidate and request a new Gradle model from the tooling API
- Recompute the contents of the class path container
- Recompute and reconfigure project dependencies
- Invalidate and request a new Gradle model from the tooling API
-
Refresh Source Folders: Like "Refresh Dependencies", but reconfigures the project's source folders.
-
Refresh All: combination of "Refresh Dependencies" and "Refresh Source Folders". This is the only refresh option that is enabled for projects that have Dependency management disabled. For these projects, the Refresh is accomplised by re-executing the "run before/after tasks" that were selected for the orginal project import.
-
Disable (or Enable) DSL Support: Remove or add the classpath entries that make the Groovy Eclipse editor 'Gradle DSL Aware'. (Note: only a small subset of the Gradle DSL is currently supported).
-
Since dependencies between projects and source folder configuration are stored in your project's metadata (the .classpath file), they will persist across Eclipse sessions.
Since 2.7.M2 the contents of the classpath container is also persisted in your workspace metadata. This reduces the time it takes for the IDE to become responsive when it starts up. However, it means you may need to manually trigger a refresh once in a while. You can tell whether a container was initialized from persisted state because it will be labeled as "Gradle Dependencies (persisted)".

Importing Additional Projects
The import wizard is designed to allow importing a subset of subprojects initially and import additional projects later.
For example, earlier on we decided not to import the root project. Let's say we want to import it now, so we can easily examine and edit the main build script. To import additional projects, simply reopen the import wizard as before and point it again to the root of the project hierarchy. The project should already be available from the project combo's pull-down history.
To import the root project in isolation, we uncheck "Auto-select subprojects" and then select the root project, as shown below.
Note that sub-projects that have previously been imported will not be shown anymore (e.g. "spring-security-core" is no longer shown), since they can't be imported again. An exception to this rule is made for projects that have subprojects themselves. Such projects must be shown because filtering them from the view would also implicitly remove all their children (making it impossible to import their children).
For example, if we would re-open the import wizard again after importing the root project, we would see this:
Note the root project's transparant look, indicating that it was already imported before.
Next
This is the end of Part I of the tutorial. This part covers the use of the Import Wizard to import existing projects into the workspace.
You can now go to Part II which will take you on a tour of the Gradle Task UI.
原文:https://github.com/spring-projects/eclipse-integration-gradle/wiki/Gradle-Import-Wizard