在以前的Apworks框架中,Apworks的核心组件(Apworks.dll)定义了所有与仓储/仓储上下文相关的接口,而在另外的程序集中,实现了这些接口并提供了针对某个ORM框架的仓储/仓储上下文的具体实现。当然,目前我也只是开发了针对NHibernate的仓储实现,也就是那个Apworks.Repositories.NHibernate程序集。这样做的目的,就是为了使得Apworks的核心组件能够脱离具体的第三方组件而独立存在,避免由于第三方组件存在的缺陷而导致核心组件需要频繁更新。这种做法参考了Martin Fowler在其PoEAA一书中描述的Separated Interface模式。当然,本文的意图不在于讨论如何将这个模式应用到实际框架的设计和开发过程中,这个内容我会在后续的博客中详细讨论。现在我们来讨论一下这个Apworks.Repositories.NHibernate程序集的设计问题。
问题
早在Apworks 2.0发布之前,我就意识到这个问题了,之后也有网友针对这个问题发表过评论。在现有的设计中,NHibernateContext在通过GetRepository方法返回仓储实例的时候,是直接新建了一个NHibernateRepository的对象然后返回的,这对普通的仓储应用并不会带来太多的影响,比如通过仓储获取一个聚合,或者将某个聚合保存到仓储中等。然而对于那些需要扩展仓储的情形而言,这种设计就是致命的:除了修改Apworks.Repositories.NHibernate程序集的源代码以外,我想,应该没有别的办法来通过NHibernateContext以获得一个定制的仓储实例。以下的代码充分证明了这一点:
public IRepository<TAggregateRoot> GetRepository<TAggregateRoot>()
    where TAggregateRoot : class, IAggregateRoot
{
    string key = typeof(TAggregateRoot).AssemblyQualifiedName;
    if (repositories.ContainsKey(key))
    {
        return repositories[key] as IRepository<TAggregateRoot>;
    }
    else
    {
        var repository = new NHibernateRepository<TAggregateRoot>(this);
        lock (sync)
        {
            repositories.Add(key, repository);
        }
        return repository;
    }
}
现在,我们需要对这部分实现进行修改,使得NHibernateRepository的实现能够像NHibernateContext那样,能够方便地在配置文件中进行配置,说得具体一些,能够通过依赖注入来消除NHibernateContext和NHibernateRepository之间的耦合。例如,在后续的应用程序开发过程中,或许我们会要对仓储进行扩展,比如加入一些分页的功能或者一些特定的查询等。在这种情况下,NHibernateContext也同样能够满足我们的需求。假设我们需要将一个FooRepository应用到应用程序中,我们或许会这样写代码:
public interface IFooRepository<T> : IRepository<T>
    where T : class, IAggregateRoot
{
    IEnumerable<T> GetWithPaging(ISpecification<T> spec, int pageNumber, int pageSize);
}

public class FooRepository<T> : NHibernateRepository<T>, IFooRepository<T>
    where T : class, IAggregateRoot
{
    public IEnumerable<T> GetWithPaging(ISpecification<T> spec, int pageNumber, int pageSize)
    {
        //...
    }
}
在使用FooRepository的时候,则有可能是这样写代码:
IFooRepository<Customer> repository = context.GetRepository<Customer>() as IFooRepository<Customer>;
最后,只需要在IoC容器(在此以Microsoft Unity为例)中注册一下这个仓储,即可实现仓储的替换:
<register type="Apworks.Repositories.IRepository`1[[MyNamespace.Domain.Customer, MyNamespace.Domain]], Apworks"
  mapTo="MyNamespace.Repositories.FooRepository`1[[MyNamespace.Domain.Customer, MyNamepsace.Domain]], MyNamespace.Repositories" />
事实上,我们需要解决的问题,并不是如何去调整仓储的设计,因为从接口的层面上看,这部分内容并没有什么问题。我们需要解决的问题是,如果通过IoC容器将仓储实例注入应用程序后,如何保证这些实例是在同一个Repository Context中进行工作的。这很重要,因为Repository Context担当了Unit Of Work的任务,它需要保证在其管辖的范围内,所有的仓储操作都是在同一个事务中完成的。不仅如此,它还能够允许多个仓储实例共享同一个数据库连接,减少了数据库连接次数。
上面也已经提到,以前是直接创建NHibernateRepository的实例,并通过构造函数将当前Repository Context的实例传给新创建的NHibernateRepository,这样就保证了所有通过Repository Context创建的仓储,都共享了同一个Context。但根据我们现在的设计,虽然仓储在构造函数上依赖IRepositoryContext接口,但如果通过IoC容器来解析获得仓储实例,就会使得IoC容器在解析IRepositoryContext时,会自动创建一个新的Context实例,而不会重用已有的实例。最终出现的结果就是:各个仓储都使用着自己的Context,各自为政,互不相干,更别提事务性的保证了。
解决方案
有关IoC容器
要解决Context共享的问题,还是得从IoC容器部分入手。比如,研究一下IoC容器是否能够在解析Repository时,将已有的Context实例注入到Repository中,使其共享同一个Context,而不是在每次解析Repository时都重新创建一个Context。Microsoft Unity是具有这样的功能的,它具有一种被称之为Resolver Override的功能,能够在解析某个类型的时候,用已存在的另一个类型的实例来覆盖原本应该由IoC容器解析的类型实例。从最初对Apworks的设计来看,它本身是不会依赖于任何第三方的依赖注入框架的,这点在本文开始的时候就已经说明了,因此,我们还需要考察一些常见的第三方依赖注入框架,看它们是否也像Unity那样,具有Resolver Override的功能。
至少,Castle Windsor是支持的,它可以通过向Resolve方法传入匿名类型对象来实现。于是我猜想,类似Resolver Override这样的功能,应该是大部分依赖注入框架所应该具备的功能,我也没有进一步去研究了。总之,我们需要对Apworks的ObjectContainer接口部分开始进行修改,使其也同样具有Resolver Override的功能,这样我们才能在后续解析NHibernateRepository的时候,将已有的NHibernateContext实例注射进去。
首先需要修改的是Apworks.IObjectContainer接口,向其添加两个方法,这两个方法其实是成对的,其中一个是另一个的泛型版本。这两个方法都会接受一个匿名类型的参数,以获得需要重写的实例:
T GetService<T>(object overridedArguments) where T : class;
object GetService(Type serviceType, object overridedArguments);
然后修改ObjectContainer抽象类和Apworks.ObjectContainers.Unity.UnityObjectContainer类的代码,使得它们能够正确地实现接口中新定义的这两个方法。ObjectContainer抽象类中的实现还是很简单直观的,就是针对这两个方法分别定义一个DoGetService的受保护(protected)方法,这么做的理由是因为ObjectContainer需要为AOP拦截提供便利;然后再在UnityObjectContainer中实现所需的受保护方法。在UnityObjectContainer中,我们重载了ObjectContainer抽象类中的DoGetService非泛型方法,并通过反射以实现Unity对Resolver Override功能的支持。代码如下:
protected override object DoGetService(Type serviceType, object overridedArguments)
{
    List<ParameterOverride> overrides = new List<ParameterOverride>();
    Type argumentsType = overridedArguments.GetType();
    argumentsType.GetProperties(BindingFlags.Public | BindingFlags.Instance)
        .ToList()
        .ForEach(property =>
        {
            var propertyValue = property.GetValue(overridedArguments, null);
            var propertyName = property.Name;
            overrides.Add(new ParameterOverride(propertyName, propertyValue));
        });
    return container.Resolve(serviceType, overrides.ToArray());
}
说明一下,就基于Castle Windsor框架的ObjectContainer的实现而言,我们只需要向WindsorContainer.Resolve方法传入这个overridedArguments对象就可以了,而不需要通过反射来做这部分转换。
至此,对IoC容器的修改就完成了。接下来就是使用这个更新了的容器来实现对NHibernateContext和NHibernateRepository的解耦。
RepositoryContextManager
现在,Apworks.Repositories命名空间下有了一个新成员:RepositoryContextManager,其主要任务就是管理RepositoryContext,并向外界提供仓储的实例。从某种意义上讲,它更像是RepositoryContext的代理。以前,当我们需要获得仓储实例时,我们需要使用IRepositoryContext.GetRepository方法来获得,而现在,由于Resolver Overrides的引入,我们可以直接通过IoC容器来获得仓储实例,只是在做解析的时候,需要把已有的RepositoryContext实例注入到解析的过程中。从这个角度讲,RepositoryContextManager的功能其实也是对这一过程的封装,不仅简化了代码的编写,而且还降低了出错的风险,因为我们很容易忘记在解析仓储实例的时候,忘记把Context的实例也一并传入。
RepositoryContextManager在构造函数中,就通过IoC容器获得了Context的实例,由于它继承了DisposableObject,并实现了IUnitOfWork接口,这就使得RepositoryContextManager的使用更像原有的RepositoryContext。比如,在操作仓储时,以前我们是这样写代码的:
using (IRepositoryContext ctx = IoCFactory.GetService<IRepositoryContext>())
{
    IRepository<Customer> customerRepository = ctx.GetRepository<Customer>();
}
而现在我们可以直接这样写:
using (RepositoryContextManager mgr = new RepositoryContextManager())
{
  IRepository<Customer> customerRepository = mgr.GetRepository<Customer>();
}
代码上虽然看上去不会有太大差别,但后面的实现机制却有了显著的变换:通过使用RepositoryContextManager,我们解耦了Context和Repository(在我们的例子中,确切地说,是NHibernateContext和NHibernateRepository)。在看完RepositoryContextManager.GetRepository方法的实现代码后,我想你一定会恍然大悟的:
public IRepository<T> GetRepository<T>()
    where T : class, IAggregateRoot
{
    IRepository<T> repository = AppRuntime
        .Instance
        .CurrentApplication
        .ObjectContainer
        .GetService<IRepository<T>>(new { context = this.context });

    return repository;
}
在这个方法中,使用了我们新定义的IoC容器接口函数,在解析IRepository接口的时候,将当前Context的实例注射到解析过程中。而“context = this.context”这句话中的第一个“context”,正是Repository抽象类中构造函数的第一个参数名称。
有关AOP拦截
如果我们不使用AOP拦截,那么至此问题已经得到圆满的解决了。然而,AOP拦截对于构建一个高复用性、高延展性的企业级应用是多么的重要。Apworks是支持AOP拦截的,而且它也不会允许由于一些框架上的变动而导致AOP拦截在某些情况下不起作用。因此,框架中代码的变动,需要去迎合AOP拦截功能。
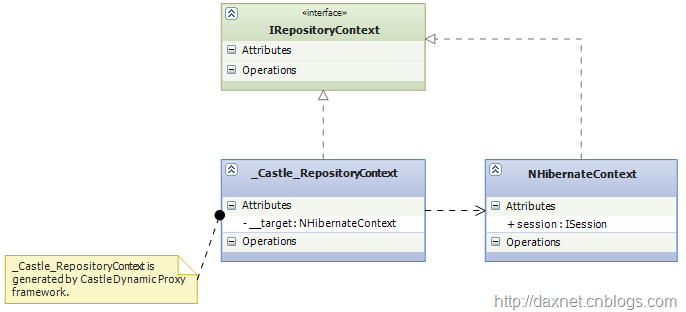
细心的读者在阅读RepositoryContextManager源代码的时候,就会注意到,如果我们启用了Apworks的AOP拦截功能,那么事实上在GetRepository方法中,通过IoC容器注入的Context实例,已经不再是我们的NHibernateContext实例了,而是由Castle Dynamic Proxy框架(Apworks使用这个框架做AOP拦截)产生的一个实现了IRepositoryContext接口、对NHibernateContext对象进行代理的代理类。结构类似如下:
于是,这个动态产生的_Castle_RepositoryContext类被不幸地注射到了NHibernateRepository的构造函数中。而在NHibernateRepository中,显然是无法通过as关键字将_Castle_RepositoryContext转换为NHibernateContext的,因为两者没有继承关系,因此,也就无法获得NHibernateContext中的这个session对象:
public NHibernateRepository(IRepositoryContext context)
            : base(context)
{
    if (context is NHibernateContext)
    {
        NHibernateContext nhContext = context as NHibernateContext;
        this.session = nhContext.Session;
    }
    else
        throw new RepositoryException(Resources.EX_INVALID_CONTEXT_TYPE);
}
此时context is NHibernateContext的判定就是False,直接抛出了异常。
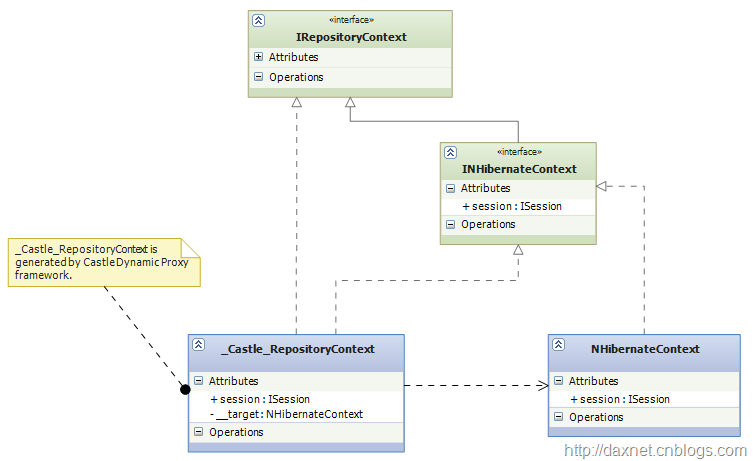
要解决这个问题,我们需要重新设计NHibernateContext,我们需要添加一个新的接口,使得NHibernateContext实现这个新的接口,同时,我们需要将这个接口织入动态代理类中,使得这个类也同样可以通过接口获得我们需要的数据。于是,我们的设计大致如下:
在这种设计下,虽然context is NHibernateContext的判定还是False,但我们已经可以通过将_Castle_RepositoryContext转换为INHibernateContext,进而获得session的实例。当然,我们更希望Apworks不仅仅是针对NHibernateContext这个特例来处理这样的接口织入,而且应该能够处理更通用的场景。因此,我们可以新建一个Attribute,在使用Castle Dynamic Proxy产生代理类之前,判断被代理的类型是否有这个Attribute,并通过Attribute的值来获得需要织入的接口类型,然后将这个接口类型织入代理类即可。在Apworks中,Apworks.Interception.AdditionalInterfaceToProxyAttribute就是这样一种Attribute:
[AttributeUsage(AttributeTargets.Class, AllowMultiple=true, Inherited=false)]
public class AdditionalInterfaceToProxyAttribute : System.Attribute
{
    #region Public Properties
    /// <summary>
    /// Gets or sets the type of the interface that needs to be intercepted
    /// when the proxy object is created.
    /// </summary>
    public Type InterfaceType { get; set; }
    #endregion

    #region Ctor
    /// <summary>
    /// Initializes a new instance of <c>AdditionalInterfaceToProxyAttribute</c>.
    /// </summary>
    /// <param name="intfType">The type of the interface that needs to be intercepted
    /// when the proxy object is create.</param>
    public AdditionalInterfaceToProxyAttribute(Type intfType)
    {
        this.InterfaceType = intfType;
    }
    #endregion
}
然后修改ObjectContainer抽象类的GetProxyObject私有方法,使得它能够处理上面所述的这些逻辑:
private object GetProxyObject(Type targetType, object targetObject)
{
    IInterceptor[] interceptors = AppRuntime.Instance.CurrentApplication.Interceptors.ToArray();

    if (interceptors == null ||
        interceptors.Length == 0)
        return targetObject;

    if (targetType.IsInterface)
    {
        object obj = null;
        ProxyGenerationOptions proxyGenerationOptionsForInterface = new ProxyGenerationOptions();
        proxyGenerationOptionsForInterface.Selector = interceptorSelector;
        Type targetObjectType = targetObject.GetType();
        if (targetObjectType.IsDefined(typeof(BaseTypeForInterfaceProxyAttribute), false))
        {
            BaseTypeForInterfaceProxyAttribute baseTypeForIPAttribute = targetObjectType
              .GetCustomAttributes(typeof(BaseTypeForInterfaceProxyAttribute), false)[0]
                as BaseTypeForInterfaceProxyAttribute;
            proxyGenerationOptionsForInterface.BaseTypeForInterfaceProxy = baseTypeForIPAttribute.BaseType;
        }
        if (targetObjectType.IsDefined(typeof(AdditionalInterfaceToProxyAttribute), false))
        {
            List<Type> intfTypes = targetObjectType.GetCustomAttributes(typeof(AdditionalInterfaceToProxyAttribute), false)
             .Select(p =>
             {
                 AdditionalInterfaceToProxyAttribute attrib = p as AdditionalInterfaceToProxyAttribute;
                 return attrib.InterfaceType;
             }).ToList();
            obj = proxyGenerator.CreateInterfaceProxyWithTarget(targetType,
              intfTypes.ToArray(),
              targetObject,
              proxyGenerationOptionsForInterface,
              interceptors);
        }
        else
            obj = proxyGenerator.CreateInterfaceProxyWithTarget(targetType,
              targetObject, proxyGenerationOptionsForInterface, interceptors);
        return obj;
    }
    else
        return proxyGenerator.CreateClassProxyWithTarget(targetType,
          targetObject, proxyGenerationOptions, interceptors);
}
总结
本文详细介绍了在Apworks中解耦NHibernateContext与NHibernateRepository的具体方法,并对这个过程中遇到的问题进行了分析。虽然所介绍的内容是基于Apworks这一框架的,而并不是所有的读者朋友对这个框架都比较熟悉,但本文在一定层面上提供了解决实际问题的思路,比如如何在不改变现有框架行为的情况下,使得新的功能能够被集成进来,希望这些思路能够帮助到正在这条道路上进行探索,并遇到实际困难的朋友。

