1、FTP传输原理
FTP,文件传输协议,是工作在应用层,基于TCP实现,依赖于互联网即可通讯。
1)连接模式
控制(命令)连接,用来通信,一直在线,客户端随机端口连接服务端TCP:21端口。
数据连接,用来传输,客户端请求数据时服务端打开,传输完成时即关闭
主动模式:客户端发送控制连接后,ftp用自己TCP:20端口连接客户端。
被动模式:客户端发送控制连接后,服务端随机打开一个端口(通常>5000)并通过命令连接通知客户端,客户端用控制连接端口号+1的端口号(如控制连接用3001号口, 那么数据传输时就用3002号)
2)传输模式:二进制&文本,模式由服务端和客户端商定。
3)数据类型:结构化数据、半结构化数据、非结构化数据
4)其他有关协议
RPC(remote procedure call,典型的像NFS,微软的远程桌面)基于二进制的不同主机间实现数据通信
Samba,基于CIFS/SMB协议实现,可实现跨平台的数据通信
2、常用FTP软件
服务端
Linux:vsftpd(very secure ftp daemon);proftpd,功能丰富;wu-ftpd,非模块化结构,鼻祖。;pureftpd;Filezilla
Windows:IIS、Serv-U、Filezilla、
客户端
Linux:ftp、tftp
windows:gftp、filezilla
3、vsftpd认证
基于pam实现用户认证,认证目录/etc/pam.d/* 依赖于/lib(64)/security/*下的认证模块来实现。由于vsftpd受SELinux控制,所以要关闭SELinux才能使vsftpd正常工作
支持虚拟用户,默认使用/var/ftp(只有root拥有写权限)提供服务的根目录,不允许运行vsftpd进程的用户具有写权限,为了让用户具有写权限,在var/ftp目录下建立目录赋予用户写权限。
4、vsftpd安装配置
本文环境:centos6.5 64位。
4.1、安装
#yum install vsftpd -y
查看安装时(后)生成的文件
[root@uu ~]# rpm -qa | grep vsftpd
vsftpd-2.2.2-24.el6.x86_64
[root@uu ~]# rpm -ql vsftpd
/etc/logrotate.d/vsftpd   #日志文件
/etc/pam.d/vsftpd       #基于pam完成认证的pam认证文件
/etc/rc.d/init.d/vsftpd  #服务控制脚本
/etc/vsftpd         #配置文件目录
/etc/vsftpd/ftpuserst   #控制用户登录文件1
/etc/vsftpd/user_list   #控制用户登录文件2
/etc/vsftpd/vsftpd.conf  #主配置文件
/etc/vsftpd/vsftpd_conf_migrate.sh  #迁移脚本
/usr/sbin/vsftpd
/*文档*/
/usr/share/doc/vsftpd-2.2.2
/usr/share/doc/vsftpd-2.2.2/AUDIT
/usr/share/doc/vsftpd-2.2.2/BENCHMARKS
/usr/share/doc/vsftpd-2.2.2/BUGS
/usr/share/doc/vsftpd-2.2.2/COPYING
/usr/share/doc/vsftpd-2.2.2/Changelog
/usr/share/doc/vsftpd-2.2.2/EXAMPLE
/usr/share/doc/vsftpd-2.2.2/EXAMPLE/INTERNET_SITE
/usr/share/doc/vsftpd-2.2.2/EXAMPLE/INTERNET_SITE/README
/usr/share/doc/vsftpd-2.2.2/EXAMPLE/INTERNET_SITE/README.configuration
/usr/share/doc/vsftpd-2.2.2/EXAMPLE/INTERNET_SITE/vsftpd.conf
/usr/share/doc/vsftpd-2.2.2/EXAMPLE/INTERNET_SITE/vsftpd.xinetd
/usr/share/doc/vsftpd-2.2.2/EXAMPLE/INTERNET_SITE_NOINETD
/usr/share/doc/vsftpd-2.2.2/EXAMPLE/INTERNET_SITE_NOINETD/README
/usr/share/doc/vsftpd-2.2.2/EXAMPLE/INTERNET_SITE_NOINETD/README.configuration
/usr/share/doc/vsftpd-2.2.2/EXAMPLE/INTERNET_SITE_NOINETD/vsftpd.conf
/usr/share/doc/vsftpd-2.2.2/EXAMPLE/PER_IP_CONFIG
/usr/share/doc/vsftpd-2.2.2/EXAMPLE/PER_IP_CONFIG/README
/usr/share/doc/vsftpd-2.2.2/EXAMPLE/PER_IP_CONFIG/README.configuration
/usr/share/doc/vsftpd-2.2.2/EXAMPLE/PER_IP_CONFIG/hosts.allow
/usr/share/doc/vsftpd-2.2.2/EXAMPLE/README
/usr/share/doc/vsftpd-2.2.2/EXAMPLE/VIRTUAL_HOSTS
/usr/share/doc/vsftpd-2.2.2/EXAMPLE/VIRTUAL_HOSTS/README
/usr/share/doc/vsftpd-2.2.2/EXAMPLE/VIRTUAL_USERS
/usr/share/doc/vsftpd-2.2.2/EXAMPLE/VIRTUAL_USERS/README
/usr/share/doc/vsftpd-2.2.2/EXAMPLE/VIRTUAL_USERS/README.configuration
/usr/share/doc/vsftpd-2.2.2/EXAMPLE/VIRTUAL_USERS/logins.txt
/usr/share/doc/vsftpd-2.2.2/EXAMPLE/VIRTUAL_USERS/vsftpd.conf
/usr/share/doc/vsftpd-2.2.2/EXAMPLE/VIRTUAL_USERS/vsftpd.pam
/usr/share/doc/vsftpd-2.2.2/EXAMPLE/VIRTUAL_USERS_2
/usr/share/doc/vsftpd-2.2.2/EXAMPLE/VIRTUAL_USERS_2/README
/usr/share/doc/vsftpd-2.2.2/FAQ
/usr/share/doc/vsftpd-2.2.2/INSTALL
/usr/share/doc/vsftpd-2.2.2/LICENSE
/usr/share/doc/vsftpd-2.2.2/README
/usr/share/doc/vsftpd-2.2.2/README.security
/usr/share/doc/vsftpd-2.2.2/REWARD
/usr/share/doc/vsftpd-2.2.2/SECURITY
/usr/share/doc/vsftpd-2.2.2/SECURITY/DESIGN
/usr/share/doc/vsftpd-2.2.2/SECURITY/IMPLEMENTATION
/usr/share/doc/vsftpd-2.2.2/SECURITY/OVERVIEW
/usr/share/doc/vsftpd-2.2.2/SECURITY/TRUST
/usr/share/doc/vsftpd-2.2.2/SIZE
/usr/share/doc/vsftpd-2.2.2/SPEED
/usr/share/doc/vsftpd-2.2.2/TODO
/usr/share/doc/vsftpd-2.2.2/TUNING
/usr/share/doc/vsftpd-2.2.2/vsftpd.xinetd
/usr/share/man/man5/vsftpd.conf.5.gz
/usr/share/man/man8/vsftpd.8.gz
/var/ftp    #ftp服务的根目录
/var/ftp/pub  #ftp服务公共目录
4.2、用户
匿名用户,默认映射为ftp用户
系统用户,访问ftp时进入的默认为系统用户的家目录,如果不禁锢在自己家目录的话,是可以切换到其他目录的。
虚拟用户---->映射为系统用户
[root@uu ~]# finger ftp
Login: ftp                              Name: FTP User
Directory: /var/ftp                     Shell: /sbin/nologin
Never logged in.
No mail.
No Plan.
4.3、启动
[root@uu ~]# /etc/init.d/vsftpd start
Starting vsftpd for vsftpd:                                [  OK  ]
[root@uu ~]# chkconfig vsftpd on
默认目录
[root@uu ~]# cd /var/ftp/
[root@uu ftp]# ll
total 4
drwxr-xr-x. 2 root root 4096 Mar 22  2017 pub
防火墙设置
[root@uu ftp]# iptables -L -n
Chain INPUT (policy ACCEPT)
target     prot opt source               destination
ACCEPT     all  --  0.0.0.0/0            0.0.0.0/0           state RELATED,ESTABLISHED
ACCEPT     icmp --  0.0.0.0/0            0.0.0.0/0
ACCEPT     all  --  0.0.0.0/0            0.0.0.0/0
ACCEPT     tcp  --  0.0.0.0/0            0.0.0.0/0           state NEW tcp dpt:22
REJECT     all  --  0.0.0.0/0            0.0.0.0/0           reject-with icmp-host-prohibited

Chain FORWARD (policy ACCEPT)
target     prot opt source               destination
REJECT     all  --  0.0.0.0/0            0.0.0.0/0           reject-with icmp-host-prohibited

Chain OUTPUT (policy ACCEPT)
target     prot opt source               destination


#开放21端口
[root@uu ftp]# vi /etc/sysconfig/iptables
# Firewall configuration written by system-config-firewall
# Manual customization of this file is not recommended.
*filter
:INPUT ACCEPT [0:0]
:FORWARD ACCEPT [0:0]
:OUTPUT ACCEPT [0:0]
-A INPUT -m state --state ESTABLISHED,RELATED -j ACCEPT
-A INPUT -p icmp -j ACCEPT
-A INPUT -i lo -j ACCEPT
-A INPUT -m state --state NEW -m tcp -p tcp --dport 22 -j ACCEPT
-A INPUT -m state --state NEW -m tcp -p tcp --dport 21 -j ACCEPT   #添加这一行
-A INPUT -j REJECT --reject-with icmp-host-prohibited
-A FORWARD -j REJECT --reject-with icmp-host-prohibited
COMMIT
~
~
"/etc/sysconfig/iptables" 14L, 541C written
[root@uu ftp]# /etc/init.d/iptables restart
iptables: Flushing firewall rules:                         [  OK  ]
iptables: Setting chains to policy ACCEPT: filter          [  OK  ]
iptables: Unloading modules:                               [  OK  ]
iptables: Applying firewall rules:                         [  OK  ]


[root@uu ftp]# iptables -L -n
Chain INPUT (policy ACCEPT)
target     prot opt source               destination
ACCEPT     all  --  0.0.0.0/0            0.0.0.0/0           state RELATED,ESTABLISHED
ACCEPT     icmp --  0.0.0.0/0            0.0.0.0/0
ACCEPT     all  --  0.0.0.0/0            0.0.0.0/0
ACCEPT     tcp  --  0.0.0.0/0            0.0.0.0/0           state NEW tcp dpt:22
ACCEPT     tcp  --  0.0.0.0/0            0.0.0.0/0           state NEW tcp dpt:21
REJECT     all  --  0.0.0.0/0            0.0.0.0/0           reject-with icmp-host-prohibited

Chain FORWARD (policy ACCEPT)
target     prot opt source               destination
REJECT     all  --  0.0.0.0/0            0.0.0.0/0           reject-with icmp-host-prohibited

Chain OUTPUT (policy ACCEPT)
target     prot opt source               destination
4.4、登录
Microsoft Windows [版本 6.1.7601]
版权所有 (c) 2009 Microsoft Corporation。保留所有权利。

C:Usersmango>ftp 107.175.240.114
连接到 107.175.240.114。
220 (vsFTPd 2.2.2)
用户(107.175.240.114:(none)): anonymous
331 Please specify the password.
密码:
230 Login successful.
ftp> help
命令可能是缩写的。  命令为:

!               delete          literal         prompt          send
?               debug           ls              put             status
append          dir             mdelete         pwd             trace
ascii           disconnect      mdir            quit            type
bell            get             mget            quote           user
binary          glob            mkdir           recv            verbose
bye             hash            mls             remotehelp
cd              help            mput            rename
close           lcd             open            rmdir
#mget  一次下载多个文件
#lcd  登录后进入其他目录

ftp> dir
200 PORT command successful. Consider using PASV.
150 Here comes the directory listing.
drwxr-xr-x    2 0        0            4096 Mar 22  2017 pub
226 Directory send OK.
ftp: 收到 61 字节,用时 0.00秒 61.00千字节/秒。
ftp> pwd
257 "/"              #此处实际为/var/ftp/  因为默认将ftp用户锁定在此目录下,ftp则认为是“/”目录
ftp>
4.5、配置文件
[root@uu ftp]# vim /etc/vsftpd/vsftpd.conf
# Example config file /etc/vsftpd/vsftpd.conf
#
# The default compiled in settings are fairly paranoid. This sample file
# loosens things up a bit, to make the ftp daemon more usable.
# Please see vsftpd.conf.5 for all compiled in defaults.
#
# READ THIS: This example file is NOT an exhaustive list of vsftpd options.
# Please read the vsftpd.conf.5 manual page to get a full idea of vsftpd's
# capabilities.
#
# Allow anonymous FTP? (Beware - allowed by default if you comment this out).
anonymous_enable=YES      #是否允许匿名用户登录
#
# Uncomment this to allow local users to log in.
local_enable=YES        #是否允许系统用户登录
#
# Uncomment this to enable any form of FTP write command.
write_enable=YES        #是否允许本地(系统)用户上传文件
#
# Default umask for local users is 077. You may wish to change this to 022,
# if your users expect that (022 is used by most other ftpd's)
local_umask=022          #服务端口
#
# Uncomment this to allow the anonymous FTP user to upload files. This only
# has an effect if the above global write enable is activated. Also, you will
# obviously need to create a directory writable by the FTP user.
#anon_upload_enable=YES    #是否允许匿名用户上传文件(注意如果是创建文件的话要将“要创建文件的目录改为匿名用户所属或具有写权限。”)
/*
#比如要在upload中创建文件,因为/var/ftp这个目录属主属组都是root。所以把upload开放给ftp用户后ftp用户才可以创建文件。
[root@uu ftp]# ll -d /var/ftp/
drwxr-xr-x. 3 root root 4096 May 18 11:16 /var/ftp/
[root@uu ftp]# mkdir /var/ftp/upload
[root@uu ftp]# setfacl -m u:ftp:rwx /var/ftp/upload/
*/
#
# Uncomment this if you want the anonymous FTP user to be able to create
# new directories.
#anon_mkdir_write_enable=YES  #是否允许匿名用户创建目录
#anon_other_write_enable=YES  #是否允许匿名用户其他权限(此行默认不存在,可新添加)
#
# Activate directory messages - messages given to remote users when they
# go into a certain directory.
dirmessage_enable=YES       #显示登录欢迎信息(要创建一个含欢迎信息的.messges文件,)
# The target log file can be vsftpd_log_file or xferlog_file.
# This depends on setting xferlog_std_format parameter
xferlog_enable=YES        #是否将ftp记录到日志
#
# Make sure PORT transfer connections originate from port 20 (ftp-data).
connect_from_port_20=YES
#
# If you want, you can arrange for uploaded anonymous files to be owned by
# a different user. Note! Using "root" for uploaded files is not
# recommended!
#chown_uploads=YES        #是否将上传后的文件更改属主属组,root除外
#chown_username=whoever     #更改的属主属组是谁
#
# The name of log file when xferlog_enable=YES and xferlog_std_format=YES
# WARNING - changing this filename affects /etc/logrotate.d/vsftpd.log
#xferlog_file=/var/log/xferlog#ftp记录的日志文件
#
# Switches between logging into vsftpd_log_file and xferlog_file files.
# NO writes to vsftpd_log_file, YES to xferlog_file
xferlog_std_format=YES     #是否以标准模式记录日志
#
# You may change the default value for timing out an idle session.
#idle_session_timeout=600    #控制连接时间
#
# You may change the default value for timing out a data connection.
#data_connection_timeout=120  #数据连接时间
#
# It is recommended that you define on your system a unique user which the
# ftp server can use as a totally isolated and unprivileged user.
#nopriv_user=ftpsecure
#
# Enable this and the server will recognise asynchronous ABOR requests. Not
# recommended for security (the code is non-trivial). Not enabling it,
# however, may confuse older FTP clients.
#async_abor_enable=YES
#
# By default the server will pretend to allow ASCII mode but in fact ignore
# the request. Turn on the below options to have the server actually do ASCII
# mangling on files when in ASCII mode.
# Beware that on some FTP servers, ASCII support allows a denial of service
# attack (DoS) via the command "SIZE /big/file" in ASCII mode. vsftpd
# predicted this attack and has always been safe, reporting the size of the
# raw file.
# ASCII mangling is a horrible feature of the protocol.
#ascii_upload_enable=YES
#ascii_download_enable=YES
#
# You may fully customise the login banner string:
#ftpd_banner=Welcome to blah FTP service.   #设定Vsftpd的登陆标语。
#Banner_file =/…                            #设定Vsftpd的登陆标语的文件。(默认不存在,需添加)
#
# You may specify a file of disallowed anonymous e-mail addresses. Apparently
# useful for combatting certain DoS attacks.
#deny_email_enable=YES
# (default follows)
#banned_email_file=/etc/vsftpd/banned_emails
#
# You may specify an explicit list of local users to chroot() to their home
# directory. If chroot_local_user is YES, then this list becomes a list of
# users to NOT chroot().
#chroot_local_user=YES     #是否禁锢所有用户家目录,想禁用全部用此选项,想禁锢部分用下面两行注释组合
#chroot_list_enable=YES    #启用禁锢的用户列表
# (default follows)
#chroot_list_file=/etc/vsftpd/chroot_list#禁锢的用户列表

#
# You may activate the "-R" option to the builtin ls. This is disabled by
# default to avoid remote users being able to cause excessive I/O on large
# sites. However, some broken FTP clients such as "ncftp" and "mirror" assume
# the presence of the "-R" option, so there is a strong case for enabling it.
#ls_recurse_enable=YES
#
# When "listen" directive is enabled, vsftpd runs in standalone mode and
# listens on IPv4 sockets. This directive cannot be used in conjunction
# with the listen_ipv6 directive.
listen=YES        #定义vsftpd是否为独立守护进程,建议加上注释
#
# This directive enables listening on IPv6 sockets. To listen on IPv4 and IPv6
# sockets, you must run two copies of vsftpd with two configuration files.
# Make sure, that one of the listen options is commented !!
#listen_ipv6=YES

pam_service_name=vsftpd  #vsftpd接受pam控制认证,指定vsftpd在/etc/pam.d/下的名称
/*守护进程
独立守护,适用于访问量大,在线时间长的服务
瞬时守护,用户量少,在线时间不长,由超级守护进程(xinetd)代为管理,超级守护进程自己是一个独立守护
*/
userlist_enable=YES  #是否启用/etc/vsftpd/user_list这个文件,配合userlist_deny=YES/NO(此行下面增加)使用。关于这项请查看下面的详细介绍
tcp_wrappers=YES
max_clients            #可增加参数,定义最多连接数
max_per_ip        #可增加参数,定义每个ip最多连接数
4.6、用户列表说明
####来看pam认证,说file=/etc/vsftpd/ftpusers里的用户sense=deny,即拒绝访问ftp#####
[root@uu vsftpd]# cat /etc/pam.d/vsftpd
#%PAM-1.0
session    optional     pam_keyinit.so    force revoke
auth       required     pam_listfile.so item=user sense=deny file=/etc/vsftpd/ftpusers onerr=succeed
auth       required     pam_shells.so
auth       include      password-auth
account    include      password-auth
session    required     pam_loginuid.so
session    include      password-auth


####看下/etc/vsftpd下的文件#####
[root@uu ~]# cd /etc/vsftpd/
[root@uu vsftpd]# ll
total 20
-rw-------. 1 root root  125 Mar 22  2017 ftpusers
-rw-------. 1 root root  361 Mar 22  2017 user_list
-rw-------. 1 root root 4599 Mar 22  2017 vsftpd.conf
-rwxr--r--. 1 root root  338 Mar 22  2017 vsftpd_conf_migrate.sh
[root@uu vsftpd]# cat ftpusers
# Users that are not allowed to login via ftp
root
bin
daemon
adm
lp
sync
shutdown
halt
mail
news
uucp
operator
games
nobody
[root@uu vsftpd]# cat user_list       #
# vsftpd userlist
# If userlist_deny=NO,(不拒绝表里用户登录) only allow users in this file
# If userlist_deny=YES (default), (拒绝表里用户登录)never allow users in this file, and
# do not even prompt for a password.
# Note that the default vsftpd pam config also checks /etc/vsftpd/ftpusers
# for users that are denied.
root
bin
daemon
adm
lp
sync
shutdown
halt
mail
news
uucp
operator
games
nobody
5、基于SSL的vsftpd配置
通讯方式
ftps:ftp+ssl/tls
sftp:ssh,openssh
5.1、生成证书
[root@uu ~]# cd /etc/pki/CA/
[root@uu CA]# touch index.txt
[root@uu CA]# echo 01 > serial
[root@uu CA]# ll
total 20
drwxr-xr-x. 2 root root 4096 May 19 10:51 certs
drwxr-xr-x. 2 root root 4096 Mar 22  2017 crl
-rw-r--r--. 1 root root    0 May 19 10:52 index.txt
drwxr-xr-x. 2 root root 4096 May 19 10:26 newcerts
drwx------. 2 root root 4096 May 19 10:09 private
-rw-r--r--. 1 root root    3 May 19 10:52 serial
[root@uu CA]# (umask 077;openssl genrsa -out private/cakey.pem 2048)
Generating RSA private key, 2048 bit long modulus
....................................................................................................................................+++
...............................+++
e is 65537 (0x10001)
[root@uu CA]#  openssl req -new -x509 -key private/cakey.pem -out cacert.pem -days 3650
You are about to be asked to enter information that will be incorporated
into your certificate request.
What you are about to enter is what is called a Distinguished Name or a DN.
There are quite a few fields but you can leave some blank
For some fields there will be a default value,
If you enter '.', the field will be left blank.
-----
Country Name (2 letter code) [XX]:CN
State or Province Name (full name) []:SD
Locality Name (eg, city) [Default City]:JN
Organization Name (eg, company) [Default Company Ltd]:cmelo
Organizational Unit Name (eg, section) []:tech
Common Name (eg, your name or your server's hostname) []:ca.cmelo.com
Email Address []:
[root@uu CA]# cd /etc/vsftpd/ssl/
[root@uu ssl]# (umask 077;openssl genrsa -out vsftpd.key 2048;)
Generating RSA private key, 2048 bit long modulus
.....................................................+++
..................................+++
e is 65537 (0x10001)
[root@uu ssl]# openssl req -new -key vsftpd.key -out vsftpd.csr
You are about to be asked to enter information that will be incorporated
into your certificate request.
What you are about to enter is what is called a Distinguished Name or a DN.
There are quite a few fields but you can leave some blank
For some fields there will be a default value,
If you enter '.', the field will be left blank.
-----
Country Name (2 letter code) [XX]:CN
State or Province Name (full name) []:SD
Locality Name (eg, city) [Default City]:JN
Organization Name (eg, company) [Default Company Ltd]:cmelo
Organizational Unit Name (eg, section) []:tech
Common Name (eg, your name or your server's hostname) []:ftp.cmelo.com
Email Address []:

Please enter the following 'extra' attributes
to be sent with your certificate request
A challenge password []:
An optional company name []:
[root@uu ssl]# openssl ca -in vsftpd.csr -out vsftpd.crt
Using configuration from /etc/pki/tls/openssl.cnf
Check that the request matches the signature
Signature ok
Certificate Details:
        Serial Number: 1 (0x1)
        Validity
            Not Before: May 19 14:55:55 2018 GMT
            Not After : May 19 14:55:55 2019 GMT
        Subject:
            countryName               = CN
            stateOrProvinceName       = SD
            organizationName          = cmelo
            organizationalUnitName    = tech
            commonName                = ftp.cmelo.com
        X509v3 extensions:
            X509v3 Basic Constraints:
                CA:FALSE
            Netscape Comment:
                OpenSSL Generated Certificate
            X509v3 Subject Key Identifier:
                30:37:5F:C7:FC:F6:6E:1C:E7:64:02:D9:57:FA:DD:24:F8:DD:12:E1
            X509v3 Authority Key Identifier:
                keyid:AC:24:D6:3A:DA:F6:70:1D:86:1A:B7:A8:33:45:28:FA:4D:F3:BB:60

Certificate is to be certified until May 19 14:55:55 2019 GMT (365 days)
Sign the certificate? [y/n]:y


1 out of 1 certificate requests certified, commit? [y/n]y
Write out database with 1 new entries
Data Base Updated
5.2、修改配置文件
在/etc/vsftpd/vsftpd.conf 中最后添加:
#ssl or tls
ssl_enable=YES
ssl_tlsv1=YES
ssl_sslv3=YES
allow_anon_ssl=NO
force_local_data_ssl=YES
force_local_logins_ssl=YES
rsa_cert_file=/etc/vsftpd/ssl/vsftpd.crt
rsa_private_key_file=/etc/vsftpd/ssl/vsftpd.key
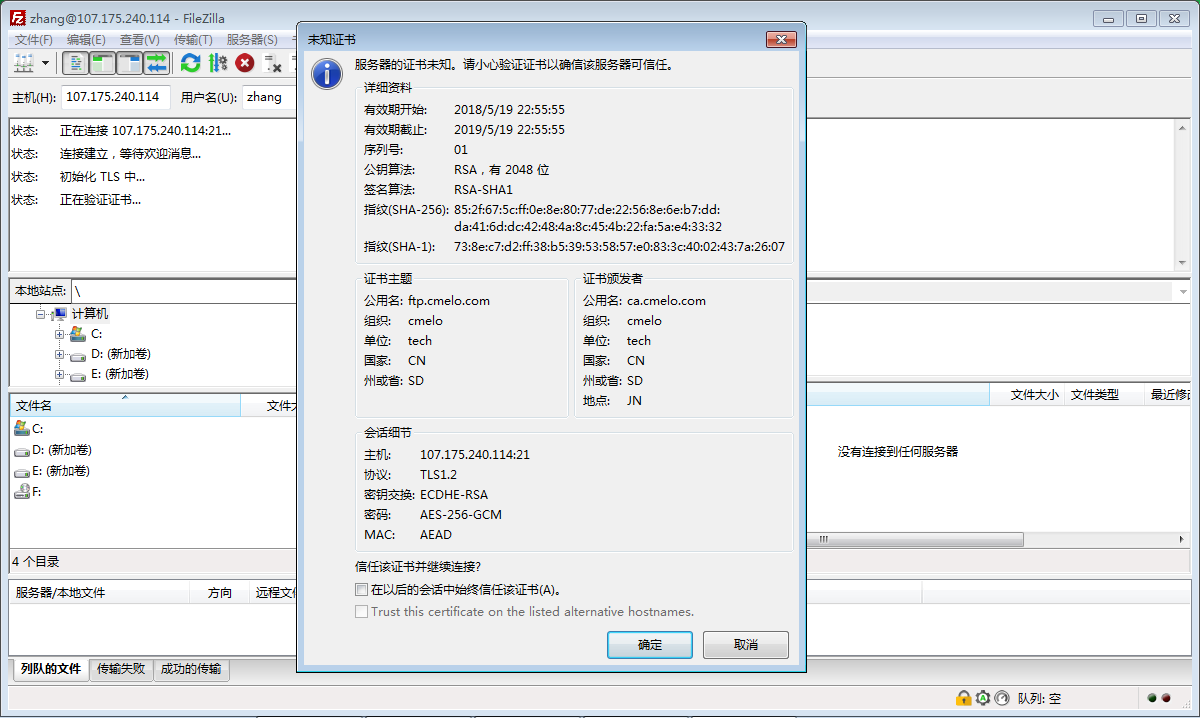
5.3、连接

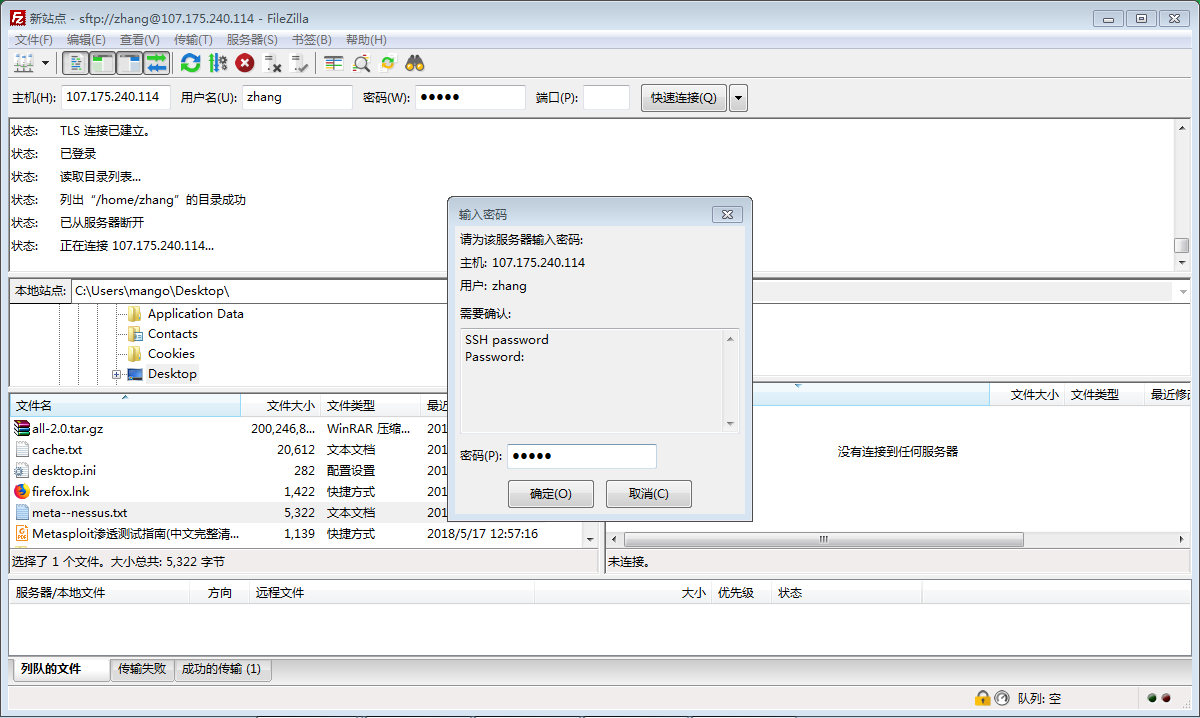
5.4、使用交互式登录


6、pam认证登录
介绍两种,一种是基于数据库(MySQL)认证,一种是用户账号文件认证
6.1、基于数据库认证
拓扑如下

用户请求vsftp服务器,vsftp在配置文件中设置把认证权交由/etc/pam.d/vsftp.mysql(名称自定义),vsftp.mysql设置使用/lib/security/pam_mysql.so(pam-mysql安装时生成)做认证检查,
由于pam不支持直接去MySQL请求数据,故需安装pam-mysql-0.7RC1(已停更)插件
数据库:vsftpd
表:vusers
字段:name, password
6.1.1、安装MySQL及插件
MySQL
[root@uu ~]# yum install mysql-server mysql-devel mysql -y
安装pam-mysql插件
[root@uu ftp]# tar xf pam_mysql-0.7RC1.tar.gz
[root@uu ftp]# cd pam_mysql-0.7RC1

[root@uu pam_mysql-0.7RC1]# ./configure --with-mysql

#出错:configure: error: Cannot locate mysql client library. Please check your mysql installation.

#验证是否安装mysql成功

 [root@uu pam_mysql-0.7RC1]# rpm -q mysql
mysql-5.1.73-8.el6_8.x86_64

#验证MySQL安装位置
[root@uu pam_mysql-0.7RC1]# rpm -ql mysql
/usr/bin/msql2mysql
.....
/usr/share/man/man1/mysqlslap.1.gz

[root@uu pam_mysql-0.7RC1]# ./configure --with-mysql=/usr

#出错:configure: error: Cannot find pam headers. Please check if your system is ready for pam module development.

[root@uu pam_mysql-0.7RC1]# yum install pam-devel -y
安装后/lib/security/已经有pam_mysql.so,如果没有需要复制一份过来。
[root@uu pam_mysql-0.7RC1]# ll /lib/security/
total 136
-rwxr-xr-x 1 root root    871 May 21 16:15 pam_mysql.la
-rwxr-xr-x 1 root root 133348 May 21 16:15 pam_mysql.so
6.1.2、数据库配置
/etc/init.d/mysqld start
连接到数据库,准备相关的数据库和表
mysql> create database vsftpd ;
Query OK, 1 row affected (0.00 sec)

mysql> use vsftpd;
Database changed
#创建users表
用户id 小整型 自动增加ID号 不为空
用户名 最多20个字符 区分字符大小写
密码 最多48个字符 区分大小写
主键 id为主键
mysql> CREATE TABLE users(
    -> id SMALLINT AUTO_INCREMENT NOT NULL,
    -> name CHAR(20) BINARY NOT NULL,
    -> password CHAR(48) BINARY NOT NULL,
    -> PRIMARY key(id));
Query OK, 0 rows affected (0.01 sec)

mysql> desc users;
+----------+-------------+------+-----+---------+----------------+
| Field    | Type        | Null | Key | Default | Extra          |
+----------+-------------+------+-----+---------+----------------+
| id       | smallint(6) | NO   | PRI | NULL    | auto_increment |
| name     | char(20)    | NO   |     | NULL    |                |
| password | char(48)    | NO   |     | NULL    |                |
+----------+-------------+------+-----+---------+----------------+
3 rows in set (0.00 sec)

#添加vsftpd用户并授权查询的权限
mysql> grant select on vsftpd.* to vsftpd@localhost identified by 'vsftpd';
Query OK, 0 rows affected (0.00 sec)

mysql> grant select on vsftpd.* to vsftpd@127.0.0.1 identified by 'vsftpd';
Query OK, 0 rows affected (0.00 sec)
#在users表中批量加入两个用户
注:password方法来加密密码这个可以理论上是可以的,但是pam-mysql和mysql加密算法不一样会导致错误,后面也有详细介绍,建议使用encrypt加密:
mysql> insert into users (name,password) value ('uqian',encrypt('centos'));
Query OK, 1 row affected (0.00 sec)
mysql> insert into users(name,password) VALUE ('tom',password('centos')),('jerry',password('centos'));
Query OK, 2 rows affected (0.00 sec)
Records: 2  Duplicates: 0  Warnings: 0
mysql> select * from users;
+----+-------+-------------------------------------------+
| id | name  | password                                  |
+----+-------+-------------------------------------------+
|  1 | tom   | *128977E278358FF80A246B5046F51043A2B1FCED |
|  2 | jerry | *128977E278358FF80A246B5046F51043A2B1FCED |
+----+-------+-------------------------------------------+
2 rows in set (0.00 sec)

mysql> flush privileges;
Query OK, 0 rows affected (0.00 sec)
测试vsftpd用户能否登录
[root@uu ~]# mysql -uvsftpd -p
Enter password:vsftpd
验证数据库
mysql> show databases;
+--------------------+
| Database           |
+--------------------+
| information_schema |
| test               |
| vsftpd             |
+--------------------+
3 rows in set (0.00 sec)

mysql> use vsftpd;
Reading table information for completion of table and column names
You can turn off this feature to get a quicker startup with -A

Database changed
mysql> show tables;
+------------------+
| Tables_in_vsftpd |
+------------------+
| users            |
+------------------+
1 row in set (0.00 sec)

mysql> select * from users;
+----+-------+-------------------------------------------+
| id | name  | password                                  |
+----+-------+-------------------------------------------+
|  1 | tom   | *128977E278358FF80A246B5046F51043A2B1FCED |
|  2 | jerry | *128977E278358FF80A246B5046F51043A2B1FCED |
+----+-------+-------------------------------------------+
2 rows in set (0.00 sec)
#删除的用法
mysql> delete from users where name='tom';
Query OK, 1 row affected (0.00 sec)

mysql> delete from users where name='jerry';
Query OK, 1 row affected (0.00 sec)
6.1.3、建立pam认证所需的文件
[root@uu ~]# vim /etc/pam.d/vsftp.mysql(名称可自定义)

auth required /lib/security/pam_mysql.so user=vsftpd passwd=vsftpd host=localhost db=vsftpd table=users usercolumn=name passwdcolumn=password crypt=1

account required /lib/security/pam_mysql.so user=vsftpd passwd=vsftpd host=localhost db=vsftpd table=users usercolumn=name passwdcolumn=password crypt=1
#使用pam_mysql.so做认证检查,连接MySQL数据库时使用的账号和密码,crypt为加密类型
这里需要提出一点的是crypt=0,即不加密。或crypt=1是成功的
crypt=2的话,由于pam-mysql和MySQL使用的加密算法不一样,认证时可能不会匹配,实际也是如此
我用md5和sha1都不支持,提示
[root@uu pam.d]# tail /var/log/secure
May 22 13:26:49 uu vsftpd[42373]: pam_mysql - non-crypt()ish MD5 hash is not supported in this build.
May 22 13:35:51 uu vsftpd[42417]: pam_mysql - non-crypt()ish SHA1 hash is not supported in this build.
参考pam-mysql-0.7RC的REDME文件:
[root@uu ~]# cd /var/ftp/pam_mysql-0.7RC1
[root@uu pam_mysql-0.7RC1]# more README

............

crypt (plain)

    The method to encrypt the user's password:

       0 (or "plain") = No encryption.  Passwords stored in plaintext.
                        HIGHLY DISCOURAGED.

       1 (or "Y")     = Use crypt(3) function.

       2 (or "mysql") = Use MySQL PASSWORD() function. It is possible
                        that the encryption function used by PAM-MySQL
                        is different from that of the MySQL server, as
                        PAM-MySQL uses the function defined in MySQL's
                        C-client API instead of using PASSWORD() SQL function
                        in the query.

       3 (or "md5")   = Use plain hex MD5.

       4 (or "sha1")  = Use plain hex SHA1.

..............
#添加本地用户vuser作为被映射用户,家目录为/var/ftproot
[root@uu ~]# useradd -s /sbin/nologin -d /var/ftproot vuser

#让其他用户具有读和执行的权限,否则映射的用户无权限访问此目录

[root@uu ~]# chmod go+rx /var/ftproot/
[root@uu ~]# ll -d /var/ftproot/
drwxr-xr-x 2 vuser vuser 4096 May 21 16:49 /var/ftproot/
6.1.4、修改vsftpd配置文件,使其适应MySQL认证
  pam_service_name=vsftpd=====>pam_service_name=vsftpd.mysql

  force_local_data_ssl=YES===>force_local_data_ssl=NO    #可不操作,此处W为避免意外,修改此选项
  force_local_logins_ssl=YES===>force_local_logins_ssl=NO  #可不操作,同上

  将虚拟用户与映射用户做关联,增加

  guest_enable=YES    #启用来宾(虚拟)用户
  guest_username=vuser  #来宾(虚拟)映射为本地用户vuser
6.2、基于db4-utils(rpm包)用户账号文件认证
db_load将文件转换为二进制文件存储用户名和密码。 注:奇数行为用户名,偶数行为密码。
vim /etc/ftp/logins
name
password
#创建db文件需要db4支持,如果系统没安装请安装
[root@uu vsftpd]# yum -y install db4 db4-devel db4-utils
#修改db文件的权限,以免被非法用户修改
[root@uu vsftpd]# chmod 600 /etc/vsftpd/vu_list.db
7、vsftpd匿名用户权限控制
1)虚拟用户的权限都是和匿名用户的权限一致的。且虚拟用户都(且必须)映射到同一用户上,所以为禁止虚拟用户上传和创建文件:
anon_mkdir_write_enable=NO
anon_upload_enable=NO
anon_****_enable=NO
2)实现不同虚拟用户具有不同权限
vim /etc/vsftpd/vsftpd.conf加入

#defined default user get slef power
user_config_dir=/etc/vsftpd/vusers
在/etc/vsftpd/vusers下为每个用户新建与用户名相同的文件
[root@uu vusers]# ll
total 8
-rw-r--r-- 1 root root 134 May 22 16:44 qian
-rw-r--r-- 1 root root  24 May 22 16:48 uqian

[root@uu vusers]# vim uqian
anon_world_readable_only=NO(使uqian用户的能下载,也只能下载;写成YES,将不能列出文件和目录)
write_enable=YES(写权限)
anon_mkdir_write_enable=YES(新建目录权限)
anon_upload_enable=YES(上传权限)
anon_other_write_enable=YES(删除/重命名的权限)
8、Q&A
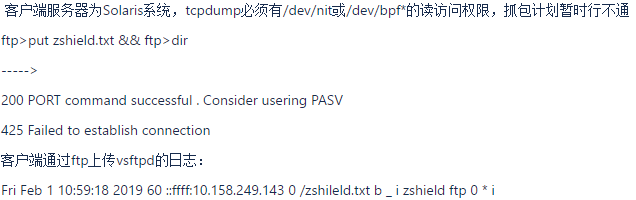
解决方式为:
ftp>passive(推荐)
ftp>quote(可能不会起作用)