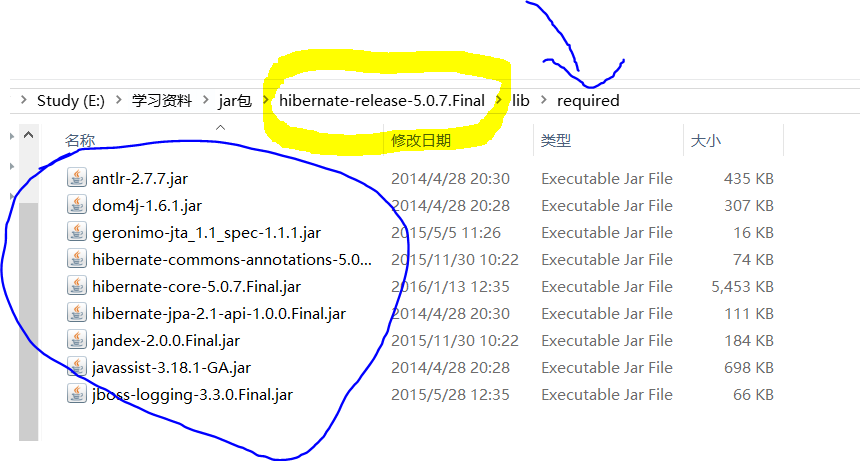
1.导包
导入Hibernate最基本的包(不要忘记导入数据库驱动包了!)
下载文件名为黄色框框中的名称的压缩包在对应路径下,有个required包下的所有包就是必备的基本包
2.建表
1 USE TEST;
2 DROP TABLE IF EXISTS customer;
3
4 CREATE TABLE customer(
5     cust_id INT AUTO_INCREMENT PRIMARY KEY,
6     cust_name VARCHAR(30),
7     cust_gender VARCHAR(5),
8     cust_phone VARCHAR(20)
9 );
3.建实体类
 1 package deep.entity;
 2
 3 import java.io.Serializable;
 4
 5 /**
 6  * 用户实体类
 7  * @author DeepSleeping
 8  *
 9  */
10 public class Customer implements Serializable{
11
12     private static final long serialVersionUID = 1L;
13
14     private int cust_id;
15     private String cust_name;
16     private String cust_gender;
17     private String cust_phone;
18
19     public int getCust_id() {
20         return cust_id;
21     }
22     public void setCust_id(int cust_id) {
23         this.cust_id = cust_id;
24     }
25     public String getCust_name() {
26         return cust_name;
27     }
28     public void setCust_name(String cust_name) {
29         this.cust_name = cust_name;
30     }
31     public String getCust_gender() {
32         return cust_gender;
33     }
34     public void setCust_gender(String cust_gender) {
35         this.cust_gender = cust_gender;
36     }
37     public String getCust_phone() {
38         return cust_phone;
39     }
40     public void setCust_phone(String cust_phone) {
41         this.cust_phone = cust_phone;
42     }
43 }
4.创建映射文件(Customer.hbm.xml)
①导入dtd文件约束
1 <!DOCTYPE hibernate-mapping PUBLIC
2     "-//Hibernate/Hibernate Mapping DTD 3.0//EN"
3     "http://www.hibernate.org/dtd/hibernate-mapping-3.0.dtd">
②导入本地dtd文件(这样就会有提示)
1:window --> preferencrs --> xml --> xml catalog --> add
2:location 选择 file system,然后选择你的本地dtd文件。(在下载的压缩包中搜索dtd也能找到)

3:key type 选择uri。
4:key 填入上述步骤中的"http://www.hibernate.org/dtd/hibernate-mapping-3.0.dtd"
③配置
 1 <?xml version = "1.0" encoding = "UTF-8"?>
 2 <!DOCTYPE hibernate-mapping PUBLIC
 3     "-//Hibernate/Hibernate Mapping DTD 3.0//EN"
 4     "http://www.hibernate.org/dtd/hibernate-mapping-3.0.dtd">
 5
 6 <hibernate-mapping>
 7     <!-- 建立类和表的一个映射关系 -->
 8     <!--
 9         class标签:用来建立类和表的映射
10             *name属性:类中的全路径
11             *table属性:表名(如果类名和表名是一致的,那么table属性可以省略)
12             *catalog属性:数据库名称,可以省略
13      -->
14      <class name="deep.entity.Customer" table = "customer">
15          <!-- 建立类中的属性与表中的主键的映射 -->
16          <!--
17              id标签:用来建立类中的属性与表中的主键字段对应
18                  *name属性:类中的属性名
19                  *column属性:表中字段名(如果类中的属性名和表中的一致,可以省略)
20                  *length属性:字段的长度
21                  *type属性:类型 Java数据类型,Hibernate数据类型(默认),SQL类型
22           -->
23          <id name = "cust_id" column = "cust_id">
24              <!-- 主键生成策略 -->
25              <generator class="native"></generator>
26          </id>
27
28
29          <!-- 建立类中的普通属性与表中的字段的映射 -->
30          <property name="cust_name" column="cust_name"/>
31          <property name="cust_gender" column="cust_gender"/>
32          <property name="cust_phone" column="cust_phone"/>
33
34      </class>
35 </hibernate-mapping>
5.创建Hibernate的核心配置文件(hibernate.cfg.xml)
在src目录下创建hibernate.cfg.xml文件
与上述步骤一致,导入约束,导入本地
1 <!DOCTYPE hibernate-configuration PUBLIC
2     "-//Hibernate/Hibernate Configuration DTD 3.0//EN"
3     "http://www.hibernate.org/dtd/hibernate-configuration-3.0.dtd">
 1 <?xml version = "1.0" encoding = "UTF-8"?>
 2 <!DOCTYPE hibernate-configuration PUBLIC
 3     "-//Hibernate/Hibernate Configuration DTD 3.0//EN"
 4     "http://www.hibernate.org/dtd/hibernate-configuration-3.0.dtd">
 5
 6 <hibernate-configuration>
 7     <session-factory>
 8         <!-- 必要的配置信息:连接数据库的基本参数 -->
 9         <property name="hibernate.connection.driver_class">com.mysql.jdbc.Driver</property>
10         <property name="hibernate.connection.url">jdbc:mysql:///test</property>
11         <property name="hibernate.connection.username">root</property>
12         <property name="hibernate.connection.password">123456</property>
13
14         <!-- Hibernate的属性 -->
15         <!-- Hibernate的方言:作用,根据配置的方言生成相应的SQL语句 -->
16         <property name="hibernate.dialect">org.hibernate.dialect.MySQLDialect</property>
17         <!-- Hibernate显示SQL语句: -->
18         <property name="hibernate.show_sql">true</property>
19         <!-- Hibernate格式化SQL语句(不然显示的就是一行,不方便阅读) -->
20         <property name="hibernate.format_sql">true</property>
21         <!-- Hibernate的hbm2ddl(数据定义语言:create drop alter ...) 属性 -->
22         <!--
23             hbm2ddl.auto的取值
24                 *none: 不用Hibernate自动生成表
25                 *create:每次都会创建一个新的表(测试)
26                 *create-drop:每次都会创建一个新的表,执行程序结束后删除这个表(测试)
27                 *update:如果数据库中有表,使用原来的表,如果没有表,创建一个新表,可以更新表结构
28                 *validate:只会使用原有的表,对映射关系进行校验
29          -->
30         <property name="hibernate.hbm2ddl.auto">update</property>
31
32
33         <!-- Hibernate加载映射 -->
34         <mapping resource="deep/entity/Customer.hbm.xml"/>
35     </session-factory>
36 </hibernate-configuration>
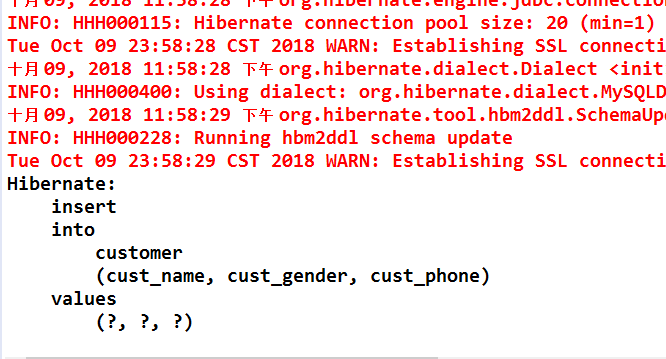
6.测试
 1 package deep.test;
 2
 3 import org.hibernate.Session;
 4 import org.hibernate.SessionFactory;
 5 import org.hibernate.Transaction;
 6 import org.hibernate.cfg.Configuration;
 7 import org.junit.Test;
 8
 9 import deep.entity.Customer;
10
11 /**
12  * 使用Hibernate保存数据
13  * @author DeepSleeping
14  *
15  */
16 public class demo {
17
18     @Test
19     public void save(){
20
21         //1.加载配置文件
22         Configuration cfg = new Configuration().configure();
23         //2.创建一个SessionFactory
24         SessionFactory sessionFactory = cfg.buildSessionFactory();
25         //3.创建Session对象,Session对象类似Connection
26         Session session = sessionFactory.openSession();
27
28         //4.开启事务
29         Transaction tx = session.beginTransaction();
30
31         //5.执行相关操作
32         Customer customer = new Customer();
33         customer.setCust_name("Hibernate测试");
34         session.save(customer);
35
36         //6.事务提交
37         tx.commit();
38         //7.释放资源
39         session.close();
40     }
41
42
43
44
45 }