前言
项目开发时,一般采用Maven来进行项目构建,管理,jar包下载,项目组开发人员开发时,只要在项目的pom.xml文件中,添加如下pom.xml信息从公共的库中下载相关的Jar包以及依赖Jar包,但有时候公共的库不是那么稳定而且下载速度往往很慢,一个团队一起开发项目时,如果每个组员都去下载一遍所有依赖的Jar包,其实是一件很麻烦的事情,所以这时候就有必要搭建一个Maven的私库了,这样如果再添加其他的构件时,会先在Maven私库下载好,以后才会下载到本地。以后,如果发现私服已经存在某一jar包,则会直接从私服下载,如果没有再去网络上下载,能大大的提高效率,因此很有必要搭建maven私服。

Maven私库安装部署
1.平台版本说明
- centos 7
- nexus-2.14.2
- JDK 8
- apache-maven-3.3.9
2.环境安装:安装nuxus maven私库之前先要安装好JDK、maven等必要环境
先安装JDK
- 下载jdk 8,去官网下载jdk8
- 解压jdk到当前目录
tar -zxvf jdk-8u91-linux-x64.tar.gz
- 配置环境变量
vim /etc/profile

添加如下内容:JAVA_HOME根据实际目录来
JAVA_HOME=/usr/java/jdk1.8.0_65
CLASSPATH=$JAVA_HOME/lib/
PATH=$PATH:$JAVA_HOME/bin
export PATH JAVA_HOME CLASSPATH
再安装Maven
- 下载maven
到Maven官网下载安装文件,目前最新版本为3.3.9,下载文件为apache-maven-3.3.9-bin.tar.gz,下载可以使用wget命令;
- 进入下载文件夹,找到下载的文件,运行如下命令解压
tar -xvf apache-maven-3.3.9-bin.tar.gz
- 配置环境变量
MAVEN_HOME=/usr/local/apache-maven-3.3.9
export MAVEN_HOME
export PATH=${PATH}:${MAVEN_HOME}/bin
- 保存文件,并运行如下命令使环境变量生效
source /etc/profile
- 在控制台输入如下命令,如果能看到Maven相关版本信息,则说明Maven已经安装成功
mvn -v

3.Nexus Maven私库安装
- nexus maven下载,下载地址:https://www.sonatype.com/download-oss-sonatype,我下载的是nexus-2.14.2-01-bundle.tar.gz
- 安装
linux版本无需安装,直接解压即可 tar -zxvf nexus-2.14.2-01-bundle.tar.gz
- 运行
进入bin目录下,运行./nexus start,启动服务
- 开机启动
sudo ln -s /usr/local/nexus/nexus-2.14.2-01/bin/nexus /etc/init.d/nexus
使用
service nexus status/start/stop
查看nexus服务状态、启动服务、停止服务等

使用
chkconfig nexus on/off
设置nexus服务开机自启动或者开机不启动
Nexus Maven私库的使用
1.初识Nexus Maven私库
在地址栏里输入服务IP地址和8081端口就可以打开用户界面,例如http://192.168.2.1:8081,点Sign In登录管理页面,用户名密码为,admin和admin123,如下如所示,在Repositories页面里显示着,默认已经创建了5个仓库(2个为group),直接可以拿来用,无需再自行创建仓库。

8081为默认的端口号,要修改端口号可进入nexus-2.14.2-01-bundle exus-2.14.2conf打开nexus.properties文件,修改application-port属性值就可以了。
一般用到的仓库种类是hosted、proxy。Hosted代表宿主仓库,用来发布一些第三方不允许的组件,比如oracle驱动、比如商业软件jar包。Proxy代表代理远程的仓库,最典型的就是Maven官方中央仓库、JBoss仓库等等。如果构建的Maven项目本地仓库没有依赖包,那么就会去这个代理站点去下载,那么如果代理站点也没有此依赖包,就回去远程中央仓库下载依赖,这些中央仓库就是proxy。代理站点下载成功后再下载至本机。笔者认为,其实Maven这个自带的默认仓库一般情况下已经够大多数项目使用了。特殊情况时在配置新的仓库,指定url即可。
hosted 类型的仓库,内部项目的发布仓库
releases 内部的模块中release模块的发布仓库
snapshots 发布内部的SNAPSHOT模块的仓库
3rd party 第三方依赖的仓库,这个数据通常是由内部人员自行下载之后发布上去
proxy 类型的仓库,从远程中央仓库中寻找数据的仓库
group 类型的仓库,组仓库用来方便我们开发人员进行设置的仓库
2.配置Nexus
- 开启远程索引
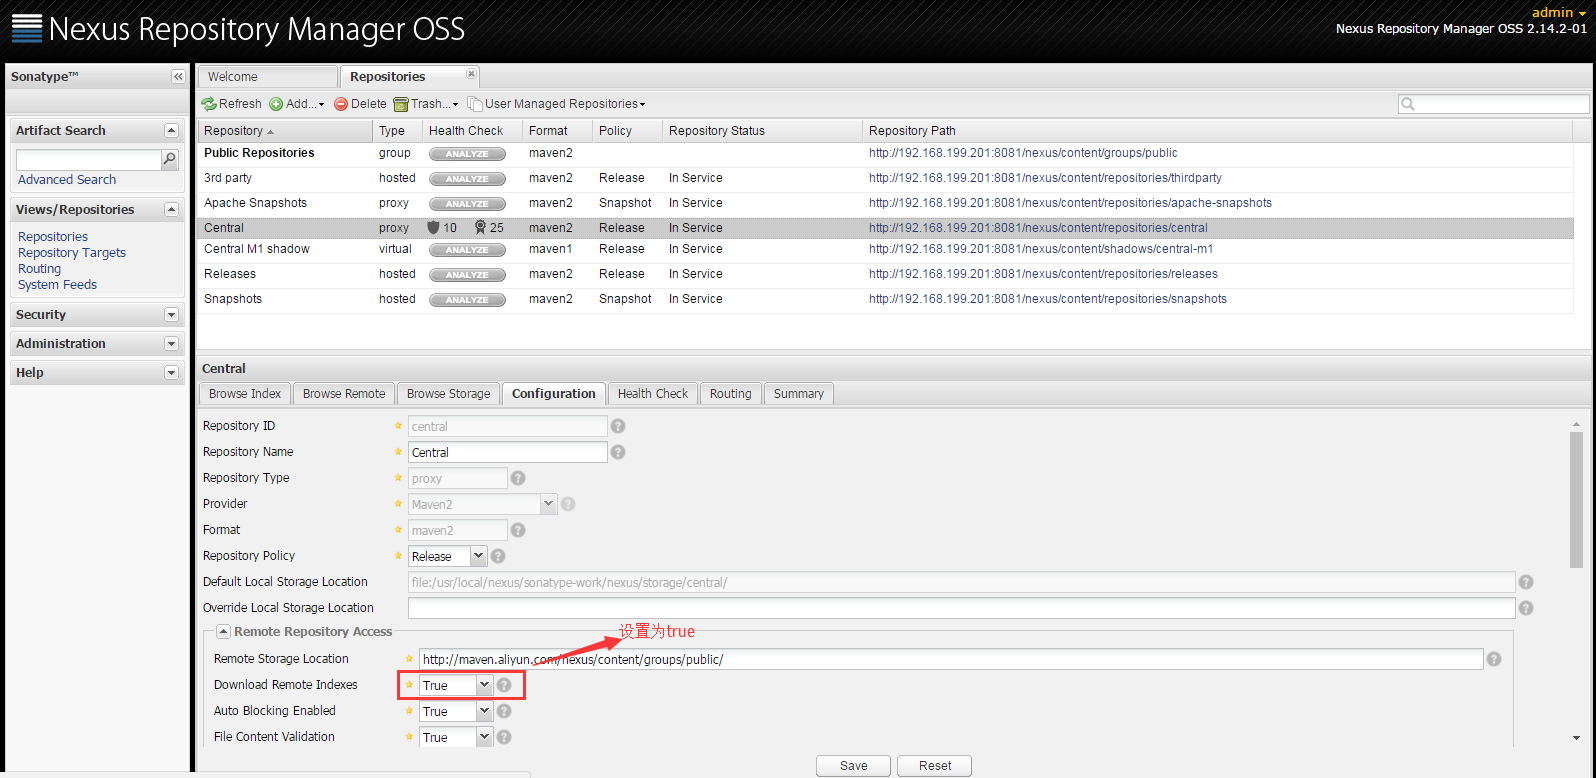
新搭建的neuxs环境只是一个空的仓库,需要手动和远程中心库进行同步,nexus默认是关闭远程索引下载,最重要的一件事情就是开启远程索引下载,点击左边Administration菜单下面的Repositories,找到右边仓库列表中的三个仓库Apache Snapshots,Codehaus Snapshots和Maven Central,然后再没有仓库的configuration下把Download Remote Indexes修改为true,操作完后记得点击下面的save按钮如下图:
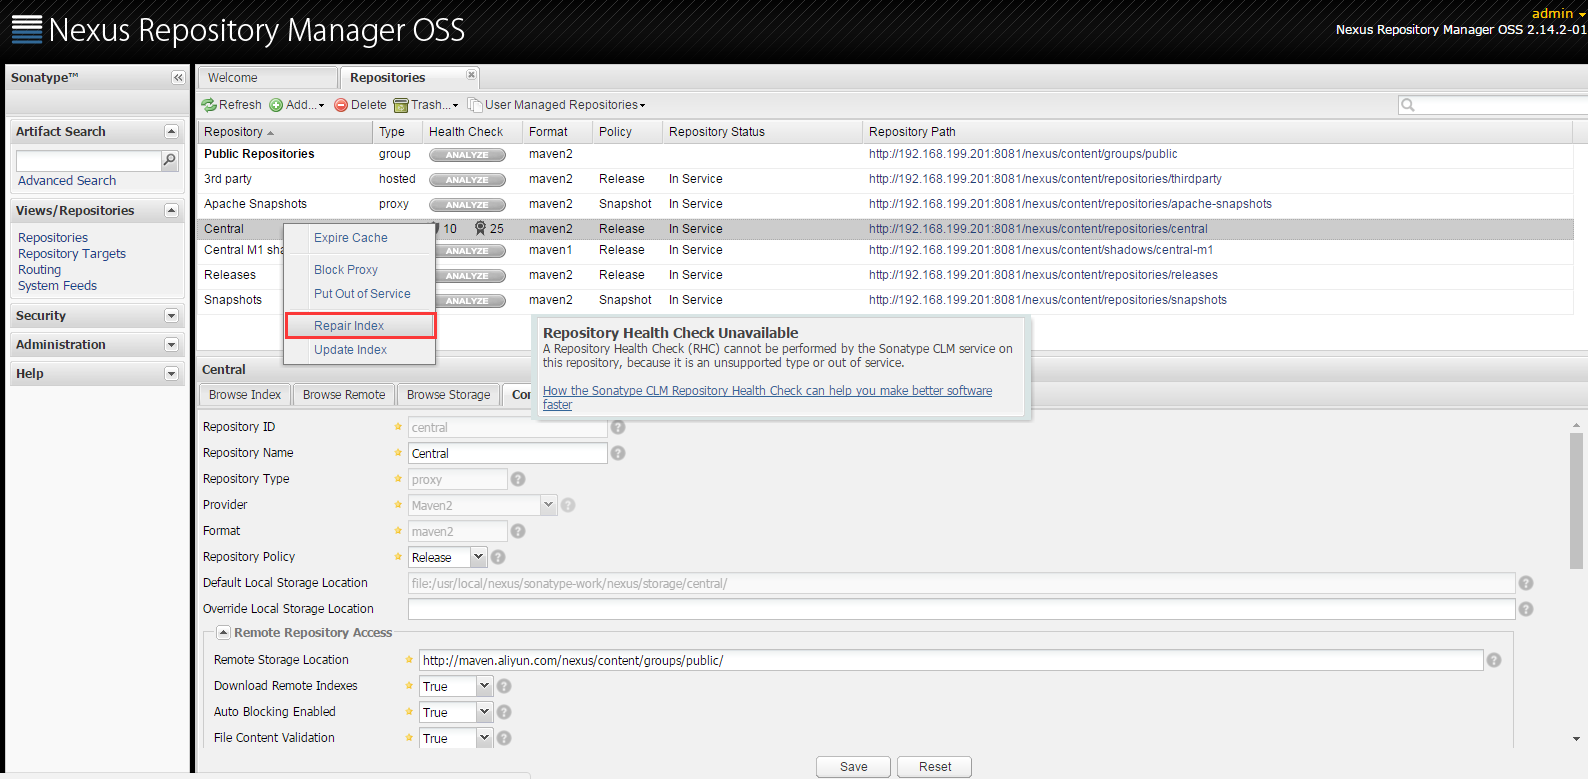
然后在Apache Snapshots,Codehaus Snapshots和Maven Central这三个仓库上分别右键,选择Repari Index,这样Nexus就会去下载远程的索引文件。
默认是从中央仓库中下载jar包,但有时候中央仓库下载很慢,经常下载不下来,所有有时候需要修改远程仓库的地址,可以改成jboss仓库https://repository.jboss.org/nexus/content/groups/public/,还可以改成http://maven.aliyun.com/nexus/content/groups/public/,后面这个库速度很快,不错。

3.nexus私库的一些使用介绍
在左边菜单栏里面有个Artifact Search, 在输入框里面输入你想要搜索的构件名字,比如:spring, 那么查询结果如下:

右下角就是这个Jar包的POM坐标信息,我们要想使用这个私服仓库,先在项目pom中配置相关私服信息:
  <repositories>
    <repository>
        <snapshots>
            <enabled>true</enabled>
        </snapshots>
        <id>public</id>
        <name>Public Repositories</name>
        <url>http://192.168.199.201:8081/nexus/content/groups/public/</url>
   </repository>
 </repositories>
    <pluginRepositories>
        <pluginRepository>
            <id>public</id>
            <name>Public Repositories</name>
            <url>http://192.168.199.201:8081/nexus/content/groups/public/</url>
        </pluginRepository>
    </pluginRepositories>
这样这个Maven项目构建的时候会从私服下载相关依赖。当然这个配置仅仅是在此项目中生效,对于其他项目还是不起作用。如果相对Maven的其他项目也生效的话。需要修改全局的settings.xml文件。
修改settings.xml为:
<?xml version="1.0" encoding="UTF-8"?>

<settings xmlns="http://maven.apache.org/SETTINGS/1.0.0"
          xmlns:xsi="http://www.w3.org/2001/XMLSchema-instance"
          xsi:schemaLocation="http://maven.apache.org/SETTINGS/1.0.0 http://maven.apache.org/xsd/settings-1.0.0.xsd">
  <!--设置本地仓库-->
<localRepository>${user.home}/.m2/repository</localRepository>
  <!-- localRepository
   | The path to the local repository maven will use to store artifacts.
   |
   | Default: ${user.home}/.m2/repository
  <localRepository>/path/to/local/repo</localRepository>
  -->

  <!-- interactiveMode
   | This will determine whether maven prompts you when it needs input. If set to false,
   | maven will use a sensible default value, perhaps based on some other setting, for
   | the parameter in question.
   |
   | Default: true
  <interactiveMode>true</interactiveMode>
  -->

  <!-- offline
   | Determines whether maven should attempt to connect to the network when executing a build.
   | This will have an effect on artifact downloads, artifact deployment, and others.
   |
   | Default: false
  <offline>false</offline>
  -->

  <!-- pluginGroups
   | This is a list of additional group identifiers that will be searched when resolving plugins by their prefix, i.e.
   | when invoking a command line like "mvn prefix:goal". Maven will automatically add the group identifiers
   | "org.apache.maven.plugins" and "org.codehaus.mojo" if these are not already contained in the list.
   |-->
  <pluginGroups>
    <!-- pluginGroup
     | Specifies a further group identifier to use for plugin lookup.
    <pluginGroup>com.your.plugins</pluginGroup>
    -->
  </pluginGroups>

  <!-- proxies
   | This is a list of proxies which can be used on this machine to connect to the network.
   | Unless otherwise specified (by system property or command-line switch), the first proxy
   | specification in this list marked as active will be used.
   |-->
  <proxies>
    <!-- proxy
     | Specification for one proxy, to be used in connecting to the network.
     |
    <proxy>
      <id>optional</id>
      <active>true</active>
      <protocol>http</protocol>
      <username>proxyuser</username>
      <password>proxypass</password>
      <host>proxy.host.net</host>
      <port>80</port>
      <nonProxyHosts>local.net|some.host.com</nonProxyHosts>
    </proxy>
    -->
  </proxies>


  <!--设置私库认证信息-->
  <servers>
    <server>
        <id>nexus</id>
        <username>admin</username>
        <password>admin123</password>
    </server>
    <server>
        <id>nexus-snapshot</id>
        <username>admin</username>
        <password>admin123</password>
    </server>
  </servers>

  <!--设置私库mirror 表示maven所有的请求都由nexus来处理-->
  <mirrors>
     <!-- <mirror>
            <id>ibiblio.org</id>
            <name>ibiblio Mirror of http://repo1.maven.org/maven2/</name>
            <url>http://mirrors.ibiblio.org/pub/mirrors/maven2</url>
            <mirrorOf>central</mirrorOf>
        </mirror> -->
   <mirror>
        <id>nexus</id>
        <mirrorOf>*</mirrorOf>
        <!-- <mirrorOf>central</mirrorOf>  -->
        <name>Nexus Mirror.</name>
        <url>http://192.168.199.201:8081/nexus/content/groups/public</url>
    </mirror>
  </mirrors>

  <!--设置maven私库信息-->
  <profiles>
    <profile>
        <id>nexus</id>
        <repositories>
          <repository>
            <id>nexus</id>
            <name>Nexus</name>
            <url>http://192.168.199.201:8081/nexus/content/groups/public/</url>
            <releases><enabled>true</enabled></releases>
            <snapshots><enabled>true</enabled></snapshots>
          </repository>
        </repositories>
        <pluginRepositories>
          <pluginRepository>
            <id>nexus</id>
            <name>Nexus</name>
            <url>http://192.168.199.201:8081/nexus/content/groups/public/</url>
            <releases><enabled>true</enabled></releases>
            <snapshots><enabled>true</enabled></snapshots>
          </pluginRepository>
        </pluginRepositories>
    </profile>

    <!--覆盖maven中央仓库设置开启releases和snapshots版本的下载-->
    <profile>
      <id>central</id>
      <repositories>
           <repository>
              <id>central</id>
              <url>http://central</url>
              <releases><enabled>true</enabled></releases>
              <snapshots><enabled>true</enabled></snapshots>
          </repository>
      </repositories>
      <pluginRepositories>
          <pluginRepository>
              <id>central</id>
              <url>http://central</url>
              <releases><enabled>true</enabled></releases>
              <snapshots><enabled>true</enabled></snapshots>
          </pluginRepository>
      </pluginRepositories>
    </profile>
  </profiles>

  <!--激活私库信息的配置-->
  <activeProfiles>
      <activeProfile>nexus</activeProfile>
      <activeProfile>central</activeProfile>
  </activeProfiles>
</settings>
之后所有本机的Maven项目就在私服下载组件,这是推荐的做法。
假如我们开发了一些自己的Jar供大家一起使用,就需要上传该jar包。选中宿主库——3rd party,之后选择Artifact Upload上传至宿主空间。

4.maven的打包发布
因为远程仓库需要安全认证,所以需要在本地maven的settings.xml中进行配置。
打开settings.xml,在settings根标签下添加如下内容:
<server>
        <id>snapshots</id>
        <username>deployment</username>
        <password>deployment</password>
    </server>
    <server>
        <id>releases</id>
        <username>deployment</username>
        <password>deployment</password>
    </server>
这里的用户名和密码就是用来部署的用户名和它的密码,id就是用来上传构建的库的ID,如下图
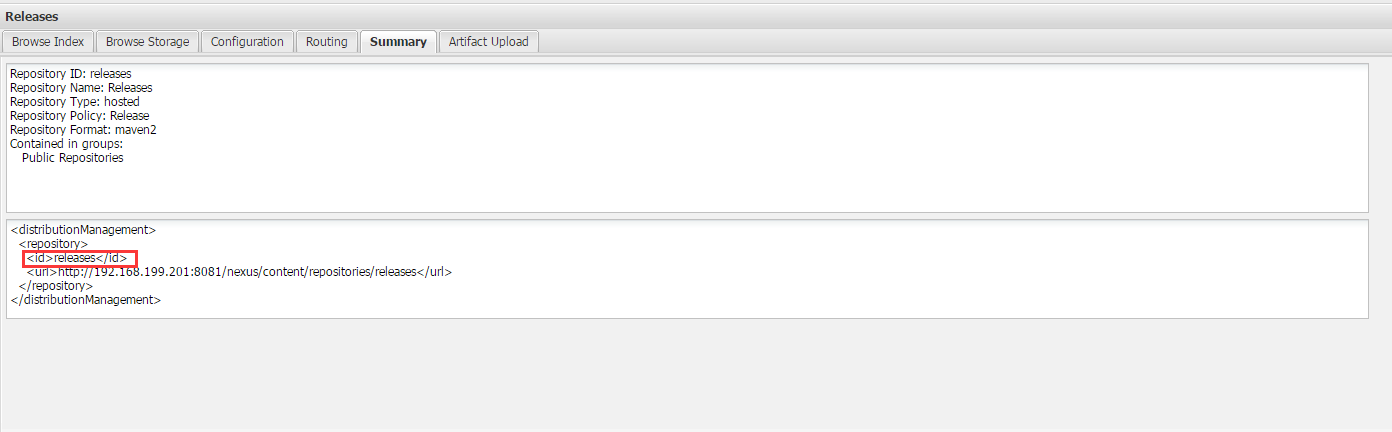
安全认证配置好后,接下来打开你要部署的maven项目的pom.xml,在project元素下添加如下内容:
<distributionManagement>
  <snapshotRepository>
    <id>snapshots</id>
    <url>http://192.168.199.201:8081/nexus/content/repositories/snapshots</url>
  </snapshotRepository>
  <repository>
    <id>releases</id>
    <url>http://192.168.199.201:8081/nexus/content/repositories/releases</url>
  </repository>
</distributionManagement>
一般都会配置两个库,上面那个是快照,下面那个是release版本,这两个库的id与setting文件中的id要保持一致,还要注意一点,pom文件中指定构件的version很重要,它会决定最后打包到哪个库里面去:
<version>0.0.1-SNAPSHOT</version>
<version>0.0.1</version>
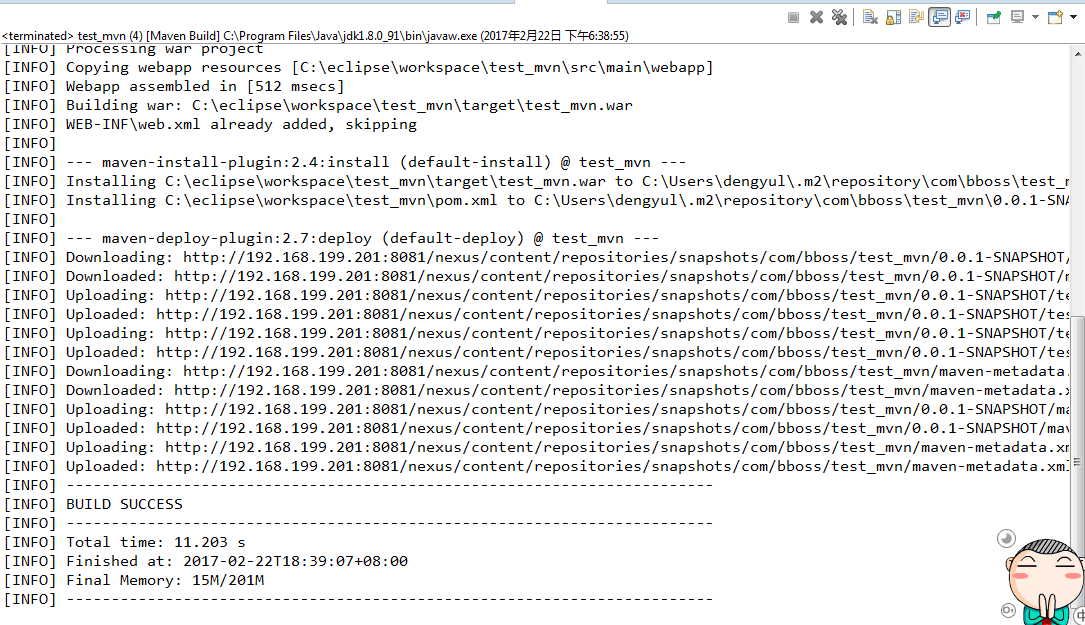
例如上面指定的两种version,第一个会打包到snapshots库中去,而第二种会打包到releases库中去,如果找不到对应的库就会报错,最后,执行下列指令:
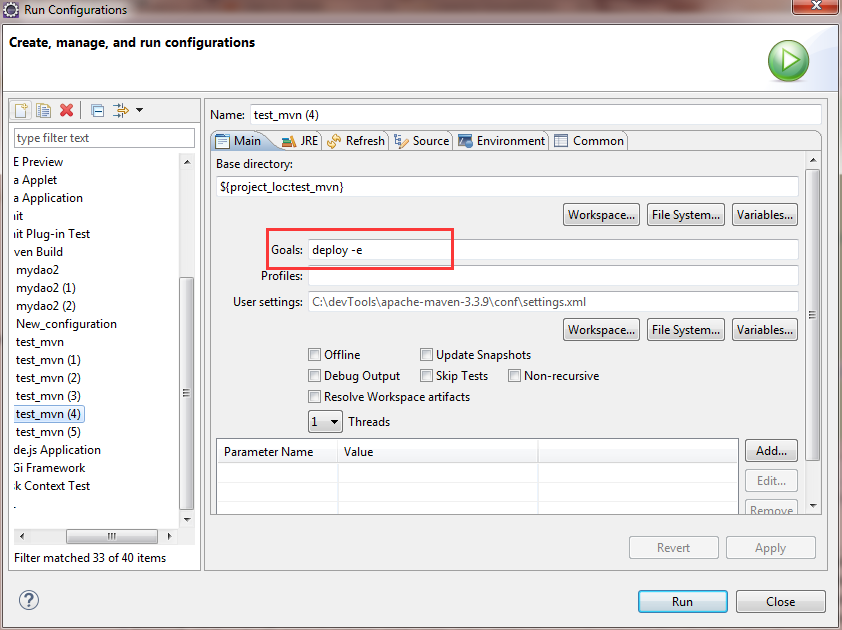
出现以下页面就发布成功:
以上就是本人在maven私库搭建过程的一些记录和心得,有些资料来自网络,当然maven的功能远不止这些,我也还在探索学习当中,希望能把这个工具用的更加充分、熟练,再跟大家分享,文章中若有错误后者不足之处,欢迎大家提出指正,谢谢~