1. 集合部分
1.1 HashMap排序
package cn.Douzi.hashMap01;

import java.util.ArrayList;
import java.util.Collections;
import java.util.Comparator;
import java.util.HashMap;
import java.util.LinkedHashMap;
import java.util.Map.Entry;
import java.util.Set;

import javax.jws.soap.SOAPBinding.Use;

public class hashMap_demo01 {

    public static void main(String[] args) {

        HashMap<Integer, User> hashMap = new HashMap<Integer, User>();

        User user = new User();
        user.setName("张三");
        user.setAge(23);

        hashMap.put(1, user);

        User user2 = new User();
        user2.setName("李四");
        user2.setAge(24);

        hashMap.put(2, user2);

        User user3 = new User();
        user3.setAge(21);
        user3.setName("王五");

        hashMap.put(3, user3);

        System.out.println("排序前HashMap:" + hashMap);

        HashMap<Integer, User> sortedHashMap = sortHashMap(hashMap);

        System.out.println("排序后:" + sortedHashMap);


    }

    private static HashMap<Integer, User> sortHashMap(
            HashMap<Integer, User> hashMap) {

        /**
         * 创建一个有序的HashMap数据结构,LinkedHashMap
         */
        LinkedHashMap<Integer, User> newHashMap = new LinkedHashMap<Integer, User>();

        //凡是要对集合排序,首先想到的就是集合的工具类
        //把Map结构转换为list结构
        //把Map转换为Set集合
        Set<Entry<Integer, User>> entrySet = hashMap.entrySet();
        //把Set集合转换为List
        ArrayList<Entry<Integer, User>> list = new ArrayList<>(entrySet);
        Collections.sort(list, new Comparator<Entry<Integer, User>>() {

            @Override
            public int compare(Entry<Integer, User> o1, Entry<Integer, User> o2) {
                // TODO Auto-generated method stub
                // -1:正序排序; 前面-后面:正序;后面-前面:倒序
                return o2.getValue().getAge() - o1.getValue().getAge();
            }
        });

        //将排好顺序的list转换为LinkedHashMap
        for (int i = 0; i < list.size(); i++) {
            Entry<Integer, User> entry = list.get(i);
            newHashMap.put(entry.getKey(), entry.getValue());
        }

        return newHashMap;
    }
}
2.java中的引用类型
- 强引用
- 软引用:SoftReference
- 弱引用:WeakReference
- 虚引用:PhantomReference
对象的可及性:
- 强可及对象,永远不会被GC回收
- 软可及对象:当系统内存不足的时候,被GC回收。
- 弱可及对象:当系统GC发现这个对象,就被回收
package cn.Douzi.Reference;

import java.lang.ref.PhantomReference;
import java.lang.ref.SoftReference;
import java.lang.ref.WeakReference;

public class ReferenceTest {

    public static void main(String[] args) {

        //强引用
//        String str = "abc";    //常量池

        //1. 在堆内存中创建了String对象  2.在常量池中创建了abc对象
        String str = new String("abc");

        //创建一个软引用,引用到str
        SoftReference<String> sfr = new SoftReference<String>(str);

        //创建一个弱引用,引用到str
        WeakReference<String> wrf = new WeakReference<String>(str);

        //虚引用:检测对象是否被虚拟机回收掉
//        PhantomReference

        //相当于去掉了强引用链
        str = null;

        //清楚软引用的引用链
        sfr.clear();

        System.gc();        //回收了堆内存, 无法回收常量池的内存

        String srfString = sfr.get();

        String wrfString = wrf.get();

        System.out.println("软引用获取到的对象:" + srfString);
        System.out.println("弱引用获取到的对象:" + wrfString);

    }
}

3. 多线程线程池部分
- 需求:控制一个方法的并发量,比如 同时只能有5个线程进来
- 注意:不要用 synchronized,用synchronized关键字的两个线程1和线程2,如果当前线程1获得锁,线程2线程等待。如果线程1阻塞,线程2则会一直等待下去。
3.1 使用 Semaphore
package cn.Douzi.Thread_Pool;

import java.lang.reflect.Method;
import java.util.concurrent.Semaphore;

public class ThreadPoolTest {

    //信号量
    private static Semaphore semaphore = new Semaphore(5);  //允许个数, 相当于放了5把锁

    public static void main(String[] args) {


        for (int i = 0; i < 100; i++) {
            new Thread(new Runnable() {

                @Override
                public void run() {
                    // TODO Auto-generated method stub
                    try {
                        method();
                    } catch (InterruptedException e) {
                        // TODO Auto-generated catch block
                        e.printStackTrace();
                    }
                }
            }).start();
        }
    }

    //同时最多只运行5个进程过来
    public static  void method() throws InterruptedException {

        semaphore.acquire();    //获取一把锁

        System.out.println("ThreadName" + Thread.currentThread().getName()+"进来了");

        try {
            Thread.sleep(1000);
        } catch (InterruptedException e) {
            // TODO Auto-generated catch block
            e.printStackTrace();
        }

        System.out.println("ThreadName="+Thread.currentThread().getName()+"出去了");

        semaphore.release();  //释放一把锁

    }

}
3.2 线程池
线程池的启动策略
系统自带的线程池
//网络访问框架,都要用线程池
    private static Executor executors = Executors.newCachedThreadPool(); //缓存线程池
    private static Executor executor2 = Executors.newFixedThreadPool(5); //固定线程个数的线程
    private static Executor executor3 = Executors.newScheduledThreadPool(5); //计划任务线程池
    private static Executor executor4 = Executors.newSingleThreadExecutor(); //单个线程的线程池
手写线程池
/*
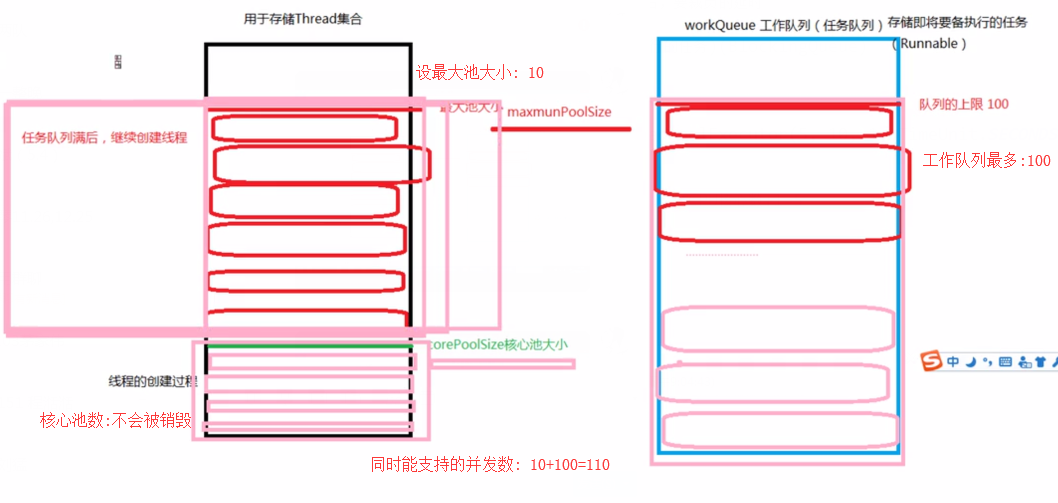
* 参数1:corePoolSize:核心池大小
* 参数2:maximumPoolSize:最大线程池上限个数
* 参数3:keepAliveTime:保存最长时间,任务执行完之后,要裁员的延时
* 参数4:unit:时间单位
* 参数5:workQueue:用于存储任务的工作队列(即将被执行的任务)(BlockingQueue)
* 参数6:ThreadFactory: 线程工厂, 用来创建线程的
*
*/
ThreadPoolExecutor poolExecutor = new ThreadPoolExecutor(5, 10, 1, TimeUnit.SECONDS, blockingQueue, threadFactlory);
创建一个线程工厂
ThreadFactory threadFactlory = new ThreadFactory() {

            //线程安全的int的包装类
            AtomicInteger atomicInteger = new AtomicInteger(0);
            @Override
            public Thread newThread(Runnable r) {
                //创建一个线程,然后把r赋值给该线程
                Thread thread = new Thread(r);
                thread.setName("MyThread=" + atomicInteger.getAndIncrement());

                return thread;
            }
};
完整创建核心池
package cn.Douzi.Thread_Pool;

import java.lang.reflect.Method;
import java.util.ArrayList;
import java.util.LinkedList;
import java.util.concurrent.BlockingQueue;
import java.util.concurrent.Executor;
import java.util.concurrent.Executors;
import java.util.concurrent.LinkedBlockingQueue;
import java.util.concurrent.Semaphore;
import java.util.concurrent.ThreadFactory;
import java.util.concurrent.ThreadPoolExecutor;
import java.util.concurrent.TimeUnit;
import java.util.concurrent.atomic.AtomicInteger;

public class ThreadPoolTest02 {

    //网络访问框架,都要用线程池
    private static Executor executors = Executors.newCachedThreadPool(); //缓存线程池
    private static Executor executor2 = Executors.newFixedThreadPool(5); //固定线程个数的线程
    private static Executor executor3 = Executors.newScheduledThreadPool(5); //计划任务线程池
    private static Executor executor4 = Executors.newSingleThreadExecutor(); //单个线程的线程池


    public static void main(String[] args) {

//        BlockingQueue<E> //单端队列
//        BlockingDQueue   //双端队列
        LinkedBlockingQueue<Runnable> blockingQueue = new LinkedBlockingQueue<>(100); //该容器的最大上限
        //创建一个线程工厂
        ThreadFactory threadFactlory = new ThreadFactory() {

            //线程安全的int的包装类
            AtomicInteger atomicInteger = new AtomicInteger(0);
            @Override
            public Thread newThread(Runnable r) {
                //创建一个线程,然后把r赋值给该线程
                Thread thread = new Thread(r);
                thread.setName("MyThread=" + atomicInteger.getAndIncrement());

                return thread;
            }
        };

        /*
         * 参数1:corePoolSize:核心池大小
         * 参数2:maximumPoolSize:最大线程池上限个数
         * 参数3:keepAliveTime:保存最长时间,任务执行完之后,要裁员的延时
         * 参数4:unit:时间单位
         * 参数5:workQueue:用于存储任务的工作队列(即将被执行的任务)(BlockingQueue)
         * 参数6:ThreadFactory: 线程工厂, 用来创建线程的
         *
         */
        ThreadPoolExecutor poolExecutor = new ThreadPoolExecutor(5, 10, 1, TimeUnit.SECONDS, blockingQueue, threadFactlory);

        /**
         * 线程不是越多越好,Google工程给了一个推荐值:线程的个数=CPU核心数+1=5
         */

        //用自己打造的线程池
        for (int i = 0; i < 110; i++) {
            poolExecutor.execute(new Runnable() {

                @Override
                public void run() {
                    // TODO Auto-generated method stub
                    try {
                        method();
                    } catch (InterruptedException e) {
                        // TODO Auto-generated catch block
                        e.printStackTrace();
                    }
                }
            });


        }

        //用系统自带的线程池
//        for (int i = 0; i < 100; i++) {
//            executor2.execute(new Runnable() {
//
//                @Override
//                public void run() {
//                    // TODO Auto-generated method stub
//                    try {
//                        method();
//                    } catch (InterruptedException e) {
//                        // TODO Auto-generated catch block
//                        e.printStackTrace();
//                    }
//                }
//            });
//        }

    }

    //同时最多只运行5个进程过来
    public static  void method() throws InterruptedException {


        System.out.println("ThreadName= " + Thread.currentThread().getName()+"进来了");

        try {
            Thread.sleep(2000);
        } catch (InterruptedException e) {
            // TODO Auto-generated catch block
            e.printStackTrace();
        }

        System.out.println("ThreadName= "+Thread.currentThread().getName()+"出去了");


    }


}
注意:核心池为0,执行完会自动退出;核心池 > 0不会被退出。