Building an OpenFlow Switch with Integrated Controller and IDS/IPS
This post describes steps to build an OpenFlow switch using Open vSwitch on a server running Ubuntu 18.0.4. The server runs a Ryu controller and Snort intrusion prevention system, both are open source software. Such a system could be used a security appliance in a network of low-to-medium bandwidth requirements. Before you begin following the post, make sure you have the hardware components at hand. The software will be downloaded as we progress. I will use the network shown in the following diagram to explain the build process:
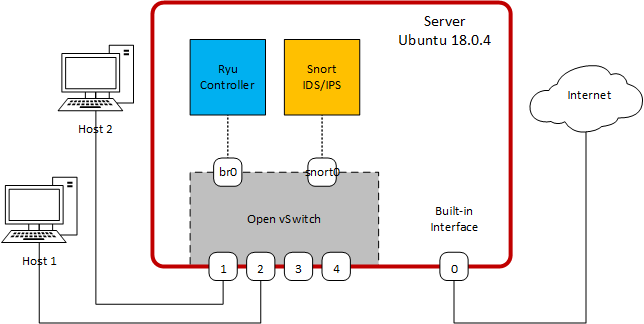 The OVS System Components
Hardware Requirements
- A computer with reasonable specs and free PCI-E slot (I used an old Dell PowerEdge R210 II)
- 4-port Ethernet card (I used IOCrest SI-PEX24042 for ~US$45)
- Internet connection (to download software packages)
Software Requirements
- Ubuntu 18.0.4 OS
- RYU
- Snort
PART I – Building the base system
In this step, you will install the 4-port Ethernet card and the Ubuntu 18.0.4 operation system.
Install the Ethernet card
Turn off the PC, unplug the power, then follow the manufacturer instructions to install the Ethernet card.
Install the OS
Follow the instructions here to install Ubuntu 18.0.4. Caution: This will wipe-out the existing data on the machine’s hard drive, so be sure you have a backup.
Verify the Installation
Once the installation is complete, login and open a terminal. Your computer should have four new Ethernet interfaces in addition to any original interfaces. Verify the status of interfaces and take note of their names:
ovs@ovs-machine:~$ ip link
1: lo: <LOOPBACK,UP,LOWER_UP> mtu 65536 qdisc noqueue state UNKNOWN mode DEFAULT group default qlen 1000
    link/loopback 00:00:00:00:00:00 brd 00:00:00:00:00:00
2: eno1: <BROADCAST,MULTICAST,UP,LOWER_UP> mtu 1500 qdisc mq state UP mode DEFAULT group default qlen 1000
    link/ether d0:67:e5:f1:03:ea brd ff:ff:ff:ff:ff:ff
3: enp3s0: <NO-CARRIER,BROADCAST,MULTICAST,UP> mtu 1500 qdisc fq_codel state DOWN mode DEFAULT group default qlen 1000
    link/ether 00:e0:4c:68:21:c1 brd ff:ff:ff:ff:ff:ff
4: enp4s0: <NO-CARRIER,BROADCAST,MULTICAST,UP> mtu 1500 qdisc fq_codel state DOWN mode DEFAULT group default qlen 1000
    link/ether 00:e0:4c:68:21:c2 brd ff:ff:ff:ff:ff:ff
5: enp5s0: <NO-CARRIER,BROADCAST,MULTICAST,UP> mtu 1500 qdisc fq_codel state DOWN mode DEFAULT group default qlen 1000
    link/ether 00:e0:4c:68:21:c3 brd ff:ff:ff:ff:ff:ff
6: eno2: <NO-CARRIER,BROADCAST,MULTICAST,UP> mtu 1500 qdisc mq state DOWN mode DEFAULT group default qlen 1000
    link/ether d0:67:e5:f1:03:eb brd ff:ff:ff:ff:ff:ff
7: enp6s0: <NO-CARRIER,BROADCAST,MULTICAST,UP> mtu 1500 qdisc fq_codel state DOWN mode DEFAULT group default qlen 1000
    link/ether 00:e0:4c:68:21:c4 brd ff:ff:ff:ff:ff:ff
Notice that all interfaces are UP. You should also confirm that you have connectivity to the Internet by pinging know external destination (try 8.8.8.8).
PART II – Create OpenFlow Switch
Here you will create an OpenFlow Switch using Open vSwitch (ovs). Form the terminal, use apt-get to install the ovs:
ovs@ovs-machine:~$ sudo apt-get update
ovs@ovs-machine:~$ sudo apt-get install openvswitch-switch
If the installation is successful, you should be able check the OVS version:
ovs@ovs-machine:~$ sudo ovs-vsctl show
d60627a8-fdb0-4fae-902f-eb839fc388c3
    ovs_version: "2.9.0"
Create a bridge and add the four Ethernet ports to it:
ovs@ovs-machine:~$ sudo ovs-vsctl add-br br0
ovs@ovs-machine:~sudo ovs-vsctl set bridge br0 stp_enable=true
ovs@ovs-machine:~$ sudo ovs-vsctl add-port br0 enp3s0 -- set interface enp3s0 ofport_request=1
ovs@ovs-machine:~$ sudo ovs-vsctl add-port br0 enp4s0 -- set interface enp4s0 ofport_request=2
ovs@ovs-machine:~$ sudo ovs-vsctl add-port br0 enp5s0 -- set interface enp5s0 ofport_request=3
ovs@ovs-machine:~$ sudo ovs-vsctl add-port br0 enp6s0 -- set interface enp6s0 ofport_request=4
The ofport_request let you set the interface port number; otherwise, the OVS will select one. Run the show command again and see the changes:
ovs@ovs-machine:~$ sudo ovs-vsctl show
d60627a8-fdb0-4fae-902f-eb839fc388c3
    Bridge "br0"
        Port "enp3s0"
            Interface "enp3s0"
        Port "enp4s0"
            Interface "enp4s0"
        Port "br0"
            Interface "br0"
                type: internal
        Port "enp5s0"
            Interface "enp5s0"
        Port "enp6s0"
            Interface "enp6s0"
    ovs_version: "2.9.0"
Use the ip command again and note the change in the output:
ovs@ovs-machine:~$ ip link
1: lo:  mtu 65536 qdisc noqueue state UNKNOWN mode DEFAULT group default qlen 1000
    link/loopback 00:00:00:00:00:00 brd 00:00:00:00:00:00
2: enp3s0:  mtu 1500 qdisc fq_codel master ovs-system state DOWN mode DEFAULT group default qlen 1000
    link/ether 00:e0:4c:68:21:c1 brd ff:ff:ff:ff:ff:ff
3: enp4s0:  mtu 1500 qdisc fq_codel master ovs-system state DOWN mode DEFAULT group default qlen 1000
    link/ether 00:e0:4c:68:21:c2 brd ff:ff:ff:ff:ff:ff
4: eno1:  mtu 1500 qdisc mq state UP mode DEFAULT group default qlen 1000
    link/ether d0:67:e5:f1:03:ea brd ff:ff:ff:ff:ff:ff
5: enp5s0:  mtu 1500 qdisc fq_codel master ovs-system state DOWN mode DEFAULT group default qlen 1000
    link/ether 00:e0:4c:68:21:c3 brd ff:ff:ff:ff:ff:ff
6: eno2:  mtu 1500 qdisc noop state DOWN mode DEFAULT group default qlen 1000
    link/ether d0:67:e5:f1:03:eb brd ff:ff:ff:ff:ff:ff
7: enp6s0:  mtu 1500 qdisc fq_codel master ovs-system state DOWN mode DEFAULT group default qlen 1000
    link/ether 00:e0:4c:68:21:c4 brd ff:ff:ff:ff:ff:ff
8: ovs-system:  mtu 1500 qdisc noop state DOWN mode DEFAULT group default qlen 1000
    link/ether ee:a0:00:e1:b8:11 brd ff:ff:ff:ff:ff:ff
9: br0:  mtu 1500 qdisc noqueue state UNKNOWN mode DEFAULT group default qlen 1000
    link/ether 00:e0:4c:68:21:c1 brd ff:ff:ff:ff:ff:ff
The br0 is now an interface and the other interfaces belong to ovs-system.
Connecting to the Controller
At this point, the switch will be working as a standalone switch (without controller). Connect the hosts Host 1 and Host 2 to the switch interfaces. If they are configured with IP addresses from the same subnet (say 192.168.1.0/24), they will be able to connect. Note: If the hosts cannot ping each other, make sure the interfaces are UP. If not, use the command:
ovs@ovs-machine:~$ sudo ip link set up
The switch needs to connect to a controller to be able to exchange OpenFlow packets and populate its flow tables. The OVS can connect to the controller in out-of-band mode, which requires a dedicated interface, or using in-band connection mode. This latter, which is the default, requires only one network for OpenFlow and the rest of the data traffic. The switch needs to have an interface configured with an IP address to communicate with the controller. Rather than using one of the physical interfaces, we will use the br0 interface, which is an internal interface of the bridge. The IP address can be anything you choose.
ovs@ovs-machine:~$ sudo ip address add 10.0.10.10/24 dev br0
ovs@ovs-machine:~$ sudo ip link set br0 up
Now, tell the switch where to find the controller and what to do if it cannot find it:
ovs@ovs-machine:~$ sudo ovs-vsctl set-controller br0 tcp:10.0.10.10:6633 \
                               -- set-fail-mode br0 standalone
Then verify:
ovs@ovs-machine:~$ sudo ovs-vsctl show
d60627a8-fdb0-4fae-902f-eb839fc388c3
    Bridge "br0"
        Controller "tcp:10.0.10.10:6633"
        fail_mode: standalone
        Port "enp6s0"
            Interface "enp6s0"
        Port "br0"
            Interface "br0"
                type: internal
        Port "enp3s0"
            Interface "enp3s0"
        Port "enp4s0"
            Interface "enp4s0"
        Port "enp5s0"
            Interface "enp5s0"
    ovs_version: "2.9.0"
The ping between the two hosts continues because the switch is still working in standalone mode.
PART III – Install the Ryu Controller
It is time to install the Ryu controller. Ryu is a component-based software defined networking framework. Ryu supports various protocols for managing network devices, such as OpenFlow, Netconf, and OF-config and integrates well with Snort.
Install Ryu
The easiest way to install Ryu is using apt-get (you can also use pip3):
ovs@ovs-machine:~$ sudo apt-get python3-ryu
Check if the installation is successful by running the ryu-manager:
ovs@ovs-machine:~$ ryu-manager --version
ryu-manager 4.15
Optionally, you can install FlowManager. The FlowManager is an application that provides a user-friendly interface to modify and monitor the flow tables in the network.
ovs@ovs-machine:~$ sudo apt-get git
ovs@ovs-machine:~$ git clone https://github.com/martimy/flowmanager
In another terminal start Ryu using the following command. The controller will run two application: the first application implements a simple L2 switch, and the second application is the FlowManager, which provide more information about the OVS.
ovs@ovs-machine:~$ ryu-manager --verbose ryu.app.simple_switch_13 flowmanager/flowmanager.py
loading app ryu.app.simple_switch_13
loading app ryu.controller.ofp_handler
instantiating app ryu.app.simple_switch_13 of SimpleSwitch13
instantiating app ryu.controller.ofp_handler of OFPHandler
BRICK SimpleSwitch13
  CONSUMES EventOFPPacketIn
  CONSUMES EventOFPSwitchFeatures
BRICK ofp_event
  PROVIDES EventOFPPacketIn TO {'SimpleSwitch13': {'main'}}
  PROVIDES EventOFPSwitchFeatures TO {'SimpleSwitch13': {'config'}}
  CONSUMES EventOFPEchoReply
  CONSUMES EventOFPEchoRequest
  CONSUMES EventOFPErrorMsg
  CONSUMES EventOFPHello
  CONSUMES EventOFPPortDescStatsReply
  CONSUMES EventOFPPortStatus
  CONSUMES EventOFPSwitchFeatures
connected socket: address:('10.0.10.10', 52636)
hello ev <ryu.controller.ofp_event.EventOFPHello object at 0x7efcb802af98>
move onto config mode
EVENT ofp_event->SimpleSwitch13 EventOFPSwitchFeatures
switch features ev version=0x4,msg_type=0x6,msg_len=0x20,xid=0xc5e4f13d,OFPSwitchFeatures(auxiliary_id=0,capabilities=79,datapath_id=963354567105,n_buffers=0,n_tables=254)
move onto main mode
…
The output above shows that the controller connected to the switch successfully. Using a browser, enter the URL http://localhost:8080/home/ to access the FlowManager. You should see something similar to the screenshot below. In the homepage you should see the switch’s ID and other information as well as the port descriptions and statistics.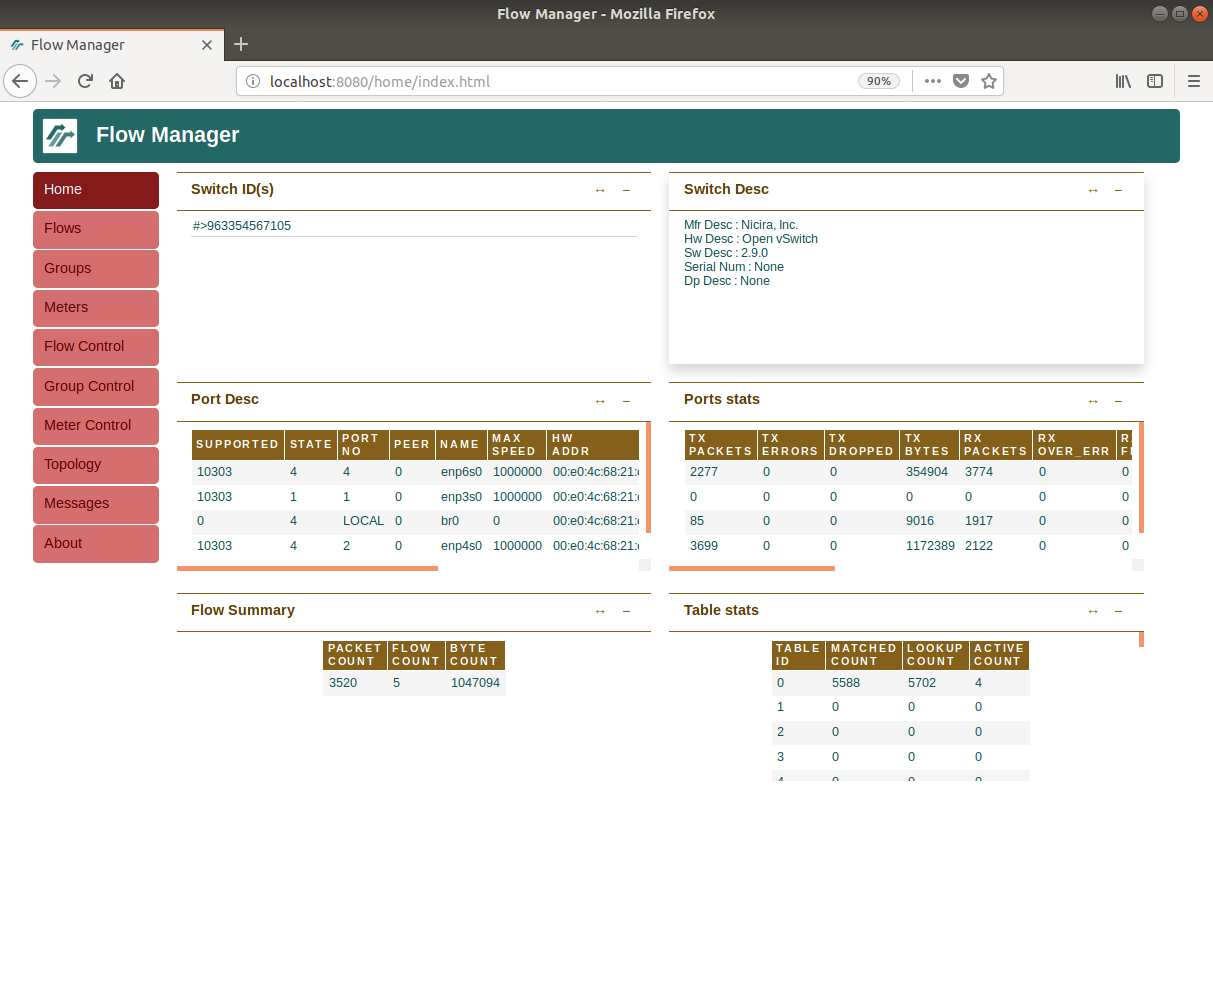 FlowManager’s homepageThe Flow Tables page shows the flow entries created by Simple_Switch_13 app to forward packets between Host 1 and Host 2 (BTW, ping should still be going between the hosts by now.)
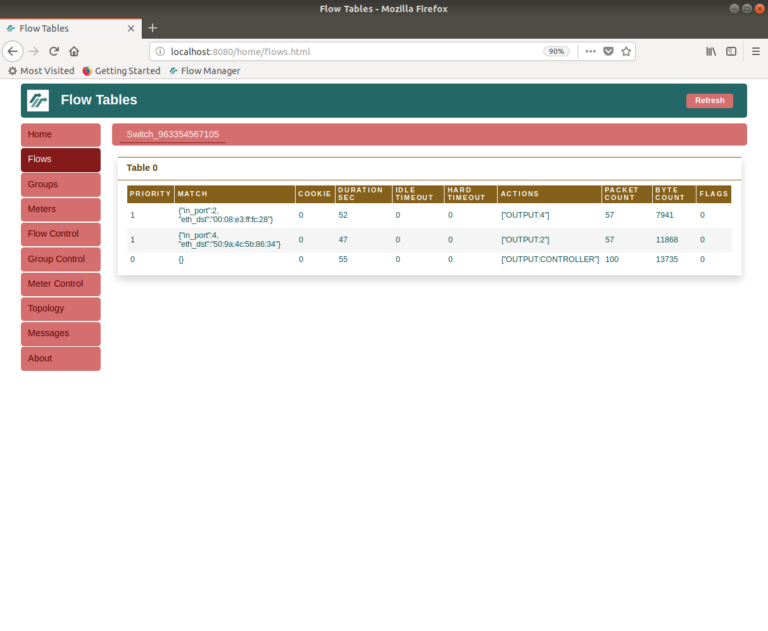 FlowManager’s Flow Tables page
Make the Interface Configuration Permanent
The OVS configuration you created earlier will remain in effect even if you reboot the server, but the IP address of the br0 interface will not. Also, the next time the machine reboots, the four switch interfaces will remain in DOWN state until activated manually. Ubuntu 18.0.4 replaces the old file /etc/network/interfaces with Netplan utility for easy networking configuration. Netplan uses a YAML to describe network interfaces and their configuration. To make the network configuration permanent, edit the following .yaml file to include the configuration shown below:
$ sudo nano /etc/netplan/01-network-manager-all.yaml
<yaml file goes here>
network:
  version: 2
  renderer: networkd
  ethernets:
    eno1:
      dhcp4: yes
      dhcp6: yes
    br0:
      dhcp4: no
      dhcp6: no
      addresses: [10.0.10.10/24]
Notice that: 1) you need to change the renderer from NetworkManager, which allows using GUI to configure the interfaces, to networkd that relies on the .yaml file for the configuration; 2) you need to make sure that the Internet-facing interface still receives a DHCP address; and 3) the br0 interface has a static IP address. To activate the configuration:
ovs@ovs-machine:~$ sudo netplan apply
Finally, you need to activate the four interfaces upon reboot. You can do this up adding ip commands to the /etc/rc.local file. This file does not exist by default in Ubuntu 18.0.4, so you must add it manually (this suggests that there may be a better way to do this, so I’ll keep looking.)
$ ovs@ovs-machine:~$ sudo nano /etc/rc.local
#!/bin/bash

ip link set enp3s0 up
ip link set enp4s0 up
ip link set enp5s0 up
ip link set enp6s0 up

exit 0
Make the file executable:
$ ovs@ovs-machine:~$ sudo chmod +x /etc/rc.local
Now the interface will be up after reboot.
Run Ryu as a service
Here we add a system service to run Ryu and its applications when automatically when the server boots. Create a file run_controller.sh in your home directory (remember to change the home directory wherever applicable):
ovs@ovs-machine:~$ sudo nano run_conroller.sh
#!/bin/bash
ryu-manager ryu.app.simple_switch_13 /home/ovs/flowmanager/flowmaanger.py
Make it executable:
ovs@ovs-machine:~$ sudo chmod +x run_controller.sh
Create a file /etc/systemd/system/ryu.service:
ovs@ovs-machine:~$ sudo /etc/systemd/system/ryu.service:
[Unit]
Description=RYU Controller
[Service]
User=ovs
TimeoutStartSec=0
WorkingDirectory=/home/ovs
ExecStart=/home/ovs/run_controller.sh
Restart=always
RestartSec=5
[Install]
WantedBy=multi-user.target
Enable the service and start it (if ryu is already running, you should stop it first):
ovs@ovs-machine:~$ sudo systemctl enable /etc/systemd/system/ryu.service
ovs@ovs-machine:~$ sudo systemctl start ryu.service
or
ovs@ovs-machine:~$ sudo service ryu start
Verify that the service is active and running
ovs@ovs-machine:~$ sudo service ryu status
Now it is a good time to reboot the server and verify that everything works correctly.
PART IV – Integrating Snort
Snort is an open source network intrusion prevention system, capable of performing real-time traffic analysis and packet logging on IP networks. Snort can be linked to Ryu in two ways as shown in here. In our case, we will follow Option #1. Once Snort is linked to Ryu, it can send alerts to the controller, which may respond to by modifying the switch flow tables.
Creating Mirror Interface
Snort requires an interface from which it receives packets for analysis. This interface is normally connected to a switch port that work in mirror mode. In our server, we will create an internal OVS port that serve this purpose. Later, the L2 switch application will be modified slightly to copy all traffic passing through the switch to this mirror port. Add an Internal port to the switch
ovs@ovs-machine:~$ sudo ovs-vsctl add-port br0 snort0 \
-- set interface snort0 type=internal \
-- set interface snort0 ofport_request=5
Verify:
ovs@ovs-machine:~$ sudo ovs-vsctl show
And bring it up:
ovs@ovs-machine:~$ sudo ip link set snort0 up
The FlowManager will also show the new port as port #5. Before you conclude this step, you should add the above command to the /etc/rc.local file to ensure that the interface is brought up when the server reboots.
#!/bin/bash

ip link set enp3s0 up
ip link set enp4s0 up
ip link set enp5s0 up
ip link set enp6s0 up
ip link set snort0 up
exit 0
Installing Snort
Install Snort using apt-get:
ovs@ovs-machine:~$ sudo apt-get install snort*
Snort will present you with a series of configuration screens:
- Screen #1 will ask for an interface name. I find this interface irrelevant, so just use your server built-in interface name.
- Screen #2 will ask for the network prefix. Use the subnet that used for Host 1 and Host 2, say 192.168.1.0/24
- Screen #3 will ask for the sniffing interface name. Enter snort0.
Don’t worry if you get these wrong (I did), you can fix it later. Once the installation is done, verify that Snort is installed properly.
ovs@ovs-machine:~$ snort –version
Snort will run as a service in the background, but for now, we want to launch it manually, so we will change the configuration:
ovs@ovs-machine:~$ sudo dpkg-reconfigure snort
The first screen will ask about the start mode. Change that to Manual. Keep the answers for the remaining screen to default unless you want to modify the interface name and/or the network range.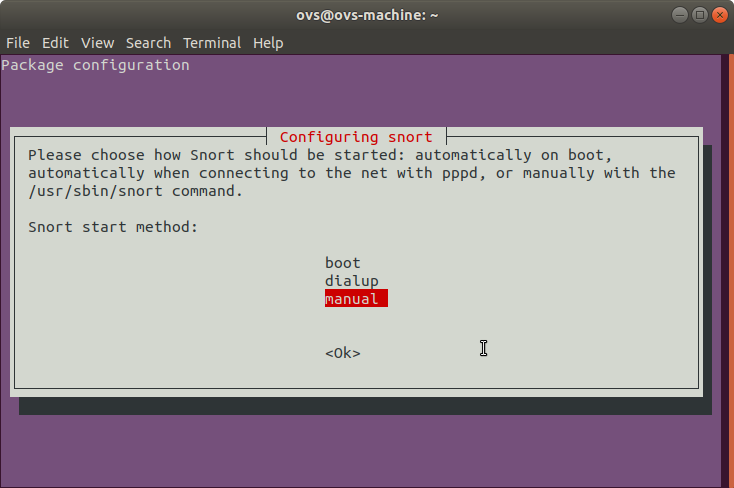 Snort configuration
Link to Ryu
For this final step, we need to launch a modified L2 switch app that imports Ryu snortlib and displays alert messages received from Snort to the standard output. The app is included with the Ryu installation, but you can also get it from Github. Before running this app, make a copy of the file to your home directory and edit the following line to include the correct port number for snort0 interface (mine is 5)
def init__(self, *args, *kwargs): super(SimpleSwitchSnort, self).__init(args, **kwargs)
   self.snort = kwargs['snortlib']
   self.snort_port = 5
   self.mac_to_port = {}
Edit the file run_controller.sh to use simple_switch_snort.py.
#!/bin/bash
ryu-manager ~/simple_switch_snort.py ~/flowmanager/flowmaanger.py
Stop the ryu service if it is running and run the ryu-manager manually:
ovs@ovs-machine:~$ sudo service ryu stop
ovs@ovs-machine:~$ ./run_controller
The FlowManager will show that the flows added include additional OUTPUT action that copies packets to port 5.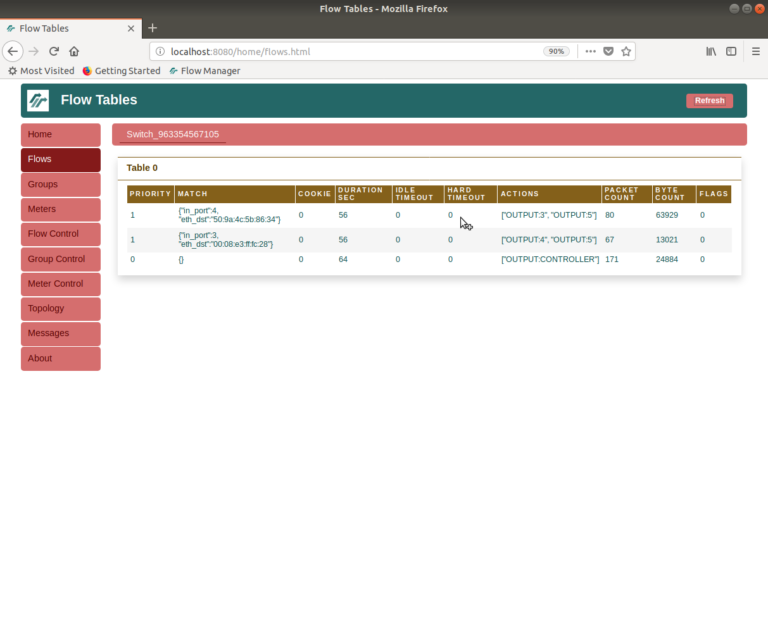 OVS Flow TableIn another terminal launch Snort manually:
ovs@ovs-machine:~$ sudo snort -i snort0 -A unsock -l /tmp -c /etc/snort/snort.conf
Watch the alert messages sent from Snort to the Ryu’s app being displayed on the terminal running the ryu-manager. You can also ping between Host 1 and Host 2 to generate alerts related to ICMP Echo.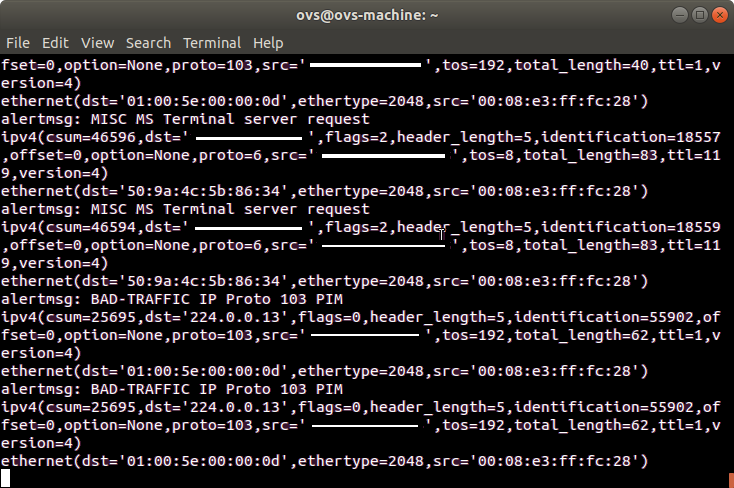 Snort alert messages received at Ryu controller.
Wrapping up
Congratulation! You have managed to build an OpenFlow switch with integrated Ryu controller and Snort IDS/IPS. Here are a couple of notes to conclude this post: We have disabled ryu and snort services temporarily to be able to launch them manually and see the alert messages. So, remember to enable and restart both services.
ovs@ovs-machine:~$ sudo service ryu --full-restart
ovs@ovs-machine:~$ sudo service ryu status
● ryu.service - RYU Controller
   Loaded: loaded (/etc/systemd/system/ryu.service; enabled; vendor preset: enab
   Active: active (running) since Thu 2018-09-13 10:53:29 ADT; 6s ago
...
Re-configure Snort to change the start mode to ‘boot’. The service will restart upon existing the configuration.
ovs@ovs-machine:~$ sudo dpkg-reconfigure snort
...
ovs@ovs-machine:~$ service ryu status
● ryu.service - RYU Controller
   Loaded: loaded (/etc/systemd/system/ryu.service; enabled; vendor preset: enab
   Active: active (running) since Thu 2018-09-13 11:56:12 ADT; 1min 12s ago
...
The next time you boot the service, both Ryu and Snort will be active and connected but you won’t be able to see the alert messages. What you can do is modify the app simple_switch_snort.py to do something with the alert message other than printing them. Perhaps, you can send them to a log file or make the app react to the messages by modifying the flow tables (to drop suspect packets, for example). This is the true benefit of connecting Snort to Ryu.