tomcat架构
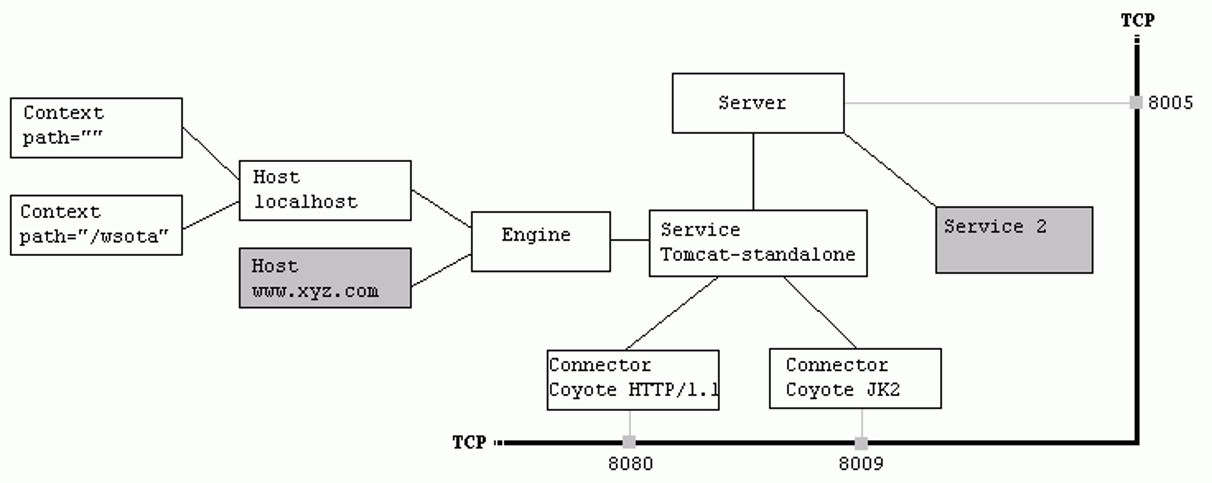
从这张图上, 可以很明确的看出, 各个组件的关系
Server: 服务器, 也就是一个tomcat
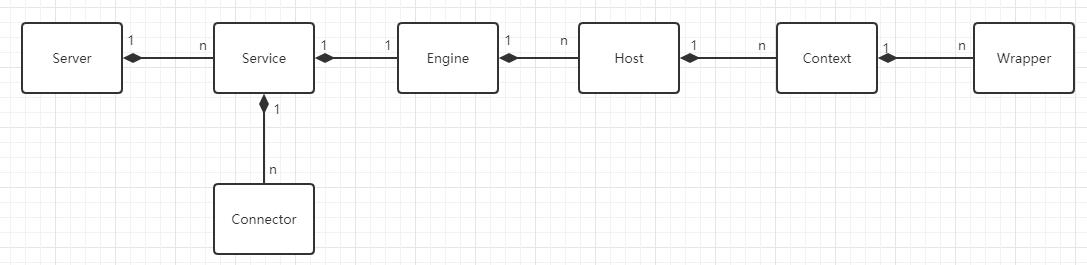
Service: 服务, 将多个 Connector 和 一个 Engine 组合起来, 成为一个服务. 1#Server -- n#Service
Connector: 接收器, 用于接收指定协议下的连接, 并交给唯一的 Engine 处理
Engine: 引擎, 用于处理连接的执行器, 默认的引擎name=catalina. 1#Service -- 1#Engine
Host: 基于域名匹配至指定虚拟机. 默认是 localhost , 也可以设置别的, 如 www.xyz.com . 1#Engine -- n#Host
Context: 应用, 其实就是 webapps 下的文件夹. 部署的1个war包, 解压出来就是一个Context. 1#Host -- n#Context
Wrapper: Servlet. 图上没有体现. 他是对Servlet的封装. 1#Context -- n#Wrapper
将上面的对应关系连起来, 就是:
conf/server.xml
server.xml关系到整个服务的结构和内容.
<?xml version="1.0" encoding="UTF-8"?> <Server port="8005" shutdown="SHUTDOWN"> <Listener className="org.apache.catalina.startup.VersionLoggerListener" /> <!--APR library loader. Documentation at /docs/apr.html --> <Listener className="org.apache.catalina.core.AprLifecycleListener" SSLEngine="on" /> <!-- Prevent memory leaks due to use of particular java/javax APIs--> <Listener className="org.apache.catalina.core.JreMemoryLeakPreventionListener" /> <Listener className="org.apache.catalina.mbeans.GlobalResourcesLifecycleListener" /> <Listener className="org.apache.catalina.core.ThreadLocalLeakPreventionListener" /> <!-- Global JNDI resources Documentation at /docs/jndi-resources-howto.html --> <GlobalNamingResources> <!-- Editable user database that can also be used by UserDatabaseRealm to authenticate users --> <Resource name="UserDatabase" auth="Container" type="org.apache.catalina.UserDatabase" description="User database that can be updated and saved" factory="org.apache.catalina.users.MemoryUserDatabaseFactory" pathname="conf/tomcat-users.xml" /> </GlobalNamingResources> <Service name="Catalina"> <!--The connectors can use a shared executor, you can define one or more named thread pools--> <!-- <Executor name="tomcatThreadPool" namePrefix="catalina-exec-" maxThreads="150" minSpareThreads="4"/> --> <!-- A "Connector" represents an endpoint by which requests are received and responses are returned. Documentation at : Java HTTP Connector: /docs/config/http.html Java AJP Connector: /docs/config/ajp.html APR (HTTP/AJP) Connector: /docs/apr.html Define a non-SSL/TLS HTTP/1.1 Connector on port 8080 --> <Connector port="8080" protocol="HTTP/1.1" connectionTimeout="20000" redirectPort="8443" /> <!-- A "Connector" using the shared thread pool--> <!-- <Connector executor="tomcatThreadPool" port="8080" protocol="HTTP/1.1" connectionTimeout="20000" redirectPort="8443" /> --> <!-- Define an SSL/TLS HTTP/1.1 Connector on port 8443 This connector uses the NIO implementation. The default SSLImplementation will depend on the presence of the APR/native library and the useOpenSSL attribute of the AprLifecycleListener. Either JSSE or OpenSSL style configuration may be used regardless of the SSLImplementation selected. JSSE style configuration is used below. --> <!-- <Connector port="8443" protocol="org.apache.coyote.http11.Http11NioProtocol" maxThreads="150" SSLEnabled="true"> <SSLHostConfig> <Certificate certificateKeystoreFile="conf/localhost-rsa.jks" type="RSA" /> </SSLHostConfig> </Connector> --> <!-- Define an SSL/TLS HTTP/1.1 Connector on port 8443 with HTTP/2 This connector uses the APR/native implementation which always uses OpenSSL for TLS. Either JSSE or OpenSSL style configuration may be used. OpenSSL style configuration is used below. --> <!-- <Connector port="8443" protocol="org.apache.coyote.http11.Http11AprProtocol" maxThreads="150" SSLEnabled="true" > <UpgradeProtocol className="org.apache.coyote.http2.Http2Protocol" /> <SSLHostConfig> <Certificate certificateKeyFile="conf/localhost-rsa-key.pem" certificateFile="conf/localhost-rsa-cert.pem" certificateChainFile="conf/localhost-rsa-chain.pem" type="RSA" /> </SSLHostConfig> </Connector> --> <!-- Define an AJP 1.3 Connector on port 8009 --> <!-- <Connector protocol="AJP/1.3" address="::1" port="8009" redirectPort="8443" /> --> <!-- An Engine represents the entry point (within Catalina) that processes every request. The Engine implementation for Tomcat stand alone analyzes the HTTP headers included with the request, and passes them on to the appropriate Host (virtual host). Documentation at /docs/config/engine.html --> <!-- You should set jvmRoute to support load-balancing via AJP ie : <Engine name="Catalina" defaultHost="localhost" jvmRoute="jvm1"> --> <Engine name="Catalina" defaultHost="localhost"> <!--For clustering, please take a look at documentation at: /docs/cluster-howto.html (simple how to) /docs/config/cluster.html (reference documentation) --> <!-- <Cluster className="org.apache.catalina.ha.tcp.SimpleTcpCluster"/> --> <!-- Use the LockOutRealm to prevent attempts to guess user passwords via a brute-force attack --> <Realm className="org.apache.catalina.realm.LockOutRealm"> <!-- This Realm uses the UserDatabase configured in the global JNDI resources under the key "UserDatabase". Any edits that are performed against this UserDatabase are immediately available for use by the Realm. --> <Realm className="org.apache.catalina.realm.UserDatabaseRealm" resourceName="UserDatabase"/> </Realm> <Host name="localhost" appBase="webapps" unpackWARs="true" autoDeploy="true"> <!-- SingleSignOn valve, share authentication between web applications Documentation at: /docs/config/valve.html --> <!-- <Valve className="org.apache.catalina.authenticator.SingleSignOn" /> --> <!-- Access log processes all example. Documentation at: /docs/config/valve.html Note: The pattern used is equivalent to using pattern="common" --> <Valve className="org.apache.catalina.valves.AccessLogValve" directory="logs" prefix="localhost_access_log" suffix=".txt" pattern="%h %l %u %t "%r" %s %b" /> </Host> </Engine> </Service> </Server>
调试设置
1. 在调试代码的时候, 可以通过一些配置, 将catalina-home独立出来. 当然, 不设置也没有关系.
VM options:
-Dfile.encoding=UTF-8
-Dcatalina.home=catalina-home
-Dcatalina.base=catalina-home
-Djava.endorsed.dirs=catalina-home/endorsed
-Djava.io.tmpdir=catalina-home/temp
-Djava.util.logging.manager=org.apache.juli.ClassLoaderLogManager
-Djava.util.logging.config.file=catalina-home/conf/logging.properties
然后将conf, webapps拷贝过来
2. 调试运行的时候, 会报错, 此时在org.apache.catalina.startup.ContextConfig#configureStart()中加一句代码:
context.addServletContainerInitializer(new JasperInitializer(), null);

Bootstrap
tomcat入口程序, 跟很多别的程序类似, 入口程序是 Bootstrap, 中文直译过来, Bootstrap --> 引导.
/**
 * tomcat入口方法
 * Main method and entry point when starting Tomcat via the provided
 * scripts.
 *
 * @param args Command line arguments to be processed
 */
public static void main(String args[]) {

    // 创建 + 初始化
    synchronized (daemonLock) {
        if (daemon == null) {
            // Don't set daemon until init() has completed
            Bootstrap bootstrap = new Bootstrap();
            try {
                bootstrap.init();
            } catch (Throwable t) {
                handleThrowable(t);
                t.printStackTrace();
                return;
            }
            // 赋值给守护变量
            daemon = bootstrap;
        } else {
            // When running as a service the call to stop will be on a new
            // thread so make sure the correct class loader is used to
            // prevent a range of class not found exceptions.
            Thread.currentThread().setContextClassLoader(daemon.catalinaLoader);
        }
    }

    // 命令检测, 默认为 start
    try {
        String command = "start";
        if (args.length > 0) {
            command = args[args.length - 1];
        }

        if (command.equals("startd")) {
            args[args.length - 1] = "start";
            daemon.load(args);
            daemon.start();
        } else if (command.equals("stopd")) {
            args[args.length - 1] = "stop";
            daemon.stop();
        }
        // 默认情况下走这里
        else if (command.equals("start")) {
            daemon.setAwait(true);
            daemon.load(args);
            daemon.start();
            // server没起来, 则退出
            if (null == daemon.getServer()) {
                System.exit(1);
            }
        } else if (command.equals("stop")) {
            daemon.stopServer(args);
        } else if (command.equals("configtest")) {
            daemon.load(args);
            if (null == daemon.getServer()) {
                System.exit(1);
            }
            System.exit(0);
        } else {
            log.warn("Bootstrap: command "" + command + "" does not exist.");
        }
    } catch (Throwable t) {
        // Unwrap the Exception for clearer error reporting
        if (t instanceof InvocationTargetException && t.getCause() != null) {
            t = t.getCause();
        }
        handleThrowable(t);
        t.printStackTrace();
        System.exit(1);
    }
}
main方法主要调用了三个方法:
1. init
2. load
3. start
从名字上猜测, 应该是 先初始化, 然后加载一些资源, 最后启动整个服务.