正好不知道接下来要怎么写的时候,发现了一本好书:《Learn IPhone and iPad Cocos2d Game Delevopment》。于是直接翻译了第4章的例子。如果你看过这部分内容,可以直接跳过不看了。 本章讲如何响应加速器事件。
一、游戏介绍
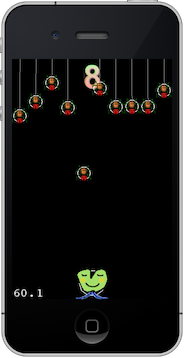
这个例子是一个叫做Doodle Drop的游戏,是一个重力感应类游戏。玩家操纵角色来躲避从空中坠落的障碍物。游戏界面如下:

二、设置主场景
1、新建Cocos2d Application,工程名DoodleDrop。
2、游戏主场景。选File -> new file,选择User Templates -> Cocos2d.0.99.x -> CCNode.class。Subclass Of选择CCLayer。文件名选GameScene。
3、在头文件中声明静态方法 +(id) scene;
4、.m文件
#import "GameScene.h"
@implementation GameScene
+(id) scene {
CCScene *scene = [CCScene node];
CCLayer* layer = [GameScene node];
[scene addChild:layer];
return scene;
}
-(id) init {
if ((self = [super init])) {
CCLOG(@"%@: %@", NSStringFromSelector(_cmd), self); return self;
}
}
-(void) dealloc {
// never forget to call [super dealloc] [super dealloc];
CCLOG(@"%@: %@", NSStringFromSelector(_cmd), self);
[super dealloc];
}
@end
5、删除HelloWorldScene.h和HelloWorldScene.m文件。
6、修改DoodleDropAppDelegate.m,将其中的主场景启动代码修改为GameScene:
[[CCDirector sharedDirector] runWithScene: [GameScene scene]];
三、游戏角色
1 、把玩家角色图片 alien.png 添加到工程。添加时,选中“ Copy items ”,同时勾选“ add to targets ”中的“ DoodleDrop ”选项。
2 、在游戏主场景 (GameScene.h) 增加变量声明:
CCSprite* player;
3、在游戏主场景(GameScene.m)的init方法中加入下列代码:
self.isAccelerometerEnabled = YES;
player = [CCSprite spriteWithFile:@"alien.png"];
[self addChild:player z:0 tag:1];
CGSize screenSize = [[CCDirector sharedDirector] winSize];
float imageHeight = [player texture].contentSize.height;
player.position = CGPointMake(screenSize.width / 2, imageHeight / 2);
这样,玩家角色就被放到屏幕底部正中的位置上。注意,player变量未retain。因为addChild会自动retain。
[player texture].contentSize.height返回的是渲染图的content size。渲染对象(玩家角色图片alient.png)有两个尺寸:content size和texture size。前者是图片的实际尺寸,后者是渲染尺寸——iPhone规定渲染尺寸只能是2的n次方。比如图片实际尺寸100*100,那么渲染尺寸则是128*128,因为最接近100的2的n次方为128。
四、使用加速器
1、为了响应加速器事件,你必须在init方法中加上:
self.isAccelerometerEnabled = YES;
同时实现accelerometer方法:
-(void) accelerometer:(UIAccelerometer *)accelerometer didAccelerate:(UIAcceleration *)acceleration{
CGPoint pos = player.position;
pos.x += acceleration.x * 10;
player.position = pos;
}
跟java和c不同。你不能对 player.position.x进行赋值。这种赋值在
c语言中是可以的,但oc中不行。因为player.position实际上是调用[player position],这个方法返回一个临时的CGPoint变量。当你想对这个临时的CGPoint的x进行赋值后,这个变量会被被抛弃,所以你的赋值没有任何作用。所以你需要用一个新的CGPoint变量,修改其x值,然后再把这个CGPoint赋值给player.position(即调用[player setPosition:])。如果你是来自java和c++的程序员,在oc中需要留心这个“不幸的”问题并尽可能的修改编程习惯。
2、运行测试
模拟器不支持重力感应,请在物理设备上运行代码。
五、玩家控制
现住发现用加速器控制有些不灵?反应迟钝,移动也不流畅?为此,我们需要增加一些代码。
首先需要增加变量声明:
CGPoint playerVelocity;
为了便于今后的扩展(假设有一天我们会想上下移动角色),这是一个CGPoint类型,而不是一个float。
然后修改加速器方法:
-(void) accelerometer:(UIAccelerometer *)accelerometer
didAccelerate:(UIAcceleration *)acceleration
{
// 减速度系数(值越小=转向越快)
float deceleration = 0.4f;
// 加速度系数 (值越大 = 越敏感)
float sensitivity = 6.0f;
// 最大速度
float maxVelocity = 100;
// 根据加速度计算当前速度
playerVelocity.x = playerVelocity.x * deceleration + acceleration.x * sensitivity;
// 限制最大速度为 ±maxVelocity之间
directions if (playerVelocity.x > maxVelocity) {
playerVelocity.x = maxVelocity;
} else if (playerVelocity.x < - maxVelocity) {
playerVelocity.x = - maxVelocity;
}
}
现在,玩家速度由一个一次线性方程决定:
V= V ₀ * β + V ∍ * ε
其中,
V 为终速
V ₀ 为初速
β 为减速系数
V ∍ 为加速度
ε 为加速系数
其中, β 和 ε两个系数(即减速度系数和加速度系数:deceleration和sensitivity变量)是两个经验值,你可以自己调整它以达到理想效果。
然后,需要通过以下方法来改变游戏角色的位置:
-(void) update:(ccTime)delta {
// 不断改变角色x坐标
CGPoint pos = player.position;
pos.x += playerVelocity.x;
// 防止角色移到屏幕以外
CGSize screenSize = [[CCDirector sharedDirector] winSize];
float imageWidthHalved = [player texture].contentSize.width * 0.5f; float leftBorderLimit = imageWidthHalved;
float rightBorderLimit = screenSize.width - imageWidthHalved;
if (pos.x < leftBorderLimit) {
pos.x = leftBorderLimit;
playerVelocity = CGPointZero;
} else if(pos.x > rightBorderLimit) {
pos.x = rightBorderLimit;
playerVelocity = CGPointZero;
}
player.position = pos;
}
然后,在init方法中加入:
[self scheduleUpdate];
这样,每隔一段时间cocos2d会自动调用update方法。
六、添加障碍物
导入spider.png图片到工程。这是一张蜘蛛的图片,在游戏中我们需要躲避的东西。
首先,增加如下变量声明:
CCArray* spiders;
float spiderMoveDuration;
int numSpidersMoved;
在init方法中,加上一句方法调用语句:
[self initSpiders];
下面是initSpiders方法:
-(void) {
CGSize screenSize = [[CCDirector sharedDirector] winSize];
// 用一个临时的CCSprider取得图片宽度
CCSprite* tempSpider = [CCSprite spriteWithFile:@"spider.png"]; float imageWidth = [tempSpider texture].contentSize.width;
// 计算出要多少蜘蛛图片可以布满屏幕的宽度
int numSpiders = screenSize.width / imageWidth;
// 初始化数组并指定数组大小
spiders = [[CCArray alloc] initWithCapacity:numSpiders];
for (int i = 0; i < numSpiders; i++) {
CCSprite* spider = [CCSprite spriteWithFile:@"spider.png"]; [self addChild:spider z:0 tag:2];
[spiders addObject:spider];
}
[self resetSpiders];
}
tempSpider是一个临时变量,我们仅用于取得图片宽度。我们没有retain他,也不需要release他——他会自动被release。
与此相反,spiders是由我们init的,我们也没有retain(实际上init会自动retain),但我们必须自己release(OC规定,init/copy/new出来的对象,必须手动release,OC的内存管理不会自动release)。因此在dealloc方法中有这么一句:
[spiders release],spiders=nil;
同时,我们使用了coco2d提供的一个类似NSMutableArray的CCArray类,该类对数组的操作更快。以下是CCArray提供的一些方法:
+ (id) array;
+ (id) arrayWithCapacity:(NSUInteger)capacity;
+ (id) arrayWithArray:(CCArray*)otherArray;
+ (id) arrayWithNSArray:(NSArray*)otherArray;
- (id) initWithCapacity:(NSUInteger)capacity;
- (id) initWithArray:(CCArray*)otherArray;
- (id) initWithNSArray:(NSArray*)otherArray;
- (NSUInteger) count;
- (NSUInteger) capacity;
- (NSUInteger) indexOfObject:(id)object;
- (id) objectAtIndex:(NSUInteger)index;
- (id) lastObject;
- (BOOL) containsObject:(id)object;
#pragma mark Adding Objects
- (void) addObject:(id)object;
- (void) addObjectsFromArray:(CCArray*)otherArray;
- (void) addObjectsFromNSArray:(NSArray*)otherArray;
- (void) insertObject:(id)object atIndex:(NSUInteger)index;
#pragma mark Removing Objects
- (void) removeLastObject;
- (void) removeObject:(id)object;
- (void) removeObjectAtIndex:(NSUInteger)index;
- (void) removeObjectsInArray:(CCArray*)otherArray;
- (void) removeAllObjects;
- (void) fastRemoveObject:(id)object;
- (void) fastRemoveObjectAtIndex:(NSUInteger)index;
- (void) makeObjectsPerformSelector:(SEL)aSelector;
- (void) makeObjectsPerformSelector:(SEL)aSelector withObject:(id)object;
- (NSArray*) getNSArray;
resetSpiders 方法如下所示:
-(void) resetSpiders {
CGSize screenSize = [[CCDirector sharedDirector] winSize];
// 用一个临时的CCSprider取得图片宽度
CCSprite* tempSpider = [spiders lastObject];
CGSize size = [tempSpider texture].contentSize;
int numSpiders = [spiders count];
for (int i = 0; i < numSpiders; i++) {
// 放置每个蜘蛛的位置
CCSprite* spider = [spiders objectAtIndex:i];
spider.position =
CGPointMake(size.width * i + size.width * 0.5f,
screenSize.height + size.height);
[spider stopAllActions];
}
// 为保险起见,在注册之前先从schedule中反注册(未注册则不动作)
[self unschedule:@selector(spidersUpdate:)];
// 注册schedule,每0.7秒执行
[self schedule:@selector(spidersUpdate:) interval:0.7f];
}
-(void) {
// 找出空闲的蜘蛛(未在移动的).
for (int i = 0; i < 10; i++) {
// 从数组中随机抽取一只蜘蛛
int randomSpiderIndex = CCRANDOM_0_1() * [spiders count];
CCSprite* spider = [spiders objectAtIndex:randomSpiderIndex];
// 若蜘蛛未在移动,让蜘蛛往下掉
if ([spider numberOfRunningActions] == 0) {
// 控制蜘蛛往下掉
[self runSpiderMoveSequence:spider];
// 每次循环仅移动一只蜘蛛
break;
}
}
}
-(void) runSpiderMoveSequence:(CCSprite*)spider
{
// 随时间逐渐加快蜘蛛的速度
numSpidersMoved++;
if (numSpidersMoved % 8 == 0 && spiderMoveDuration > 2.0f) {
spiderMoveDuration -= 0.1f;
}
// 移动的终点
CGPoint belowScreenPosition = CGPointMake(spider.position.x,
-[spider texture].contentSize.height);
// 动作:移动
CCMoveTo* move = [CCMoveTo actionWithDuration:spiderMoveDuration
position:belowScreenPosition];
// 瞬时动作:方法调用
CCCallFuncN* call = [CCCallFuncN actionWithTarget:self
selector:@selector(spiderBelowScreen:)];
// 组合动作:移动+方法调用
CCSequence* sequence = [CCSequence actions:move, call, nil];
// 运行组合动作
[spider runAction:sequence];
}
spiderBelowScreen方法重置蜘蛛的状态,让其回到屏幕上端等待下次坠落。
-(void) spiderBelowScreen:(id)sender {
// 断言:sender是否为CCSprite.
NSAssert([sender isKindOfClass:[CCSprite class]], @"sender is not a CCSprite!");
CCSprite* spider = (CCSprite*)sender;
// 把蜘蛛重新放回屏幕上端
CGPoint pos = spider.position;
CGSize screenSize = [[CCDirector sharedDirector] winSize];
pos.y = screenSize.height + [spider texture].contentSize.height; spider.position = pos;
}
书中作者提到,出于一个“保守”程序员的习惯,作者使用了 NSAssert语句来测试sender是否是一个CCSprite类。虽然理论上,Sender应当是一个CCSprite,实际上它却有可能根本不是。 因为作者曾犯过一个错误:把CCCallFuncN写成了CCCallFunc(二者的区别在于,后者不能传递参数而前者带一个sender参数),导致sender未被作为参数传递到调用方法,即sender=nil。这样的错误也被NSAssert捕获到了,于是作者发现并修改了这个错误。
七、碰撞检测
很简单。在update方法中添加语句:
[self checkForCollision];
checkForCollision中包含了碰撞检测的所有逻辑:
-(void ) checkForCollision {
// 玩家和蜘蛛的尺寸
float playerImageSize = [player texture].contentSize.width;
float spiderImageSize = [[spiders lastObject] texture].contentSize.width;
//玩家和蜘蛛的碰撞半径
float playerCollisionRadius = playerImageSize * 0.4f;
float spiderCollisionRadius = spiderImageSize * 0.4f;
// 发生碰撞的最大距离,如果两个对象间的距离<=此距离可判定为有效碰撞
float maxCollisionDistance=playerCollisionRadius +spiderCollisionRadius;
int numSpiders = [spiders count];
//循环检测玩家和每一只蜘蛛间的碰撞距离
for (int i = 0; i < numSpiders; i++) {
CCSprite* spider = [spiders objectAtIndex:i];
// 计算每只蜘蛛和玩家间的距离. ccpDistance及其他非常有用的函数都列在 CGPointExtension中
float actualDistance = ccpDistance(player.position, spider.position);
// 如二者距离小于碰撞最大距离,认为发生碰撞?
if (actualDistance < maxCollisionDistance) {
// 结束游戏.
[self showGameOver];
}
}
}
-(void) showGameOver
{
// 屏保开启
[self setScreenSaverEnabled:YES];
// 冻结所有对象的动作
CCNode* node;
CCARRAY_FOREACH([self children], node) {
[node stopAllActions];
}
// 使蜘蛛保持扭动
CCSprite* spider;
CCARRAY_FOREACH(spiders, spider) {
[self runSpiderWiggleSequence:spider];
}
// 游戏开始前,关闭加速器的输入
self.isAccelerometerEnabled = NO;
// 允许触摸
self.isTouchEnabled = YES;
// 取消所有schedule
[self unscheduleAllSelectors];
// 显示GameOver文本标签
CGSize screenSize = [[CCDirector sharedDirector] winSize];
CCLabel* gameOver = [CCLabel labelWithString:@"GAME OVER!" fontName:@"Marker Felt" fontSize:60];
gameOver.position = CGPointMake(screenSize.width / 2, screenSize.height / 3);
[self addChild:gameOver z:100 tag:100];
// 动作:色彩渐变
CCTintTo* tint1 = [CCTintTo actionWithDuration:2 red:255 green:0 blue:0];
CCTintTo* tint2 = [CCTintTo actionWithDuration:2 red:255 green:255 blue:0];
CCTintTo* tint3 = [CCTintTo actionWithDuration:2 red:0 green:255 blue:0];
CCTintTo* tint4 = [CCTintTo actionWithDuration:2 red:0 green:255 blue:255];
CCTintTo* tint5 = [CCTintTo actionWithDuration:2 red:0 green:0 blue:255];
CCTintTo* tint6 = [CCTintTo actionWithDuration:2 red:255 green:0 blue:255];
CCSequence* tintSequence = [CCSequence actions:tint1, tint2, tint3, tint4, tint5, tint6, nil];
CCRepeatForever* repeatTint = [CCRepeatForever actionWithAction:tintSequence];
[gameOver runAction:repeatTint];
// 动作:转动、颤动
CCRotateTo* rotate1 = [CCRotateTo actionWithDuration:2 angle:3];
CCEaseBounceInOut* bounce1 = [CCEaseBounceInOut actionWithAction:rotate1];
CCRotateTo* rotate2 = [CCRotateTo actionWithDuration:2 angle:-3];
CCEaseBounceInOut* bounce2 = [CCEaseBounceInOut actionWithAction:rotate2];
CCSequence* rotateSequence = [CCSequence actions:bounce1, bounce2, nil];
CCRepeatForever* repeatBounce = [CCRepeatForever actionWithAction:rotateSequence];
[gameOver runAction:repeatBounce];
// 动作:跳动
CCJumpBy* jump = [CCJumpBy actionWithDuration:3 position:CGPointZero height:screenSize.height / 3 jumps:1];
CCRepeatForever* repeatJump = [CCRepeatForever actionWithAction:jump];
[gameOver runAction:repeatJump];
// 标签:点击游戏开始
CCLabel* touch = [CCLabel labelWithString:@"tap screen to play again" fontName:@"Arial" fontSize:20];
touch.position = CGPointMake(screenSize.width / 2, screenSize.height / 4);
[self addChild:touch z:100 tag:101];
// 动作:闪烁
CCBlink* blink = [CCBlink actionWithDuration:10 blinks:20];
CCRepeatForever* repeatBlink = [CCRepeatForever actionWithAction:blink];
[touch runAction:repeatBlink];
}
当然,为了使游戏一开始就停顿在GameOver画面,需要在init方法中调用:
[self showGameOver];
只有当用户触摸屏幕后,游戏才会开始。这需要实现方法:
-(void) ccTouchesEnded:(NSSet *)touches withEvent:(UIEvent *)event
{
[self resetGame];
}
resetGame方法负责重置游戏变量并启动游戏。
-(void) resetGame
{
// 关闭屏保
[self setScreenSaverEnabled:NO];
// 移除GameOver标签和启动游戏标签
[self removeChildByTag:100 cleanup:YES];
[self removeChildByTag:101 cleanup:YES];
// 启动加速器输入,关闭触摸输入
self.isAccelerometerEnabled = YES;
self.isTouchEnabled = NO;
// 重设蜘蛛数组
[self resetSpiders];
// 注册schedule
[self scheduleUpdate];
// 积分
score = 0;
totalTime = 0;
[scoreLabel setString:@"0"];
}
开启/关闭屏保的方法:
-(void) setScreenSaverEnabled:(bool)enabled
{
UIApplication *thisApp = [UIApplication sharedApplication];
thisApp.idleTimerDisabled = !enabled;
}
使蜘蛛不停扭动的方法如下(实际上是把图像不断的放大缩小):
-(void) runSpiderWiggleSequence:(CCSprite*)spider
{
//动作:放大
CCScaleTo* scaleUp = [CCScaleTo actionWithDuration:CCRANDOM_0_1() * 2 + 1 scale:1.05f];
//速度渐变动作:速度由慢至快,再由快至慢
CCEaseBackInOut* easeUp = [CCEaseBackInOut actionWithAction:scaleUp];
//动作:缩小
CCScaleTo* scaleDown = [CCScaleTo actionWithDuration:CCRANDOM_0_1() * 2 + 1 scale:0.95f];
//速度渐变动作:速度由慢至快,再由快至慢
CCEaseBackInOut* easeDown = [CCEaseBackInOut actionWithAction:scaleDown];
CCSequence* scaleSequence = [CCSequence actions:easeUp, easeDown, nil];
CCRepeatForever* repeatScale = [CCRepeatForever actionWithAction:scaleSequence];
[spider runAction:repeatScale];
}
八、CCLabel、 CCBitmapFontAtlas 和 Hiero
我们的计分标准很简单,以游戏时间作为游戏分数。
在init方法中加入:
scoreLabel = [CCLabel labelWithString:@"0" fontName:@"Arial" fontSize:48];
scoreLabel.position = CGPointMake(screenSize.width / 2, screenSize.height);
// 调整锚点。
scoreLabel.anchorPoint = CGPointMake(0.5f, 1.0f);
// 把label添加到scene,z坐标为-1,则位于所有layer的下方
[self addChild:scoreLabel z:-1];
为了将计分牌对其到屏幕上端中心位置,这里使用了“锚点”的概念。 锚点即参考点,和position属性配合使用,用于将物体向其他物体对齐。比如当把一个物体移动到一个位置点时,实际上是把这个物体的“锚点”移动/对齐到另外一个点。锚点由两个float表示,表示的是锚点相对于物体宽/高的比率。比如锚点(0.5f,1.0f)表示该锚点位于该物体宽1/2,高1/1的地方。
修改update方法,在其中加入:
// 每秒更新一次计分牌
totalTime += delta;
int currentTime = (int)totalTime;
if (score < currentTime)
{
score = currentTime;
[scoreLabel setString:[NSString stringWithFormat:@"%i", score]];
}
这里需要说明的是,[CCLabel setString]方法的效率很低:它需要释放老的texture,分配一个新的texture,并用iOS font的rendering方法重新构造texture。你只需要注释[CCLabel setString]方法就可以知道,那有多么的糟糕。不使用setString方法时帧率为60帧/秒,而使用该方法的帧率竟然才30帧/秒。
象CCSprite等刷新效率高(只是更费一点内存)的Label类,都是属于 CCBitmapFontAtlas类的特例。我们可以通过简单地把CCLabel变量声明从CCLabel更改为 CCBitmapFontAtlas,并修改它的构造语句:
scoreLabel = [CCBitmapFontAtlas bitmapFontAtlasWithString:@"0" fntFile:@"bitmapfont.fnt"];
在游戏中使用bitmapfont是很好的选择,因为操作更快速,同时会有一个缺点:bitmap字体都是大小固定的。如果同样的字体,大小不同,你需要对CCBitmapFontAtlas 对象进行缩放。或者为不同尺寸的字体创建单独的bitmap文件,并因此占用更多的内存。
当然需要把bitmapfont.fnt文件和对应的.png文件一起加入到工程的资源目录下。
如果你需要创建自己的bitmap字体,可以用Hiero这个小工具(java web application):
http://slick.cokeandcode.com/demos/hiero.jnlp
也可以使用 BMFont (windows应用):
www.angelcode.com/products/bmfont/
Hiero允许你从TrueTypeFont创建一个.fnt文件,该文件可以直接用于 cocos2d的CCBitmapFontAtlas类。
安装Hiero时需要同意一个数字签名 。请放心,迄今为止没有迹象表明该签名有任何问题。
Hiero的使用很简单,首先挑选一种TrueType字体,在Sample Text 文本框中输入你要用的字符,然后点击File->Save BMFont Files…即可保存为.fnt文件。

其他的选项是可选的。比如你可以加上渐变和阴影效果,使字体显得更3D。
选择Glyph cache后,你还可以调整生成的.png文件的大小。 当然,如果你象我一样只用到了极少的几个字符,只要把页宽/高设为最小值(比如在这里我们设成了256),然后点击Reset Cache应用。这样可以创建比较小.png文件同时减少内存占用。对于更复杂的字体,Hiero会创建多个.png文件——记住,每一个.png文件都应当加到工程中。
在这个例子里,我们的字体文件里只放了几个数字。因为png文件被创建为256*256大小,不管你是输入1个字还是再加几个其他的字,都会占用这么多的空间。
*注意,如果你使用了在.fnt文件中不存在的字符,那么该字符会被忽略掉,且不会显示在 CCBitmapFontAtlas中 。
九、加入音频
在工程目录中有一对音频文件: blues.mp3 和 alien- sfx.caf 。
在cocos2d中播放音频的最好也是最初的方法是用 SimpleAudioEngine。然而音频支持并不是cocos2d内置的一部分。它属于CocosDenshion,就像物理引擎一样。因此,你需要import额外的头文件:
#import "SimpleAudioEngine.h"
然后可以在init方法中象这样来播放音乐/音频:
[[SimpleAudioEngine sharedEngine] playBackgroundMusic:@"blues.mp3" loop:YES];
[[SimpleAudioEngine sharedEngine] preloadEffect:@"alien-sfx.caf"];
对于背景音乐,我们设置loop参数为YES,这样就会循环播放。
对于音频声效,我们并没有立即播放,而仅仅是加载到内存。然后在条件合适时播放(比如碰撞发生时):
[[SimpleAudioEngine sharedEngine] playEffect:@"alien-sfx.caf"];
对于音乐,最好使用mp3格式。注意,同一时间内,只能播放1首背景音乐。虽然同时播放多首mp3从技术上是可行的,但物理硬件在同一时间内只能对一首mp3进行解码。在游戏中拒绝任何额外的CPU开销,因此对大部分游戏而言,都不会同时播放多首mp3.
至于声效,我喜欢用CAF格式。如果要进行音频格式的转换,可以使用 SoundConverter:
http://dekorte.com/projects/ shareware/SoundConverter/
如果文件大小在500k以内,该软件是免费的,无限制的许可仅仅需要$15。
如果你发现无法播放音频文件或者出现杂音,不要担心。有无数音频软件和音频编码拥有它们特有的文件格式。有些格式无法在iOS设备上播放,然而在其他设备上播放正常。解决办法是打开它们,然后重新保存。或者使用音频转换程序或音频软件。
十、迁移至iPad
如果所有的坐标都采用屏幕坐标,在iPad的大屏上运行游戏将会进行简单缩放而没有任何问题。相反,如果采用了固定坐标,你不得不重新编写游戏代码。
迁移至iPad工程很简单。在Groups&Files面板中选择Target,选择Project->Upgrade Current Target for iPad…,将打开对话框:

对于这个游戏,选“One Universal application”(即iPhone/iPad通用)。
这样的缺点是两个设备的特性都会被加到target,增加了程序大小。但程序既可在iPhone上运行,也可在iPad上运行。
另一个选择是“Two device-specific application”,你会得到两个独立于设备的app,你需要提交两次。如果用户有两个设备—— iPhone和iPad的,那么需要分别购买。
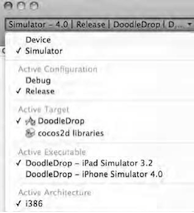
编译运行。程序会自动侦测当前所连接的设备类型并运行对应的版本。如图,选择iPad Simulator 3.2 ,可以查看在iPad模拟器运行游戏的效果:
