简述
hashchange
-->
match route
-->
set vm._route
-->
<router-view> render()
-->
render matched component
监听hashchange方法
window.addEventListener('hashchange', () => {
    // this.transitionTo(...)
})
进行地址匹配,得到对应当前地址的 route。
将其设置到对应的 vm._route 上。侵入vue监听_route变量而触发更新流程
最后是router-view组件调用render函数渲染匹配到的route
测试代码
<!DOCTYPE html>
<html>
<head>
  <title>vue test</title>
</head>
<body>
<div id="app">
  <h1>Hello App!</h1>
  <button @click="goBack">click me and go back</button>
  <button @click="goIndex">click me and go to index</button>
  <p>
    <router-link to="/foo">Go to Foo</router-link>
  </p>
  <p>
    <router-link to="/bar">Go to Bar</router-link>
  </p>

  <router-view></router-view>
</div>

  <!-- Vue.js v2.6.11 -->
  <script src="https://cdn.jsdelivr.net/npm/vue/dist/vue.js"></script>
  <script src="https://cdn.bootcss.com/vue-router/3.1.3/vue-router.js"></script>
  <script>
    const Foo = { template: '<div>render foo</div>' }
    const Bar = { template: '<div>render bar</div>' }
    const routes = [
      { path: '/foo', component: Foo },
      { path: '/bar', component: Bar }
    ]
    const router = new VueRouter({
      routes // (缩写) 相当于 routes: routes
    })

    var app = new Vue({
      el: '#app',
      router,
      methods: {
        goBack() {
          this.$router.back();
        },
        goIndex() {
          this.$router.push('/');
        }
      }
    })

    console.log(app);
    // var event = new CustomEvent('test', { 'detail': 5 }); window.dispatchEvent(event);
  </script>
</body>
</html>
怎么注入进的 vue
一个 install 函数,把 $route 挂载到了 Vue.prototype 上,保证 Vue 的所有组件实例,都是取同一份 router。并且在里面注册了 RouterView 和 RouterLink 组件
function install(Vue) {
  // ...

  Vue.mixin({
    beforeCreate: function beforeCreate() {
      // ...

      this._routerRoot = this;
      this._router = this.$options.router;
      this._router.init(this);
      Vue.util.defineReactive(this, '_route', this._router.history.current);

      // ...
    },
    destroyed: function destroyed() {
      // ...
    }
  });

  Object.defineProperty(Vue.prototype, '$router', {
    get: function get() { return this._routerRoot._router }
  });

  Object.defineProperty(Vue.prototype, '$route', {
    get: function get() { return this._routerRoot._route }
  });

  Vue.component('RouterView', View);
  Vue.component('RouterLink', Link);

  // ...
}

VueRouter.install = install;
最后进入了 vue 的初始化逻辑里 initUse 函数里去触发插件的 install 函数执行。
router 是个什么结构
详见 function VueRouter (options),下面代码中需要注意三点:
- app 将会挂上 vue 实例对象
- mode 代表用户配置的路由模式,默认是 hash,也就是使用 url 上的 hash 部分作为路由路径的判定。
- history 将会挂载上用户曾经的访问的记录数组。
var VueRouter = function VueRouter (options) {
  this.app = null;
  this.apps = [];
  this.options = options;
  this.beforeHooks = [];
  this.resolveHooks = [];
  this.afterHooks = [];
  this.matcher = createMatcher(options.routes || [], this);

  var mode = options.mode || 'hash';
  // ...
  this.mode = mode;

  switch (mode) {
    case 'history':
      this.history = new HTML5History(this, options.base);
      break
    case 'hash':
      this.history = new HashHistory(this, options.base, this.fallback);
      break
    case 'abstract':
      this.history = new AbstractHistory(this, options.base);
      break
    default:
      {
        assert(false, ("invalid mode: " + mode));
      }
  }
};
RouterView 组件长什么样
看下文代码,总结一下关键的步骤:
最关键的一步 var component = cache[name] = matched.components[name]; 获取到具体是那个组件,这里的 component 其实是
{
  template: "<div>render bar</div>"
  _Ctor: {0: ƒ}
  __proto__: Object
}
然后最后面就是调用 h(component, data, children) 完成渲染,h其实是 Vue 实例的 $createElement 函数,它会具体解析此 template 成为视图渲染。
var View = {
    name: 'RouterView',
    functional: true,
    props: {
      name: {
        type: String,
        default: 'default'
      }
    },
    render: function render (_, ref) {
      var props = ref.props;
      var children = ref.children;
      var parent = ref.parent;
      var data = ref.data;

      // used by devtools to display a router-view badge
      data.routerView = true;

      // directly use parent context's createElement() function
      // so that components rendered by router-view can resolve named slots
      var h = parent.$createElement;
      var name = props.name;
      var route = parent.$route;
      var cache = parent._routerViewCache || (parent._routerViewCache = {});

      // ...

      var component = cache[name] = matched.components[name];

      // ...

      return h(component, data, children)
    }
  };
RouterLink 呢?
很精妙,此组件的 props 默认把 tag 设置为 a,并且代码中还支持 slotScope 插槽。
最后一样 h(this.tag, data, this.$slots.default) 去渲染,所以此组件渲染后的标签才会默认是 a 标签呀。。
var Link = {
  name: 'RouterLink',
  props: {
    to: {
      type: toTypes,
      required: true
    },
    tag: {
      type: String,
      default: 'a'
    },
    exact: Boolean,
    append: Boolean,
    replace: Boolean,
    activeClass: String,
    exactActiveClass: String,
    event: {
      type: eventTypes,
      default: 'click'
    }
  },
  render: function render(h) {

    var router = this.$router;
    var current = this.$route;
    var ref = router.resolve(
      this.to,
      current,
      this.append
    );
    // ...
    var href = ref.href;

    // ...

    var data = { class: classes };

    var scopedSlot =
      !this.$scopedSlots.$hasNormal &&
      this.$scopedSlots.default
    // ...

    if (scopedSlot) {
      if (scopedSlot.length === 1) {
        return scopedSlot[0]
      } else if (scopedSlot.length > 1 || !scopedSlot.length) {
        // ...
        return scopedSlot.length === 0 ? h() : h('span', {}, scopedSlot)
      }
    }

    if (this.tag === 'a') {
      data.on = on;
      data.attrs = { href: href };
    } else {
      // ...
    }

    return h(this.tag, data, this.$slots.default)
  }
};
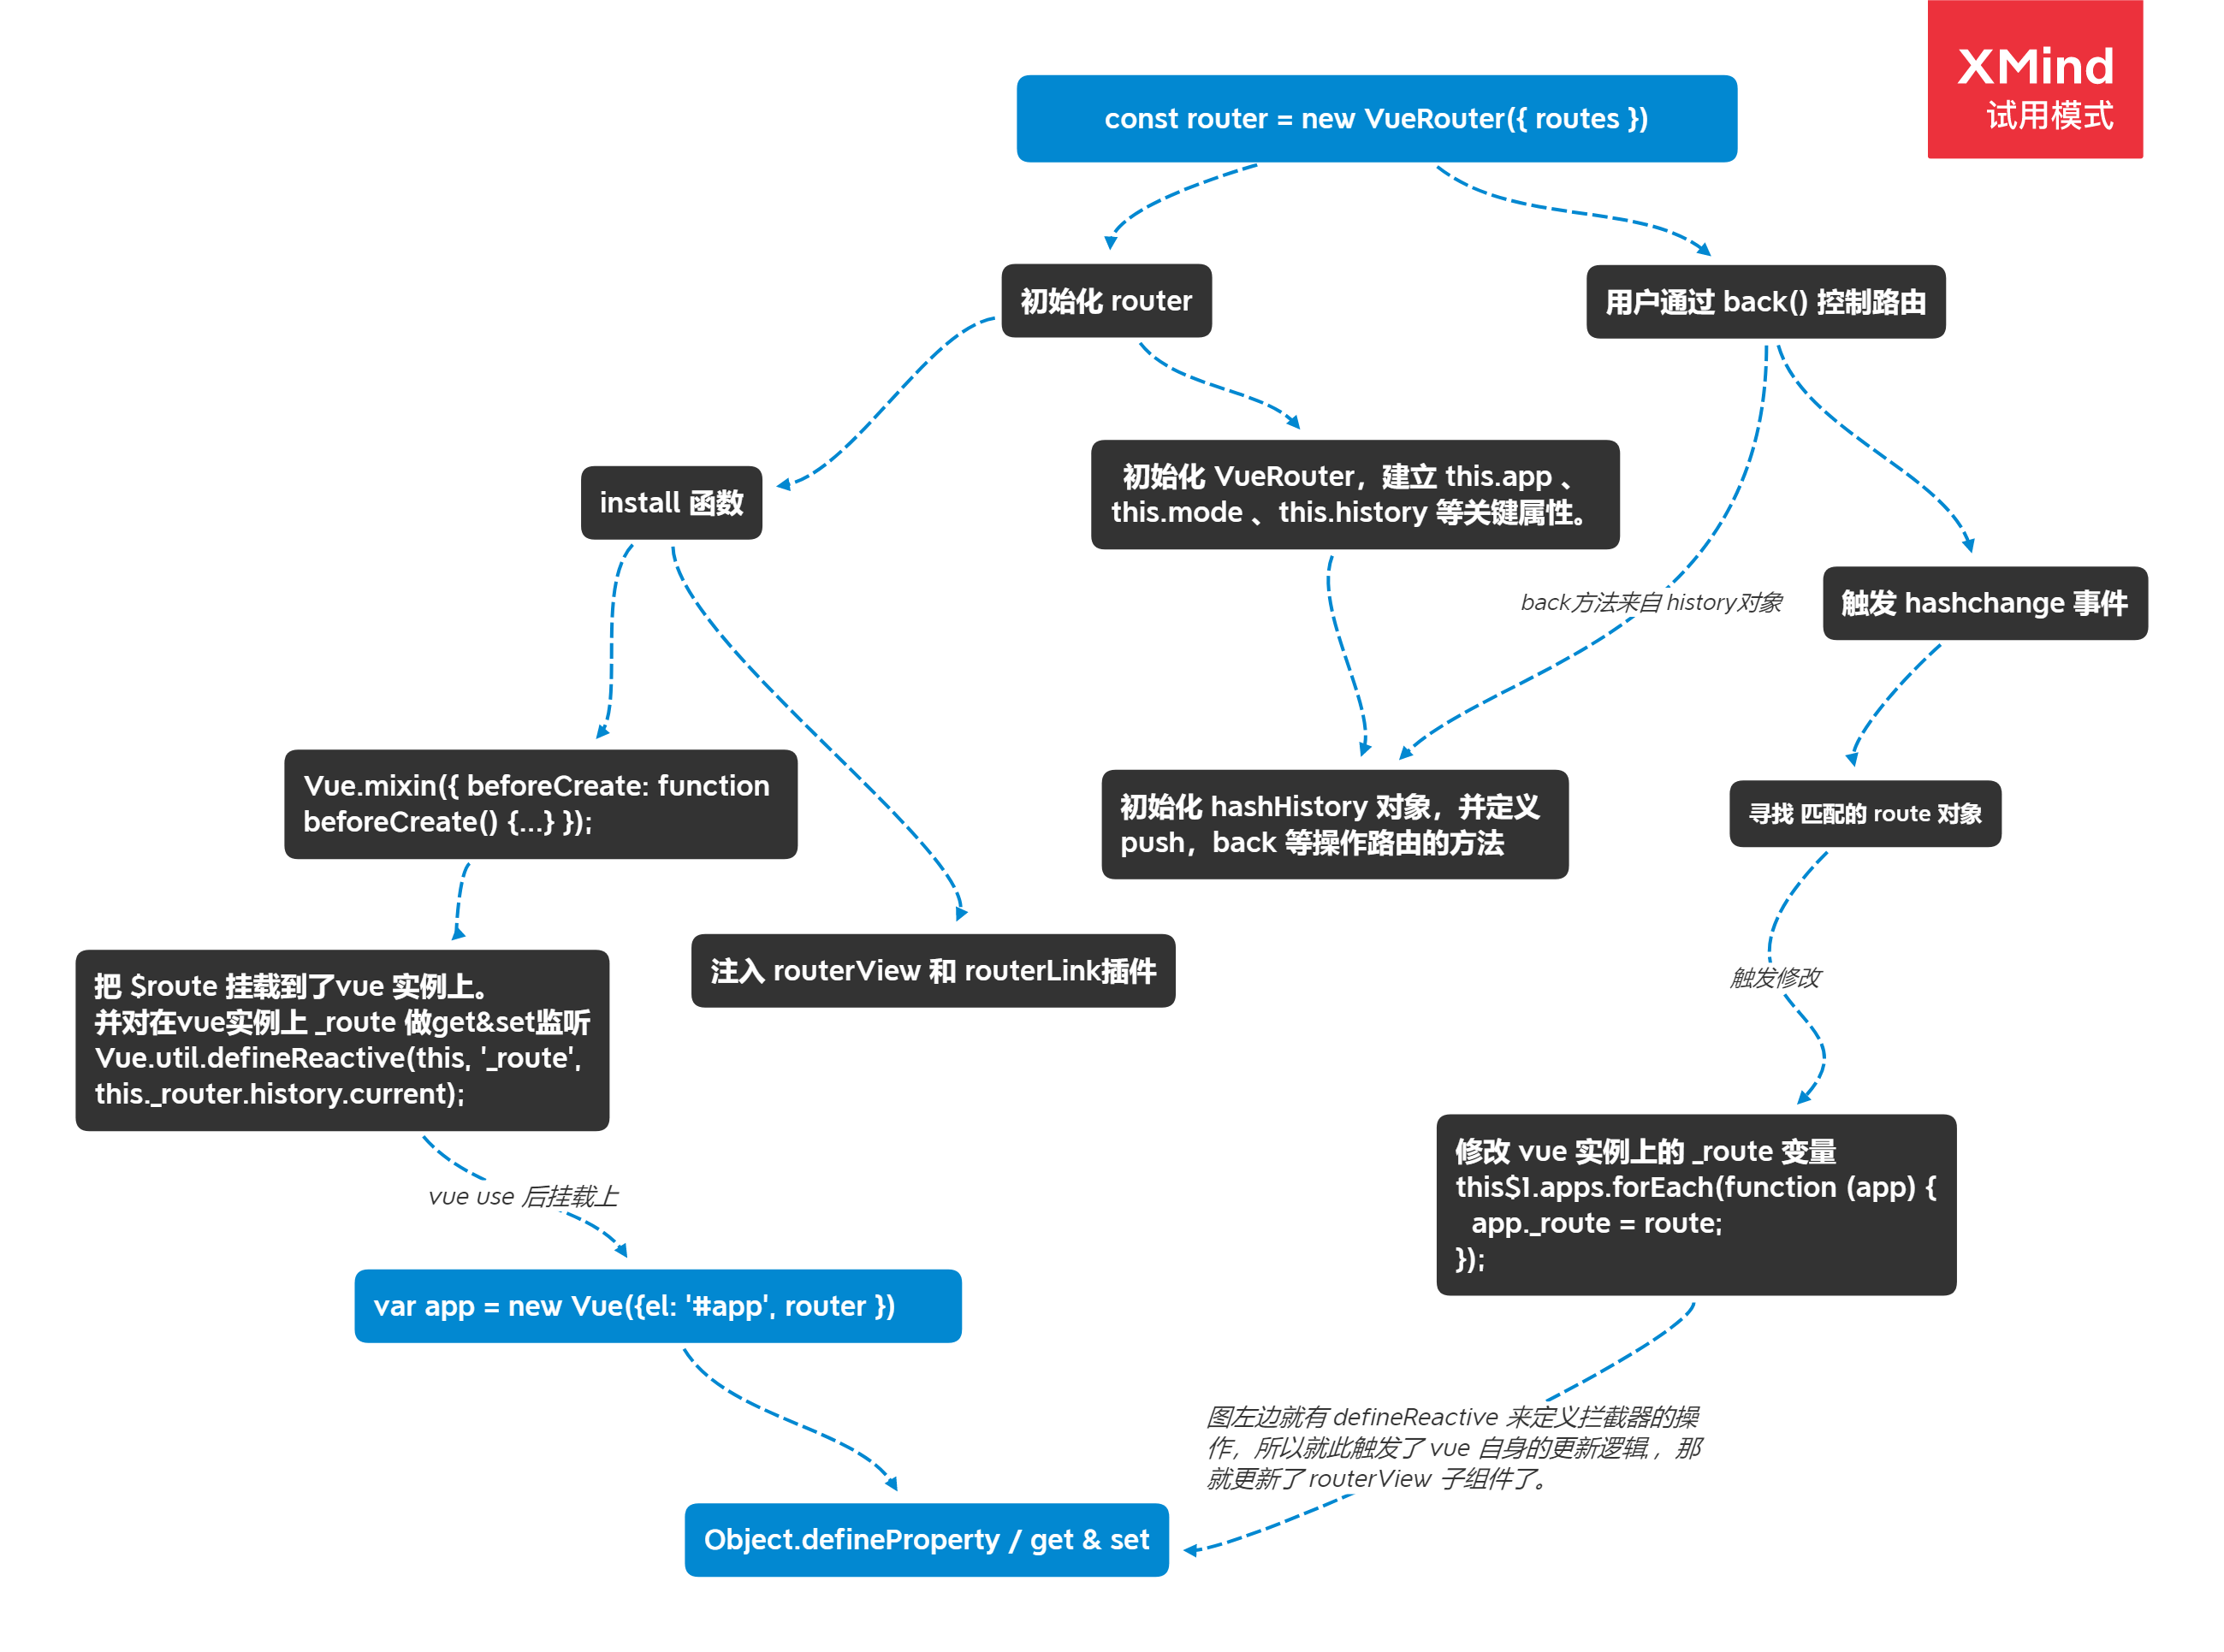
路由控制是怎么做的
本质上就是改变了 hash
hashchange 的事件监听触发,接着去触发 HashHistory 实例里的 updateRoute 函数,updateRoute 函数里触发回调去更新 route 对象,route 对象更新就走入了 vue 自身的 set 触发广播通知被观察者了。
VueRouter.prototype.back = function back () {
    this.go(-1);
  };

VueRouter.prototype.go = function go (n) {
    this.history.go(n);
  };

HashHistory.prototype.go = function go (n) {
  window.history.go(n);
};

// ...

window.addEventListener(
  supportsPushState ? 'popstate' : 'hashchange',
  function () {
    var current = this$1.current;
    // ...
    this$1.transitionTo(getHash(), function (route) {
      if (supportsScroll) {
        handleScroll(this$1.router, route, current, true);
      }
      if (!supportsPushState) {
        replaceHash(route.fullPath);
      }
    });
  }
);

// ...

History.prototype.transitionTo = function transitionTo(
  location,
  onComplete,
  onAbort
) {
  var this$1 = this;

  var route = this.router.match(location, this.current);
  this.confirmTransition(
    route,
    function () {
      this$1.updateRoute(route);
      // ...
    },
    function (err) {
      // ...
    }
  );
};

// ...

History.prototype.updateRoute = function updateRoute(route) {
  var prev = this.current;
  this.current = route;
  // 这里的 cb 就是下面一段的 history.listen
  this.cb && this.cb(route);
  this.router.afterHooks.forEach(function (hook) {
    hook && hook(route, prev);
  });
};

// ...

history.listen(function (route) {
  this$1.apps.forEach(function (app) {
    // 改变 app._route 就会进入 vue 实例自身的 get/set 拦截器中,然后自己触发更新。
    // 因为上文 install 函数里做了属性劫持 Vue.util.defineReactive(this, '_route', this._router.history.current);
    app._route = route;
  });
});
钩子是怎么做的
this.beforeHooks 是个数组,registerHook 函数做的就只是往前面的数组里添加进入这个方法。
VueRouter.prototype.beforeEach = function beforeEach(fn) {
  return registerHook(this.beforeHooks, fn)
};

VueRouter.prototype.beforeResolve = function beforeResolve(fn) {
  return registerHook(this.resolveHooks, fn)
};

VueRouter.prototype.afterEach = function afterEach(fn) {
  return registerHook(this.afterHooks, fn)
};
beforeHooks 在每次触发更新前的队列里调用
resolveHooks 执行是在下文的 runQueue 里,也就是是在触发更新前,但比 beforeHooks 晚,主要用于异步组件
afterHooks 的触发,是在 updateRoute 函数后,也就是开始触发 vue 的更新逻辑时,但并不一定视图已经更新完毕,因为 vue 自身也有不少的队列操作,不会立即更新。
// beforeHooks
var queue = [].concat(
  // in-component leave guards
  extractLeaveGuards(deactivated),
  // global before hooks
  this.router.beforeHooks,
  // in-component update hooks
  extractUpdateHooks(updated),
  // in-config enter guards
  activated.map(function (m) { return m.beforeEnter; }),
  // async components
  resolveAsyncComponents(activated)
);

runQueue(queue, iterator, function () {
  // ...
}

// resolveHooks
runQueue(queue, iterator, function () {
  // ...

  // wait until async components are resolved before
  // extracting in-component enter guards
  var enterGuards = extractEnterGuards(activated, postEnterCbs, isValid);
  var queue = enterGuards.concat(this$1.router.resolveHooks);
  runQueue(queue, iterator, function () {
    //...
    onComplete(route);
    //...
  });
});

// afterHooks
History.prototype.updateRoute = function updateRoute(route) {
  var prev = this.current;
  this.current = route;
  this.cb && this.cb(route);
  this.router.afterHooks.forEach(function (hook) {
    hook && hook(route, prev);
  });
};
history 是怎么做的
hash 模式的路由是采用的 hash change 函数来做监听,并且操作浏览器 hash 做标识,
而 history 模式采用的 popstate event 来记住路由的状态,而 window.history.state 里的 key 只是用时间来生成的一个缓存。
HTML5History.prototype.push = function push (location, onComplete, onAbort) {
  var this$1 = this;

  var ref = this;
  var fromRoute = ref.current;
  this.transitionTo(location, function (route) {
    pushState(cleanPath(this$1.base + route.fullPath));
    handleScroll(this$1.router, route, fromRoute, false);
    onComplete && onComplete(route);
  }, onAbort);
};

function pushState (url, replace) {
  saveScrollPosition();
  // try...catch the pushState call to get around Safari
  // DOM Exception 18 where it limits to 100 pushState calls
  var history = window.history;
  try {
    if (replace) {
      history.replaceState({ key: getStateKey() }, '', url);
    } else {
      history.pushState({ key: setStateKey(genStateKey()) }, '', url);
    }
  } catch (e) {
    window.location[replace ? 'replace' : 'assign'](url);
  }
}

function genStateKey () {
  return Time.now().toFixed(3)
}