目录
1.介绍
约束条件与数据类型的宽度一样,都是可选参数
作用:用于保证数据的完整性和一致性
主要分为:
PRIMARY KEY (PK)    标识该字段为该表的主键,可以唯一的标识记录
FOREIGN KEY (FK)    标识该字段为该表的外键
NOT NULL    标识该字段不能为空
UNIQUE KEY (UK)    标识该字段的值是唯一的
AUTO_INCREMENT    标识该字段的值自动增长(整数类型,而且为主键)
DEFAULT    为该字段设置默认值

UNSIGNED 无符号
ZEROFILL 使用0填充
说明:
1. 是否允许为空,默认NULL,可设置NOT NULL,字段不允许为空,必须赋值
2. 字段是否有默认值,缺省的默认值是NULL,如果插入记录时不给字段赋值,此字段使用默认值
sex enum('male','female') not null default 'male'
age int unsigned NOT NULL default 20 必须为正值(无符号) 不允许为空 默认是20
3. 是否是key
主键 primary key
外键 foreign key
索引 (index,unique...)
2.not null 和default
是否可空,null表示空,非字符串
not null - 不可空
null - 可空
default默认值,创建列时可以指定默认值,当插入数据时如果未主动设置,则自动添加默认值
create table tb1(
id int not null defalut 2 ,
num int not null
)
3.unique约束(唯一性约束)
单列唯一
-----1.单列唯一---------
create table t2(
id int not null unique,
name char(10)
);
insert into t2 values(1,'egon');
insert into t2 values(1,'alex');
#上面创建表的时候把id设置了唯一约束。那么在插入id=1,就会出错了
多列唯一
-----2.多列唯一---------
#255.255.255.255
create table server(
id int primary key auto_increment,
name char(10),
host char(15), #主机ip
port int, #端口
constraint host_port unique(host,port) #constraint host_port这个只是用来设置唯一约束的名字的,也可以不设置默认就有了
);
insert into server(name,host,port) values('ftp','192.168.20.11',8080);
insert into server(name,host,port) values('https','192.168.20.11',8081); #ip和端口合起来唯一
select * from server;
4.primary key (主键约束)
primary key字段的值不为空且唯一
一个表中可以:
单列做主键
多列做主键(复合主键)
但一个表内只能有一个主键primary key
单列主键
 1 ============单列做主键===============
 2 #方法一:not null+unique
 3 create table department1(
 4 id int not null unique, #主键
 5 name varchar(20) not null unique,
 6 comment varchar(100)
 7 );
 8
 9 mysql> desc department1;
10 +---------+--------------+------+-----+---------+-------+
11 | Field   | Type         | Null | Key | Default | Extra |
12 +---------+--------------+------+-----+---------+-------+
13 | id      | int(11)      | NO   | PRI | NULL    |       |
14 | name    | varchar(20)  | NO   | UNI | NULL    |       |
15 | comment | varchar(100) | YES  |     | NULL    |       |
16 +---------+--------------+------+-----+---------+-------+
17 rows in set (0.01 sec)
18
19 #方法二:在某一个字段后用primary key
20 create table department2(
21 id int primary key, #主键
22 name varchar(20),
23 comment varchar(100)
24 );
25
26 mysql> desc department2;
27 +---------+--------------+------+-----+---------+-------+
28 | Field   | Type         | Null | Key | Default | Extra |
29 +---------+--------------+------+-----+---------+-------+
30 | id      | int(11)      | NO   | PRI | NULL    |       |
31 | name    | varchar(20)  | YES  |     | NULL    |       |
32 | comment | varchar(100) | YES  |     | NULL    |       |
33 +---------+--------------+------+-----+---------+-------+
34 rows in set (0.00 sec)
35
36 #方法三:在所有字段后单独定义primary key
37 create table department3(
38 id int,
39 name varchar(20),
40 comment varchar(100),
41 constraint pk_name primary key(id); #创建主键并为其命名pk_name
42
43 mysql> desc department3;
44 +---------+--------------+------+-----+---------+-------+
45 | Field   | Type         | Null | Key | Default | Extra |
46 +---------+--------------+------+-----+---------+-------+
47 | id      | int(11)      | NO   | PRI | NULL    |       |
48 | name    | varchar(20)  | YES  |     | NULL    |       |
49 | comment | varchar(100) | YES  |     | NULL    |       |
50 +---------+--------------+------+-----+---------+-------+
51 rows in set (0.01 sec)
多列主键
 1 ==================多列做主键================
 2 create table service(
 3 ip varchar(15),
 4 port char(5),
 5 service_name varchar(10) not null,
 6 primary key(ip,port)
 7 );
 8
 9
10 mysql> desc service;
11 +--------------+-------------+------+-----+---------+-------+
12 | Field        | Type        | Null | Key | Default | Extra |
13 +--------------+-------------+------+-----+---------+-------+
14 | ip           | varchar(15) | NO   | PRI | NULL    |       |
15 | port         | char(5)     | NO   | PRI | NULL    |       |
16 | service_name | varchar(10) | NO   |     | NULL    |       |
17 +--------------+-------------+------+-----+---------+-------+
18 rows in set (0.00 sec)
19
20 mysql> insert into service values
21     -> ('172.16.45.10','3306','mysqld'),
22     -> ('172.16.45.11','3306','mariadb')
23     -> ;
24 Query OK, 2 rows affected (0.00 sec)
25 Records: 2  Duplicates: 0  Warnings: 0
26
27 mysql> insert into service values ('172.16.45.10','3306','nginx');
28 ERROR 1062 (23000): Duplicate entry '172.16.45.10-3306' for key 'PRIMARY'
5.auto_increment (自增约束)
步长increment与起始偏移量offset:auto_increment_increment,auto_increment_offset
3.--------偏移量:auto_increment_offset---------
==============没有设置偏移量的时候
create table dep(
id int primary key auto_increment,
name char(10)
);
insert into dep(name) values('IT'),('HR'),('EFO');
select * from dep;

================设置自增的时候以10开头
create table dep1(
id int primary key auto_increment,
name char(10)
)auto_increment = 10;
insert into dep1(name) values('IT'),('HR'),('EFO');
select * from dep1;

===============auto_increment_increment:自增步长
create table dep3(
id int primary key auto_increment,
 name char(10)
);
会话:通过客户端连到服务端(一次链接称为一次会话)
set session auto_increment_increment = 2; #会话级,只对当前会话有效
set global auto_increment_increment=2; #全局,对所有的会话都有效
insert into dep3(name) values('IT'),('HR'),('SALE'),('Boss');

-----------查看变量----------
show variables like '%auto_in%';#查看变量。只要包含auto_in就都查出来了

=========auto_increment_offset:偏移量+auto_increment_increment:步长===========
注意:如果auto_increment_offset的值大于auto_increment_increment的值,
则auto_increment_offset的值会被忽略

set session auto_increment_offset=2;
set session auto_increment_increment=3;
show variables like '%auto_in%';

create table dep4(
id int primary key auto_increment,
name char(10)
);
insert into dep4(name) values('IT'),('HR'),('SALE'),('Boss');
6.foreign key (外键约束)
员工信息表有三个字段:工号 姓名 部门
公司有3个部门,但是有1个亿的员工,那意味着部门这个字段需要重复存储,部门名字越长,越浪费
解决方法:
我们完全可以定义一个部门表
然后让员工信息表关联该表,如何关联,即foreign key
如下图简单的表示了一下员工表与部门表的关系,即员工表的(dep_id)要关联部门表的id字段

多对一(一个表多条记录的某一字段关联另一张表的唯一一个字段):员工有部门,部门又有好多信息,所以
分开建了一张部门表,部门表的id 和员工表里面
的dep_id相关联。(dep_id要关联部门表的id字段
(注意:1.先建被关联的表,
2.被关联的字段必须唯一
3.先给被关联的表插入记录
)
先建张部门表(被关联表)
create table dep(
id int not null unique,
#id int primary key auto_increment,
name varchar(50),
comment varchar(100)
);
再建张员工表(关联表)
create table emp_info(
id int primary key auto_increment,
name varchar(20),
dep_id int,
constraint FK_depid_id foreign key(dep_id) references dep(id) #references :关联
on delete cascade #关联的表删了,被关联的表也删了
on update cascade #关联的表修改了,被关联的表也修改了
);
#先给被关联的表初始化记录
insert into dep values
(1,'欧德博爱技术有限事业部','说的好...'),
(2,'艾利克斯人力资源部','招不到人'),
(3,'销售部','卖不出东西');
# 级联:级联有几个模式
1.严格模式(默认的),外键有强制约束效果,被关联字段不能随意删除和修改
2.模式(cascade):外键有强制约束效果,被关联字段删除或者修改,关联他的那么字段数据会随之删除或者修改
constraint fk_t1_publish foreign key(pid) references publish(id) on delete cascade on update cascade;
3.set null模式: 被关联字段删除时,关联他的字段数据会置成null
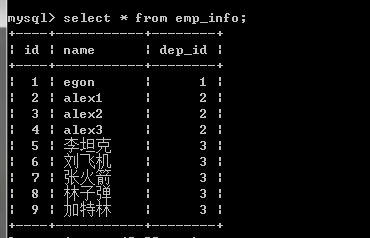
insert into emp_info values
(1,'egon',1),
(2,'alex1',2),
(3,'alex2',2),
(4,'alex3',2),
(5,'李坦克',3),
(6,'刘飞机',3),
(7,'张火箭',3),
(8,'林子弹',3),
(9,'加特林',3);
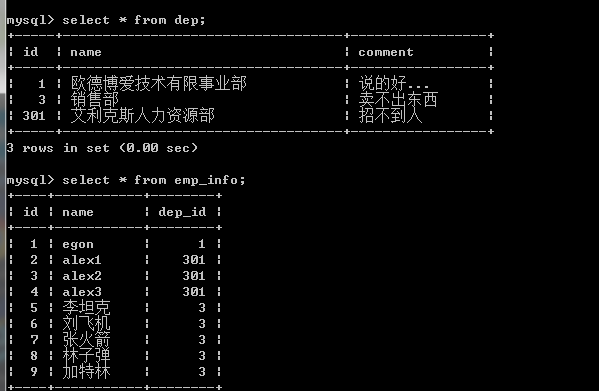
#修改
update dep set id =301 where id = 2;
select * from dep;
delect * from em_info;
如果部门解散了,员工也就走吧,就是部门表没了,
员工表也就没有了。
运行结果如下图:
查看创建的表

修改id=301

查看被关联表和关联表