如果你对 Spring Cloud 体系还不是很了解,可以先读一下 Spring Cloud 都有哪些模块
Eureka 是 Netflix 开源的服务注册发现组件,服务发现可以说是微服务架构的核心功能了,微服务部署之后,一定要有服务注册和发现的能力,Eureka 就是担任这个角色的。如果你用过 dubbo 的话,那一定知道 dubbo 中服务注册和发现的功能是用 zookeeper 来实现的。
Eureka 目前是 2.x 版本,并且官方已经宣布不再维护更新。不过其实 Eureka 已经很稳定了,当做注册中心完全没有问题。Spring Cloud 集成了 Eureka ,并做了完善的封装。方便我们使用 Spring boot 开发的时候简单配置就可以使用。
微服务框架中有三类角色,分别是注册中心、服务提供者、服务消费者,注册中心就是今天要说的主角 Eureka,这篇文章简单说明 Spring Cloud Eureka 的使用,模拟实现单点和高可用注册中心,并简单介绍服务提供者和服务消费者如何使用 Eureka 提供的服务注册和发现功能。
版本说明
Java : 1.8
Spring Boot : 2.1.3.RELEASE
Spring Cloud: Finchley.SR2
之说以要说一下版本,因为 Finchley.SR2 版本较之前的版本包名有变化,所以在引用 maven 包的时候要注意。
单点注册中心
创建 Eureka 注册中心
1、引用 maven 包,其中
<dependencyManagement>
  <dependencies>
    <dependency>
      <groupId>org.springframework.cloud</groupId>
      <artifactId>spring-cloud-dependencies</artifactId>
      <version>Finchley.SR2</version>
      <type>pom</type>
      <scope>import</scope>
    </dependency>
  </dependencies>
</dependencyManagement>

<!-- 最新版的 eureka 服务端包 -->
<dependency>
  <groupId>org.springframework.cloud</groupId>
  <artifactId>spring-cloud-starter-netflix-eureka-server</artifactId>
</dependency>

<!-- 监控管理 -->
<dependency>
  <groupId>org.springframework.boot</groupId>
  <artifactId>spring-boot-starter-actuator</artifactId>
</dependency>
2、新建 bootstrap.yml,并配置 Spring cloud 参数
spring:
  application:
    name: kite-eureka-center
  cloud:
    inetutils: ## 网卡设置
      ignoredInterfaces:  ## 忽略的网卡
        - docker0
        - veth.*
        - VM.*
      preferredNetworks:  ## 优先的网段
        - 192.168
3、新建 application.yml ,并配置参数
server:
  port: 3000
eureka:
  instance:
    hostname: eureka-center
    appname: 注册中心
  client:
    registerWithEureka: false # 单点的时候设置为 false 禁止注册自身
    fetchRegistry: false
    serviceUrl:
      defaultZone: http://localhost:3000/eureka
  server:
    enableSelfPreservation: false
    evictionIntervalTimerInMs: 4000
bootstrap.yml 和 application.yml 的区别:
-
bootstrap.yml 在 application.yml 之前启动;
-
bootstrap.yml 配置 application 的 name、spring.cloud.config.server.git.uri、一些encryption/decryption(加密/解密)信息;
-
application.yml 的信息会覆盖 bootstrap.yml 中的内容,当遇到相同的配置的时候;
4、新建 Application.java 启动文件
@EnableEurekaServer
@SpringBootApplication
public class Application {
    public static void main(String[] args) {
        SpringApplication.run(Application.class, args);
    }
}
@EnableEurekaServer 表示使用 Eureka Server 端功能,也就是启动为一个注册中心节点。
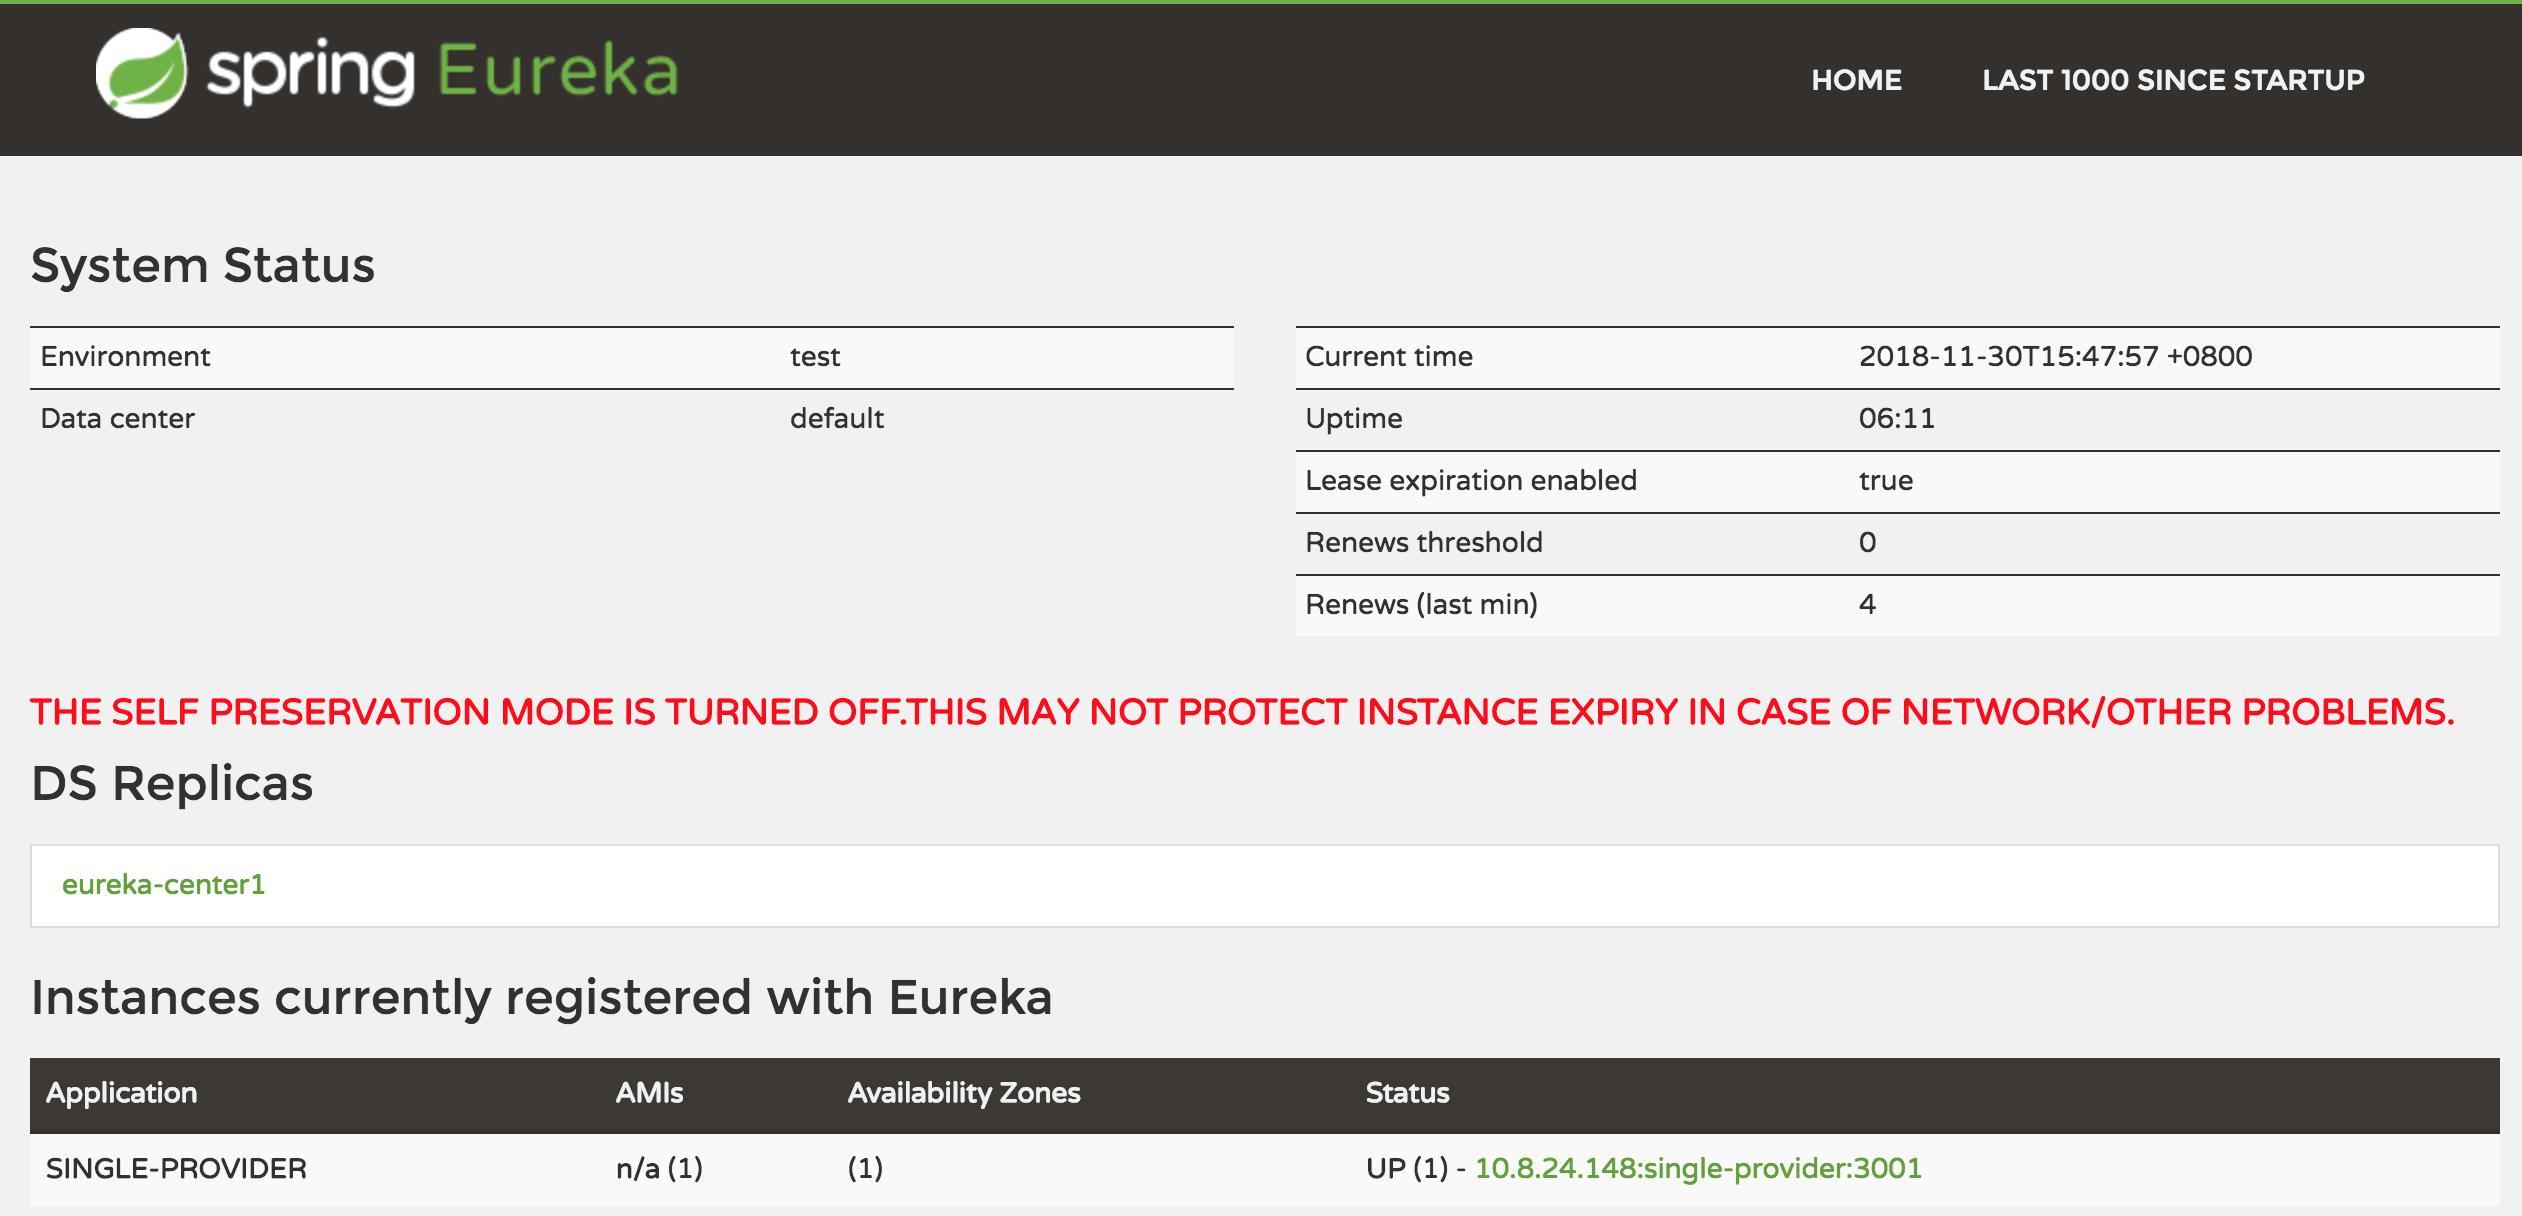
5、运行 Application.java ,访问 http://localhost:3000 即可看到 Eureka 提供的 ui 控制台。
创建一个服务提供者
接下来创建一个服务提供者,并注册到上面创建的 Eureka 注册中心。
1、添加 maven 依赖包
<dependency>
    <groupId>org.springframework.boot</groupId>
    <artifactId>spring-boot-starter-web</artifactId>
</dependency>
<!-- eureka 客户端 -->
<dependency>
    <groupId>org.springframework.cloud</groupId>
    <artifactId>spring-cloud-starter-netflix-eureka-client</artifactId>
</dependency>
2、配置 application.yml
server:
  port: 3001

eureka:
  instance:
    preferIpAddress: true
  client:
    serviceUrl:
      defaultZone: http://localhost:3000/eureka  ## 注册到 eureka
spring:
  application:
    name: single-provider  ## 应用程序名称,后面会在消费者中用到
3、创建一个简单的 RESTful 接口 controller
@Slf4j
@RestController
public class ProviderController {

    @Autowired
    private DiscoveryClient discoveryClient;

    @RequestMapping(value = "/hello")
    public String hello(){
        List<String> services = discoveryClient.getServices();
        for(String s : services){
            log.info(s);
        }
        return "hello spring cloud!";
    }

    @RequestMapping(value = "/nice")
    public String nice(){
        List<String> services = discoveryClient.getServices();
        for(String s : services){
            log.info("gogogo" + s);
        }
        return "nice to meet you!";
    }

}
4、创建 spring boot 启动类
@EnableEurekaClient
@SpringBootApplication
public class SingleProviderApplication {

    public static void main(String[] args) {
        SpringApplication.run(SingleProviderApplication.class, args);
    }
}
@EnableEurekaClient 修饰,表示要注册到注册中心。
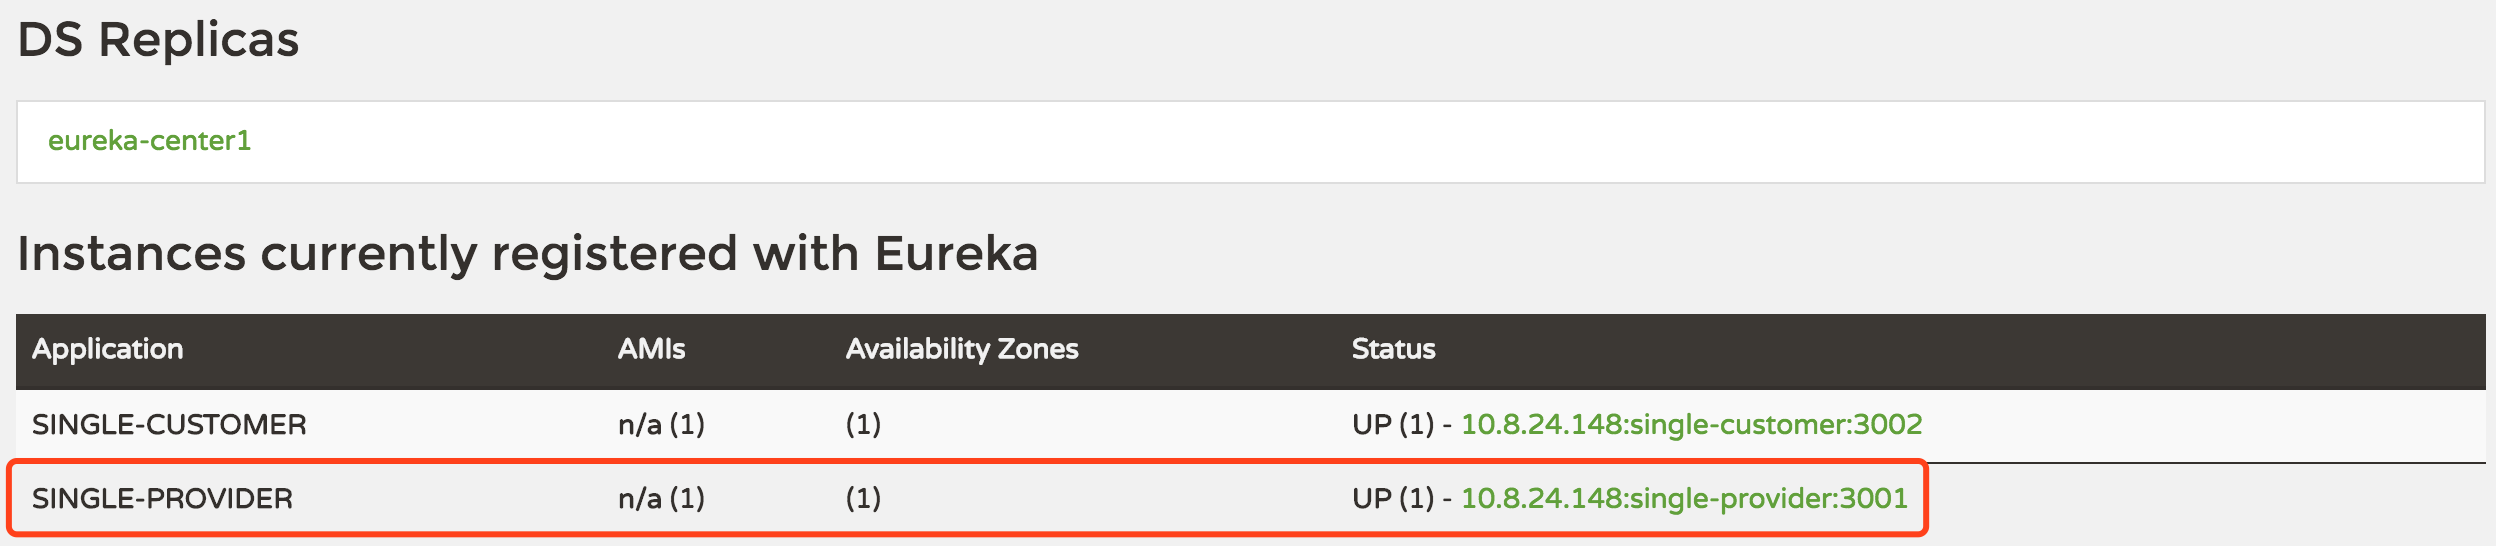
5、启动项目,正常情况下就注册到了 Eureka 注册中心,打开 Eureka 控制台,会看到已经出现了这个服务
创建一个服务消费者
有了服务提供者,接下来创建一个消费者来消费一下
1、引用 maven 包
<dependency>
    <groupId>org.springframework.cloud</groupId>
    <artifactId>spring-cloud-starter-netflix-eureka-client</artifactId>
</dependency>
<dependency>
    <groupId>org.springframework.boot</groupId>
    <artifactId>spring-boot-starter-web</artifactId>
</dependency>
<dependency>
    <groupId>org.springframework.cloud</groupId>
    <artifactId>spring-cloud-starter-openfeign</artifactId>
</dependency>
<dependency>
    <groupId>org.springframework.boot</groupId>
    <artifactId>spring-boot-starter-actuator</artifactId>
</dependency>
2、配置 application.yml
server:
  port: 3002
eureka:
  client:
    serviceUrl:
      defaultZone: http://127.0.0.1:3000/eureka  ## 注册到 eureka
  instance:
    preferIpAddress: true
spring:
  application:
    name: single-customer
3、开始消费提供者提供的服务接口,这里演示了两种消费方法,一种是用 RestTemplate ,另外一种是用 FeignClient,Feign 同样是 Netflix 开源,并被 Spring Cloud 封装到 spring-cloud-starter-openfeign 包中。
创建启动类,并添加相关注解
@SpringBootApplication
@EnableEurekaClient
@EnableFeignClients
public class SingleCustomerApplication {

    /**
     * 注入 RestTemplate
     * 并用 @LoadBalanced 注解,用负载均衡策略请求服务提供者
     * 这是 Spring Ribbon 的提供的能力
     * @return
     */
    @LoadBalanced
    @Bean
    public RestTemplate restTemplate() {
        return new RestTemplate();
    }

    public static void main(String[] args) {
        SpringApplication.run(SingleCustomerApplication.class, args);
    }
}
@EnableEurekaClient 声明此项目为一个 eureka 客户端,@EnableFeignClients 声明此项目可以使用 Feign。
4、创建一个服务接口类,这是 Feign 的使用方式,详细的用法可以查一下 Spring Cloud Feign 相关文档
/**
 * IHelloService
 * 配置服务提供者:single-provider 是服务提供者的 application.name
 */
@FeignClient("single-provider")
public interface IHelloService {

    @RequestMapping(value = "/hello")
    String hello();

    @RequestMapping(value = "nice")
    String nice();
}
@FeignClient 注解的 value 为服务提供者的 appplication.name 。
5、创建一个 Controller 用于调用服务
@RestController
public class ConsumerController {

    @Autowired
    private RestTemplate restTemplate;

    @Autowired
    private IHelloService helloService;

    private static final String applicationName = "single-provider";

    @RequestMapping(value = "feignRequest")
    public Object feignRequest(){
        String s = helloService.nice();
        return s;
    }

    @RequestMapping(value = "commonRequest")
    public Object commonRequest(){
        String url = "http://"+ applicationName +"/hello";
        String s = restTemplate.getForObject(url,String.class);
        return s;
    }

}
其中 feignRequest 方法是使用了 Feign 的方式调用服务接口;
commonRequest 方法是用 RestTemplate 提供的方法调用服务接口;
6、最后,启动服务,访问地址:http://localhost:3002/commonRequest 和 http://localhost:3002/feignRequest
如果你觉得写的还可以的话,请点个「推荐」吧
欢迎关注,不定期更新本系列和其他文章
古时的风筝 ,进入公众号可以加入交流群
