本文转自:http://www.linuxidc.com/Linux/2011-08/41343.htm
如果希望在Activity中出现多个Tab可以点击,并且点击每个Tab之后跳转到相应的Activity,可以使用TabActivity类。以下演示一个简单的范例。
首先要定义一个继承TabActivity的类,这里我们定义MainActivity,并且使其作为应用程序的入口。其代码为
1.package com.myAndroid.tabtest;
2.
3.import Android.app.TabActivity;
4.import Android.content.Intent;
5.import android.os.Bundle;
6.import Android.widget.TabHost;
7.import android.widget.TabHost.TabSpec;
8.
9.public class MainActivity extends TabActivity {
10. private TabHost m_tabHost;
11. /** Called when the activity is first created. */
12. @Override
13. public void onCreate(Bundle savedInstanceState) {
14. super.onCreate(savedInstanceState);
15. setContentView(R.layout.tabs);
16.
17. //getTabHost返回的TabHost用于装载tabs
18. m_tabHost = getTabHost();
19.
20. //add tabs,这里用于添加具体的Tabs,并用Tab触发相应的Activity
21. addOneTab();
22. addTwoTab();
23. addThreeTab();
24. addFourTab();
25. }
26.
27. public void addOneTab(){
28. Intent intent = new Intent();
29. intent.setClass(MainActivity.this, OneActivity.class);
30.
31. TabSpec spec = m_tabHost.newTabSpec("One");
32. spec.setIndicator(getString(R.string.one), null);
33. spec.setContent(intent);
34. m_tabHost.addTab(spec);
35. }
36.
37. public void addTwoTab(){
38. Intent intent = new Intent();
39. intent.setClass(MainActivity.this, TwoActivity.class);
40.
41. TabSpec spec = m_tabHost.newTabSpec("Two");
42. spec.setIndicator(getString(R.string.two), null);
43. spec.setContent(intent);
44. m_tabHost.addTab(spec);
45. }
46. public void addThreeTab(){
47. Intent intent = new Intent();
48. intent.setClass(MainActivity.this, ThreeActivity.class);
49.
50. TabSpec spec = m_tabHost.newTabSpec("Three");
51. spec.setIndicator(getString(R.string.three), null);
52. spec.setContent(intent);
53. m_tabHost.addTab(spec);
54. }
55. public void addFourTab(){
56. Intent intent = new Intent();
57. intent.setClass(MainActivity.this, FourActivity.class);
58.
59. TabSpec spec = m_tabHost.newTabSpec("Four");
60. spec.setIndicator(getString(R.string.four), null);
61. spec.setContent(intent);
62. m_tabHost.addTab(spec);
63. }
64.}
可以看到在MainActivity中,我们使用getTabHost()返回一个TabHost,而TabHost正是用来添加Tabs的。这里我们添加了4个Tabs,使用4个函数完成:addOneTab(),addTwoTab(),addThreeTab(),addFourTab(). 在这4个函数中我们使用TabSpec来描述每个的Tab,并且设置Intent,完成点击该Tab时跳转到相应的Activity的功能。
当然,这个应用还有一个关键点,就是这里的布局tabs.xml.其代码为:
1.<?xml version="1.0" encoding="utf-8"?>
2.<TabHost
3. xmlns:Android="http://schemas.android.com/apk/res/android"
4. Android:id="@android:id/tabhost"
5. android:layout_width="fill_parent"
6. Android:layout_height="fill_parent">
7. <LinearLayout
8. Android:orientation="vertical"
9. android:layout_width="fill_parent"
10. Android:layout_height="fill_parent">
11.
12. <TabWidget Android:id="@android:id/tabs"
13. android:layout_width="fill_parent"
14. Android:layout_height="wrap_content"
15. android:paddingLeft="1dip"
16. Android:paddingRight="1dip"
17. android:paddingTop="4dip"
18. />
19.
20. <FrameLayout Android:id="@android:id/tabcontent"
21. android:layout_width="fill_parent"
22. Android:layout_height="0dip"
23. android:layout_weight="1"
24. />
25. </LinearLayout>
26.</TabHost>
注意在tabs.xml中,定义TabHost标签,并且其中有一个TabWidget标签是装载整个Tabs的,其id必须为Android:id/tabs
完成这些工作之后,接下来的任务就是定义前面的几个Activity,OneActivity,TwoActivity,ThreeActivity,FourActivity.这些Activity由大家根据自己的功能设定。
================================================================
本文转自:http://www.blogjava.net/freeman1984/archive/2010/10/29/302803.html
android Tabhost部件
本文结合源代码和实例来说明TabHost的用法。
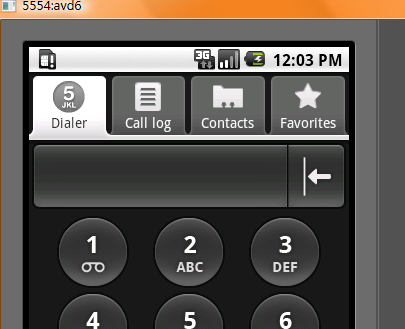
使用TabHost 可以在一个屏幕间进行不同版面的切换,例如android自带的拨号应用,截图:

查看tabhost的源代码,主要实例变量有:
 private TabWidget mTabWidget;
 private FrameLayout mTabContent;
 private List<TabSpec> mTabSpecs
 也就是说我们的tabhost必须有这三个东西,所以我们的.xml文件就会有规定:继续查看源代码:
 if (mTabWidget == null) {
 throw new RuntimeException(
 "Your TabHost must have a TabWidget whose id attribute is 'android.R.id.tabs'");
 }
}


 mTabContent = (FrameLayout) findViewById(com.android.internal.R.id.tabcontent);
 if (mTabContent == null) {
 throw new RuntimeException(
 "Your TabHost must have a FrameLayout whose id attribute is 'android.R.id.tabcontent'");
 }
} 也就是说我们的.xml文件需要TabWidget和FrameLayout标签。
接下来构建我们自己的tab实例:
有两种方式可以实现:
一种是继承TabActivity 类,可以使用android的自己内部定义好的.xml资源文件作容器文件。也就是在我们的代码中使用getTabHost(); , 而相应的后台源码是这样的:
 this.setContentView(com.android.internal.R.layout.tab_content);
 在系统的资源文件中可以看见这个layout

有了容器,然后我们就需要我们为每个tab分配内容,当然要可以是如何类型的标签:
例如我们构建一下.xml文件
首先tab1.xml 是一个LinearLayout布局
 <?xml version="1.0" encoding="utf-8"?>
 <LinearLayout xmlns:android="http://schemas.android.com/apk/res/android"
 android:id="@+id/LinearLayout01" android:layout_width="wrap_content"
 android:layout_height="wrap_content">
 <TextView android:text="tab1 with linear layout"
 android:id="@+id/TextView01" android:layout_width="wrap_content"
 android:layout_height="wrap_content">
 </TextView>
 </LinearLayout>
然后是tab2.xml是一个FrameLayout布局
 <?xml version="1.0" encoding="utf-8"?>
 <FrameLayout xmlns:android="http://schemas.android.com/apk/res/android"
 android:id="@+id/FrameLayout02"
 android:layout_width="wrap_content"
 android:layout_height="wrap_content">
 <LinearLayout android:id="@+id/LinearLayout02"
 android:layout_width="wrap_content"
 android:layout_height="wrap_content">
 <TextView android:text="tab2"
 android:id="@+id/TextView01" android:layout_width="wrap_content"
 android:layout_height="wrap_content">
 </TextView>
 </LinearLayout>
 </FrameLayout>
接着要注册这两个FrameLayout为tabhost的Content,也就是接下来的代码:
 LayoutInflater inflater_tab1 = LayoutInflater.from(this);
  inflater_tab1.inflate(R.layout.tab1, mTabHost.getTabContentView());
  inflater_tab1.inflate(R.layout.tab2, mTabHost.getTabContentView());
然后需要构建前面说的tabhost的第三个实例变量对应得内容,源代码中是这样的:
 private List<TabSpec> mTabSpecs = new ArrayList<TabSpec>(2);
 初始化是两个tab的空间然后会自动扩展:
好 我们构建我们的tabspec:
 mTabHost.addTab(mTabHost.newTabSpec("tab_test1").setIndicator("TAB 11").setContent(R.id.LinearLayout01));
  mTabHost.addTab(mTabHost.newTabSpec("tab_test1").setIndicator("TAB 11").setContent(R.id.FrameLayout02));
也就是把我们的2个layout作为他的content,当然FrameLayout中可以有其他的布局,来放我的组件。
我们不需要在代码里面设置setContentView();因为getTabHost(); 这个方法调用后就已经设置了,源代码:
 if (mTabHost == null) {
 this.setContentView(com.android.internal.R.layout.tab_content);
 }
}也就是把系统的tab_content当做view设置。
运行后如下:

完整代码:
 TabHost mTabHost = getTabHost();
 LayoutInflater inflater_tab1 = LayoutInflater.from(this);
  inflater_tab1.inflate(R.layout.tab1, mTabHost.getTabContentView());
  inflater_tab1.inflate(R.layout.tab2, mTabHost.getTabContentView());
  mTabHost.addTab(mTabHost.newTabSpec("tab_test1").setIndicator("TAB 11").setContent(R.id.LinearLayout01));
  mTabHost.addTab(mTabHost.newTabSpec("tab_test1").setIndicator("TAB 11").setContent(R.id.FrameLayout02));
还有一种就是定义我们自己的tabhost:不用继承TabActivity
首先建立我们自己的.xml文件,当然要包含Tabhost,TabWidget,FrameLayout,着3个标签:
 <?xml version="1.0" encoding="utf-8"?>
  <TabHost xmlns:android="http://schemas.android.com/apk/res/android"
  android:id="@+id/tabhost"
  android:layout_width="fill_parent"
  android:layout_height="fill_parent">
  <LinearLayout
  android:orientation="vertical"
  android:layout_width="fill_parent"
  android:layout_height="fill_parent">
  <TabWidget
  android:id="@android:id/tabs"
  android:layout_width="fill_parent"
  android:layout_height="wrap_content" />
  <FrameLayout
  android:id="@android:id/tabcontent"
  android:layout_width="fill_parent"
  android:layout_height="fill_parent">
 </FrameLayout>
  </LinearLayout>
  </TabHost>
注意的是:除了tabhost的id可以自定义外,其他的必须使用系统的id,为什么后面说,
当然我们可以在FrameLayout里面添加view来作为tab的内容只需要在create tabspce时候添加就可以了,我们为了把每个tab的内容分开我们依然使用前面用到的两个tab xml文件
java代码:
获取TabHost 通过findviewbyid,
 setContentView(R.layout.main);
  TabHost mTabHost = (TabHost)findViewById(R.id.tabhost);
 接下来很重要的一步是要使用TabHost.setup();
作用是来初始化我们的TabHost容器:
源代码是这样说的:
 <p>Call setup() before adding tabs if loading TabHost using findViewById(). <i><b>However</i></b>: You do
 * not need to call setup() after getTabHost() in {@link android.app.TabActivity TabActivity}.
 也就是说通过findviewbyid,方法获得tabhost必须setup 而通过getTabHost则不用。
setup干什么呢:源代码
 mTabWidget = (TabWidget) findViewById(com.android.internal.R.id.tabs);
 if (mTabWidget == null) {
 throw new RuntimeException(
 "Your TabHost must have a TabWidget whose id attribute is 'android.R.id.tabs'");
 }
}

 mTabContent = (FrameLayout) findViewById(com.android.internal.R.id.tabcontent);
 if (mTabContent == null) {
 throw new RuntimeException(
 "Your TabHost must have a FrameLayout whose id attribute is 'android.R.id.tabcontent'");
 }
} 他主要是初始化了tabhost的两个实例变量,这里也回答了为什么我们的id必须使用系统定义的id的原因
接下来工作就和前面相同了:
 LayoutInflater inflater_tab1 = LayoutInflater.from(this);
  inflater_tab1.inflate(R.layout.tab1, mTabHost.getTabContentView());
  inflater_tab1.inflate(R.layout.tab2, mTabHost.getTabContentView());
 mTabHost.addTab(mTabHost.newTabSpec("tab_test1").setIndicator("TAB a").setContent(R.id.LinearLayout01));
  mTabHost.addTab(mTabHost.newTabSpec("tab_test2").setIndicator("TAB b").setContent(R.id.FrameLayout02));
完整代码:
 setContentView(R.layout.main);
  TabHost mTabHost = (TabHost)findViewById(R.id.tabhost);
  mTabHost.setup();
 LayoutInflater inflater_tab1 = LayoutInflater.from(this);
  inflater_tab1.inflate(R.layout.tab1, mTabHost.getTabContentView());
  inflater_tab1.inflate(R.layout.tab2, mTabHost.getTabContentView());
 mTabHost.addTab(mTabHost.newTabSpec("tab_test1").setIndicator("TAB a").setContent(R.id.LinearLayout01));
  mTabHost.addTab(mTabHost.newTabSpec("tab_test2").setIndicator("TAB b").setContent(R.id.FrameLayout02));
运行结果同上。 如有问题欢迎提出。
转载请说明出处。。。
加上源代码,有用了可以下载下:/Files/freeman1984/atab.rar
