基础知识学习
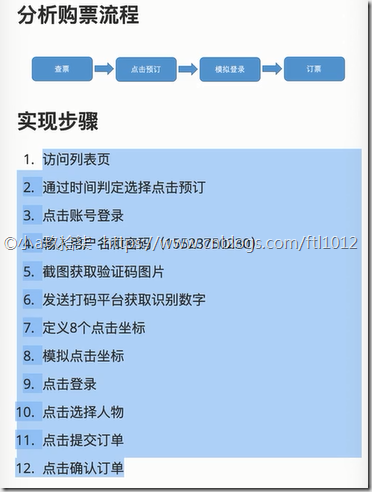
目标: 通过python程序实现自动登录下单功能
知识点: Selenium + 云打码 + Python
学习链接:
需求分析
Chrome浏览器:71.0.3578.98_chrome_installer.exe
12306官网: https://www.12306.cn/index/index.html
# 选择时间,点击确定,查询列表,获取列表页的请求URL
# 通过F12,查看当前页面的请求URL:
https://kyfw.12306.cn/otn/leftTicket/init?linktypeid=dc&fs=%E4%B8%8A%E6%B5%B7,SHH&ts=%E6%88%90%E9%83%BD,CDW&date=2019-02-03&flag=N,N,Y
# 查看请求参数
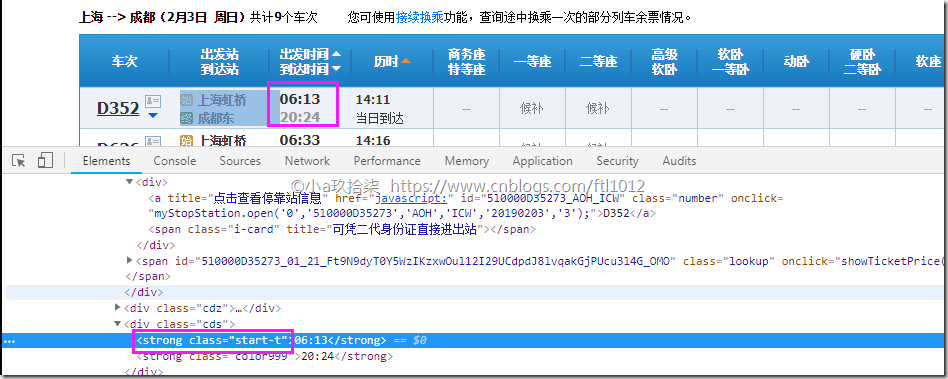
# 选择一条车次数据,查看该列表(一条tr一条数据)
# 获取时间元素
# 查看预定按钮
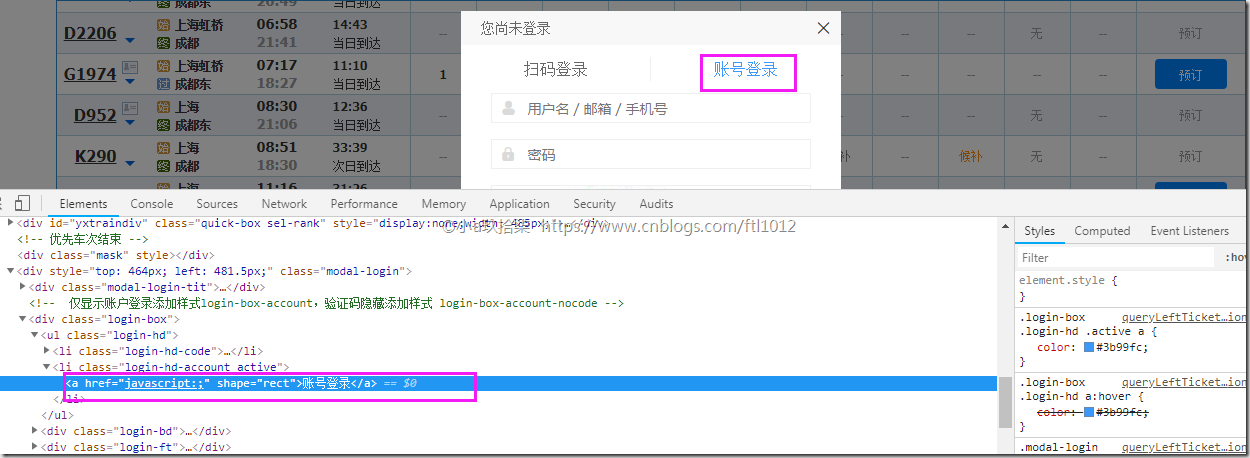
# 当根据时间选择好了列车后,点击预定按钮就会提示我们登录账号(注意是Ajax请求,所以需要until查找)
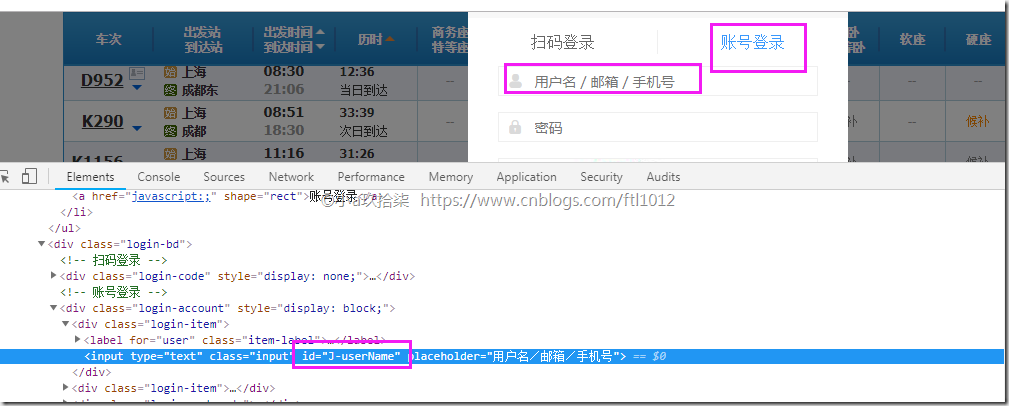
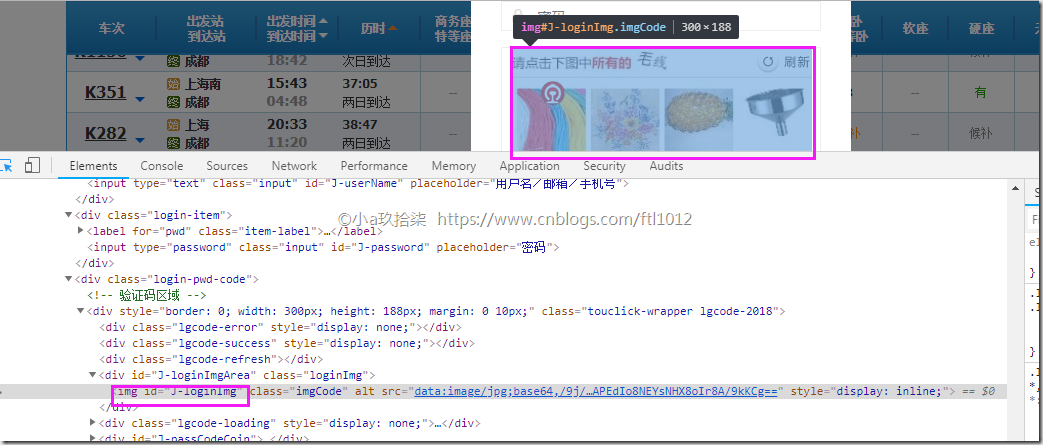
# 查找用户名和密码登录框的ID
# 截取验证码
安装插件 pip3 install Pillow
# 获取全屏图片 –> 计算截图位置(根据元素的宽和高确定大小) –> 截取所需要图片的大小
# 利用云打码进行验证码解析
# 定义打点(模拟选中图片)
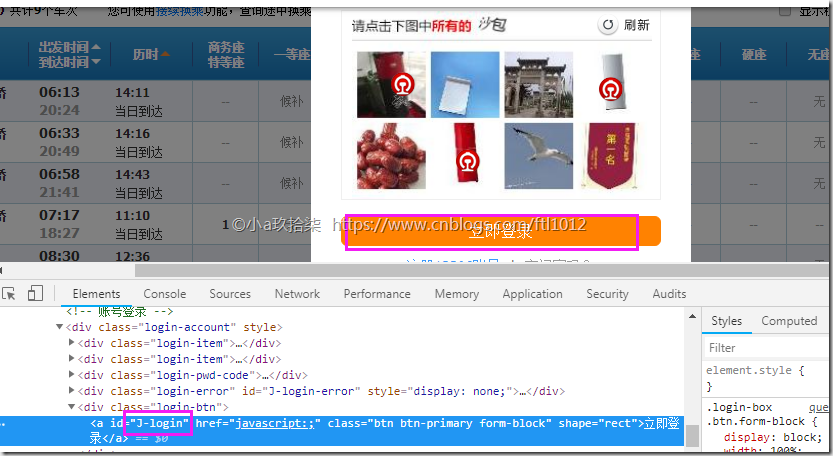
# 点击登录
# 选择需要买票的人
# 点击提交
完整代码
12306.py
# coding: utf-8

import os
import time
import json
# 图片操作对象
from PIL import Image
# 将二进制文件转换为IO流输出
from io import BytesIO
import yundama

from selenium import webdriver
# 1. 导入模块
from selenium import webdriver
# 1> 等待对象模块
from selenium.webdriver.support.wait import WebDriverWait
# 2> 导入等待条件模块
from selenium.webdriver.support import expected_conditions as EC
# 3> 导入查询元素模块
from selenium.webdriver.common.by import By
from selenium.webdriver import ActionChains

browser = webdriver.Chrome("chromedriver")

# 12306是异步请求,所以使用selenium的显性等待方案
wait = WebDriverWait(browser, 10, 0.5)    # 创建等待对象

# 请求参数
linktypeid = 'dc'
fs = '上海,SHH'
ts = '成都,CDW'
date ='2019-02-03'
flag = 'N,N,Y'

# 请求URL:
# https://kyfw.12306.cn/otn/leftTicket/init?linktypeid=dc&fs=上海&ts=北京&date=2019-02-03&flag=N,N,Y
base_url = "https://kyfw.12306.cn/otn/leftTicket/init?linktypeid={}&fs={}&ts={}&date={}&flag={}"
url = base_url.format(linktypeid, fs, ts, date, flag)

# 访问12306的列表页面
browser.get(url)

# 通过时间判定,选择点击预订
# 寻找tr标签中,属性id以ticket开头的数据
tr_list = wait.until(EC.visibility_of_all_elements_located((By.XPATH, "//tr[starts-with(@id, 'ticket_')]")))  # 找到所有可见元素

for tr in tr_list:
    count = 0
    t_start = tr.find_element_by_class_name('start-t').text
    with open('start.txt', 'a') as f:
        f.write(t_start)

    # 判断时间是否在符合条件的范围内
    if count < 5 and t_start == "11:16":   # 这里以06:33为例
        tr.find_element_by_class_name('btn72').click()
        break
    else:
        count += 1
        continue


# 点击账号(注意因为是异步加载的所有需要显性等待)
# browser.find_element_by_link_text("账号登录").click()   # 因为还没有加载出来,因为是Ajax请求,所以要用until查找
wait.until(EC.visibility_of_element_located((By.LINK_TEXT, "账号登录"))).click()

# 打开json文件,
with open('account.json', 'r', encoding='utf-8') as f:
    account = json.load(f, encoding='utf-8')


# 输入用户名和密码
j_username = browser.find_element_by_id('J-userName').send_keys(account['username'])
j_password = browser.find_element_by_id('J-password').send_keys(account['password'])


# 获取全屏图片
full_img_data = browser.get_screenshot_as_png()

# 计算截图位置
login_img_element = browser.find_element_by_id("J-loginImg")

# 获取截图元素对象
scale = 1.0
x1 = login_img_element.location["x"] - 155
y1 = login_img_element.location["y"] - 100
x2 = x1 + login_img_element.size["width"]
y2 = y1 + login_img_element.size["height"]
cut_info = (x1, y1, x2, y2)
print('cut_info', cut_info)

# 把全屏图片构建成全屏图片操作对象
full_img = Image.open(BytesIO(full_img_data))
# 通过截图信息对象截图图片
cut_img = full_img.crop(cut_info)
# 把图片保存到本地
cut_img.save('cut_img.png')
time.sleep(5)
# 利用云打码进行图片解析
result = yundama.decode('cut_img.png', '6701')
print('Image Decode:', result)

# 定义8个点击坐标点
positions = [
    (80, 140),
    (230, 140),
    (380, 140),
    (530, 140),
    (80, 280),
    (230, 280),
    (380, 280),
    (530, 280)
]

# 模拟点击坐标
for num in result:
    position = positions[int(num) - 1]
    # ActionChains 动作对象
    ActionChains(browser).move_to_element_with_offset(login_img_element,position[0] / 2,position[1] / 2).click().perform()
    print(position[0], position[1], "点击图片完成")
    time.sleep(5)


# 点击登录
browser.find_element_by_id("J-login").click()


# 点击选择人物
wait.until(EC.visibility_of_element_located((By.ID, "normalPassenger_1"))).click()

# 点击提交订单
browser.find_element_by_id('submitOrder_id').click()

time.sleep(2)
# 点击确认订单
wait.until(EC.visibility_of_element_located((By.ID, 'qr_submit_id'))).click()

print("抢票成功,请支付")


time.sleep(5)
browser.quit()
account.json
{
	"username":"18XXXXXXXXXX",
	"password":"18XXXXXXXXXX"
}
yundama.json
import http.client, mimetypes, urllib, json, time, requests


######################################################################

class YDMHttp:
    apiurl = 'http://api.yundama.com/api.php'
    username = ''
    password = ''
    appid = ''
    appkey = ''

    def __init__(self, username, password, appid, appkey):
        self.username = username
        self.password = password
        self.appid = str(appid)
        self.appkey = appkey

    def request(self, fields, files=[]):
        response = self.post_url(self.apiurl, fields, files)
        response = json.loads(response)
        return response

    def balance(self):
        data = {'method': 'balance', 'username': self.username, 'password': self.password, 'appid': self.appid,
                'appkey': self.appkey}
        response = self.request(data)
        if (response):
            if (response['ret'] and response['ret'] < 0):
                return response['ret']
            else:
                return response['balance']
        else:
            return -9001

    def login(self):
        data = {'method': 'login', 'username': self.username, 'password': self.password, 'appid': self.appid,
                'appkey': self.appkey}
        response = self.request(data)
        if (response):
            if (response['ret'] and response['ret'] < 0):
                return response['ret']
            else:
                return response['uid']
        else:
            return -9001

    def upload(self, filename, codetype, timeout):
        data = {'method': 'upload', 'username': self.username, 'password': self.password, 'appid': self.appid,
                'appkey': self.appkey, 'codetype': str(codetype), 'timeout': str(timeout)}
        file = {'file': filename}
        response = self.request(data, file)
        if (response):
            if (response['ret'] and response['ret'] < 0):
                return response['ret']
            else:
                return response['cid']
        else:
            return -9001

    def result(self, cid):
        data = {'method': 'result', 'username': self.username, 'password': self.password, 'appid': self.appid,
                'appkey': self.appkey, 'cid': str(cid)}
        response = self.request(data)
        return response and response['text'] or ''

    def decode(self, filename, codetype, timeout):
        cid = self.upload(filename, codetype, timeout)
        if (cid > 0):
            for i in range(0, timeout):
                result = self.result(cid)
                if (result != ''):
                    return cid, result
                else:
                    time.sleep(1)
            return -3003, ''
        else:
            return cid, ''

    def report(self, cid):
        data = {'method': 'report', 'username': self.username, 'password': self.password, 'appid': self.appid,
                'appkey': self.appkey, 'cid': str(cid), 'flag': '0'}
        response = self.request(data)
        if (response):
            return response['ret']
        else:
            return -9001

    def post_url(self, url, fields, files=[]):
        for key in files:
            files[key] = open(files[key], 'rb');
        res = requests.post(url, files=files, data=fields)
        return res.text


def decode(filename, codetype):
    ######################################################################
    # 用户名
    username = 'XXXXXXXXX'

    # 密码
    password = 'XXXXXXXX'
    # 软件ID,开发者分成必要参数。登录开发者后台【我的软件】获得!
    appid = 6795

    # 软件密钥,开发者分成必要参数。登录开发者后台【我的软件】获得!
    appkey = '62a6760f83a91f818be141d9a77463c5'

    # 图片文件
    # filename = 'getimage.jpg'

    # 验证码类型,# 例:1004表示4位字母数字,不同类型收费不同。请准确填写,否则影响识别率。
    # 在此查询所有类型 http://www.yundama.com/price.html
    # codetype = 3000

    # 超时时间,秒
    timeout = 60

    # 检查
    if (username == 'username'):
        print('请设置好相关参数再测试')
    else:
        # 初始化
        yundama = YDMHttp(username, password, appid, appkey)

        # 登陆云打码
        uid = yundama.login();
        print('uid: %s' % uid)

        # 查询余额
        balance = yundama.balance();
        print('balance: %s' % balance)

        # 开始识别,图片路径,验证码类型ID,超时时间(秒),识别结果
        cid, result = yundama.decode(filename, codetype, timeout);
        print('cid: %s, result: %s' % (cid, result))
        return result

    ######################################################################
