1.安装并引入joint
使用jquery情况下,引入jquery,loadsh,backbone以及这三个js,之后是jointjs,且顺序不能乱;
使用框架的情况下,npm install jointjs --save;然后在使用的页面上 import * as joint from 'jointjs';
2.创建graph对象和paper容器
this_.graph = new joint.dia.Graph;
this_.paper = new joint.dia.Paper({
el:document.getElementById("page"), //元素的id
t300, //设置容器的宽
height:600, //设置容器的高
model:this_.graph,
multiLinks:false,
// perpendicularLinks: !0,
snapLinks: { radius: 50 },
drawGrid:true, //背景的小圆点
gridSize: 20,
// clickThreshold: 10,
background: {
color: 'blue'
},
3.设置连线
方式一 let link = new joint.shapes.standard.Link({ //这样设置的连线不会直接产生线的移除的标识

source:{id:id},//源id
target:{id:id}, //目标id
label: [{ position: 0.5, attrs: { text: { text: "ceshi" || '', 'font-weight': 'bold','font-size': '12px' } } }], //设置线上的label的样式设置
attrs:{
line: {
connection: true,
stroke: 'gray', //线条的颜色
strokeWidth: 2, //线条的粗细
// pointerEvents: "none",
targetMarker: { //目标箭头的样式
type: 'path',
fill: 'gray', //箭头的填充颜色
stroke: 'none', //箭头的轮廓的颜色
// d: 'M 7.5 -10 2.5 -10 2.5 10 7.5 10 Z M 17.5 -10 12.5 -10 12.5 10 17.5 10 Z M 40 -10 20 0 40 10 Z' //箭头的形状,不写默认是i默认的样式
}
}
}
});
方式二 //这样设置的连线会直接产生线的移除的标识 ,点击黑色的圆点,移除当前的线条 
let link = new joint.dia.Link ({
source: { id: rect.id },
target: { id: rect2.id },
labels: [{ position: 0.5, attrs: { text: { text: "ceshi" || '', 'font-weight': 'bold','font-size': '12px' } } }],
router: { name: 'manhattan' },//设置连线弯曲样式(自动生成拐点) manhattan直角
attrs: {
'.marker-source': { stroke:"#585858", d: "M 10 0 L 0 5 L 10 10 z" },
'.marker-target': { stroke:"#585858", d: "M 10 0 L 0 5 L 10 10 z" } ,
'.connection': { //线的样式
'stroke': 'gray',
'stroke-width': 2,
"stroke-dasharray": "3,3"
}
}
});
//手动设置线条的拐点
link.set('vertices', [{ x: 300, y: 60 }, { x: 400, y: 60 }, { x: 400, y: 20 }]);//里边是拐点的坐标
设置之后 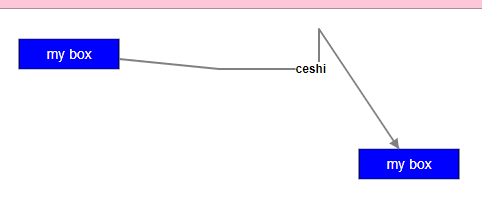 设置之前
设置之前 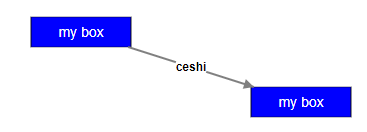
设置之前
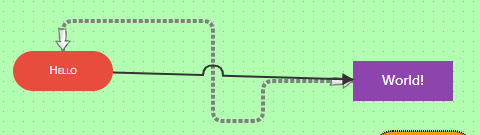
//设置线条的样式(直‘折线/光滑)
link.set('smooth', true)
设置为直线或者折现  设置smooth
设置smooth
//设置线条之间不叠压的样式
link.connector('jumpover', { size: 10 });
4.关于连接点(锚点)
inPorts: ["in"],
outPorts: ["out"],
ports: { //与attrs是同一级
groups: {
'in': {
position: 'left',
attrs: {
circle: {
magnet: true, //控制该点是否可以被连接
stroke: 'white',
fill: '#feb663',
r: 8 //半径
},
},
},
"out": {
position: 'right',
attrs: {
'circle': {
magnet: true, //控制改锚点是否可以被连接
stroke: 'none',
fill: '#31d0c6',
r: 8,
}
}
}
},
items: [ //放置要展示的锚点列表,可以动态的添加
{
group: 'in', //锚点的id
attrs: {
text: { text: '' } //锚点的文本内容
}
},
{
group: 'out',
attrs: {
text: { text: '' }
}
}]
},
attrs:{}
5.实现锚点的高亮 -- 鼠标移上去的时候
首先是自定义的锚点
1 export const portConfig = (type)=> { 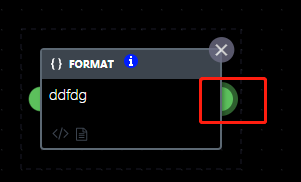
2 let returnObj={
 3     groups: {
 4       'in': {
 5           position: 'left',
 6           attrs: {
 7               circle: {
 8                 magnet: true,
 9                   stroke: '#5cc05c',
10                   fill: '#5cc05c',
11                   r:(type=='TASK'||type=='FILTER')?10:12,
12                   "ref-y":type=='TASK'?14:0,
13                   "stroke-opacity": 0.5
14               },
15           },
16           z: -1   //层级设置
17       },
18       "out": {
19           position: 'right',
20           attrs: {      //这里如果不写入stroke以及stroke-opacity的话,不会出现高亮的效果
21               'circle': {
22                   magnet: true, //控制改锚点是否可以被连接
23                   stroke: '#5cc05c',  //锚点的边的填充
24                   fill: '#5cc05c',
25                   r: (type=='TASK'||type=='FILTER')?10:12,
26                   "ref-y":type=='TASK'?14:0,
27                   "stroke-opacity": 0.5  //高亮的时候,边的颜色
28               }
29           },
30           z: -1
31       }
32     },
33     items: []
34   };
35   let outObj= {
36     group: 'out',
37     attrs: {
38         text: { text: '' }
39     }
40   },
41   inObj={
42     group: 'in',
43     attrs: {
44         text: { text: '' }
45     }
46   };
47   if(type=="START"){
48     returnObj.items.push(outObj);
49   }else if(type == "END"){
50     returnObj.items.push(inObj);
51   }else{
52     returnObj.items.push(inObj);
53     returnObj.items.push(outObj);
54   }
55   return returnObj;
56 };
57
58 使用
59 export const cEnd = cBase.extend(
60   Object.assign({},{
61     defaults: joint.util.deepSupplement(
62       {
63         type: "coa.End",
64         size: {  80, height: 54 },
65         inPorts: [],
66         outPorts: [],
67         attrs: attrConfig({text:"END",content:"ddfdg"}),
68         ports: portConfig("END"),
69       },joint.shapes.basic.Rect.prototype.defaults),
70       markup: cStartHtml,
71       initialize: function() {
72           joint.dia.Element.prototype.initialize.apply(this, arguments);
73       }
74   })
75 );
6.关于什么时候可以用attr,什么时候不可以用 (获取的是元素可以直接attr改变属性,获取的是元素的视图就需要进一步获取model,在paper的on事件中,获取到的都是元素的视图)
var elements = this.paper.model.getElements();获取当前paper上所有的元素
var links = this.paper.model.getLinks(); 获取当前paper上所有的线,不包括箭头
for (var i = 0, ii = elements.length; i < ii; i++) {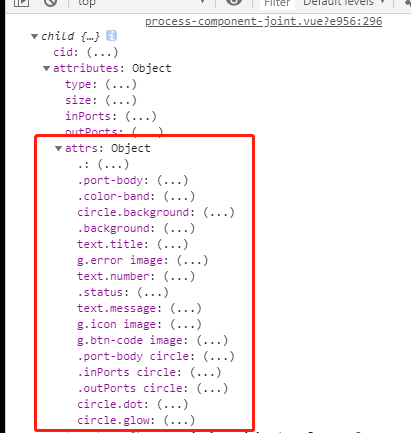
var currentElement = elements[i];
      var type = currentElement.attributes["type"];
      currentElement.attr('.background/stroke', '#3C444D');
      currentElement.attr('.background/height', 100);
      currentElement.attr("text.message/opacity",0);
      currentElement.attr(".status/opacity",0);
    };
}
这个currentElement  代表的就是右侧的child
在child-》attributes-》attrs 中的是自定义的元素的classname或者是元素的tagname,这里边的可以对使用attr进行重置,一般是用来改变样式
若想获取type,只能是attribute来获取,如上


但是在
paper.on(‘pointerclick’,function(cellView){
  cellView是获取的是当前的cell的view
  想要进行改变样式,要获取到
    var cell = cellview.model;
  cell.attr(".background/height",120);
  如上;
})
7.如何移除没有终点的连线
var links = this.paper.model.getLinks();
          //判断没有结束点的link,移除
          for (var j = 0, jj = links.length; j < jj; j++) {
              var currentLink = links[j];
             //判断当前link的target是否有id
              var hasTarget =  currentLink.attributes.target.id?true:false;
        //如果没有
              if(!hasTarget){
          //移除当前的线
                this.graph.removeCells(currentLink)
              }
            //下面是设置样式
              // currentLink.attr('line/stroke', 'black');
              // currentLink.label(0, {
              //     attrs: {
              //         body: {
              //             stroke: 'black'
              //         }
              //     }
              // })
          }  这是自己写的方法

后来发现在     dia.Paper.prototype.options.linkPinning = false的时候,表示当在空白处结束时,将返回原位置
8.页面的放大缩小
this.paper.scale(0.5, 0.5);
9.实现页面的拖拽和各种点击事件
 1 // 事件 - 注意,这里的this指向是this.paper   this_ 是我之前定义的,指向的是vue
 2 this.paper.on({
 3          // 点击label事件
 4          'link:pointerclick': function(linkView){
 5             this_.resetAll();
 6             let labelModel = linkView.model;
 7             // 更新line的样式
 8              labelModel.attr("line/stroke","red");
 9              // 更新label的样式
10               labelModel.label(0, {
11                   attrs: {
12                      labelBody: {
13                        stroke: 'orange'
14                      },
15                      labelText:{
16                         text:"包含",
17                      }
18                   }
19               });27            },
28            // 元素的点击
29            'element:pointerdown':function(cellView){
30                var cell = cellView.model;
31                console.log("点击节点")
32                // 更新元素的样式
33                // cell.attr("body/stroke","red");
34            },
35            // 点击空白处或者点击元素的时候,清空点击过的样式
36            'blank:pointerdown element:pointerdown': function(){
37                 this_.resetAll();
38            },
39            //实现画布拖拽
40            'blank:pointerdown': function(evt, x, y){
41               this.startX = x;
42               this.startY = y;
43               this.origin = this_.paper.options.origin;
44               this.startMove = true;
45             },
46             'blank:pointermove': function(evt, x, y) {
47                  if (this.startMove) {
48                     var diffX = x - this.startX + this.origin.x;
49                     var diffY = y - this.startY + this.origin.y;
50                     this_.paper.translate(diffX, diffY);
51                   }
52              },
53              'blank:pointerup': function(evt, x, y) {
54                  this.startMove = false;
55              },
56 })
10.动态的增加节点,动态的给节点设置内容等
前提是先定义新的类型对象,使用原有的也可以
joint.shapes.coa = {};
在一个页面定义 自定义的节点类型
这是一个公共的shape扩展
export const cBase = joint.shapes.basic.Generic.extend(
  Object.assign({}, joint.shapes.basic.PortsViewInterface, {
      baseEvents: {

      },
      extraEvents: {},
      initialize: function() {
        joint.dia.ElementView.prototype.initialize.apply(this, arguments);
        joint.shapes.basic.PortsViewInterface.initialize.apply(this, arguments);
      }
)
//定义
export const  cAPI = cBase.extend(
    Object.assign({},{
        markup: cApiHtml,
        defaults:joint.util.deepSupplement(
          {
            type: "coa.API",
            // state: "api",
            // name: "call api",
            // show_number: !1,
            // message: "",
            color: "",
            // size: {  180, height: 100 },
            inPorts: ['in'],
            outPorts: ["out"],
            minWidth: 180,
            attrs: attrConfig({text:"API",content:"API"}),
            ports: portConfig("API"),
            content:"API"
          },
          joint.shapes.devs.Model.prototype.defaults
        ),
        initialize: function() {
          joint.shapes.basic.Generic.prototype.initialize.apply(this, arguments);
          console.log(this)  指代当前的cell
          //修改内容
          this.attr('text.api/text', this.get('content'), { silent: true });
        }
      })
);
joint.shapes.coa.API = cAPI;
定义调用的方式
export  const createApi=(data)=>{
    return new joint.shapes.coa.API({
        position: { x:data.posX, y:data.posY } ,
        size: {  120, height: 100 },
        content:data["text.content"]   这里加入我们想要修改的属性
    });
}

调用的位置直接
var block = createApi(data);
block.addTo(this.graph);