对于版本号大于1.13的tensorflow-gpu版本,如1.14、1.15和2.0,要安装CUDA10.0,不要安装最新的CUDA10.1,安装后会提示缺少很多库文件,而导致GPU版本的tensorflow无法使用。
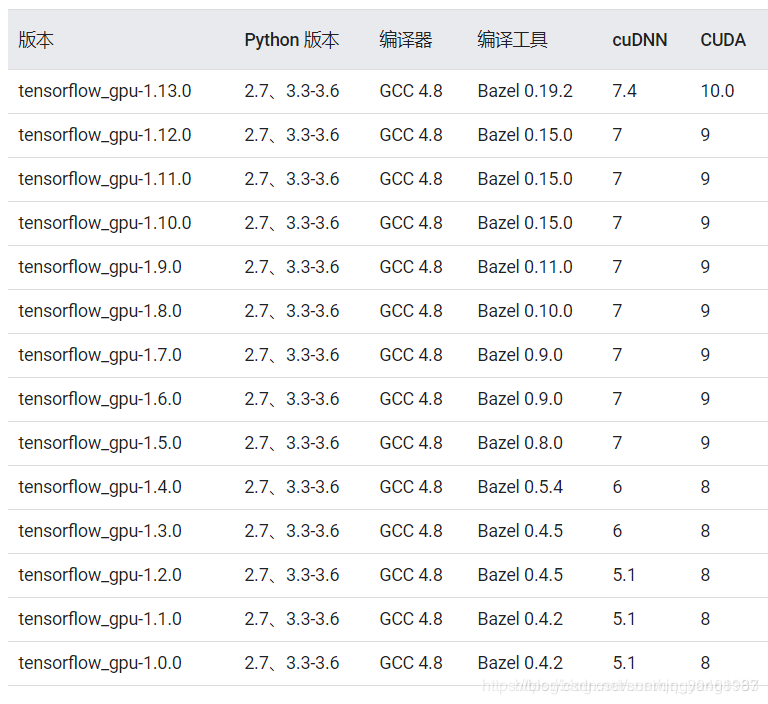
CUdnn与CUDA的对应关系
NVIDIA官网链接:https://developer.nvidia.com/rdp/cudnn-archive#a-collapse742-10
目前为止(2019年11月2日),最新的cuDNN版本号是7.6.3,7.5和7.6的cuDNN都支持CUDA10.1,7.4只能支持到CUDA10.0,一般如果安装的CUDA10.0的话,cuDNN7.4是可以的
检验tensorflow-gpu安装成功
import  tensorflow as tf
a = tf.constant([1.0,2.0,3.0],shape = [3], name='a')
b = tf.constant([1.0,2.0,3.0], shape = [3], name='b')
c = a +b
sess = tf.Session(config = tf.ConfigProto(log_device_placement =True))
print(sess.run(c))
如果出现错误
ImportError: libcublas.so.10.0: cannot open shared object file: No such file or directory

##那么在终端输入以下命令(未测试):

sudo ldconfig /usr/local/cuda-10.0/lib64
nvidia-cuda 镜像地址
https://hub.docker.com/r/nvidia/cuda/tags?page=4
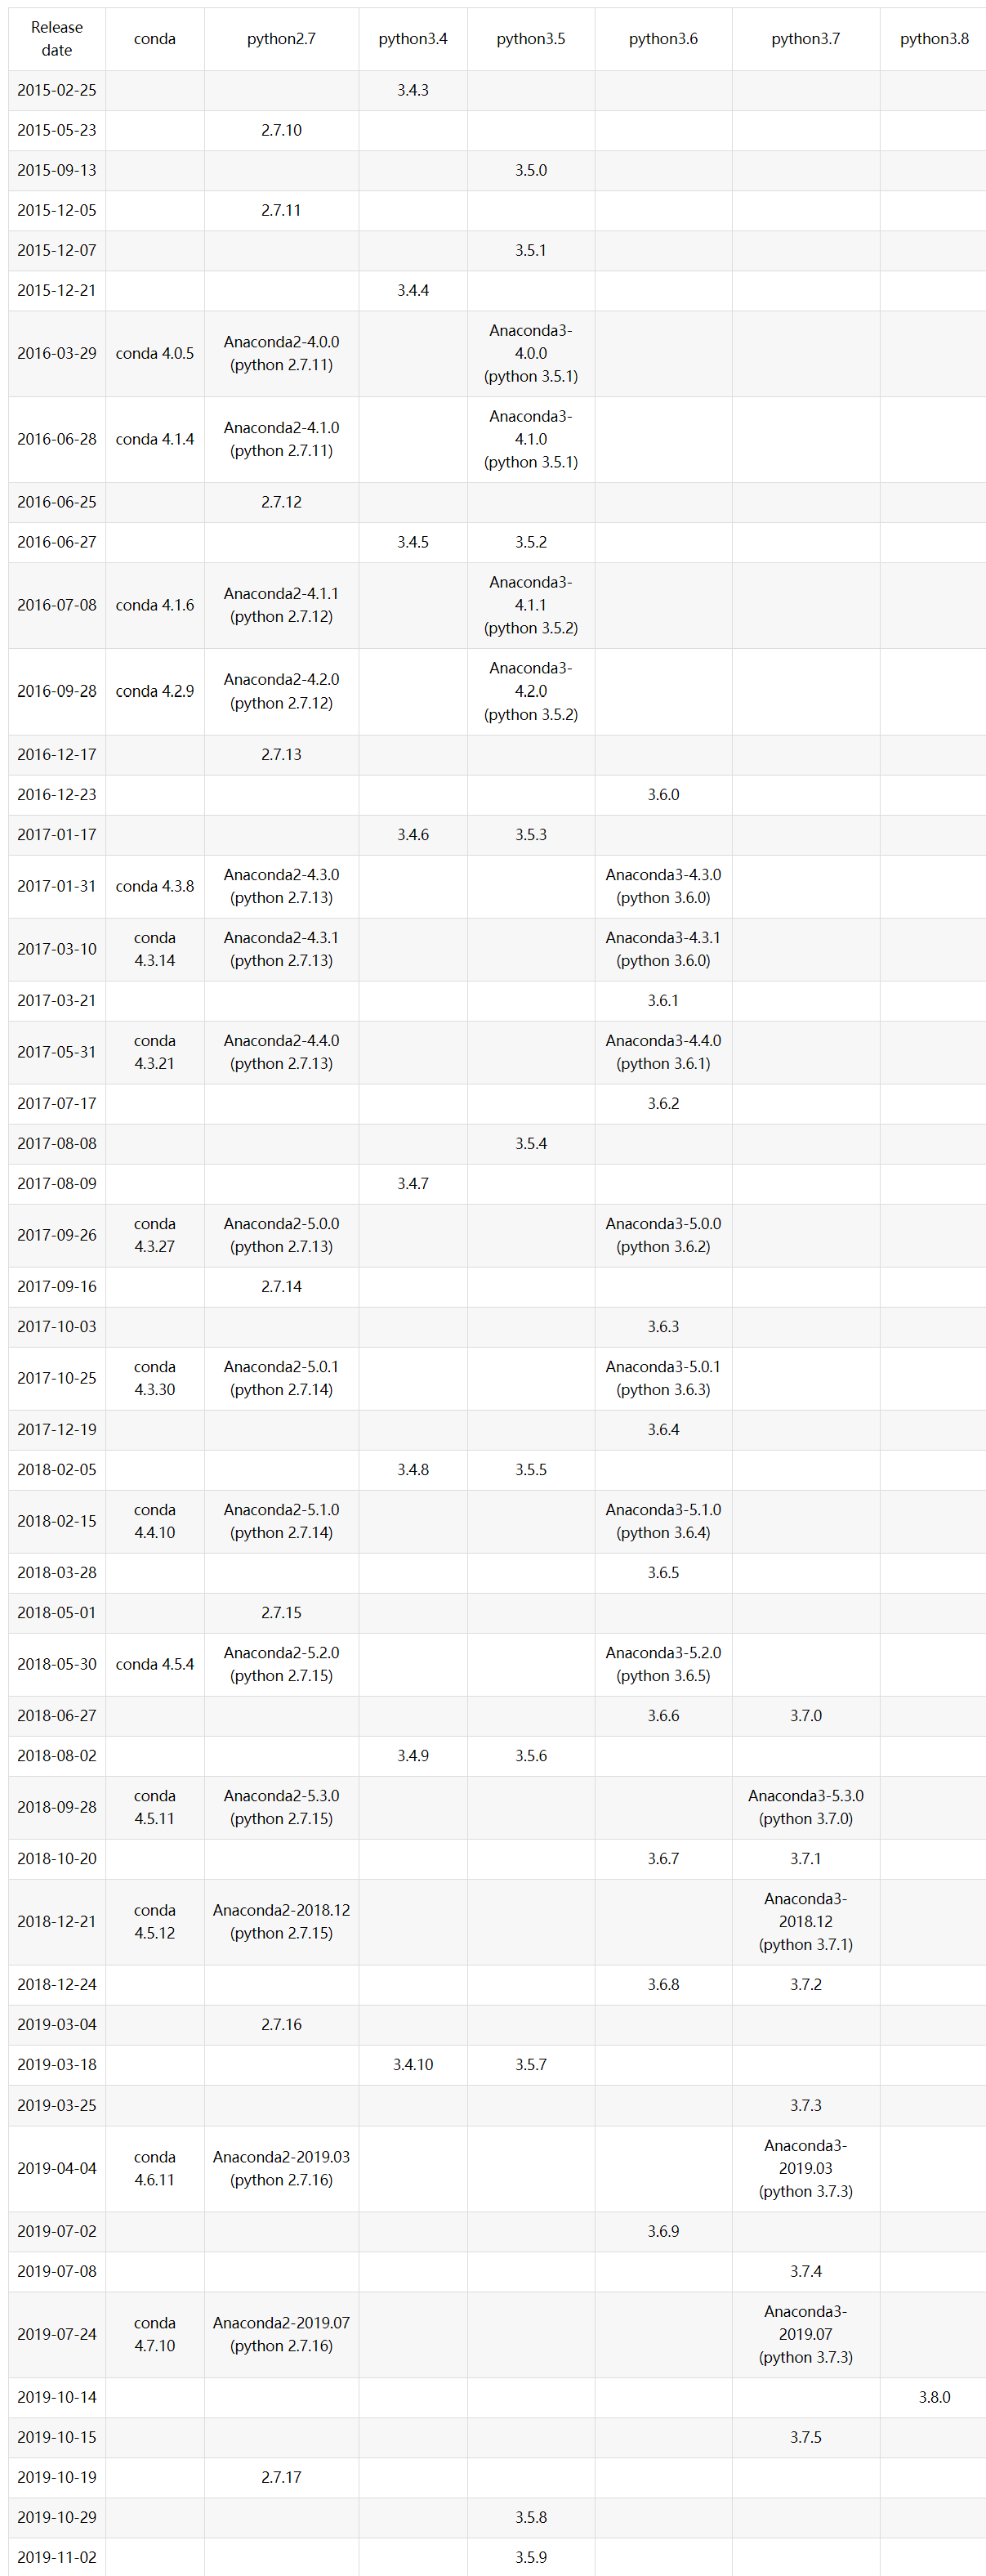
anaconda python 版本对应关系
jupyter lab 支持gpu
##docker 拉取镜像
docker  pull nvidia/cuda:9.0-cudnn7-runtime-ubuntu16.04

##在容器内操作:nvidia-docker  run -it --rm   -p 3333:8888  nvidia/cuda:9.0-cudnn7-runtime-ubuntu16.04  /bin/sh
apt update
apt  install  wget  #获取anaconda
apt  install  bzip2  #安装anaconda
wget https://mirrors.tuna.tsinghua.edu.cn/anaconda/archive/Anaconda3-5.2.0-Linux-x86_64.sh  #默认保存在/路径下

chmod  +x Anaconda3-5.2.0-Linux-x86_64.sh

./Anaconda3-5.2.0-Linux-x86_64.sh -b    #不提示直接默认安装  python3.6
export PATH=/root/anaconda3/bin:$PATH   #指定路径,需要在dockerfile 中定义,在容器内定义后commit 容器后会失效
pip  install tensorflow-gpu==1.11.0   -i   https://pypi.tuna.tsinghua.edu.cn/simple
pip  install jupyterlab   #pip install jupyterlab   https://jupyterlab.readthedocs.io/en/stable/getting_started/installation.html
pip  install  msgpack  #安装以上后会报缺少此包


##执行后commit  容器,以此容器为基础构建
##dockerfile
FROM  nvidia/cuda:9.0-cudnn7-runtime-ubuntu16.04-python3-jupyterlab
ENV   PATH   /root/anaconda3/bin:$PATH
RUN  echo  'import subprocess
import sys
subprocess.call("cd /", shell=True)
subprocess.call("jupyter lab --ip=0.0.0.0 --no-browser --allow-root  --NotebookApp.allow_root=False --NotebookApp.token='jupyterAdmin' --notebook-dir=/home", shell=True)'  >>/python_service.py
CMD ["python3","/python_service.py"]


##
执行启动jupyterlab 的脚本
python_service.py
import subprocess
import sys
subprocess.call("cd /", shell=True)
subprocess.call("jupyter lab --ip=0.0.0.0 --no-browser --allow-root  --NotebookApp.allow_root=False --NotebookApp.token='jupyterAdmin' --notebook-dir=/home", shell=True)


##手动执行的jupyter lab
jupyter lab --ip=0.0.0.0 --no-browser --allow-root  --NotebookApp.allow_root=False --NotebookApp.token='jupyterAdmin' --notebook-dir=/home
##容器外执行
nvidia-docker run  -d --rm  -p 3333:8888  ademord/jupyterlab-gpu   /bin/bash -c  "jupyter notebook --notebook-dir=/tf --ip 0.0.0.0 --no-browser --allow-root  --NotebookApp.token='jupyterAdmin' "
gpu-tensflow-jupyter dockerfile
FROM  nvidia/cuda:9.0-cudnn7-runtime-ubuntu16.04
ENV   PATH  /root/anaconda3/bin:$PATH
RUN   apt update   &&  apt  install  wget  && apt  install  bzip2   &&  cd  /
      &&  wget https://mirrors.tuna.tsinghua.edu.cn/anaconda/archive/Anaconda3-5.2.0-Linux-x86_64.sh
      &&  chmod  +x  /Anaconda3-5.2.0-Linux-x86_64.sh
      &&  ./Anaconda3-5.2.0-Linux-x86_64.sh -b
      &&  rm -rf  ./Anaconda3-5.2.0-Linux-x86_64.sh
RUN  pip install tensorflow-gpu==1.11.0   -i   https://pypi.douban.com/simple/
      &&   pip  install  msgpack   -i   https://pypi.douban.com/simple/
      &&   pip install jupyterlab

RUN  echo  'import subprocess
import sys
subprocess.call("cd /", shell=True)
subprocess.call("jupyter lab --ip=0.0.0.0 --no-browser --allow-root  --NotebookApp.allow_root=False --NotebookApp.token='jupyterAdmin' --notebook-dir=/home", shell=True)'  >>/python_service.py
CMD ["python3","/python_service.py"]