一、简单工厂
定义:定义一个创建对象的接口,可是由其子类决定要实例化的对象是哪一个,工厂方法让类的实例化推迟到子类。
通俗的来讲就是由工厂方法确定一个框架。详细的实现由其子类来完毕。
与简单工厂相比,简单工厂但是完毕了整个对象的创建。
严格的来说简单工厂并非一种设计模式,他更像是一种编程习惯。
代码说明一切!
1、这是一个简单工厂
|
1
2
3
4
5
6
7
8
9
10
11
12
13
14
15
16
17
18
19
20
21
22
23
24
|
package my.oschina.net.design.factory;public class SimplePizzaFactory { /** * 依据传入的type參数,返回对应的pizza * @param type * @return */ public Pizza createPizza(String type) { Pizza pizza = null; if (type.equals("cheese")) { pizza = new CheesePizza(); } else if (type.equals("pepperoni")) { pizza = new PepperoniPizza(); } else if (type.equals("clam")) { pizza = new ClamPizza(); } else if (type.equals("veggie")) { pizza = new VeggiePizza(); } return pizza; }} |
2、这是一个pizza的store
|
1
2
3
4
5
6
7
8
9
10
11
12
13
14
15
16
17
18
19
20
21
22
23
|
package my.oschina.net.design.factory;public class PizzaStore { //通过组合的使用,加上一个简单工厂SimplePizzaFactory的引用,用于创建pizza SimplePizzaFactory factory; public PizzaStore(SimplePizzaFactory factory) { this.factory = factory; } public Pizza orderPizza(String type) { Pizza pizza; //调用简单工厂SimplePizzaFactory的createPizza(type)方法创建pizza pizza = factory.createPizza(type); pizza.prepare(); pizza.bake(); pizza.cut(); pizza.box(); return pizza; }} |
我们能够看到。当我们须要一个pizza时并不须要知道该怎样创建详细的pizza,我们仅仅要调用一个简单工厂的方法。工厂就会给我们返回一个pizza,非常炫酷!(更深一步,我们能够增加第一个模式——策略模式,也就是说能够动态的设置不同的简单工厂,从而让简单工厂返回不同的pizza)
事实上,大家在写代码的时候都或多或少的用到过这个code习惯。比方说在写一些项目的时候。我们会额外加一个叫作utils的包,里面基本上都是一些类的静态方法或者叫做工具函数(像一些提取特定字符串啊等)。
这事实上就是静态工厂(我们不须要创建对象就能够通过其类名调用想用的工具函数)。而与普通的简单工厂相比,他不能通过继承改变创建对象的行为。
二、工厂方法模式
看完简单工厂,你可能会说,哟,不错哦!那我们为什么还要使用工厂方法模式呢?
细致想想,假如我们又出新产品了,不仅有cheese, peperoni, clam。 vegie的pizza还有什么白菜,萝卜,西瓜pizza,意思就是说我们的产品但是变化着的。那问题来了,我们会不可避免的改动代码,什么?改动类的代码!那就不好了!head first 曾提及过一个原则叫做开放关闭原则,大概的意思是说,类应该对扩展开放(你能够通过继承来扩展这个类),而对改动关闭(你要是想要改动我这个类。我就不愿意了)。
非常明显啊!简单工厂要想实现产品的更新工作。就必需要违反这个原则!
那肿么办呢?好吧,来看看工厂方法模式。
来看看我们新的PizzaStore(这是一个abstract类,不能创建这个类的对象)
|
1
2
3
4
5
6
7
8
9
10
11
12
13
14
15
16
17
18
19
20
21
22
23
24
25
|
package my.oschina.net.design.factory;/** * 这是一个抽象类,通过继承实现createPizza方法, * 我们能够创建不同的对象 * @author Eswin * */public abstract class PizzaStore { //这里定义一个工厂方法 abstract Pizza createPizza(String item); public Pizza orderPizza(String type) { Pizza pizza = createPizza(type); System.out.println("--- Making a " + pizza.getName() + " ---"); pizza.prepare(); pizza.bake(); pizza.cut(); pizza.box(); return pizza; }} |
再来看两个他的子类(通过继承我们实现了超类代码和子类创建对象的代码的解耦)
|
1
2
3
4
5
6
7
8
9
10
11
12
13
14
15
16
17
18
19
20
21
22
23
24
25
26
27
28
29
30
31
32
33
34
|
package my.oschina.net.design.factory;public class ChicagoPizzaStore extends PizzaStore { Pizza createPizza(String item) { if (item.equals("cheese")) { return new ChicagoStyleCheesePizza(); } else if (item.equals("veggie")) { return new ChicagoStyleVeggiePizza(); } else if (item.equals("clam")) { return new ChicagoStyleClamPizza(); } else if (item.equals("pepperoni")) { return new ChicagoStylePepperoniPizza(); } else return null; }}package my.oschina.net.design.factory;public class NYPizzaStore extends PizzaStore { Pizza createPizza(String item) { if (item.equals("cheese")) { return new NYStyleCheesePizza(); } else if (item.equals("veggie")) { return new NYStyleVeggiePizza(); } else if (item.equals("clam")) { return new NYStyleClamPizza(); } else if (item.equals("pepperoni")) { return new NYStylePepperoniPizza(); } else return null; }} |
检验代码
|
1
2
3
4
5
6
7
8
9
10
11
12
13
14
15
16
17
18
19
20
21
|
package my.oschina.net.design.factory;public class PizzaTestDrive { public static void main(String[] args) { PizzaStore nyStore = new NYPizzaStore(); PizzaStore chicagoStore = new ChicagoPizzaStore(); Pizza pizza = nyStore.orderPizza("cheese"); System.out.println("Ethan ordered a " + pizza.getName() + "
"); pizza = chicagoStore.orderPizza("cheese"); System.out.println("Joel ordered a " + pizza.getName() + "
"); pizza = nyStore.orderPizza("clam"); System.out.println("Ethan ordered a " + pizza.getName() + "
"); pizza = chicagoStore.orderPizza("clam"); System.out.println("Joel ordered a " + pizza.getName() + "
"); }} |
这样。我们通过不同的store(不同的子类)同样的orderPizza方法就能够创造出不同的pizza!
三、抽象工厂
定义:提供一个接口,用于创建一组相关的或者相依赖的的家族,而不需明白指明详细类。
在我理解就是纯粹的工厂方法的叠加,他提供一个创建一系列相关联的一组对象的接口,由实现这个接口的类来详细实现各个对象的创建工作
先来定义一个接口PizzaIngredientFactory,他定义了一系列的创建Pizza材料的方法
|
1
2
3
4
5
6
7
8
9
10
11
12
|
package my.oschina.net.design.abstract_actory;public interface PizzaIngredientFactory { public Dough createDough(); public Sauce createSauce(); public Cheese createCheese(); public Veggies[] createVeggies(); public Pepperoni createPepperoni(); public Clams createClam(); } |
看他的两个子类(准确的说是实现了这个接口的类)
|
1
2
3
4
5
6
7
8
9
10
11
12
13
14
15
16
17
18
19
20
21
22
23
24
25
26
27
28
29
30
31
32
33
34
35
36
37
38
39
40
41
42
43
44
45
46
47
48
49
50
51
52
53
54
55
56
57
58
59
60
61
|
package my.oschina.net.design.abstract_actory;public class NYPizzaIngredientFactory implements PizzaIngredientFactory { public Dough createDough() { return new ThinCrustDough(); } public Sauce createSauce() { return new MarinaraSauce(); } public Cheese createCheese() { return new ReggianoCheese(); } public Veggies[] createVeggies() { Veggies veggies[] = { new Garlic(), new Onion(), new Mushroom(), new RedPepper() }; return veggies; } public Pepperoni createPepperoni() { return new SlicedPepperoni(); } public Clams createClam() { return new FreshClams(); }}package my.oschina.net.design.abstract_actory;public class ChicagoPizzaIngredientFactory implements PizzaIngredientFactory { public Dough createDough() { return new ThickCrustDough(); } public Sauce createSauce() { return new PlumTomatoSauce(); } public Cheese createCheese() { return new MozzarellaCheese(); } public Veggies[] createVeggies() { Veggies veggies[] = { new BlackOlives(), new Spinach(), new Eggplant() }; return veggies; } public Pepperoni createPepperoni() { return new SlicedPepperoni(); } public Clams createClam() { return new FrozenClams(); }} |
看看我们的CheesePizza类和ClamPizza类的创建
|
1
2
3
4
5
6
7
8
9
10
11
12
13
14
15
16
17
18
19
20
21
22
23
24
25
26
27
28
29
30
31
32
33
34
35
36
37
38
39
40
|
package my.oschina.net.design.abstract_actory;public class CheesePizza extends Pizza { //这里组合了一个PizzaIngredientFactory对象的引用。用于提供不同的原料 PizzaIngredientFactory ingredientFactory; /** * 通过传入一个PizzaIngredientFactory原料工厂。我们能够在制作Pizza的时候动态的产生所须要的原料 * @param ingredientFactory */ public CheesePizza(PizzaIngredientFactory ingredientFactory) { this.ingredientFactory = ingredientFactory; } void prepare() { System.out.println("Preparing " + name); dough = ingredientFactory.createDough(); sauce = ingredientFactory.createSauce(); cheese = ingredientFactory.createCheese(); }}package my.oschina.net.design.abstract_actory;public class ClamPizza extends Pizza { PizzaIngredientFactory ingredientFactory; public ClamPizza(PizzaIngredientFactory ingredientFactory) { this.ingredientFactory = ingredientFactory; } void prepare() { System.out.println("Preparing " + name); dough = ingredientFactory.createDough(); sauce = ingredientFactory.createSauce(); cheese = ingredientFactory.createCheese(); clam = ingredientFactory.createClam(); }} |
再来看看改进后的NYPPizzaStore
|
1
2
3
4
5
6
7
8
9
10
11
12
13
14
15
16
17
18
19
20
21
22
23
24
25
26
27
28
29
30
31
32
|
package my.oschina.net.design.abstract_actory;public class NYPizzaStore extends PizzaStore { protected Pizza createPizza(String item) { Pizza pizza = null; PizzaIngredientFactory ingredientFactory = new NYPizzaIngredientFactory(); if (item.equals("cheese")) { pizza = new CheesePizza(ingredientFactory); pizza.setName("New York Style Cheese Pizza"); } else if (item.equals("veggie")) { pizza = new VeggiePizza(ingredientFactory); pizza.setName("New York Style Veggie Pizza"); } else if (item.equals("clam")) { pizza = new ClamPizza(ingredientFactory); pizza.setName("New York Style Clam Pizza"); } else if (item.equals("pepperoni")) { pizza = new PepperoniPizza(ingredientFactory); pizza.setName("New York Style Pepperoni Pizza"); } return pizza; }} |
对于此时的NYPPizzaStore,创建详细的Pizza的时候我们就要传入一个PizzaIngredientFactory对象了!
四、三者的比較
对于简单工厂。全部的对象的创建由简单工厂全权负责。仅仅要最后能够给我们返回一个我们须要的对象就能够了。他的运用是通过组合的方式实现的;
对于工厂方法。抽象的父类提供一个对象创建的接口,详细对象的创建推迟到子类中去实现,从而实现扩展;
对于抽象工厂,能够看成是工厂方法的叠加,他提供了创建一系列相关的对象的接口。由各个子类去实现,他的运用也是通过组合的方式实现的。
工厂方法模式,往往是设计模式刚開始学习的人入门的模式,的确。有人称之为最为典型最具启示效果的模式。
android中用到了太多的工厂类,当中实用工厂方法模式的,当然也有非常多工厂并非使用工厂方法模式的。仅仅是工具管理类。
今天以ThreadFactory举例说明一下简单工厂模式和工厂方法模式。
工厂方法模式,Factory Method,简单的方式,不简单的应用。
1.意图
定义一个用于创建对象的接口。让子类决定实例化哪个类。工厂方式模式使一个类的实例化延迟到其子类。
热门词汇:虚构造器 延迟 创建对象 子类
2.结构图和代码
我们先看看标准的工厂方法结构图:

先抽象的产品类,抽象的工厂类。然后用client详细的工厂生产对应的详细的产品,可是client并不知道详细的产品是怎么生产的,生产的过程封装在工厂里。所以说,某种程度上。工厂方法模式改变了我们直接用new创建对象的方式。一个非常好的開始,意义重大。
以ThreadFactory为例:

这张图事实上和原本的结构图有细微的差别。那就是參数化得工厂,并且从业务意义上也有些不同,可是思想是一样的。
我们来看下详细的代码:
|
1
2
3
4
5
6
7
8
9
|
//抽象产品public interface Runnable
{ public abstract void run();}//抽象工厂public interface ThreadFactory
{ Thread
newThread(Runnable r);} |
以下是详细的实现:
比方AsyncTask类中工厂的详细实现例如以下:
|
1
2
3
4
5
6
7
8
9
10
11
|
//工厂实现类private static final ThreadFactory
sThreadFactory = new ThreadFactory()
{ private final AtomicInteger
mCount = new AtomicInteger(1); public Thread
newThread(Runnable r) { return new Thread(r,
"AsyncTask
 #"
+
mCount.getAndIncrement()); }};//那么产品类在哪里呢?//做为參数Runnable
r,我们能够创建千千万万个此系列的产品类//同理,我们能够创建另外类似的工厂。生产某种专门的线程,很easy扩展 |
看到这里,我们一方面为它的生产便利性感叹。一方面又为没创建某类产品都要创建一个工厂而感到繁琐,所以我们以下介绍简单工厂,它的结构图例如以下:

简单工厂把抽象工厂去掉了,你就创建一个专门生产某类产品就好。在一些特定而又不负责的领域很有用方便套用这个模式。
在android中的Connection类中使用到了这个类:

当中Connection这个抽象类,既充当抽象产品类,也充当详细工厂类。
由于这样的情况下,我们往往须要的是立即生产子类,getConnection方法往往是静态的,所以简单工厂,也叫静态工厂方法。
我们看看代码例如以下:
|
1
2
3
4
5
6
7
8
9
10
11
12
13
|
abstract class Connection{
static Connection
getConnection( Context
context, HttpHost host, HttpHost proxy, RequestFeeder
requestFeeder) { if (host.getSchemeName().equals("http"))
{ return new HttpConnection(context,
host, requestFeeder); } //
Otherwise, default to https return new HttpsConnection(context,
host, proxy, requestFeeder); }} |
这就是简单工厂,一个非常easy的參数化工厂,真的非常easy。
3.效果
1. 创建型模式;
2.參数化工厂方法模式得到对应的对象;
3.为子类提供挂钩;
4.连接平行的类层次。
主要内容:
一、工厂方法模式定义
| 工厂方法模式定义: |
| Define an interface for creating an object, but let subclasses decide which class to instantiate. Factory Method lets a class defer instantiation to subclasses. |
| 定义一个用于创建对象的接口,让子类决定实例化哪一个类。工厂方法使一个类的实例化延迟到其子类。 |
经常使用的工厂方法模式结构:
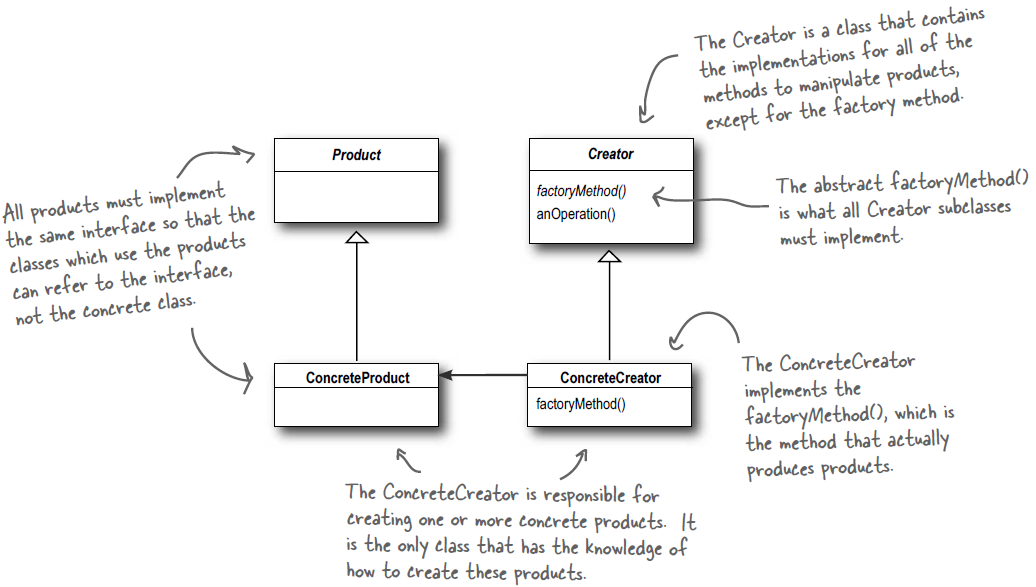
如上图所看到的(截取自《Head First Design Patterns》一书),主要包含四个部分:
抽象产品类Product负责定义产品的共性,实现对事物抽象的定义;Creator是抽象创建类,也就是抽象工厂,详细怎样创建产品类是由详细的实现工厂ConcreteCreator完毕的。当中在《Head First Design Patterns》对工厂方法模式做了细节的说明,原文例如以下:
As in the official definition, you’ll often hear developers say that the Factory Method lets subclasses decide which class to instantiate. They say “decides” not because the pattern allows subclasses themselves to decide at runtime, but because the creator class is written without knowledge of the actual products that will be created, which is decided purely by the choice of the subclass that is used.
二、工厂方法模式优势
|
良好的封装性,代码结构清楚。一个对象创建具有条件约束的,假设一个调用者须要一个详细的产品对象,仅仅要知道这个产品的类名就能够了。不用知道创建对象的过程,减少模块间的耦合。 |
| 可扩展性好。在添加产品类的情况下。仅仅要适当的改动详细的工厂类或扩展一个工厂类,就能够完毕。 |
|
屏蔽产品类。 产品类的实现怎样变化,调用者都不须要关心,它仅仅须要关心产品的接口,仅仅要接口保持不变,系统中的上层模块就不用改变。由于产品类的实例化工作是由工厂类负责的,一个产品对象详细由哪一个产品生成是由工厂类决定的。此外工厂方法模式是典型的松耦合结构。高层模块仅仅须要知道产品的抽象类,其它的实现类都不用关系,符合迪米特法则、依赖倒置原则、里氏替换原则等。 |
三、工厂方法模式在Android源代码中的应用
在Android源代码中,ListActivity继承自Activity。将Activity作为工厂方法。生成具有ListView特点的Activity。对ListActivity的说明例如以下:
|
An activity that displays a list of items by binding to a data source such as an array or Cursor, and exposes event handlers when the user selects an item. |
ListActivity hosts a ListView object
that can be bound to different data sources, typically either an array or a Cursor holding query results. Binding, screen layout, and row layout are discussed in the following sections. |
|
Screen Layout
ListActivity has a default layout that consists of a single, full-screen list in the center of the screen. However, if you desire, you can customize the screen layout by setting your
own view layout with setContentView() in onCreate(). To do this, your own view MUST contain a ListView object with the id "@android:id/list" (or |
在Activity类中有这么一个函数:

    /**
     * This method is called after {@link #onStart} when the activity is
     * being re-initialized from a previously saved state, given here in
     * <var>savedInstanceState</var>.  Most implementations will simply use {@link #onCreate}
     * to restore their state, but it is sometimes convenient to do it here
     * after all of the initialization has been done or to allow subclasses to
     * decide whether to use your default implementation.  The default
     * implementation of this method performs a restore of any view state that
     * had previously been frozen by {@link #onSaveInstanceState}.
     *
     * <p>This method is called between {@link #onStart} and
     * {@link #onPostCreate}.
     *
     * @param savedInstanceState the data most recently supplied in {@link #onSaveInstanceState}.
     *
     * @see #onCreate
     * @see #onPostCreate
     * @see #onResume
     * @see #onSaveInstanceState
     */
    protected void onRestoreInstanceState(Bundle savedInstanceState) {
        if (mWindow != null) {
            Bundle windowState = savedInstanceState.getBundle(WINDOW_HIERARCHY_TAG);
            if (windowState != null) {
                mWindow.restoreHierarchyState(windowState);
            }
        }
    }
在凝视中“but it is sometimes convenient to do it here after all of the initialization has been done or to allow subclasses to decide whether to use your default implementation.”,英语不太好,但大致的意思是Activity子类能够重载这个函数来决定是否使用默认的实现。
在看子类ListActivity:
public class ListActivity extends Activity {
    /**
     * This field should be made private, so it is hidden from the SDK.
     * {@hide}
     */
    protected ListAdapter mAdapter;
    /**
     * This field should be made private, so it is hidden from the SDK.
     * {@hide}
     */
    protected ListView mList;

    private Handler mHandler = new Handler();
    private boolean mFinishedStart = false;

    private Runnable mRequestFocus = new Runnable() {
        public void run() {
            mList.focusableViewAvailable(mList);
        }
    };

    /**
     * This method will be called when an item in the list is selected.
     * Subclasses should override. Subclasses can call
     * getListView().getItemAtPosition(position) if they need to access the
     * data associated with the selected item.
     *
     * @param l The ListView where the click happened
     * @param v The view that was clicked within the ListView
     * @param position The position of the view in the list
     * @param id The row id of the item that was clicked
     */
    protected void onListItemClick(ListView l, View v, int position, long id) {
    }

    /**
     * Ensures the list view has been created before Activity restores all
     * of the view states.
     *
     *@see Activity#onRestoreInstanceState(Bundle)
     */
    @Override
    protected void onRestoreInstanceState(Bundle state) {
        ensureList();
        super.onRestoreInstanceState(state);
    }

    /**
     * @see Activity#onDestroy()
     */
    @Override
    protected void onDestroy() {
        mHandler.removeCallbacks(mRequestFocus);
        super.onDestroy();
    }

    /**
     * Updates the screen state (current list and other views) when the
     * content changes.
     *
     * @see Activity#onContentChanged()
     */
    @Override
    public void onContentChanged() {
        super.onContentChanged();
        View emptyView = findViewById(com.android.internal.R.id.empty);
        mList = (ListView)findViewById(com.android.internal.R.id.list);
        if (mList == null) {
            throw new RuntimeException(
                    "Your content must have a ListView whose id attribute is " +
                    "'android.R.id.list'");
        }
        if (emptyView != null) {
            mList.setEmptyView(emptyView);
        }
        mList.setOnItemClickListener(mOnClickListener);
        if (mFinishedStart) {
            setListAdapter(mAdapter);
        }
        mHandler.post(mRequestFocus);
        mFinishedStart = true;
    }

    /**
     * Provide the cursor for the list view.
     */
    public void setListAdapter(ListAdapter adapter) {
        synchronized (this) {
            ensureList();
            mAdapter = adapter;
            mList.setAdapter(adapter);
        }
    }

    /**
     * Set the currently selected list item to the specified
     * position with the adapter's data
     *
     * @param position
     */
    public void setSelection(int position) {
        mList.setSelection(position);
    }

    /**
     * Get the position of the currently selected list item.
     */
    public int getSelectedItemPosition() {
        return mList.getSelectedItemPosition();
    }

    /**
     * Get the cursor row ID of the currently selected list item.
     */
    public long getSelectedItemId() {
        return mList.getSelectedItemId();
    }

    /**
     * Get the activity's list view widget.
     */
    public ListView getListView() {
        ensureList();
        return mList;
    }

    /**
     * Get the ListAdapter associated with this activity's ListView.
     */
    public ListAdapter getListAdapter() {
        return mAdapter;
    }

    private void ensureList() {
        if (mList != null) {
            return;
        }
        setContentView(com.android.internal.R.layout.list_content_simple);

    }

    private AdapterView.OnItemClickListener mOnClickListener = new AdapterView.OnItemClickListener() {
        public void onItemClick(AdapterView<?> parent, View v, int position, long id)
        {
            onListItemClick((ListView)parent, v, position, id);
        }
    };
}
当中复写了函数onRestoreInstanceState(Bundle state),并在View中设置了默认的setContentView(com.android.internal.R.layout.list_content_simple);
    /**
     * Ensures the list view has been created before Activity restores all
     * of the view states.
     *
     *@see Activity#onRestoreInstanceState(Bundle)
     */
    @Override
    protected void onRestoreInstanceState(Bundle state) {
        ensureList();
        super.onRestoreInstanceState(state);
    }

。。。

private void ensureList() {
        if (mList != null) {
            return;
        }
        setContentView(com.android.internal.R.layout.list_content_simple);

    }
Activity中的setContentView()函数:
 /**
     * Set the activity content from a layout resource.  The resource will be
     * inflated, adding all top-level views to the activity.
     *
     * @param layoutResID Resource ID to be inflated.
     *
     * @see #setContentView(android.view.View)
     * @see #setContentView(android.view.View, android.view.ViewGroup.LayoutParams)
     */
    public void setContentView(int layoutResID) {
        getWindow().setContentView(layoutResID);
        initActionBar();
    }

    /**
     * Set the activity content to an explicit view.  This view is placed
     * directly into the activity's view hierarchy.  It can itself be a complex
     * view hierarchy.  When calling this method, the layout parameters of the
     * specified view are ignored.  Both the width and the height of the view are
     * set by default to {@link ViewGroup.LayoutParams#MATCH_PARENT}. To use
     * your own layout parameters, invoke
     * {@link #setContentView(android.view.View, android.view.ViewGroup.LayoutParams)}
     * instead.
     *
     * @param view The desired content to display.
     *
     * @see #setContentView(int)
     * @see #setContentView(android.view.View, android.view.ViewGroup.LayoutParams)
     */
    public void setContentView(View view) {
        getWindow().setContentView(view);
        initActionBar();
    }

    /**
     * Set the activity content to an explicit view.  This view is placed
     * directly into the activity's view hierarchy.  It can itself be a complex
     * view hierarchy.
     *
     * @param view The desired content to display.
     * @param params Layout parameters for the view.
     *
     * @see #setContentView(android.view.View)
     * @see #setContentView(int)
     */
    public void setContentView(View view, ViewGroup.LayoutParams params) {
        getWindow().setContentView(view, params);
        initActionBar();
    }
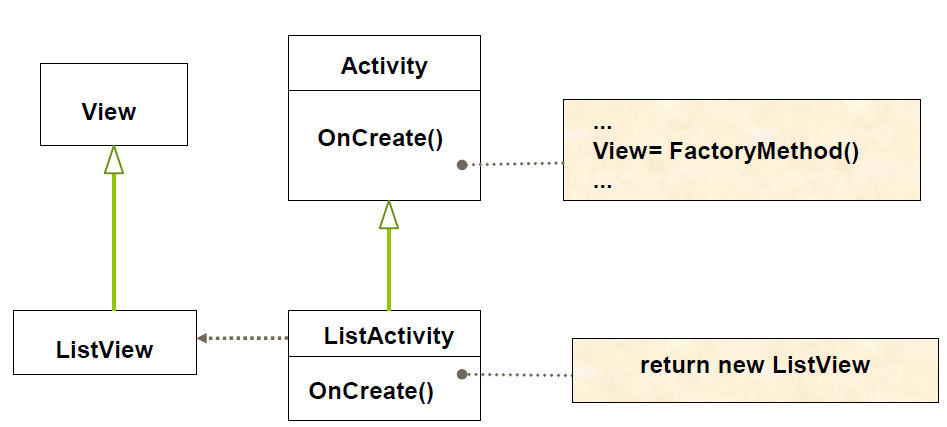
总结:Activity作为“工厂方法”。详细View中显示什么由默认设置或者由子类来实现;ListActivity作为详细实现,它决定在View中显示的是ListView;这里的View是Activity中的默认显示,即为“Product”,而ListView是“ConcreteProduct”,由ListActivity来决定显示。
除了ListActivity以外,还有ExpandableListActivity也是以Activity为工厂类,创建立自己的显示。
版权声明:本文博主原创文章,博客,未经同意不得转载。