1、下载rocketmq包
2、解压zip包
3、编译部署
4、配置环境变量
5、启动 NameServer(每台机器都要启动)
6、启动broker(每台机器都要)
7、测试验证
1、下载rocketmq包
下载地址:http://rocketmq.apache.org/dowloading/releases/
我用的版本是 rocketmq-all-4.2.0-source-release.zip
2、解压zip包
[root@iZbp1hsztk393u9v8k87m3Z local]# unzip rocketmq-all-4.2.0-source-release.zip
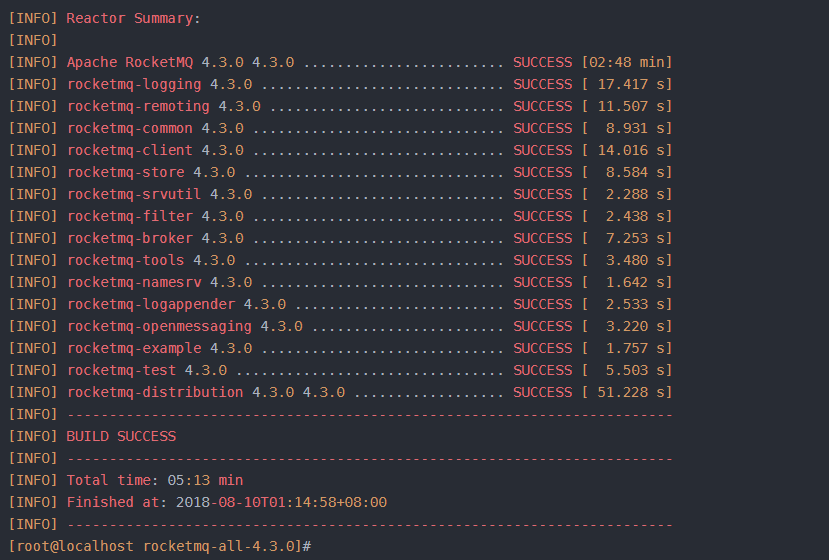
3、编译部署
前提是已经安装好maven
进入到解压出来的目录 rocketmq-all-4.2.0,执行 mvn -Prelease-all -DskipTests clean install -U

需要等待几分钟,完成显示
4、配置环境变量
vi /etc/profile中添加
#set rocketmq
export rocketmq=/usr/local/rocketmq-all-4.2.0/distribution/target/apache-rocketmq
export PATH=$PATH:$rocketmq/bin
添加后别忘了执行source /etc/profile,使环境变量生效
5、启动 NameServer(每台机器都要启动)
进入到 /usr/local/rocketmq-all-4.2.0/distribution/target/apache-rocketmq 目录
先在/usr/local/rocketmq-all-4.2.0目录下新建文件夹rocketmqlogs
启动nameserver
nohup mqnamesrv > /usr/local/rocketmq-all-4.2.0/rocketmqlogs/namesrv.log 2>&1 &
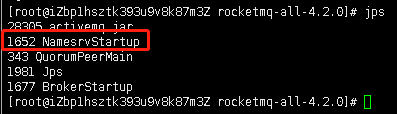
启动后查看日志文件是否正确启动,出现红框中的说明已经启动

也可以使用jps命令查看
6、启动broker(每台机器都要)
6.1 进入到目录:/usr/local/rocketmq-all-4.2.0/distribution/target/apache-rocketmq/conf/2m-noslave
配置 broker-a.properties文件
在最后一行添加 namesrvAddr=10.132.131.64:9876;10.132.131.81:9876;10.132.131.82:9876
因为64/81/82三台机器都要安装rocketmq,做集群,同理配置,81机器的broker-b.properties文件,82机器的broker-c.properties文件
[root@iZbp1hsztk393u9v8k87mcZ 2m-noslave]# vi broker-a.properties
# Licensed to the Apache Software Foundation (ASF) under one or more
# contributor license agreements.  See the NOTICE file distributed with
# this work for additional information regarding copyright ownership.
# The ASF licenses this file to You under the Apache License, Version 2.0
# (the "License"); you may not use this file except in compliance with
# the License.  You may obtain a copy of the License at
#
#     http://www.apache.org/licenses/LICENSE-2.0
#
# Unless required by applicable law or agreed to in writing, software
# distributed under the License is distributed on an "AS IS" BASIS,
# WITHOUT WARRANTIES OR CONDITIONS OF ANY KIND, either express or implied.
# See the License for the specific language governing permissions and
# limitations under the License.
brokerClusterName=DefaultCluster
brokerName=broker-a
brokerId=0
deleteWhen=04
fileReservedTime=48
brokerRole=ASYNC_MASTER
flushDiskType=ASYNC_FLUSH
namesrvAddr=10.132.131.64:9876;10.132.131.81:9876;10.132.131.82:9876
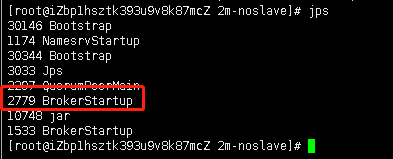
启动broker
nohup mqbroker -c /usr/local/rocketmq-all-4.2.0/distribution/target/apache-rocketmq/conf/2m-noslave/broker-a.properties >/dev/null 2>&1 &
jps查看下,已经启动
7、测试验证
7.1 命令行验证
最后使用clusterList命令来验证一下集群健康状态
命令:
mqadmin clusterList -n 10.132.131.64:9876
执行结果如下:

三台机器都已经成功启动
7.2 rocketmq-console页面验证
这个更直观,搜一下很简单
参考:https://blog.csdn.net/so_geili/article/details/90142461
8、停止服务
停止时需要先停止broker,再停止namesrv
mqshutdown broker
mqshutdown namesrv
