1.maven的仓库
maven的仓库分为本地仓库和远程仓库,私服是一种特殊的远程仓库,假设在局域网上的一个私有的服务器(用其来代理所有外部的远程仓库,内部的项目也可以部署到私服上供其他项目使用),默认使用的是中央仓库,当然也可以添加使用其他的仓库,例如jboss仓库(http://repository.jboss.com/maven2/)等,本地仓库在安装的时候不存在,在运行第一条mvn命令之后产生。本地仓库的默认地址可以查看conf的setting.xml文件(默认为Default: ${user.home}/.m2/repository,也可以自己更改位置,一般是把settings文件复制到名用户目录下的.m2中,然后对其文件进行修改),默认的中央仓库在lib下的maven-model-builder-3.5.3.jar中的maven-model-builder-3.5.3.jarorgapachemavenmodel下有一个pom-4.0.0.xml(超级pom)。
里面配置如下:
<repositories>
		<repository>
			<id>central</id>
			<name>CentralRepository</name>
			<url>https://repo.maven.apache.org/maven2</url><!--中央仓库-->
			<layout>default</layout><!--使用默认的仓库布局-->
			<snapshots>
				<enabled>false</enabled><!--不会下载快照版-->
			</snapshots>
		</repository>
</repositories>
2.maven运行时的加载顺序
maven首先会查找本地仓库中是否存在需要的jar,插件等,假如不存在,在架设了私服的前提下,在私服上查找,假如私服上不存在,那么就会去广域网上下载,广域网不存在就会报错,下载的过程是一个逆过程,maven对插件,jar等的调用最终是在本地仓库上进行的(maven(eclispe)对jar的引用是一个指向相应本地的链接),在maven中加在依赖时有些不需要书写版本是因为在maven中有默认的版本设置。
3.在pom.xml配置中添加自定义的远程仓库
1)添加局部的自定义仓库
//pom.xml中添加
<repositories>
		<repository>
			<id>jboss</id>
			<name>JBoss Repository </name>
			<url> http://repository.jboss.com/maven2/</url>
			<layout>default</layout><!--使用默认的仓库布局-->
			<releases>
				true <!--表示支持从jboss发布版本中下载-->
			</releases>
			<snapshots>
				<enabled>false</enabled><!--不会下载快照版-->
			</snapshots>
		</repository>
</repositories>
备注:id必须是唯一的,倘若使用中央仓库的id,会导致覆盖中央仓库,对releases和snapshot来说还有两个值updatePolicy和checksumPolicy;updatePolicy:默认值为daily表示每天从远程仓库检查更新的频率,never表示从不,always表示每次总是,Interval:表示每隔多少分钟检查一次更新。(用于依赖的版本管理);Checksumpolicy:默认值是warn,会在构件的时候发出警告信息,fail遇到检验和错误就会让构建失败,ignore忽略检验和错误
2)也可以添加到setting.xml的<profiles>中添加全局设置如下(源文件中有提示,只要模仿即可)
<profile>
	 <id>nexus</id>
	 <repositories>
		<repository>
			<id>releases</id>
			<name>releases  info</name>
			<url>http://localhost:8081/nexus/repository/maven-releases/</url>
			<releases><enabled>true</enabled></releases>
			<snapshots><enabled>false</enabled></snapshots>
		</repository>

		<repository>
			<id>snapshot</id>
			<name>snapshot  info</name>
			<url>http://localhost:8081/nexus/repository/maven-snapshots/</url>
			<releases><enabled>false</enabled></releases>
			<snapshots><enabled>true</enabled></snapshots>
		</repository>
	 </repositories>
</profile>
3)添加局部的自定义远程插件的仓库
//pom.xml文件中添加
<pluginRepository>
                    <id> snapshot1</id>
                    <name> snapshot  info </name>
                    <url>http: //localhost:8081/nexus/repository/maven-snapshots/</url>
                    <releases>
                        <enabled>false</enabled>
                    </releases>
                    <snapshots>
                        <enabled>true</enabled>
                    </snapshots>
</pluginRepository>
4)添加全局的远程插件仓库
//在settings文件中天剑(源文件中有提示,只要模仿即可)
<profile>
	<id>nexus</id>
	   <repositories>
		<repository>
			<id>snapshot</id>
			<name>snapshot  info</name>
			<url>http://localhost:8081/nexus/repository/maven-snapshots/</url>
			<releases><enabled>false</enabled></releases>
			<snapshots><enabled>true</enabled></snapshots>
		</repository>
	 </repositories>
     <pluginRepository>
         <id> snapshot1 </id>
         <name> snapshot  info </name>
           <url>http: //localhost:8081/nexus/repository/maven-snapshots/</url>
            <releases><enabled>false</enabled></releases>
            <snapshots><enabled>true</enabled></snapshots>
         </pluginRepository>
     </pluginRepository>
</profile>
4.镜像仓库:只可以读不可以写//如果在找寻的过程中,如果发现该仓库有镜像设置,则用镜像的地址代替。
1)中央仓库的镜像(settings源文件中有提示,settings中设置)
  <mirror>
      <id>mirrorId</id>
      <mirrorOf>repositoryId</mirrorOf>
      <name>Human Readable Name for this Mirror.</name>
      <url>http://my.repository.com/repo/path</url>
 </mirror>
id 仓库id
mirrorOf 匹配为远程仓库的id
name:名称
url:镜像地址
当访问中央仓库的时候会转向访问中央仓库的镜像仓库
2)私服的镜像(settings源文件中有提示,只要模仿即可)
 <mirror>
        <id>cj-nexus</id>
        <name>cj internal nexus repository</name>
        <url>http://localhost:8081/nexus/repository/maven-public/</url>
        <mirrorOf>central</mirrorOf>
 </mirror>
3)中央仓库很慢,一般使用阿里的maven仓库覆盖中央仓库,也可以书写多个镜像地址,当第一个镜像地址失效的时候,就会找第二个镜像地址
<mirror>
    <id>alimaven</id>
    <name>aliyun maven</name>
    <url>http://maven.aliyun.com/nexus/content/groups/public/</url>
    <mirrorOf>central</mirrorOf>
</mirror>
4)http://localhost:8081/nexus/repository/maven-public/中有如下仓库
操作步骤如下


以上在超级pom中以及setting文件中可以看到相应的示例,当然官方文档也有相关的说明
http://maven.apache.org/what-is-maven.html
5私服的搭建
1)nexus私服的安装
下载地址:https://www.sonatype.com/download-oss-sonatype
安装:在windows的(环境变量)path下添加相应的bin(下载解压里面有一个bin目录),然后再dos窗口中使用相应的命令进行安装,卸载,启动服务,关闭服务,相关命令如下(以管理员身份打开)
nexus.exe /install 安装nexus为系统服务
nexus.exe /uninstall 卸载nexus为系统服务
net start nexus 启动nexus服务
net stop nexus停止nexus服务
在浏览器中输入如下localhost:8081/nexus(按下图截图产生的),在nexus-3.12.0-01etc nexus-default.properties文件中

Sign in的默认的账户为admin 密码为admin123,进去之后可以相应的添加账户,修改密码。

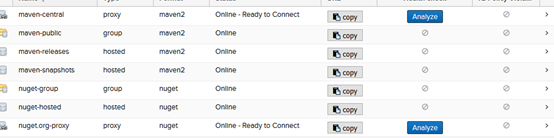
maven2 是java的仓库
nuget是.net的仓库
maven需要连接远程仓库,那么需要在pom.xml配置文件中添加如下配置
maven-central:表示中央仓库
maven-public 仓库聚合并通过一致的地址提供服务
maven –releases:release的宿主仓库
maven –snapshots:snapshot的宿主仓库
2)maven从nexus的下载相应的依赖,见3.2 3.3 3.4 3.5
3)maven部署构件到私服
//pom.xml中的配置
<distributionManagement>
		<repository>
			<id>releases</id>
			<name>releases  info</name>
			<url>http://localhost:8081/nexus/repository/maven-releases/</url>
		</repository>

		<snapshotRepository>
			<id>snapshot</id>
			<name>snapshot  info</name>
			<url>http://localhost:8081/nexus/repository/maven-snapshots/</url>
		</snapshotRepository>
</distributionManagement>
//在setting的servers下添加认证,需要放置在用户目录的.m2下,否则会出现401 error,需要与用户账户密码一致
<server>
      <id>releases</id>
      <username>admin</username>
      <password>admin123</password>
</server>
<server>
      <id>snapshot</id>
      <username>admin</username>
      <password>admin123</password>
</server>
5)上传文件在maven仓库删除
