ELK--04 使用redis优化方案
目录
1.filebeat引入redis缓存 (redis 单节点)

filebeat收集日志传给redis,因为redis和es不能直接通信,需要中间件logstash从redis中取数据传给es,es在传给kibana展示数据
1.安装redis
[root@db01 ~]# yum install redis
[root@db01 ~]# sed -i 's#^bind 127.0.0.1#bind 127.0.0.1 10.0.0.51#' /etc/redis.conf
[root@db01 ~]# systemctl start redis
[root@db01 ~]# netstat -lntup|grep redis
[root@db01 ~]# redis-cli -h 10.0.0.51

2.停止docker容器
[root@db01 ~]# docker stop $(docker ps -q)

3.停止filebeat
[root@db01 ~]# systemctl stop filebeat

4.删除旧的ES索引

5.确认nginx日志为json格式
[root@db01 ~]#  grep "access_log" nginx.conf
access_log  /var/log/nginx/access.log  json;

6.修改filebeat配置文件
[root@db01 ~]# cat >/etc/filebeat/filebeat.yml <<EOF
filebeat.inputs:
- type: log
  enabled: true
  paths:
    - /var/log/nginx/access.log
  json.keys_under_root: true
  json.overwrite_keys: true
  tags: ["access"]

- type: log
  enabled: true
  paths:
    - /var/log/nginx/error.log
  tags: ["error"]

output.redis:
  hosts: ["10.0.0.51"]
  keys:
    - key: "nginx_access"
      when.contains:
        tags: "access"
    - key: "nginx_error"
      when.contains:
        tags: "error"

setup.template.name: "nginx"
setup.template.pattern: "nginx_*"
setup.template.enabled: false
setup.template.overwrite: true
EOF

7.重启filebaet和nginx
[root@db01 ~]# systemctl restart nginx
[root@db01 ~]# systemctl restart filebeat

8.生成测试数据
[root@db01 ~]# curl 127.0.0.1/haha

9.检查
[root@db01 ~]# redis-cli -h 10.0.0.51
keys *
TYPE nginx_access
LLEN nginx_access
LRANGE nginx_access 0 -1
确认是否为json格式

10.安装logstash
[root@db01 ~]# rpm -ivh jdk-8u102-linux-x64.rpm
[root@db01 ~]# rpm -ivh logstash-6.6.0.rpm


11.配置redis将数据传给logstash的配置文件
[root@db01 ~]# cat >/etc/logstash/conf.d/redis.conf<<EOF
input {
  redis {
    host => "10.0.0.51"
    port => "6379"
    db => "0"
    key => "nginx_access"
    data_type => "list"
  }
  redis {
    host => "10.0.0.51"
    port => "6379"
    db => "0"
    key => "nginx_error"
    data_type => "list"
  }
}

filter {
  mutate {
    convert => ["upstream_time", "float"]
    convert => ["request_time", "float"]
  }
}

output {
   stdout {}
   if "access" in [tags] {
      elasticsearch {
        hosts => "http://10.0.0.51:9200"
        manage_template => false
        index => "nginx_access-%{+yyyy.MM}"
      }
    }
    if "error" in [tags] {
      elasticsearch {
        hosts => "http://10.0.0.51:9200"
        manage_template => false
        index => "nginx_error-%{+yyyy.MM}"
      }
    }
}
EOF

12.前台启动测试
[root@db01 ~]#  /usr/share/logstash/bin/logstash -f /etc/logstash/conf.d/redis.conf

13.检查
logstash输出的内容有没有解析成json
es-head上有没有索引生成
redis里的列表数据有没有在减少

14.将logstash放在后台运行
ctrl+c
[root@db01 ~]#  systemctl start logstash
听风扇声音,开始转的时候表示logstash启动了

15.后台启动后生成数据并在es-head中查看

2.filebeat引入redis完善方案 (使用两台服务器完成redis高可用)
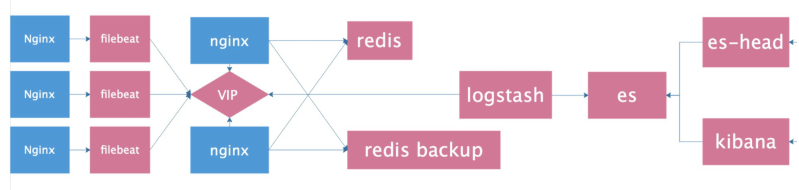
因为filebeat只支持把数据传到redis单节点上面(filebeat不支持传输给redis哨兵或集群,logstash也不支持从redis哨兵或集群里读取数据),所以在filebeat和redis之前配置nginx代理服务,引用keepalives高可用来完成转换,即在redis前面使用nginx做keepalived,假如节点1挂掉了,节点2还能接收filebeat数据传给redis,logstash也连接keepalived,
1.前提条件
- filebeat不支持传输给redis哨兵或集群
- logstash也不支持从redis哨兵或集群里读取数据

2.安装配置redis(db01、db02安装)
[root@db01 ~]# yum install redis -y
[root@db02 ~]# yum install redis -y
[root@db01 ~]# sed -i 's#^bind 127.0.0.1#bind 127.0.0.1 10.0.0.51#' /etc/redis.conf
[root@db02 ~]# sed -i 's#^bind 127.0.0.1#bind 127.0.0.1 10.0.0.52#' /etc/redis.conf
[root@db01 ~]# systemctl start redis
[root@db02 ~]# systemctl start redis

3.安装配置nginx
配置官方源
[root@db01 ~]# yum install nginx -y
[root@db02 ~]# yum install nginx -y
放在nginx.conf最后一行的}后面,不要放在conf.d里面
stream {
  upstream redis {
      server 10.0.0.51:6379 max_fails=2 fail_timeout=10s;
      server 10.0.0.52:6379 max_fails=2 fail_timeout=10s backup;
  }

  server {
          listen 6380;
          proxy_connect_timeout 1s;
          proxy_timeout 3s;
          proxy_pass redis;
  }
}

#检查并启动nginx
[root@db01 ~]# nginx -t
[root@db02 ~]# nginx -t
[root@db01 ~]# systemctl start nginx
[root@db02 ~]# systemctl start nginx

4.安装配置keepalived
[root@db01 ~]# yum install keepalived -y
[root@db02 ~]# yum install keepalived -y

#db01的配置  =======(# 虚拟ip 10.0.100)
[root@db01 ~]# cat /etc/keepalived/keepalived.conf
global_defs {
    router_id db01
}
vrrp_instance VI_1 {
    state MASTER
        interface eth0
        virtual_router_id 50
        priority 150
        advert_int 1
        authentication {
            auth_type PASS
            auth_pass 1111
        }
        virtual_ipaddress {
            10.0.0.100
        }
}

#db02的配置 =======(# 虚拟ip 10.0.100)
[root@db02 ~]# cat /etc/keepalived/keepalived.conf
global_defs {
    router_id db02
}
vrrp_instance VI_1 {
    state BACKUP
    interface eth0
    virtual_router_id 50
    priority 100
    advert_int 1
    authentication {
        auth_type PASS
        auth_pass 1111
    }
    virtual_ipaddress {
        10.0.0.100
    }
}

[root@db01 ~]# systemctl start keepalived
[root@db02 ~]# systemctl start keepalived
[root@db01 ~]# ip addr |grep 10.0.0.100

5.测试访问能否代理到redis
[root@db01 ~]# redis-cli -h 10.0.0.100 -p 6380
#把db01的redis停掉,测试还能不能连接redis

6.配置filebeat #(只在一台器机器上执行即可)
[root@db01 ~]#  cat >/etc/filebeat/filebeat.yml <<EOF
filebeat.inputs:
- type: log
  enabled: true
  paths:
    - /var/log/nginx/access.log
  json.keys_under_root: true
  json.overwrite_keys: true
  tags: ["access"]

- type: log
  enabled: true
  paths:
    - /var/log/nginx/error.log
  tags: ["error"]

output.redis:
  hosts: ["10.0.0.100:6380"]     #注意此处ip为虚拟ip:10.0.0.100
  keys:
    - key: "nginx_access"
      when.contains:
        tags: "access"
    - key: "nginx_error"
      when.contains:
        tags: "error"

setup.template.name: "nginx"
setup.template.pattern: "nginx_*"
setup.template.enabled: false
setup.template.overwrite: true
EOF

7.测试访问filebeat能否传输到redis
[root@db01 ~]# curl 127.0.0.1/haha
[root@db01 ~]# redis-cli -h 10.0.0.51 #应该有数据
[root@db02 ~]# redis-cli -h 10.0.0.52 #应该没数据
[root@db01 ~]# redis-cli -h 10.0.0.100 -p 6380 #应该有数据

8.配置logstash
[root@db01 ~]# cat >/etc/logstash/conf.d/redis.conf<<EOF
input {
  redis {
    host => "10.0.0.100"     #注意此处ip为虚拟ip:10.0.0.100
    port => "6380"
    db => "0"
    key => "nginx_access"
    data_type => "list"
  }
  redis {
    host => "10.0.0.100"      #注意此处ip为虚拟ip:10.0.0.100
    port => "6380"
    db => "0"
    key => "nginx_error"
    data_type => "list"
  }
}

filter {
  mutate {
    convert => ["upstream_time", "float"]
    convert => ["request_time", "float"]
  }
}

output {
   stdout {}
   if "access" in [tags] {
      elasticsearch {
        hosts => "http://10.0.0.51:9200"
        manage_template => false
        index => "nginx_access-%{+yyyy.MM}"
      }
    }
    if "error" in [tags] {
      elasticsearch {
        hosts => "http://10.0.0.51:9200"
        manage_template => false
        index => "nginx_error-%{+yyyy.MM}"
      }
    }
}
EOF

9.启动测试
/usr/share/logstash/bin/logstash -f /etc/logstash/conf.d/redis.conf

#测试完毕后台启动
systemctl start logstash

10.最终测试
ab -n 10000 -c 100 10.0.0.100/
检查es-head上索引条目是否为10000条
关闭db01的redis,在访问,测试logstash正不正常
恢复db01的redis,再测试

11.登录es-head查看日志数据

3.filbeat引入redis优化方案
1.新增加一个日志路径需要修改4个地方:
- filebat 2个位置
- logstash 2个位置

2.优化之后需要修改的地方2个地方
- filebat 1个位置
- logstash 1个位置

3.filebeat配置文件
cat /etc/filebeat/filebeat.yml
filebeat.inputs:
- type: log
  enabled: true
  paths:
    - /var/log/nginx/access.log
  json.keys_under_root: true
  json.overwrite_keys: true
  tags: ["access"]

- type: log
  enabled: true
  paths:
    - /var/log/nginx/error.log
  tags: ["error"]


output.redis:
  hosts: ["10.0.0.100:6380"]
  key: "nginx_log"

setup.template.name: "nginx"
setup.template.pattern: "nginx_*"
setup.template.enabled: false
setup.template.overwrite: true

4.优化后的logstash
 cat /etc/logstash/conf.d/redis.conf
input {
  redis {
    host => "10.0.0.100"
    port => "6380"
    db => "0"
    key => "nginx_log"
    data_type => "list"
  }
}

filter {
  mutate {
    convert => ["upstream_time", "float"]
    convert => ["request_time", "float"]
  }
}

output {
   stdout {}
   if "access" in [tags] {
      elasticsearch {
        hosts => "http://10.0.0.51:9200"
        manage_template => false
        index => "nginx_access-%{+yyyy.MM}"
      }
    }
    if "error" in [tags] {
      elasticsearch {
        hosts => "http://10.0.0.51:9200"
        manage_template => false
        index => "nginx_error-%{+yyyy.MM}"
      }
    }
}