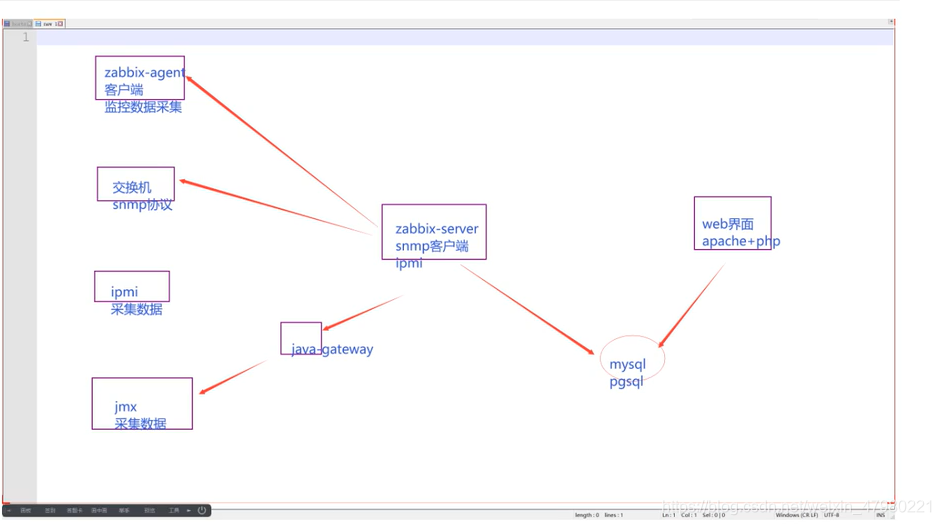
1、zabbix的软件架构

2、zabbix安装
-
安装什么版本
- 标准版
- 长期支持版:LTS
1、安装zabbix的repo源
清华源地址:https://mirror.tuna.tsinghua.edu.cn/
rpm -ivh https://mirror.tuna.tsinghua.edu.cn/zabbix/zabbix/4.0/rhel/7/x86_64/zabbix-release-4.0-2.el7.noarch.rpm
##替换一下源的地址
vim /etc/yum.repo.d/zabbix.repo
:%s#repo.zabbix.com#mirror.tuna.tsinghua.edu.cn/zabbix#g
2、安装zabbix-server-mysql和zabbix-web-mysql
# yum -y install zabbix-server-mysql zabbix-web-mysql3、配置数据库mariadb-server,导入初始数据
yum install -y mariadb-server.x86_64
systemctl enable mariadb.service
systemctl start mariadb.service
mysql_secure_installation	//数据库安全初始化
mysql
MariaDB [(none)]> create database zabbix character set utf8 collate utf8_bin;
MariaDB [(none)]> grant all on zabbix.* to zabbix@localhost identified by '123123';
导入数据 # rpm -ql zabbix-server-mysql //查询sql文件位置 cd /usr/share/doc/zabbix-server-mysql-4.0.21/ gzip -d create.sql.gz mysql -uzabbix -p123123 zabbix <create.sql4、修改zabbix-server配置文件
# vim /etc/zabbix/zabbix_server.conf
# grep -Ev '^$|#' /etc/zabbix/zabbix_server.conf
LogFile=/var/log/zabbix/zabbix_server.log
LogFileSize=0
PidFile=/var/run/zabbix/zabbix_server.pid
SocketDir=/var/run/zabbix
DBHost=localhost	//手动修改
DBName=zabbix		//手动修改
DBUser=zabbix		//手动修改
DBPassword=123123		//手动修改
SNMPTrapperFile=/var/log/snmptrap/snmptrap.log
Timeout=4
AlertScriptsPath=/usr/lib/zabbix/alertscripts
ExternalScripts=/usr/lib/zabbix/externalscripts
LogSlowQueries=3000
启动服务 systemctl enable zabbix-server.service systemctl start zabbix-server.service netstat -lnptu5、修改zabbix-web配置文件
systemctl enable httpd
systemctl start httpd
vim /etc/httpd/conf.d/zabbix.conf
	php_value date.timezone Asia/Shanghai
systemctl restart httpd
配置登录 上面导入数据时候有默认的账号密码为Admin/zabbix

修改为中文


3、添加监控主机
zabbix-server安装agent
yum -y install zabbix-agent.x86_64
systemctl enable zabbix-agent.service
systemctl start zabbix-agent.service
其他主机添加监控
wget https://mirror.tuna.tsinghua.edu.cn/zabbix/zabbix/4.0/rhel/7/x86_64/zabbix-agent-4.0.16-1.el7.x86_64.rpm
rpm  -ivh zabbix-agent-4.0.16-1.el7.x86_64.rpm
vim /etc/zabbix/zabbix_agentd.conf
	//修改Server=192.168.53.6
systemctl enable zabbix-agent.service
systemctl start zabbix-agent.service


4、添加触发器

创建触发器


点添加


创建自动生成触发器


5、自定义报警
a:创建自定义监控项
agent操作
vim /etc/zabbix/zabbix_agentd.conf
	UserParameter=login_users,who|wc -l
systemctl restart zabbix-agent.service

server操作
yum -y install zabbix-get.x86_64	//zabbix取值用
zabbix_get -s 192.168.53.7 -k login_users	//-s 指定主机 -k 指定要取得值


创建对应触发器

a:自定义发件人


b:定义收件人

c:启动触发器得动作

改成启用

触发报警动作测试邮件告警

6、使用grafana自定义图形
7、自定义zabbix模板