Vuex 是一个专为 Vue.js 应用程序开发的状态管理模式,它采用集中式存储管理应用的所有组件的状态,注意:使用前需要先加载vue文件才可以使用(在node.js下需要使用Vue.use(Vuex)来安装vuex插件,在浏览器环境下直接加载即可,vuex会自行安装)
vuex的使用方法很简单,首先调用new Vuex.Store(options)创建一个store实例即可,然后在创建vue实例时把这个store实例作为store属性传入即可,调用new Vuex.Store(options)创建一个vuex实例时可以传入如下参数:
state 存储的数据
getters 可以认为是store的计算属性
mutations 这是更改Vuex的store里的数据的唯一方法,只能是同步方法(官网这样写的,其实不赞同这个说法,具体请看下面)
actions 可以包含一些异步操作,它提交的是mutation,而不是直接变更状态。
modules 为了更方便的管理仓库,我们把一个大的store拆成一些modules(子仓库),整个modules是一个树型结构
strict 是否开启严格模式,无论何时发生了状态变更且不是由mutation函数引起的,将会抛出错误,这能保证所有的状态变更都能被调试工具跟踪到。 ;默认为false
后面介绍每个api时单独介绍用法,举个栗子,如下:
writer by:大沙漠 QQ:22969969
<!DOCTYPE html>
<html lang="en">
<head>
    <meta charset="UTF-8">
    <title>Document</title>
    <script src="https://cdn.jsdelivr.net/npm/vue@2.5.16/dist/vue.js"></script>
    <script src="https://unpkg.com/vuex@3.1.0/dist/vuex.js"></script>
</head>
<body>
    <div id="app">
        <p>{{message}}</p>
        <p>{{reverseMessage}}</p>
        <p>{{no}}</p>
        <button @click="test1">mutation测试</button>
        <button @click="test2">action测试</button>
    </div>
    <script>
        const store = new Vuex.Store({
            state:{message:'Hello World',no:123},
            getters:{                                   //getters类似于Vue的计算属性
                reverseMessage:state=>{return state.message.split('').reverse().join('')},
                increment:state=>{state.no++}
            },
            mutations:{                                 //mutation包含一些同步操作
                increment(state,payload){state.no+=payload.no}
            },
            actions:{                                   //actions包含一些异步操作
                increment({commit},info){
                    setTimeout(function(){
                        commit('increment',info)
                    },500)
                }
            }
        })

        var app = new Vue({
            el:"#app",
            store,
            computed:{
                no:function(){return this.$store.state.no},
                message:function(){return this.$store.state.message},
                reverseMessage:function(){return this.$store.getters.reverseMessage}
            },
            methods:{
                test1:function(){this.$store.commit('increment',{no:10})},
                test2:function(){this.$store.dispatch('increment',{no:10})}
            }
        })
    </script>
</body>
</html>
渲染如下:
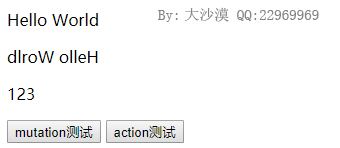
我们点击mutation测试这个按钮123会这个数字会立马递增10,而点击action测试这个按钮,数字会延迟0.5秒,再递增10,前者是mutation对应的同步操作,而后者是action对应的异步操作
如果只是这样显式数据,感觉vuex没有什么用处,我们在浏览器里输入store.state.message="Hello Vue"来直接修改state里的数据看看怎么样,如下:
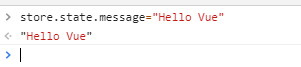
修改后页面里的内容立即就变化了,如下:
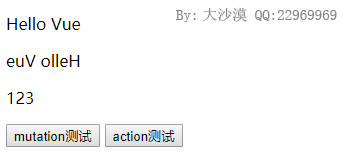
是不是很神奇,这里只是一个组件引用了vuex,如果很多的组件都引用了同一个vuex实例,那么只要状态发生变化,对应的组件都会自动更新,这就是vuex的作用。
vuex官网说mutations是更改store里数据的唯一方法,这在逻辑上不严谨的,只有设置了strict为true,那么说mutations是更改store里数据的唯一方法还可以接收,比如我们在控制台里直接修改store里的数据了,也没报错啥的。
vuex内部的实现原理很简单,就是定义一个vue实例,把vuex.store里的state作为data属性(不是根data,而是放到$$state这个属性里,不过由于值是个对象,因此也是响应式的),getters作为计算属性来实现的
源码分析
我们先看看vuex插件导出了哪些符号,打开vuex的源文件,拉到最底部,如下:
  var index = {
    Store: Store,                           //初始化
    install: install,                       //安装方法
    version: '3.1.0',                       //版本号
    mapState: mapState,                     //State辅助函数
    mapMutations: mapMutations,             //Mutations辅助函数
    mapGetters: mapGetters,                 //Getters辅助函数
    mapActions: mapActions,                 //Actions辅助函数
    createNamespacedHelpers: createNamespacedHelpers
  };
可以看到Store就是初始化函数,install是安装用的,version是版本号,其它几个都是辅助函数,最后一个是和辅助函数的上下文绑定(也就是命名空间)相关,一般用不到。
我们先看看安装流程,如下:
  function install (_Vue) {         //安装Vuex
    if (Vue && _Vue === Vue) {        //如果Veue存在且等于参数_Vue,表示已经安装过了,则报错
      {
        console.error(
          '[vuex] already installed. Vue.use(Vuex) should be called only once.'
        );
      }
      return
    }
    Vue = _Vue;                       //将_Vue保存到局部变量Vue里
    applyMixin(Vue);                  //调用applyMixin()进行初始化
  }
安装时最后会执行applyMixin函数,该函数如下:
  function applyMixin (Vue) {                         //将Vuex混入到Vue里面
    var version = Number(Vue.version.split('.')[0]);      //获取主版本号

    if (version >= 2) {                                   //如果是Vue2.0及以上版
      Vue.mixin({ beforeCreate: vuexInit });                  //则执行Vue.mixin()方法,植入一个beforeCreate回调函数
    } else {
      // override init and inject vuex init procedure
      // for 1.x backwards compatibility.
      var _init = Vue.prototype._init;
      Vue.prototype._init = function (options) {
        if ( options === void 0 ) options = {};

        options.init = options.init
          ? [vuexInit].concat(options.init)
          : vuexInit;
        _init.call(this, options);
      };
    }

    /**
     * Vuex init hook, injected into each instances init hooks list.
     */

    function vuexInit () {                                //Vuex的安装方法
      var options = this.$options;
      // store injection
      if (options.store) {                                    //如果options.store存在,即初始化Vue实例时传入了store实例
        this.$store = typeof options.store === 'function'         //则将store保存到大Vue的$store属性上,如果store是个函数,则执行该函数
          ? options.store()
          : options.store;
      } else if (options.parent && options.parent.$store) {   //如果options.store不存在,但是父实例存在$store(组件的情况下)
        this.$store = options.parent.$store;                      //则设置this.$store为父实例的$store
      }
    }
  }
这样不管是根vue实例,还是组件,都可以通过this.$store来获取到对应的$store实例了,安装就是这样子,下面说一下整体流程
以上面的例子为例,当我们执行new Vuex.Store()创建一个Vuex.Store的实例时会执行到导出符号的Store函数,如下:
  var Store = function Store (options) {                  //构造函数
    var this$1 = this;
    if ( options === void 0 ) options = {};

    // Auto install if it is not done yet and `window` has `Vue`.
    // To allow users to avoid auto-installation in some cases,
    // this code should be placed here. See #731
    if (!Vue && typeof window !== 'undefined' && window.Vue) {      //如果局部变量Vue不存在且window.Vue存在,即已经引用了Vue,而且window.Vue不存在(还没安装)
      install(window.Vue);                                              //执行install()方法进行安装     ;从这里看出在浏览器环境下不需要执行Vue.use(vuex),在执行new Vuex.Store()会自己安装
    }

    {
      assert(Vue, "must call Vue.use(Vuex) before creating a store instance.");
      assert(typeof Promise !== 'undefined', "vuex requires a Promise polyfill in this browser.");
      assert(this instanceof Store, "store must be called with the new operator.");
    }

    var plugins = options.plugins; if ( plugins === void 0 ) plugins = [];
    var strict = options.strict; if ( strict === void 0 ) strict = false;

    // store internal state
    this._committing = false;
    this._actions = Object.create(null);
    this._actionSubscribers = [];
    this._mutations = Object.create(null);
    this._wrappedGetters = Object.create(null);
    this._modules = new ModuleCollection(options);                    //初始化modules,ModuleCollection对象是收集所有模块信息的
    this._modulesNamespaceMap = Object.create(null);
    this._subscribers = [];
    this._watcherVM = new Vue();

    // bind commit and dispatch to self
    var store = this;
    var ref = this;
    var dispatch = ref.dispatch;
    var commit = ref.commit;
    this.dispatch = function boundDispatch (type, payload) {          //重写dispatch方法,将上下文设置为当前的this实例
      return dispatch.call(store, type, payload)
    };
    this.commit = function boundCommit (type, payload, options) {     //重写commit方法,将上下文设置为当前的this实例
      return commit.call(store, type, payload, options)
    };

    // strict mode
    this.strict = strict;

    var state = this._modules.root.state;                             //获取根仓库的state信息

    // init root module.
    // this also recursively registers all sub-modules
    // and collects all module getters inside this._wrappedGetters
    installModule(this, state, [], this._modules.root);               //安装根模块,该函数会递归调用的安装子模块,并收集它们的getters到this._wrappendGetters属性上

    // initialize the store vm, which is responsible for the reactivity
    // (also registers _wrappedGetters as computed properties)
    resetStoreVM(this, state);                                        //安装vm,也就是这里会创建一个vue实例,并把state、getter作为响应式对象

    // apply plugins
    plugins.forEach(function (plugin) { return plugin(this$1); });    //安装插件

    var useDevtools = options.devtools !== undefined ? options.devtools : Vue.config.devtools;
    if (useDevtools) {
      devtoolPlugin(this);
    }
  };
ModuleCollection模块会收集根模块和子模块的的所有信息,例子里执行到这里时对应的this._modules如下:

然后会调用执行到installModule()会安装每个模块,也就是把每个模块的getters、mutations、actions进行一系列处理,如果还有子模块(module属性)则递归调用installModule依次处理每个子模块,如下:
function installModule (store, rootState, path, module, hot) {      //安装模块
    var isRoot = !path.length;                                          //当前是否为根Module
    var namespace = store._modules.getNamespace(path);                  //获取命名空间

    // register in namespace map
    if (module.namespaced) {
      store._modulesNamespaceMap[namespace] = module;
    }

    // set state
    if (!isRoot && !hot) {
      var parentState = getNestedState(rootState, path.slice(0, -1));
      var moduleName = path[path.length - 1];
      store._withCommit(function () {
        Vue.set(parentState, moduleName, module.state);
      });
    }

    var local = module.context = makeLocalContext(store, namespace, path);

    module.forEachMutation(function (mutation, key) {                     //遍历module模块的mutations对象
      var namespacedType = namespace + key;
      registerMutation(store, namespacedType, mutation, local);             //调用registerMutation注册mutation
    });

    module.forEachAction(function (action, key) {                         //遍历module模块的actions对象
      var type = action.root ? key : namespace + key;
      var handler = action.handler || action;
      registerAction(store, type, handler, local);                          //调用registerAction注册action
    });

    module.forEachGetter(function (getter, key) {                         //遍历module模块的getter对象
      var namespacedType = namespace + key;
      registerGetter(store, namespacedType, getter, local);                 //调用registerGetter注册getter
    });

    module.forEachChild(function (child, key) {                           //如果有定义了module(存在子模块的情况)
      installModule(store, rootState, path.concat(key), child, hot);        //则递归调用installModule
    });
  }
最后会执行resetStoreVM()函数,该函数内部会创建一个vue实例,这样state和getters就是响应式数据了,如下:
  function resetStoreVM (store, state, hot) {         //重新存储数据
    var oldVm = store._vm;

    // bind store public getters
    store.getters = {};
    var wrappedGetters = store._wrappedGetters;               //获取store的所有getter数组信息
    var computed = {};
    forEachValue(wrappedGetters, function (fn, key) {         //遍历wrappedGetters
      // use computed to leverage its lazy-caching mechanism
      computed[key] = function () { return fn(store); };        //将getter保存到computed里面
      Object.defineProperty(store.getters, key, {
        get: function () { return store._vm[key]; },
        enumerable: true // for local getters
      });
    });

    // use a Vue instance to store the state tree
    // suppress warnings just in case the user has added
    // some funky global mixins
    var silent = Vue.config.silent;                           //保存Vue.config.silent的配置
    Vue.config.silent = true;                                 //设置Vue.config.silent配置属性为true(先关闭警告)
    store._vm = new Vue({                                     //创建new Vue()实例把$$state和computed变成响应式的
      data: {
        $$state: state
      },
      computed: computed
    });
    Vue.config.silent = silent;                               //将Vue.config.silent复原回去

    // enable strict mode for new vm
    if (store.strict) {
      enableStrictMode(store);
    }

    if (oldVm) {
      if (hot) {
        // dispatch changes in all subscribed watchers
        // to force getter re-evaluation for hot reloading.
        store._withCommit(function () {
          oldVm._data.$$state = null;
        });
      }
      Vue.nextTick(function () { return oldVm.$destroy(); });
    }
  }
这样整个流程就跑完了,就是内部创建一个vue实例,利用vue的响应式做数据动态响应。