RabbitMQ日常(一)HelloWorld之模拟收发消息
2019-08-29 17:01:13 wujianqinjian 阅读数 19更多
分类专栏: 消息队列
版权声明:本文为博主原创文章,遵循 CC 4.0 BY-SA 版权协议,转载请附上原文出处链接和本声明。
本文链接:https://blog.csdn.net/u010569419/article/details/100076066
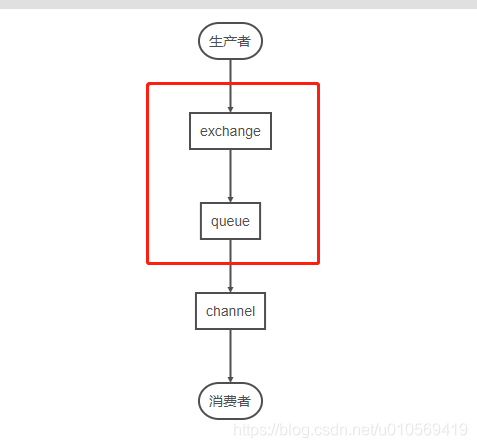
下图为一个简易的RabbitMQ流程草图,RabbitMQ一般流程为:
- 由生产者创建消息后,放置在(交换机)exchange中
- RabbitMQ通过相关配置绑定exchange和queue(队列)
- 消费者通过channel(管道)获取channel中的消息

- rabbitmq 3.7.14(使用rpm安装)
- 创建一个Springboot项目,小白请自行百度
- 通过maven的pom文件引入相关依赖jar包
- 编写生产端、消费端代码
- pom.xml文件
<?xml version="1.0" encoding="UTF-8"?>
<project xmlns="http://maven.apache.org/POM/4.0.0" xmlns:xsi="http://www.w3.org/2001/XMLSchema-instance"
         xsi:schemaLocation="http://maven.apache.org/POM/4.0.0 https://maven.apache.org/xsd/maven-4.0.0.xsd">
    <modelVersion>4.0.0</modelVersion>
    <parent>
        <groupId>org.springframework.boot</groupId>
        <artifactId>spring-boot-starter-parent</artifactId>
        <version>2.1.7.RELEASE</version>
        <relativePath/> <!-- lookup parent from repository -->
    </parent>
    <groupId>com.rabbitMQ</groupId>
    <artifactId>mq_demo</artifactId>
    <version>0.0.1-SNAPSHOT</version>
    <name>mq_demo</name>
    <description>Demo project for Spring Boot</description>

    <properties>
        <java.version>1.8</java.version>
    </properties>

    <dependencies>
        <dependency>
            <groupId>org.springframework.boot</groupId>
            <artifactId>spring-boot-starter-web</artifactId>
        </dependency>

        <dependency>
            <groupId>org.springframework.boot</groupId>
            <artifactId>spring-boot-starter-test</artifactId>
            <scope>test</scope>
        </dependency>
        <dependency>
            <groupId>com.rabbitmq</groupId>
            <artifactId>amqp-client</artifactId>
            <version>5.6.0</version>
        </dependency>
    </dependencies>

    <build>
        <plugins>
            <plugin>
                <groupId>org.springframework.boot</groupId>
                <artifactId>spring-boot-maven-plugin</artifactId>
            </plugin>
        </plugins>
    </build>
</project>
生产者代码
package com.new_rabbitmq;
import com.rabbitmq.client.Channel;
import com.rabbitmq.client.Connection;
import com.rabbitmq.client.ConnectionFactory;

public class Produce {

    public static void main(String[] args) throws Exception{
        ConnectionFactory connectionFactory= new ConnectionFactory();
        connectionFactory.setHost("你的主机IP");
        connectionFactory.setPort(5672);
        connectionFactory.setVirtualHost("/");

        Connection connection=connectionFactory.newConnection();

        Channel channel=connection.createChannel();
        String msg="This is a message2!";
        //这里的test01为队列名称
        channel.basicPublish("","test01",null,msg.getBytes());
        channel.close();
        connection.close();

    }
}
消费者代码
package com.new_rabbitmq;

import com.rabbitmq.client.*;
import com.rabbitmq.client.impl.AMQImpl;

import java.io.IOException;

public class Consumer {

    public static void main(String[] args) throws Exception{
        //创建链接
        ConnectionFactory connectionFactory= new ConnectionFactory();
        connectionFactory.setHost("你的主机IP");
        connectionFactory.setPort(5672);
        connectionFactory.setVirtualHost("/");
        Connection connection=connectionFactory.newConnection();
        //创建一个管道
        Channel channel=connection.createChannel();
        // 声明一个队列
        channel.queueDeclare("test01",true,false,false,null);
        // 创建消费者
        DefaultConsumer consumer= new DefaultConsumer(channel){
            @Override
            public void handleDelivery(String consumerTag, Envelope envelope, AMQP.BasicProperties properties, byte[] body) throws IOException {
                //super.handleDelivery(consumerTag, envelope, properties, body);
                String message = new String(body, "utf-8");
                System.out.println("[Receive]:" + message);
            }
        };
        channel.basicConsume("test01",true,consumer);
	/*
	//创建消费者的第二种方式
        DeliverCallback deliverCallback = (consumer, delivery) -> {
            String message = new String(delivery.getBody(), "UTF-8");
            System.out.println(" [x] Received '" + message + "'");
        };
        channel.basicConsume(queueName, true, deliverCallback, consumer -> { });
    */
    }
}
- 上面总结了两种创建consumer的方法(虽然是官网抄的),但重点是 channel.basicConsume(“test01”,true,consumer); 这里的true是代表自动签收(生产一般不用自动签收)。
- 根据rabbitMQ的原理:我们这里需要先启动消费者端,再启动生产端,才可以看到消费者监听队列的效果!