1.请运行以下示例代码StringPool.java,查看输出结果。如何解释这样的输出结果?从中你能总结出什么?
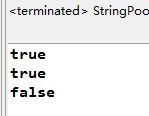
 1 public class StringPool {
 2
 3     public static void main(String args[])
 4     {
 5
 6         String s0="Hello";
 7
 8         String s1="Hello";
 9
10         String s2="He"+"llo";
11
12         System.out.println(s0==s1);//true
13
14         System.out.println(s0==s2);//true
15
16         System.out.println(new String("Hello")==new String("Hello"));//false
17
18     }
19
20 }
程序运行结果:
结论:
1、在Java中,内容相同的字符常量只保存一份以节省内存,所以s0,s1,s2实际上引用的是同一个对象。
2、编译器在编译s2一句时,会去掉“+”号,直接把两个字串连接起来得一个字串。这种优化工作由Java编译器自动完成。
3、当直接使用new关键字创建字符串对象时,虽然值一致,但仍然是两个独立的对象。
再看……
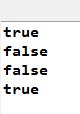
 1 public class Test {
 2
 3     public static void main(String[] args) {
 4
 5         String s1 = "a";
 6
 7         String s2 = s1;
 8
 9         System.out.println(s1 == s2);
10
11         s1 += "b";
12
13         System.out.println(s1 == s2);
14
15         System.out.println(s1 == "ab");
16
17         System.out.println(s1.equals("ab"));
18
19     }
20
21 }
程序运行结果:
为什么会有上述的输出结果?从中你又能总结出什么?
1、给字串变量赋值意味着:两个变量(s1,s2)现在引用同一个字符串对象。
2、String对象的内容是只读的,使用“+”修改s1变量的值,实际上是得到了一个新的字符串对象,其内容为“ab”,它与原先s1所引用的对象“a”
无关,所以s1==s2返回false;
3、代码中的“ab”字符串是一个常量,它所引用的字符串与s1所引用的“ab”对象无关。
4、String.equals()方法可以比较两个字符串的内容。
2、请查看String.equals()方法的实现代码,注意学习其实现方法。
String.equals()源代码:
 1 public boolean equals(Object anObject) {
 2     if (this == anObject) {
 3         return true;
 4     }
 5     if (anObject instanceof String) {
 6         String anotherString = (String)anObject;
 7         int n = count;
 8         if (n == anotherString.count) {
 9         char v1[] = value;
10         char v2[] = anotherString.value;
11         int i = offset;
12         int j = anotherString.offset;
13         while (n-- != 0) {
14             if (v1[i++] != v2[j++])
15             return false;
16         }
17         return true;
18         }
19     }
20     return false;
21     }
由代码可知,这个函数首先判断这两个对象是否引用同一个字符串对象,如果是直接比较是否相同,如果不是,则比较两个对象中的字符是否相等。而且比较的方式是比较单个字符。
3、整理String类的length()、charAt()、 getChars()、replace()、 toUpperCase()、 toLowerCase()、trim()、toCharArray()使用说明。
(1)、int length():返回字符串的长度。
例:
 1 public class Test {
 2
 3     public static void main(String[] args) {
 4
 5         String s1 = new String("hello world!");
 6
 7         String s2 = new String("hello");
 8
 9         System.out.println("s1的长度为:"+s1.length());
10
11         System.out.println("s2的长度为:"+s2.length());
12
13     }
14
15 }
执行结果:

(2)、 char charAt(int index):取字符串中的某一个字符,其中的参数index值得是字符串中序数。字符串的序数从0开始到length()-1。
例:
 1 public class Test {
 2
 3     public static void main(String[] args) {
 4
 5         String s1 = new String("hello world!");
 6
 7         System.out.println("排在s1的第7位的字符为:"+s1.charAt(6));
 8
 9     }
10
11 }
执行结果:

(3)、void getChars(int srcBegin, int srcEnd, char dst[], int dstBegin):将字符从字符串复制到目标字符数组。
-
srcBegin -- 字符串中要复制的第一个字符的索引。
-
srcEnd -- 字符串中要复制的最后一个字符之后的索引。
-
dst -- 目标数组。
-
dstBegin -- 目标数组中的起始偏移量。
- 无返回值,但会抛出IndexOutOfBoundsException异常
例:
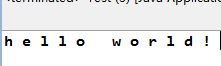
 1 public class Test {
 2
 3     public static void main(String[] args) {
 4
 5         String s1 = new String("hello world!");
 6
 7         char s2[] = new char[10];
 8
 9         s1.getChars(6, 12, s2, 0);
10
11         System.out.println(s2);
12
13     }
14
15 }
执行结果:

(4)、String replace(char oldChar,char newChar):将字符串中的所有oldChar替换成newChar
例:
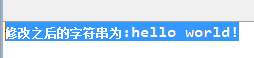
 1 public class Test {
 2
 3     public static void main(String[] args) {
 4
 5         String s1 = new String("hello world!");
 6
 7         String s2 = s1.replace('o','a');
 8
 9         System.out.println("修改之后的字符串为:"+s2);
10
11     }
12
13 }
执行结果:

(5)、String toUpperCase():全部字符变为大写,返回新字符串。
例:
 1 public class Test {
 2
 3     public static void main(String[] args) {
 4
 5         String s1 = new String("hello world!");
 6
 7         System.out.println("修改之后的字符串为:"+s1.toUpperCase());
 8
 9     }
10
11 }
执行结果:

(6)、String toLowerCase():全部字符变为小写,返回新字符串。
例:
 1 public class Test {
 2
 3     public static void main(String[] args) {
 4
 5         String s1 = new String("HELLO WORLD!");
 6
 7         System.out.println("修改之后的字符串为:"+s1.toLowerCase());
 8
 9     }
10
11 }
执行结果:

(7)、String trim():去掉字符串首尾的空格。
例:
 1 public class Test {
 2
 3     public static void main(String[] args) {
 4
 5         String s1 = new String("   hello world!    ");
 6
 7         System.out.println("修改之后的字符串为:"+s1.trim());
 8
 9     }
10
11 }
执行结果:
(8)、char [] toCharArray():将该String对象转换成char数组。
例:
 1 public class Test {
 2
 3     public static void main(String[] args) {
 4
 5         String s1 = new String("hello world!");
 6
 7         char s2[] = new char[12];
 8
 9         s2 = s1.toCharArray();
10
11         for(int i = 0 ; i < 12 ; i ++){
12
13             System.out.print(s2[i]+" ");
14
15         }
16
17     }
18
19 }
执行结果: