AngularJS(下面简称其为ng)是Google开源的一款JavaScript MVC框架,弥补了HTML在构建应用方面的不足,其通过使用指令(directives)结构来扩展HTML词汇,使开发者可以使用HTML来声明动态内容,从而使得Web开发和测试工作变得更加容易。
一、历史
AngularJS最初由Misko Hevery和Adam Abrons于2009年开发,后来成为了Google公司的项目。
当前最新版是:1.2.0-beta.10
当前最新稳定版是:1.2.16
二、授权
Angular是开源免费的。授权协议是:MIT
GitHub地址:https://github.com/angular/angular.js
三、兼容性
Safari, Chrome, Firefox, Opera, IE8, IE9 and mobile browsers (Android, Chrome Mobile, iOS Safari).
对于早期IE版本,请参考: Internet Explorer Compatibility
五、核心特性
1.MVC
2.模块化
3.自动化双向数据绑定
4.语义化标签
5.依赖注入
六、优缺点
如果你要开发的是单页应用,AngularJS就是你的上上之选。Gmail、Google Docs、Twitter和Facebook这样的应用,都很能发挥AngularJS的长处。但是像游戏开发之类对DOM进行大量操纵、又或者单纯需要 极高运行速度的应用,就不是AngularJS的用武之地了。
七、使用Angular
1.新建一个名为index的网页。
<!DOCTYPE html>
<head>
     <title>Learning AngularJS</title>
</head>
<body>

</body>
</html>
2.引入Angular.js文件
<!DOCTYPE html>
<head>
     <title>Learning AngularJS</title>
      <script src="./angular.min.js"></script>
</head>
<body>

</body>
</html>
也可以使用谷歌的cdn
https://ajax.googleapis.com/ajax/libs/angularjs/1.0.7/angular.min.js
3.使用ng-app来声明Angular的边界,使用ng-controller来声明其使用的控制器
<!DOCTYPE html>
<html>
<head>
    <title>Learning AngularJS</title>
    <script src="./angular.min.js"></script>
    </head>
<body>
   <div id='content' ng-app='MyTutorialApp' ng-controller='MainController'>

   </div>
</body>
</html>
4.在index.html文件同目录下新建app.js,并写入以下内容。
//module方法传入作用域和初始化的模块数组(此处为空数组)
var app = angular.module('MyTutorialApp',[]);
5.在index.html同目录下新建maincontroller.js并写入以下内容
app.controller("MainController", function($scope){  //传入的$scope表示变量的作用域

});
6.将app.js和maincontroller.js分别引入到index.js目录中。App.js要先于maincontroller.js引入
<!DOCTYPE html>
<html>
<head>
    <title>Learning AngularJS</title>
    <script src="./angular.min.js"></script>
    <script src="app.js" type="text/javascript"></script>
    <script src="maincontroller.js" type="text/javascript"></script>
</head>
<body>
<div id='content' ng-app='MyTutorialApp' ng-controller='MainController'>

</div>
</body>
</html>
7.在maincontroller.js中添加$scope的变量
app.controller("MainController", function($scope){
//为作用域内的understand变量赋值,这样页面上的{{understand}}就得到相应的值了
$scope.understand = "I now understand how the scope works!";
});
8.在index.js页面中写上要访问的变量
<!DOCTYPE html>
<html>
<head>
    <title>Learning AngularJS</title>
    <script src="./angular.min.js"></script>
    <script src="app.js" type="text/javascript"></script>
    <script src="maincontroller.js" type="text/javascript"></script>
</head>
<body>
<div id='content' ng-app='MyTutorialApp' ng-controller='MainController'>
    {{understand}}
</div>
</body>
</html>
{{}}双大括号,这是ng的模板中用于书写表达式的标记,ng成功运行起来后,{{}}内的表达式会生效
9.效果

{{understand}}变成了I now understand how the scope works!了
八、模板与数据的双向绑定
例一:
1.修改maincontroller.js文件如下
app.controller("MainController", function($scope){
     $scope.inputValue = "";
});
2.修改index.html文件如下:
<!DOCTYPE html>
<head>
	<title>Learning AngularJS</title>
	<script src="https://ajax.googleapis.com/ajax/libs/angularjs/1.0.7/angular.min.js" type="text/javascript"></script>
	<script src="app.js" type="text/javascript"></script>
	<script src="maincontroller.js" type="text/javascript"></script>
</head>
<body>
	<div id='content' ng-app='MyTutorialApp' ng-controller='MainController'>
		<input type='text' ng-model='inputValue' />
		{{inputValue}}
	</div>
</body>
</html>
3.效果


这里我们使用了ng-modle这个指令,我们使用它分别为输入框中的值和$scope中的变量inputValue进行了双向绑定,这样当输入框内的值发生变化时,函数中的变量也会跟随变化,它的变化会实时反馈在后面的区域中
例二:二级select联动
1.修改maincontroller.js文件内容如下:
app.controller("MainController", function($scope){
	$scope.selectedPerson = 0;
	$scope.selectedGenre = null;
	$scope.people = [
		{
			id: 0,
			name: 'Leon',
			music: [
				'Rock',
				'Metal',
				'Dubstep',
				'Electro'
			]
		},
		{
			id: 1,
			name: 'Chris',
			music: [
				'Indie',
				'Drumstep',
				'Dubstep',
				'Electro'
			]
		},
		{
			id: 2,
			name: 'Harry',
			music: [
				'Rock',
				'Metal',
				'Thrash Metal',
				'Heavy Metal'
			]
		},
		{
			id: 3,
			name: 'Allyce',
			music: [
				'Pop',
				'RnB',
				'Hip Hop'
			]
		}
	];
});
2.修改index.html文件的内容如下:
<!DOCTYPE html>
<head>
	<title>Learning AngularJS</title>
	<script src="https://ajax.googleapis.com/ajax/libs/angularjs/1.0.7/angular.min.js" type="text/javascript"></script>
	<script src="app.js" type="text/javascript"></script>
	<script src="maincontroller.js" type="text/javascript"></script>
</head>
<body>
	<div id='content' ng-app='MyTutorialApp' ng-controller='MainController'>
		<select ng-model='selectedPerson' ng-options='obj.name for obj in people'></select>
		<select ng-model='selectedGenre'>
			<option ng-repeat='label in people[selectedPerson.id].music'>{{label}}</option>
		</select>
	</div>
</body>
</html>
ng-repeat表示循环输出
3.效果
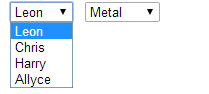
这个例子实现了二级联动的效果
九、Angular的数据过滤
1.修改index.html文件内容如下:
<!DOCTYPE html>
<html>
<head>
    <title>Learning AngularJS</title>
    <script src="./angular.min.js"></script>
    <script src="app.js" type="text/javascript"></script>
    <script src="maincontroller.js" type="text/javascript"></script>
</head>
<body>
<div id='content' ng-app='MyTutorialApp' ng-controller='MainController'>
    <input type='text' ng-model='searchText' />
    <ul>
        <li ng-repeat='person in people | filter:searchText'>#{{person.id}} {{person.name}}</li>
    </ul>
</div>
</body>
</html>
2.效果

当在输入框中输入文字时,下面的列表就会根据输入的文字进行过滤
十、使用Angular显示或隐藏元素
1.修改maincontroller.js文件如下:
app.controller("MainController", function($scope){
  $scope.people = [
        {
            id: 0,
            name: 'Leon',
            music: [
                'Rock',
                'Metal',
                'Dubstep',
                'Electro'
            ],
            live: true
        },
        {
            id: 1,
            name: 'Chris',
            music: [
                'Indie',
                'Drumstep',
                'Dubstep',
                'Electro'
            ],
            live: true
        },
        {
            id: 2,
            name: 'Harry',
            music: [
                'Rock',
                'Metal',
                'Thrash Metal',
                'Heavy Metal'
            ],
            live: false
        },
        {
            id: 3,
            name: 'Allyce',
            music: [
                'Pop',
                'RnB',
                'Hip Hop'
            ],
            live: true
        }
    ];
});
2.修改index.html文件如下
<!DOCTYPE html>
<html>
<head>
    <title>Learning AngularJS</title>
    <script src="./angular.min.js"></script>
    <script src="app.js" type="text/javascript"></script>
    <script src="maincontroller.js" type="text/javascript"></script>
</head>
<body>
<div id='content' ng-app='MyTutorialApp' ng-controller='MainController'>
    <input type='text' ng-model='searchText' />
    <ul>
        <li ng-repeat='person in people | filter:searchText' ng-show='person.live == true'>#{{person.id}} {{person.name}}</li>
    </ul>
    <ul>
        <li ng-repeat='person in people | filter:searchText' ng-hide='person.live == false'>#{{person.id}} {{person.name}}</li>
    </ul>
</div>
</body>
</html>
ng-show与ng-hide,用于控制元素的显示和隐藏
3.效果

可以看出,live=false的#2被隐藏了
十一、事件绑定
1.修改index.html内容如下:
<!DOCTYPE html>
<head>
  <title>Learning AngularJS</title>
    <script src="https://ajax.googleapis.com/ajax/libs/angularjs/1.0.7/angular.min.js" type="text/javascript"></script>
    <script src="app.js" type="text/javascript"></script>
    <script src="maincontroller.js" type="text/javascript"></script>
</head>
<body>
    <div id='content' ng-app='MyTutorialApp' ng-controller='MainController'>
        <input type='text' ng-model='searchText' />
        <ul>
            <li ng-repeat='person in people | filter:searchText' ng-show='person.live == true'>#{{person.id}} {{person.name}}</li>
        </ul>
        <input type='text' ng-model='newPerson' />
        <button ng-click='addNew()'>Add</button>
    </div>
</body>
</html>
2.修改maincontroller.js文件内容如下
app.controller("MainController", function($scope){
  $scope.people = [
        {
            id: 0,
            name: 'Leon',
            music: [
                'Rock',
                'Metal',
                'Dubstep',
                'Electro'
            ],
            live: true
        },
        {
            id: 1,
            name: 'Chris',
            music: [
                'Indie',
                'Drumstep',
                'Dubstep',
                'Electro'
            ],
            live: true
        },
        {
            id: 2,
            name: 'Harry',
            music: [
                'Rock',
                'Metal',
                'Thrash Metal',
                'Heavy Metal'
            ],
            live: false
        },
        {
            id: 3,
            name: 'Allyce',
            music: [
                'Pop',
                'RnB',
                'Hip Hop'
            ],
            live: true
        }
    ];
    $scope.newPerson = null;
    $scope.addNew = function() {
        if ($scope.newPerson != null && $scope.newPerson != "") {
            $scope.people.push({
                id: $scope.people.length,
                name: $scope.newPerson,
                live: true,
                music: []
            });
        }
    }
});
3.效果

点击add按钮的时候,people数组会新增一个元素,然后模板中的变量会自动的更新,然后页面跟着改变
十二、优点与缺点
优点:
1. 模板功能强大丰富,并且是声明式的,自带了丰富的Angular指令;
2. 是一个比较完善的前端MVC框架,包含模板,数据双向绑定,路由,模块化,服务,依赖注入等所有功能;
3. 自定义Directive,比JQuery插件还灵活,但是需要深入了解Directive的一些特性,简单的封装容易,复杂一点官方没有提供详细的介绍文档,我们可以通过阅读源代码来找到某些我们需要的东西,如:在directive使用 $parse;
4. ng模块化比较大胆的引入了Java的一些东西(依赖注入),能够很容易的写出可复用的代码,对于敏捷开发的团队来说非常有帮助。
缺点:
1.angular 入门很容易 但深入后概念很多, 学习中较难理解.
2.中文教程非常少, 官方的文档基本只写了api, 一个例子都没有, 很多时候具体怎么用都是google来的, 或直接问misko,angular的作者.
3.对IE6/7 兼容不算特别好, 就是可以用jQuery自己手写代码解决一些.
4.不利于seo.(SEO目前也有了prerender解决方案) https//prerender.io
5.不适合交互频繁的,如游戏之类交互体验网站。