在html5 <audio> 之前,打破web上的宁静需要引入flash或者其他插件。即使在web上不需要别的插件,audio标签在实现复杂游戏和交互应用时也带来了明显的限制。
web audio api是一个在web上处理和合成音频的高级js api。该api的目标包括现在游戏音频引擎的功能,以及在现代桌面音频制作应用中的一些混合,处理和过滤任务。接下来是对此强大api的简要介绍。
AudioContext入门
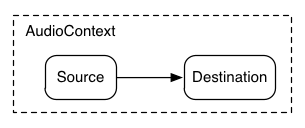
AudioContext是用于管理和播放所有声音。使用web audio api来产生声音,创建一个或多个声音源,并将它们连接到由AudioContext 示例提供的声音目的地。该连接不必直接连接,可以通过任意数量的中间AudioNodes 来作为音频信号的处理模块。这篇文章对web audio进行了详细的描述。
一个AudioContext 实例可以支持多个声音输入和复杂的音频图,所以在我们创建的每一个音频应用中只需要一个实例。web audio api有许多有趣的功能,比如创建AudioNodes和解码音频文件数据都是AudioContext 提供的方法。
创建AudioContext的代码片段:
var context;
window.addEventListener('load', init, false);
function init() {
  try {
    // Fix up for prefixing
    window.AudioContext = window.AudioContext||window.webkitAudioContext;
    context = new AudioContext();
  }
  catch(e) {
    alert('Web Audio API is not supported in this browser');
  }
}
对于基于WebKit-和Blink-的浏览器,目前需要webkit前缀:webkitAudioContext。
加载声音
web audio api用 AudioBuffer 来播放很短或者适中的声音。获取声音文件最基本的方法是使用XMLHttpRequest 。api支持加载多种格式的音频文件,比如WAV, MP3, AAC, OGG 和一些其他格式。浏览器支持的格式种类。
加载声音的代码示例片段:
var dogBarkingBuffer = null;
// Fix up prefixing
window.AudioContext = window.AudioContext || window.webkitAudioContext;
var context = new AudioContext();

function loadDogSound(url) {
  var request = new XMLHttpRequest();
  request.open('GET', url, true);
  request.responseType = 'arraybuffer';

  // Decode asynchronously
  request.onload = function() {
    context.decodeAudioData(request.response, function(buffer) {
      dogBarkingBuffer = buffer;
    }, onError);
  }
  request.send();
}
音频文件是二进制格式(非文本),因此我们设置请求的responseType为 'arraybuffer'。查看更多 ArrayBuffers 信息。
一旦收到为解码的音频文件数据,可以保存起来随后在解码,或者立即可以用AudioContext 的decodeAudioData()方法来正确的解码。这个方法会获取存储在request.response 中的音频文件数据ArrayBuffer,并进行异步的解码(不会阻塞主要的js执行线程)。
当decodeAudioData()完成后,它讲调用一个回调函数(提供解码后的PCM音频数据作为AudioBuffer).
播放声音
一旦一个或者多个ArrayBuffers被加载后,就可开始播放声音了。假设我们刚刚加载了带有狗叫声的AudioBuffer。然后我们就可以用下边的代码播放这个buffer。
// Fix up prefixing
window.AudioContext = window.AudioContext || window.webkitAudioContext;
var context = new AudioContext();

function playSound(buffer) {
  var source = context.createBufferSource(); // creates a sound source
  source.buffer = buffer;                    // tell the source which sound to play
  source.connect(context.destination);       // connect the source to the context's destination (the speakers)
  source.start(0);                           // play the source now
                                             // note: on older systems, may have to use deprecated noteOn(time);
}
每次当有人按下键盘或者用鼠标进行点击操作, playSound()方法都会被调用。
start(time)方法可以使您轻松的为预习和其他时间严格的应用安排精确的声音播放。当然,为了能使得这个安排工作正确执行,请确保已经预加载您的声音缓冲(在一些老的系统上,你可能需要调用noteOn(time),而不是start(time))。
在ios上一个需要注意的点:苹果会消音所有的音频输出知道用户有交互事件发生。比如,在touch事件处理中调用playSound()。除非您了解这个问题,否则可能会在ios设备上无法正常工作,为了避免此类问题,播放声音最好在一个ui事件处理中(对用户提醒,比如:点击此处播放)。
抽象化web audio api
当然,最好创建一个通用的加载系统,不用硬编码来加载特定的声音。
处理音频应用或者游戏的时候有许多处理中等长度或者适中长度的方法-这里我们是用BufferLoader class
下边的例子是如何使用BufferLoader 。创建2个AudioBuffers,加载后,同时播放它们。
window.onload = init;
var context;
var bufferLoader;

function init() {
  // Fix up prefixing
  window.AudioContext = window.AudioContext || window.webkitAudioContext;
  context = new AudioContext();

  bufferLoader = new BufferLoader(
    context,
    [
      '../sounds/hyper-reality/br-jam-loop.wav',
      '../sounds/hyper-reality/laughter.wav',
    ],
    finishedLoading
    );

  bufferLoader.load();
}

function finishedLoading(bufferList) {
  // Create two sources and play them both together.
  var source1 = context.createBufferSource();
  var source2 = context.createBufferSource();
  source1.buffer = bufferList[0];
  source2.buffer = bufferList[1];

  source1.connect(context.destination);
  source2.connect(context.destination);
  source1.start(0);
  source2.start(0);
}
处理time:以节奏播放声音
web audio api允许开发者精确的播放。为了> 原文地址: Getting Started with Web Audio API
在html5 <audio> 之前,打破web上的宁静需要引入flash或者其他插件。即使在web上不需要别的插件,audio标签在实现复杂游戏和交互应用时也带来了明显的限制。
web audio api是一个在web上处理和合成音频的高级js api。该api的目标包括现在游戏音频引擎的功能,以及在现代桌面音频制作应用中的一些混合,处理和过滤任务。接下来是对此强大api的简要介绍。
AudioContext入门
AudioContext是用于管理和播放所有声音。使用web audio api来产生声音,创建一个或多个声音源,并将它们连接到由AudioContext 示例提供的声音目的地。该连接不必直接连接,可以通过任意数量的中间AudioNodes 来作为音频信号的处理模块。这篇文章对web audio进行了详细的描述。
一个AudioContext 实例可以支持多个声音输入和复杂的音频图,所以在我们创建的每一个音频应用中只需要一个实例。web audio api有许多有趣的功能,比如创建AudioNodes和解码音频文件数据都是AudioContext 提供的方法。
创建AudioContext的代码片段:
var context;
window.addEventListener('load', init, false);
function init() {
  try {
    // Fix up for prefixing
    window.AudioContext = window.AudioContext||window.webkitAudioContext;
    context = new AudioContext();
  }
  catch(e) {
    alert('Web Audio API is not supported in this browser');
  }
}
对于基于WebKit-和Blink-的浏览器,目前需要webkit前缀:webkitAudioContext。
加载声音
web audio api用 AudioBuffer 来播放很短或者适中的声音。获取声音文件最基本的方法是使用XMLHttpRequest 。api支持加载多种格式的音频文件,比如WAV, MP3, AAC, OGG 和一些其他格式。浏览器支持的格式种类。
加载声音的代码示例片段:
var dogBarkingBuffer = null;
// Fix up prefixing
window.AudioContext = window.AudioContext || window.webkitAudioContext;
var context = new AudioContext();

function loadDogSound(url) {
  var request = new XMLHttpRequest();
  request.open('GET', url, true);
  request.responseType = 'arraybuffer';

  // Decode asynchronously
  request.onload = function() {
    context.decodeAudioData(request.response, function(buffer) {
      dogBarkingBuffer = buffer;
    }, onError);
  }
  request.send();
}
音频文件是二进制格式(非文本),因此我们设置请求的responseType为 'arraybuffer'。查看更多 ArrayBuffers 信息。
一旦收到为解码的音频文件数据,可以保存起来随后在解码,或者立即可以用AudioContext 的decodeAudioData()方法来正确的解码。这个方法会获取存储在request.response 中的音频文件数据ArrayBuffer,并进行异步的解码(不会阻塞主要的js执行线程)。
当decodeAudioData()完成后,它讲调用一个回调函数(提供解码后的PCM音频数据作为AudioBuffer).
播放声音
一旦一个或者多个ArrayBuffers被加载后,就可开始播放声音了。假设我们刚刚加载了带有狗叫声的AudioBuffer。然后我们就可以用下边的代码播放这个buffer。
// Fix up prefixing
window.AudioContext = window.AudioContext || window.webkitAudioContext;
var context = new AudioContext();

function playSound(buffer) {
  var source = context.createBufferSource(); // creates a sound source
  source.buffer = buffer;                    // tell the source which sound to play
  source.connect(context.destination);       // connect the source to the context's destination (the speakers)
  source.start(0);                           // play the source now
                                             // note: on older systems, may have to use deprecated noteOn(time);
}
每次当有人按下键盘或者用鼠标进行点击操作, playSound()方法都会被调用。
start(time)方法可以使您轻松的为预习和其他时间严格的应用安排精确的声音播放。当然,为了能使得这个安排工作正确执行,请确保已经预加载您的声音缓冲(在一些老的系统上,你可能需要调用noteOn(time),而不是start(time))。
在ios上一个需要注意的点:苹果会消音所有的音频输出知道用户有交互事件发生。比如,在touch事件处理中调用playSound()。除非您了解这个问题,否则可能会在ios设备上无法正常工作,为了避免此类问题,播放声音最好在一个ui事件处理中(对用户提醒,比如:点击此处播放)。
抽象化web audio api
当然,最好创建一个通用的加载系统,不用硬编码来加载特定的声音。
处理音频应用或者游戏的时候有许多处理中等长度或者适中长度的方法-这里我们是用BufferLoader class
下边的例子是如何使用BufferLoader 。创建2个AudioBuffers,加载后,同时播放它们。
window.onload = init;
var context;
var bufferLoader;

function init() {
  // Fix up prefixing
  window.AudioContext = window.AudioContext || window.webkitAudioContext;
  context = new AudioContext();

  bufferLoader = new BufferLoader(
    context,
    [
      '../sounds/hyper-reality/br-jam-loop.wav',
      '../sounds/hyper-reality/laughter.wav',
    ],
    finishedLoading
    );

  bufferLoader.load();
}

function finishedLoading(bufferList) {
  // Create two sources and play them both together.
  var source1 = context.createBufferSource();
  var source2 = context.createBufferSource();
  source1.buffer = bufferList[0];
  source2.buffer = bufferList[1];

  source1.connect(context.destination);
  source2.connect(context.destination);
  source1.start(0);
  source2.start(0);
}
处理time:以节奏播放声音
web audio api允许开发者精确的播放。为了演示,我们建立一个简单的节奏track。一个广为人知的鼓点模式如下(看了下面的谱例和代码你可能搞不懂,但是你肯定听过 动次打次 动地打次):
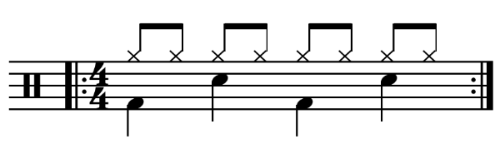
上图中的 : 表示反复记号,演奏的时候会重复一次(一共演奏两小节)

为了方便大家理解这个节奏,我在网上找到了架子鼓的组成图:
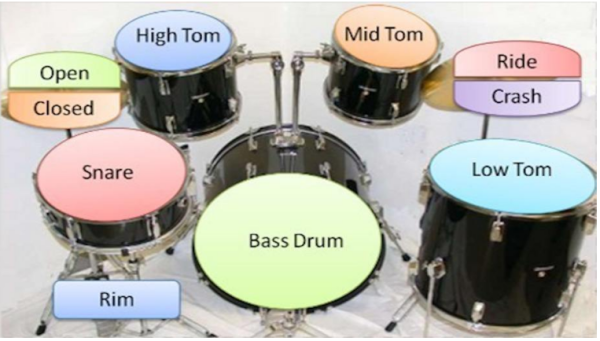
其中,每个八分音符会演奏hihat(译者注:发出 ci 的声音,架子鼓中的踩镲hi-hat),这是个4/4拍(译者注:一个小节有4个拍子),每一拍会交替kick(译者注:发出 dong 的声音,架子鼓中低音大鼓Bass Drum,又称底鼓)和snare(译者注:发出 dang 的声音,架子鼓中的军鼓snare drum)。假设我们已经加载了kick, snare 和hihat,执行此操作的代码很简单:
// bar在音乐中值小节,这里有两小节
for (var bar = 0; bar < 2; bar++) {
  var time = startTime + bar * 8 * eighthNoteTime;
  // Play the bass (kick) drum on beats 1, 5(四分音符)
  playSound(kick, time);
  playSound(kick, time + 4 * eighthNoteTime);

  // Play the snare drum on beats 3, 7(四分音符)
  playSound(snare, time + 2 * eighthNoteTime);
  playSound(snare, time + 6 * eighthNoteTime);

  // Play the hi-hat every eighth note.(八分音符)
  for (var i = 0; i < 8; ++i) {
    playSound(hihat, time + i * eighthNoteTime);
  }
}
在这里,我们只重复一遍,而不是在乐谱中看到的无限循环。playSound 函数在指定的时间播放buffer:
function playSound(buffer, time) {
  var source = context.createBufferSource();
  source.buffer = buffer;
  source.connect(context.destination);
  source.start(time);
}
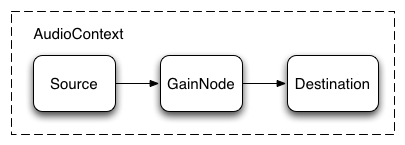
改变声音的音量
许多基础操作之一就是改变音量。使用Web Audio API,我们通过GainNode将我们的声音源路由到目的地来操纵音量。
这个连接设置可以通过以下代码试下:
// Create a gain node.
var gainNode = context.createGain();
// Connect the source to the gain node.
source.connect(gainNode);
// Connect the gain node to the destination.
gainNode.connect(context.destination);
设置完后,我们通过编程时的方式改变音量:操作gainNode.gain.value
// Reduce the volume.
gainNode.gain.value = 0.5;
下面是一个用 元素控制音量的示例: 完整代码
两种声音淡入淡出
现在,假设我们有一个稍微复杂的场景,我们正在播放多种声音,我们希望它们之前淡入淡出。这是dj类应用的常见场景,我们有2个转盘,我们希望能从一个声源平移到另一个声源。可以使用如下音频图来完成:
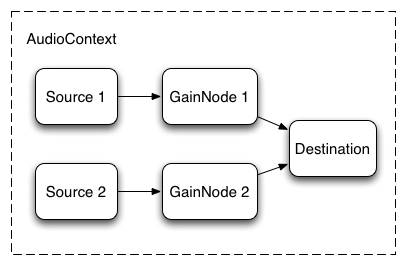
为了完成设置,我们只需要创建2个GainNode,使用以下的函数连接每一个源:
function createSource(buffer) {
  var source = context.createBufferSource();
  // Create a gain node.
  var gainNode = context.createGain();
  source.buffer = buffer;
  // Turn on looping.
  source.loop = true;
  // Connect source to gain.
  source.connect(gainNode);
  // Connect gain to destination.
  gainNode.connect(context.destination);

  return {
    source: source,
    gainNode: gainNode
  };
}
等功率交叉淡入淡出
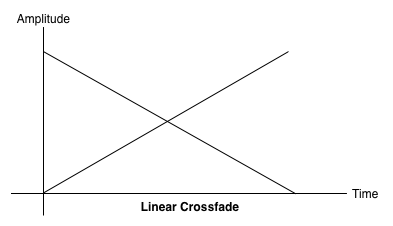
当您在样本之间平移时,幼稚的线性交叉淡入淡出方法会显示出音量下降。
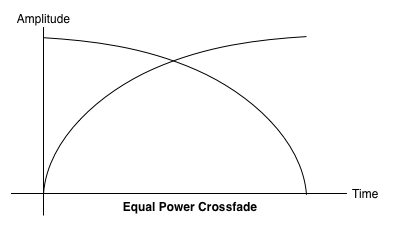
为了解决这个问题,我们使用相等的功率曲线。其中相应的增益曲线是非线性的,并以较高的振幅相交。这样可以最大程度的减少音频区域之间的音量下降,从而使水平之间可能略有不同的区域之间的淡入淡出。
下面的代码使用 在2种音源之间控制淡入淡出: 完整代码
播放列表淡入淡出
另一个常见的渐变引用是音乐播放器。当切歌时,我们想淡出当前歌曲,然后淡入新的,避免造成过度不连贯。为此,请在将来安排交叉渐变。尽管我们使用setTimeout来进行调度,但是这并不精确。使用Web Audio API,我们使用AudioParam接口作为参数来规划将来的值,例如GainNode的的增量值。
因此,给定一个播放列表,我们可以在当前播放曲目规划一个增加量减少来切换曲目,并在下一首曲目增加增量,两者都是在当前曲目播放之前。
function playHelper(bufferNow, bufferLater) {
  var playNow = createSource(bufferNow);
  var source = playNow.source;
  var gainNode = playNow.gainNode;
  var duration = bufferNow.duration;
  var currTime = context.currentTime;
  // Fade the playNow track in.
  gainNode.gain.linearRampToValueAtTime(0, currTime);
  gainNode.gain.linearRampToValueAtTime(1, currTime + ctx.FADE_TIME);
  // Play the playNow track.
  source.start(0);
  // At the end of the track, fade it out.
  gainNode.gain.linearRampToValueAtTime(1, currTime + duration-ctx.FADE_TIME);
  gainNode.gain.linearRampToValueAtTime(0, currTime + duration);
  // Schedule a recursive track change with the tracks swapped.
  var recurse = arguments.callee;
  ctx.timer = setTimeout(function() {
    recurse(bufferLater, bufferNow);
  }, (duration - ctx.FADE_TIME) * 1000);
}
Web Audio API提供了一组RampToValue方法逐步修改参数的值:linearRampToValueAtTime,exponentialRampToValueAtTime。虽然可以从内置的线性和指数函数(如上)选择过渡定时函数,你还可以使用setValueCurveAtTime函数通过一个值数组来指定以及的值曲线。
以下演示使用上述方法现实了两条音轨之间类似的淡入淡出功能。完整代码
对声音进行简单的过滤效果
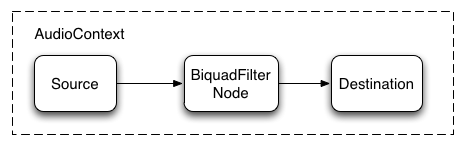
Web Audio API允许你将声音从一个音频节点传输到另一个,创建可能复杂的处理器链,为您的声音形式添加复杂的效果。一种方法就是在声音源和目标之间放置BiquadFilterNodes。这种类型的音频节点可以执行各种低阶过滤器,可用于构建图形均衡器甚至更复杂的效果,主要与选择声音的频谱的那一部分去强调。
过滤器支持的类型:
- Low pass filter
- High pass filter
- Band pass filter
- Low shelf filter
- High shelf filter
- Peaking filter
- Notch filter
- All pass filter
所有过滤器包含用于指定一定量的增益的参数,频率过滤和品质过滤。Low-pass过滤保持很低的频率范围,放弃高频。端点值由频率值决定,Q因数是没单位的,并决定了图形的形状。增益只会影响确定的过滤器,
比如low-shelf和peaking,而不会影响low-pass。
我们设置一个简单的low-pass过滤,从声音样本中提取基数。
// Create the filter
var filter = context.createBiquadFilter();
// Create the audio graph.
source.connect(filter);
filter.connect(context.destination);
// Create and specify parameters for the low-pass filter.
filter.type = 'lowpass'; // Low-pass filter. See BiquadFilterNode docs
filter.frequency.value = 440; // Set cutoff to 440 HZ
// Playback the sound.
source.start(0);
通常情况下,频率需要控制到对数刻度,因为人类的听觉本身按照相同的原理工作(that is, A4 is 440hz, and A5 is 880hz)。
最后,请注意,示例代码可让你断开和连接过滤器,动态改变AudioContext图。我们调用ode.disconnect(outputNumber)从图上断开AudioNodes。例如,要将图形过滤重新路由到直接连接,我可以这样:
// Disconnect the source and filter.
source.disconnect(0);
filter.disconnect(0);
// Connect the source directly.
source.connect(context.destination);
进一步聆听
我们已经介绍了基本的api知识,包括加载和播放音频样本。我们建立了带有增益节点和过滤的音频图,以及计划的声音和音频参数调整以启动一些常见的声音效果,此时,你就可以开始构建一些不错的web音频应用了。
如果你正在寻找灵感,许多开发者已经使用web autio api创建了出色的作品:
- AudioJedit,一个在浏览器中使用SoundCloud 进行永久链接的声音链接工具
- ToneCraft,通过堆叠3d块创建声音,音序器
- Plink,一个使用web audio和web socket的合作音乐制作游戏