Circos (http://circos.ca/) is a very useful tool for generating circular figures. Initially, it is designed for genome network studies, but we also could apply it in neuroscience or other fields.
According to my knowledge, not so many Chinese summary for how to use it, the existing ones are just for the installation or directly translated from the Circos tutorial, not very convenient for beginners or non-genetic researchers. After struggling with it for almost one day, now I tried to simply summarize it for application in brain network studies.
If you can manage English Reading and Programming very well, try to follow the tutorial on the website (the Quick Start part is very useful). Learning by yourself will match your own requirments very well. Otherwise, read my summary to get quick start.
背景:
1.假设你用的是Windows, 如果你用的是LINUX,那就把Windows下命令行操作换成LINUX下的;
2.Circos的使用需要用到Perl语言,而Perl有三种版本;这里我只用了Strawberry Perl。如果你用的是Windows,建议你用Strawberry Perl 或Active State Perl,因为这两个版本提供了快捷工具CPAN以安装或更新Perl里的Modules;
3.在Windows,通过cmd来使用Circos(如果你不知道怎么打开cmd或使用cmd命令,百度或google下)
安装:
1.下载Perl (https://www.perl.org/get.html)
2.根据你下载的格式,直接安装或直接解压缩。例如:安装在D盘,获得Perl路径D:Strawberryperl
3.下载Circos (http://circos.ca/software/download/)
4.直接解压缩。例如,解压在D盘,获得Circos路径D:circos-0.69
检查并安装modules:
1.打开cmd,进入D盘
2.检查Circos的modules:
在cmd窗口输入circos-0.69incircos -modules,回车后会显示Circos里的modules;
列1显示是否缺失,列2为版本号,列3是module名称
3.确保Perl里安装了一样的modules:
(1)安装方法(CPAN的使用方法):
例如,要安装Config::General,
在cmd窗口进入D:Strawberry,输入cpan,打开cpan工具;
依次输入并运行以下命令,
get Config::General
make Config::General
install Config::General
所需modules全部安装完成后,输入exit,退出CPAN
(2)一般,我们需要对Perl安装如下modules:
(3)为确保所有modules都安装,可以逐个安装步骤2中显示的modules
运行Circos示例,初步认识它:
示例在data和tutorial文件夹中,最新版本的circos解压后已包含它们;如果你的circos里没有,去网站下载tutorial,解压后把data和tutorial拷贝进circos中。
1.在cmd窗口进入D:circos-0.69
2.运行命令:
perl bincircos -conf tutorials51circos.conf
运行成功会显示:

此时结果保存在D:circos-0.69下,文件名为circos.png和circos.svg
4.运行命令,并指定保存路径和文件名:
perl bincircos -conf tutorials51circos.conf -outputdir D:output -outputfile tutorial_5_1.png
此时结果保存在D:output下,文件名为tutorial_5_1 .png和tutorial_5_1 .svg
5.如果没有运行成功,根据cmd窗口给的提示,查看是否有缺失的module或路径输入错误
关于circos.conf文件:
通过上述示例,我们知道,生成circular图,需要用到circos.conf文件,现在我们打开这个文件,看看它里面是什么。
1.用文本编辑器打开D:circos-0.69 utorial51circos.conf
2.可以看到它调用了两个文件:
data/karyotype/karyotype.human.txt
data/5/segdup.txt
并定义了相应的参数
下面,我们逐步设置自己的circos.conf及相关文件和参数:
推荐阅读:
(1)Data files for Circos
(2)Quick Start
注意:
不要尝试用tutorial里面的示例文件进行修改,因为示例用到基因数据、很复杂,修改后很难运行成功;
根据你的需求,去Quick Start里找相应的基本代码及参数进行修改,是最快的实现方式。
1.确定作图目标:
作图前,务必根据你的需求,画出草图;从而确定你所需的data file和参数类型。
例如(此处显示了circos的生成图),
该图共需显示6个脑区,红色曲线代表正相关、蓝色曲线代表负相关,粗线代表显著性p<.001,细线代表显著性p<.005。

2.设置所需txt文件:
(1)定义脑区的karyotype*.txt:
文本格式:
chr - ID LABEL START END COLOR
chr - : 标识开始定义脑区及其相关参数
ID:脑区编号
LABEL:脑区名称
START END:脑区色块的大小
COLOR:脑区颜色
根据作图目标,新建karyotype.6regions.txt如下,并保存在D:myData下,

(2)定义连接的segdup*.txt:
文本格式:
chr1 start1 end1 chr2
start2 end2 [options]
chr1和chr2:存在连接的两个脑区的编号,对应karyotype*.txt中的ID
start和end:分别定义连接曲线起始的位置
(注意,起始位置不可超过karyotype*.txt中定义的色块大小)
options:定义连接曲线的颜色、粗细等
根据作图目标,新建segdup.6regions.txt如下,并保存在D:myData下

3.设置circos.conf:
(1)新建文本,并保存为D:myDatacircos.conf;
(2)复制基本Configuration参数至D:myDatacircos.conf :

修改karyotype路径:
karyotype =
myData/karyotype.6regions.txt
参数的意义:
radius:circular图的半径
thickness:脑区色块的宽度
fill:是否为色块填充颜色
(3)需要显示脑区的LABEL,复制如下参数至D:myDatacircos.conf
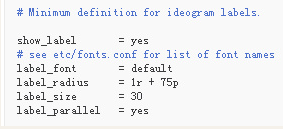
根据需要修改LABEL的字体、字号等
(4)读取和设置脑区间的连接,复制如下参数至D:myDatacircos.conf

修改segdup文件路径:
file =
myData/segdup.6regions.txt
(5)保存circos.conf,最终文件为:

(6)运行circos.conf:
cmd下进入D:circos-0.69
运行:
perl bincircos -conf
D:myDatacircos.conf -outputdir D:myData -outputfile
mycircular.png
运行成功后,生成图为

(7)调整参数:
ideogram中:
thickness=60p, label_size=60
link中:
radius=0.9r, thickness=10
保存后运行,得到:

该总结只介绍了最基本的用法,更多的方法可通过网站上的Tutoria或Quick Start进行学习,做出更复杂、更美的图。
参考连接:http://blog.sina.com.cn/s/blog_5b8f74400102w8vy.html