注:例子来自微软Web API官网(https://www.asp.net/web-api/overview/data/using-web-api-with-entity-framework/part-1),也有加入自己的一点体会。
一、创建一个MVC项目,选择Web API类型的MVC,命名为BookService:
二、创建Mode和Controller:
在Models文件夹下面创建两个Model,分别是Author.cs和Book.cs;
1)、其中Author的定义如下:
using System.Collections.Generic;
using System.ComponentModel.DataAnnotations;

namespace BookService.Models
{
    public class Author
    {
        public int Id { get; set; }
        [Required]
        public string Name { get; set; }
    }
}
2)、Book的定义如下:
using System.ComponentModel.DataAnnotations;

namespace BookService.Models
{
    public class Book
    {
        public int Id { get; set; }
        [Required]
        public string Title { get; set; }
        public int Year { get; set; }
        public decimal Price { get; set; }
        public string Genre { get; set; }

        // Foreign Key
        public int AuthorId { get; set; }
        // Navigation property
        public Author Author { get; set; }
    }
}
3)、插入小知识点----POCO:
(1)、概念:所谓的POCO就是 pure old C# object 的缩写,翻译过来就是“纯洁老式的C#对象”,不过太拗口了,所以现在更多的称它为“简单C#对象”。
含义:POCO的内在含义是指一个类不曾继承或者实现任何类和接口,也没有被其它框架侵入的C#对象。就是最原生态的C#对象,我的理解是它是一个“光棍”。
(2)、意义:简单、灵活、易扩展。我们定义的POCO在后面使用的用于逻辑层的DTO(Data Transfer Object)以及用于UI显示的VO(View Object)都是以此为基础的。
三、添加API Controller,在控制器的选择当中选择 “包含操作的Web API(使用EF)”,这样子它会帮我们生成增删改查的操作。

选择之后会蹦出如下弹出框要求对控制器进行设置:
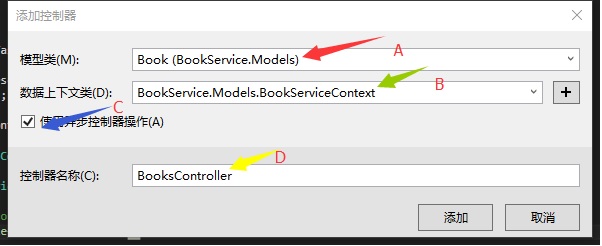
设置的话就按照上面要求的来做就行。下面进行解释:
A、模型类的选择:下拉选择,是为哪一个Model创建控制器就选择哪一个;
B、数据上下文,这个是用来创建Context文件的,这个文件是Model与数据库交互的一个门户,是对数据操作的一个集合,所有的Model都在这个类里面进行管理,我理解成是中介。添加的方式就是点击右侧的“+”然后再弹出框中点击确定就OK了。就是选择默认的名字就好了。
C、 选择异步的控制器操作,异步操作方法通常用于长时间运行的、非 CPU 绑定的请求操作方法,在这个小例子当中实际上并不是必须的。(我对这个其实还不懂,今后会好好去搞明白,索性这个异步在目前对于例子也不重要,所以可以先不用管)
D、控制器名称,这个建议是使用默认的,这个命名是很规范的,使用了REST API的设计原则,对于资源命名使用的是名词,而且是复数形式Books而不是单数形式Book,很规范。
点击 “添加” 之后会生成两个文件BooksController.cs控制器(在controller文件夹中)和BookServiceContext.cs上下文文件(在Models文件夹中)。
注:如果是跟着上面的步骤做的话其实是无法创建控制器的,因为EF是ORM框架,是根据反射进行创建的,也就是说它是需要程序集的,因此在创建使用EF的控制器之前需要进行编译,之后才可以创建成功。在这里才进行说明是个人觉得犯错才记得牢(*_*).
BooksController.cs文件主要包含对Book.cs实体类的CRUD操作,而BookServiceContext.cs包含了对Book.cs实体的注册。打开的话就可以看到。
接下来该做的就是按照上面的步骤创建Author.cs实体的控制器。
三、创建数据库,完成EF的映射:
1、添加Migration:生成一下-->在VS中选择工具-->NuGet包管理器-->Nuget程序管理控制台--->输入命令:Enable-Migrations
效果: 在项目之下创建一个文件夹Migration,里面有一个配置文件Configuration.cs。
2.打开Configuration.cs文件,添加代码(用途是初始化数据库当中的数据),代码如下:
protected override void Seed(BookService.Models.BookServiceContext context)
{
    context.Authors.AddOrUpdate(x => x.Id,
        new Author() { Id = 1, Name = "Jane Austen" },
        new Author() { Id = 2, Name = "Charles Dickens" },
        new Author() { Id = 3, Name = "Miguel de Cervantes" }
        );

    context.Books.AddOrUpdate(x => x.Id,
        new Book() { Id = 1, Title = "Pride and Prejudice", Year = 1813, AuthorId = 1,
            Price = 9.99M, Genre = "Comedy of manners" },
        new Book() { Id = 2, Title = "Northanger Abbey", Year = 1817, AuthorId = 1,
            Price = 12.95M, Genre = "Gothic parody" },
        new Book() { Id = 3, Title = "David Copperfield", Year = 1850, AuthorId = 2,
            Price = 15, Genre = "Bildungsroman" },
        new Book() { Id = 4, Title = "Don Quixote", Year = 1617, AuthorId = 3,
            Price = 8.95M, Genre = "Picaresque" }
        );
}
seed方法是用于为数据库设置初始值的,一般在开发项目的时候我们不使用这个方法,这个例子只是为了为数据库添加数据才使用的。
3、继续在Nuget程序包控制台输入指令:
Add-Migration Initial
Update-Database
分析:
Add-Migration Initial:生成文件;

Update-Database:这个方法会创建数据库,当Model改动的时候,需要再次运行上面两个指令进行数据库的更新操作(可以想见,这个就是使用了Migration的好处:不需要再
重新创
建EF,不会丢失数据)。
注:在这一步的时候我出了一个错误:根本无法创建数据库成功,后来找到原因,因为我使用的是VS自带的LocalDB,生成的实例名是Data Source=(localdb)MSSQLLocalDB
(在web.config中),这个实例名是SQL Express2014的,而我安装的是SQl Express 2012,这样子的话就会出现问题,需要把实例名改成Data Source=(localdb)v11.0,
那么问题就解决了。个人感觉这是一个问题,微软的VS无法检测到我们安装的是哪一个版本的SQL Exepress.

让我们来看看数据库:

4、创建DTO(Data Transfer Object):
先来说说DTO的优点:
1)、克服对数据库的重复调用;
2)、隐藏不想让用户知道的数据库表规则,即隐藏一些字段,防止数据库规则泄露;
3)、减少一些属性(字段)的调用降低服务器负荷;
4)、减少数据库中表的对象嵌套,即方便用户使用数据;
5)、避免over posting(不懂这个怎么翻译呀);
6)、解耦合(数据层和业务逻辑层之间解耦)。

四、修改自动生成的BooksController中的GetBooks()、GetBook(int id)和PostBook()方法。
// GET api/Books
public IQueryable<BookDTO> GetBooks()
{
    var books = from b in db.Books
                select new BookDTO()
                {
                    Id = b.Id,
                    Title = b.Title,
                    AuthorName = b.Author.Name
                };

    return books;
}

// GET api/Books/5
[ResponseType(typeof(BookDetailDTO))]
public async Task<IHttpActionResult> GetBook(int id)
{
    var book = await db.Books.Include(b => b.Author).Select(b =>
        new BookDetailDTO()
        {
            Id = b.Id,
            Title = b.Title,
            Year = b.Year,
            Price = b.Price,
            AuthorName = b.Author.Name,
            Genre = b.Genre
        }).SingleOrDefaultAsync(b => b.Id == id);
    if (book == null)
    {
        return NotFound();
    }

    return Ok(book);
}

[ResponseType(typeof(Book))]
public async Task<IHttpActionResult> PostBook(Book book)
{
    if (!ModelState.IsValid)
    {
        return BadRequest(ModelState);
    }

    db.Books.Add(book);
    await db.SaveChangesAsync();

    // New code:
    // Load author name
    db.Entry(book).Reference(x => x.Author).Load();

    var dto = new BookDTO()
    {
        Id = book.Id,
        Title = book.Title,
        AuthorName = book.Author.Name
    };

    return CreatedAtRoute("DefaultApi", new { id = book.Id }, dto);
}
五、创建UI和写Script脚本,显示数据:
注:这一步和官网的是不一样的,如果看官想看的话可以自行到官网查看:https://www.asp.net/web-api/overview/data/using-web-api-with-entity-framework/part-6
官网使用的是Knockout.js。公司这边已经不使用Knockout.js,所以我是使用angular.js来写的。
1、先上HTML代码,把View文件夹下的子文件夹下面的Home中的index替换成如下代码(要自己引用angular.js):
<style type="text/css">
    h1,h2,h3,html,div{
        margin:0;
        padding:0;

    }
    #books {
        border: 2px solid #000000;
        padding: 20px;
        width: 350px;
        font-size: 18px;
        margin:10px;
        float:left;
    }
    #addBlock{
        border: 2px solid #000000;
        padding: 20px;
        width: 350px;
        font-size: 18px;
        margin:10px;
        float:left;
    }

    #details{
        border: 2px solid #000000;
        padding: 20px;
        width: 350px;
        font-size: 18px;
        margin:10px;
        float:left;
    }
    #edit{
        border: 2px solid #000000;
        padding: 20px;
        width: 350px;
        font-size: 18px;
        margin:10px;
        clear:both;
    }
    /*div{float:left;
        margin:20px;
    }*/
</style>

<div ng-app="First" ng-controller="firstController">

    <!--base message-->
    <div id="books">
        <h1>Books</h1>
        <p ng-repeat="x in baseMessage"> <label ng-bind="x.Title+': '+x.AuthorName"></label>
            <a href="#" ng-click="detail(x.Id)">Details</a>
            <a href="#" ng-click="delete(x.Id)">Delete</a>
        </p>
    </div>

    <!--detail message-->
    <div id="details">
        <h1>Details</h1>
        <label>Author</label> <label>{{": "+Author}}</label><br />
        <label>Title</label> <label>{{": "+Title}}</label><br />
        <label>Year</label> <label>{{": "+Year}}</label><br />
        <label>Genre</label> <label>{{": "+Genre}}</label><br />
        <label>Price</label> <label>{{": "+Price}}</label><br />
    </div>
    <!--add block-->
    <div id="addBlock">
        <h1>Add Book</h1>
        <label>Author</label><select id="Author" ng-options="item as item.AuthorName for item in baseMessage" ng-model="selectedAuthor"></select><br />
        @*@Html.DropDownList("Author", new List<SelectListItem>(), new { ng_options = "item as item.AuthorName for item in baseMessage", ng_model = "selected" });*@
        <!--Why???????-->
        <label>Title</label><input type="text" id="Title" /> <br />
        <label>Year</label> <input type="text" id="Year" /><br />
        <label>Genre</label> <input type="text" id="Genre" /><br />
        <label>Price</label> <input type="text" id="Price" /><br />
        <input type="button" value="Add" ng-click="AddBook(selectedAuthor)"/>
    </div>
    <hr />
    <!--Edit block-->
    <div id="edit">
        <h1>Modify Books</h1>
        <label>Book:</label><select id="Author" ng-options="item as item.Title for item in baseMessage" ng-model="selectedBook"></select><br />
        <label>Title:</label><input type="text" id="titleModify" /> <br />
        <label>Year:</label> <input type="text" id="yearModify" /><br />
        <label>Genre:</label> <input type="text" id="genreModify" /><br />
        <label>Price:</label> <input type="text" id="priceModify" /><br />
        <input type="button" value="Modify" ng-click="ModifyBook(selectedBook)" />
    </div>
</div>
2、新建一个js文件,引用到index,js文件写的是angular代码,如下:
var app = angular.module("First", []);
app.controller("firstController", function ($scope, $http) {
    var message = new Array();
    var selectAuthor = new Array();
    $http({
        method: "GET",
        url: "/api/Books/"
    }).then(function (data) {
        angular.forEach(data.data, function (value, key) {
            message.push(value);
            selectAuthor.push(value.AuthorName);
        })
        $scope.baseMessage = message;
        $scope.selectAuthors = selectAuthor;
        $scope.selected = $scope.baseMessage[0];
    })

    $scope.detail = function detail(id) {
        $http.get("/api/Books/" + id).then(function (data) {
            $scope.Author = data.data.AuthorName;
            $scope.Title = data.data.Title;
            $scope.Year = data.data.Year;
            $scope.Genre = data.data.Genre;
            $scope.Price = data.data.Price;
        });
    }

    $scope.delete = function (id) {
        $http.delete("api/Books/" + id).then(function () {
            alert("OK,You have already delete it!");
        })
    }

    $scope.AddBook = function (selectedAuthor) {
        //alert(selected.Id);
        var Title = $("#Title").val();
        var Year = $("#Year").val();
        var Genre = $("#Genre").val();
        var Price = $("#Price").val();
        var book = {
            AuthorId: parseInt(selectedAuthor.Id),
            Title: Title,
            Year: parseInt(Year),
            Genre: Genre,
            Price: Price
        }
        $http.post(
            "/api/Books/", book).success(function () {
                alert("Add Sucess!");
            })
    }

    $scope.ModifyBook = function (selectedModify) {
        var id = selectedModify.Id;
        var AuthorId = 1;
        authorId(id);
        function authorId(id) {
            $http.get("/api/Books/" + id).then(function (data) {
                AuthorId = data.data.AuthorId;

                var Title = $("#titleModify").val();
                var Year = $("#yearModify").val();
                var Genre = $("#genreModify").val();
                var Price = $("#priceModify").val();
                var book = {
                    AuthorId: AuthorId,
                    Id: parseInt(selectedModify.Id),
                    Title: Title,
                    Year: parseInt(Year),
                    Genre: Genre,
                    Price: Price
                }
                //$http.put("/api/Books/" + selectedModify.Id, book,function () {
                //    alert("OK,You have already modify it (*_*) ~");
                //});
                $http({ method: "PUT", url: "/api/Books/" + selectedModify.Id, data: { "id": selectedModify.Id, "book": book } }).then(function () {
                    alert("OK,You have already modify it (*_*) ~");
                });

            });
        }
    }
});
3、生成解决方案然后运行就会有结果了。
注:博主有强迫症,一个博文不喜欢写太长,所以对于angular代码的解析就放在其他博文里面http://www.cnblogs.com/heisehenbai/p/Angular.html